Showing posts with label easy. Show all posts

Monday, December 20, 2010

Chocolate Hazelnut Truffles


From the kitchen of One Perfect Bite...This confection is private stock, served only to BFF's or shared with my daughters as we sip pear brandy and talk late into the night. While not quite as good as the Ferrero Rocher chocolates after which they're patterned, I must say, with all due modesty and a drum roll or two, that these are PDG. They are also embarrassingly easy to assemble and for that reason I make them throughout the year. The truffles take about 30 minutes to prepare, but the chocolate mixture used to form them must be chilled before they can be shaped, so, despite ease of preparation, you'll have to build wait time into your game plan. I found the recipe on the Taste of Home website several years ago and I've made no changes to it, save for altering the time the chocolate must be refrigerated. I've found that the overnight chill suggested in the recipe produces an unworkable mass that must sit for an hour before the truffles can be shaped. A three hour chill is all that's really need. I am currently using milk chocolate candy bars to make these, but come the first of the year I want to make these using Nutella. I like the thought of triple hazelnut truffles. I hope you'll give these a try. They really are delicious. Here's the recipe.

Chocolate Hazelnut Truffles...from the kitchen of One Perfect Bite, courtesy of Debra Pedrazzi and Taste of Home magazine

Ingredients:
3/4 cup confectioners' sugar
2 tablespoons baking cocoa
4 milk chocolate candy bars (1.55-oz. each)
6 tablespoons butter
1/4 cup heavy whipping cream
24 whole hazelnuts
1 cup very finely chopped hazelnuts, toasted

Directions:

1) In a large bowl, sift together confectioners' sugar and cocoa; set aside. In a saucepan, melt candy bars and butter. Add the cream and reserved cocoa mixture. Cook and stir over medium-low heat until mixture is thickened and smooth. Pour into an 8-in. square dish. Cover and refrigerate for about 3 hours or overnight.
2) Using a melon baller or spoon, shape candy into 1-in. balls; press a hazelnut into each. Reshape balls and roll in ground hazelnuts. Store in an airtight container in refrigerator. Yield: 2 dozen.

You might also enjoy these recipes:
Easy and Festive Peppermint Bark Candy - Sugar and Spice
Candy Cane Fudge - What's Cookin Chicago?
Dark Chocolate-Covered Peanut Butter Cups - Verses from My Kitchen
Honey Cream Caramels - Eat Good 4 Life
Peanut Butter Fudge - Brown Eyed Baker
Chocolate Covered Toffee - Petit Foodie
Rocky Road Fudge Candy - Baking and Boys
Easy Chocolate Turtles - Culinary Cory

Thursday, December 9, 2010

Quick and Crusty Hard Rolls


From the kitchen of One Perfect Bite...For over a year now, I've been testing recipes for hard rolls. I've been trying to find buns that are similar to those used to make authentic Vietnamese bánh mì. The best of these rolls have crusts that shatter when you bite into them and their interiors are pillowy soft. While I have yet to have that "Eureka" moment, this last effort did yield wonderful rolls that I know your family will love. If you have a stand mixer with a dough hook, this recipe defines simplicity. All ingredients get thrown into a bowl and the contents are beaten until everything is mixed and a dough is formed. The dough goes into the refrigerator for at least 24 hours before it is shaped and left to rise again. That's it. The original recipe came from King Arthur Flour and I found it on a food board whose name I no longer remember. The slow rise in the refrigerator actually improves the flavor of the rolls, so don't be tempted to cut it short. The dough can be kept for up to five days before it begins to sour. This recipe calls for instant yeast which is slightly more potent than active dry yeast. A discussion of the two types of yeast can be found here. You can substitute one for the other if you wish. Like all breads of this type, the rolls are best eaten the day they are made. They lose their crackle if they sit over night and stale very quickly. The stale rolls do, however, make wonderful stuffing for pork chops or a small chicken. I hope you'll give these a try. Here's the recipe.

Quick and Crusty Hard Rolls
...from the kitchen of One Perfect Bite courtesy of King Arthur Flour

Ingredients:
4 to 4-1/2 cups all-purpose flour
1-1/2 cups water
2 teaspoons salt
1/2 teaspoon instant yeast

Directions:
1) Combine all of the ingredients and mix till cohesive. Knead dough, by hand or mixer, about 5 to 10 minutes, till it's soft and somewhat smooth; it should be cohesive, but surface should still be a bit rough. Place kneaded dough in a greased bowl, cover it, and refrigerate at least overnight, or for up to 5 days.
2) Remove dough from refrigerator, fold it over gently a few times, and cut off desired amount; you'll need golf-ball size pieces for dinner-size rolls and egg size pieces for sandwich buns. Return any remaining dough to refrigerator.
3) Form rolls by shaping the pieces into balls, then rolling them under your lightly cupped fingers on an unfloured work surface. Place shaped rolls onto a greased or parchment-lined baking sheet, cover, and let them rise for 1 1/2 to 2 hours, until they're very puffy.
4) Bake rolls in a preheated 425 degree F oven for 15 to 18 minutes, till they're golden brown. Yield: 9 sandwich buns or 18 dinner rolls.

You might also enjoy these recipes:
Rockin' Rolls - Food Gal
Soft Garlic Bread Sticks - Cookery Corner
Dinner Rolls - A Little Bit of Everything
Addictive Parker House Rolls - Sublime Hodge Podge
Multigrain Rolls - Annie's Eats
Sweet Potato Rolls - Coconut and Lime

This recipe is being linked to:
Designs By Gollum - Foodie Friday

Monday, December 6, 2010

Broccoli and Cheddar Soup


A soup to brighten gray and foggy days.


From the kitchen of One Perfect Bite...The hillside into which our house is built is no stranger to fog. Normally, it burns away and we can go about our business in an unhampered fashion. Occasionally, the fog refuses to lift and we are marooned, at least until our driveway, which was not designed for the feint of heart, is visible again. That happened last week. We were buried in a fog so thick you could cut it with a knife. Trite but true. Save for missing fog horns, I'd have sworn I was on the coast of Maine. The sheer grayness of the day demanded counter measures. With a fire lit and loaves on the rise, I decided to make a soup du jour. I played with the idea of making a pea soup, but our fog lacked the characteristic yellow color of a true pea souper, and I wasn't sure the Silver Fox, who was suffering from cabin fever, would appreciate my humor. I still had broccoli and, because we always have a ready supply of cheese, I knew where I was going. I had to be a bit inventive because a lack of cream precluded using my usual recipe for a broccoli and cheese soup. The soup I came up with was easy to make and surprisingly good. The recipe is straight forward and you can't go wrong unless you allow the soup to boil once the cheese has been added to the pot. The cheese will break and curdle and, while that won't affect taste, it's not a pretty sight. While the soup can be reheated, it's best eaten the day it's made. If it becomes too thick, use additional chicken broth to thin it out a bit. This is a very nice soup and I think you'll enjoy it. Here's the recipe.

Broccoli and Cheddar Soup...from the kitchen of One Perfect Bite

Ingredients:
1 pound of fresh broccoli florets
4 tablespoons butter
1/3 cup finely chopped carrot
2/3 cup finely chopped onion
6 cups chicken broth, divided
1/2 cup flour
3 cups whole milk
1/8 teaspoon garlic powder
1/2 teaspoon salt
1/2 teaspoon freshly ground pepper
8 ounces Colby cheese, shredded
4 ounces sharp Cheddar, shredded

Directions:

1) Melt butter in a large saucepan set over over medium heat. Add onions and carrots and saute for 5-6 minutes, or until vegetables are tender.
2) Add 2 cups chicken broth to pan and heat until boiling. Add broccoli and cook, covered, until broccoli is tender, about 5 to 6 minutes. Using a spoon, break broccoli into small pieces. Reduce heat to low. Add remaining 4 cups chicken broth to pot.
3) Mix flour and milk in a small bowl and whisk until smooth. Add mixture to pot. Add garlic powder, salt, and pepper. Continue cooking over low heat until soup thickens - about 5-6 minutes.
4) Add cheese, handfuls at a time, and stir constantly over low heat until smooth and creamy - about 10 minutes. If soup becomes too thick, add additional chicken stock. Do not let soup boil. Serve hot. Yield: 8 servings.

You might also enjoy these recipes:
Creamy Butternut Squash Soup - Taste and Tell
Creamy Mushroom Soup - Really Hungry
Spicy Southwestern Turkey Soup - A Spoonful of Thyme
Matzo Ball and Hanukkah Soup Recipes - Seriously Soupy
Italian Wedding Soup - Kalofagas
Minestra di Pasta e Fagioli, or Pasta and Bean Soup - La Bella Vita

Monday, November 29, 2010

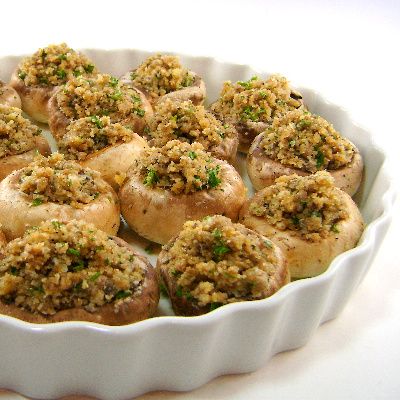
Stuffed Mushrooms


From the kitchen of One Perfect Bite...Stuffed mushrooms are one of my favorite hot appetizers. I've collected an impressive assortment of recipes for them and, over time, you'll probably get to see them all. However, today I'm only going to feature one. I chose this one to serve over the weekend because it's so easy to do, and, when you're into day four of a long weekend, easy assumes an importance it might otherwise not have. I think the original recipe, found here, was developed by Giada De Laurentis, but I found another that is similar in an online book, called Almost Italian, which is a compilation of recipes and stories from Italian immigrant communities across America. Those of you who love Italian food might find the book really interesting. I know I did. I've changed the recipe slightly to avoid waste. I've included finely chopped mushroom stems in my stuffing and changed the herb mix a bit. I think the mushrooms help keep the stuffing, which can be dry, moist and I replaced the mint, which I found to be off-putting, with additional parsley. Here's my version of the recipe.

Stuffed Mushrooms...from the kitchen of One Perfect Bite inspired by Giada De Laurentis

Ingredients:

28 large (2 1/2-inch-diameter) white mushrooms, stems removed and finely chopped
5 tablespoon extra-virgin olive oil, divided use
2 garlic cloves, peeled and minced
1/2 cup Italian-style dried bread crumbs
1/2 cup grated Parmesan cheese
1/4 cup chopped fresh Italian parsley
Salt and freshly ground black pepper


Directions:

1) Heat 1 tablespoon olive oil in a frying pan. Add chopped mushroom stems and cook just until softened, about 3 minutes. Stir in garlic and cook until fragrant, about 15 seconds longer. Remove from heat and cool to room temperature.
2) Preheat the oven to 400 degrees F.
3) Add 2 tablespoons olive oil, bread crumbs, cheese, parsley and salt and pepper to taste to mushroom mixture in skillet. Mix with a spoon to blend.
4) Coat bottom of a large baking sheet with about 1 tablespoon olive oil. Spoon filling into the mushroom cavities and arrange on baking sheet, cavity side up. Drizzle remaining oil over filling in each mushroom. Bake until mushrooms are tender and filling is heated through and golden on top, about 25 minutes. Serve immediately. Yield: 7 servings.

You might also enjoy these recipes:
Caprese Skewers - Culinary Cory

Savory Herbed Glazed Nuts - Mz. Tasty Kitchen
Parmesan Crusted Baked Zucchini Strips with Marinara Sauce - Closet Cooking
Easy Olive Tapenade - Annie Bakes
Honey Walnut and Brie Tartletts - What's Cookin, Chicago?
Tiny Gougeres with Scallions Parsley and Lemon - She's in the Kitchen
Parmesan Cheese Sticks - Easy Appetizers

Friday, November 26, 2010

Apple Cake with Caramel Glaze


Joshua, who brought a catalog along for his visit to Santa, knows exactly what he wants for Christmas. I hope Santa was taking notes!

From the kitchen of One Perfect Bite...Earlier this week I had to make a cake for a morning coffee. I wanted to bake something that was seasonal, easy to make and just a little different than standard holiday fare. I found one in the book Southern Cakes, written by Nancie McDermott, that was exactly what I was looking for. I thought the cake would be too sweet for my own taste, but I knew others would love the apple and caramel confection. To my great surprise I found that I like it, too. The small piece I'd cut for myself was delicious and the caramel glaze that covered the top of the cake was amazingly good. The cake is definitely a keeper and, if you have not tried it, I hope you will soon. Here's the recipe.

Apple Cake with Caramel Glaze...from the kitchen of One Perfect Bite, inspired by Nancie McDermott

Ingredients:
Cake
3 cups all purpose flour
2 cups sugar
1 teaspoon baking soda
1 teaspoon salt
3 eggs
1 cup vegetable oil
1/2 cup unsweetened applesauce
2 teaspoons vanilla extract
3 cups finely chopped apples
1 cup coarsely chopped pecans or walnuts
Brown Sugar Glaze
1 cup tightly packed light brown sugar
1/3 cup butter
1 teaspoon vanilla extract
2 tablespoons heavy cream

Directions:
1) Preheat oven to 350 degrees F. Grease a 13 x 9-inch pan. Set aside.
2) Combine flour, sugar, baking soda and salt in a medium bowl. Stir with a fork to mix everything together well.
3) In a large bowl, beat eggs with a wooden spoon or a mixer at low speed until pale yellow and foamy. Add oil, applesauce and vanilla and beat well. Stir in flour mixture with a wooden spoon and continue stirring batter just until flour disappears. Add apples and nuts, stir to mix them into the batter until fairly uniform. Scrape batter into prepared pan.
4) Bake for 45-50 minutes, or until the cake is golden brown, springs back when touched lightly and is beginning to pull away from sides of the pan. Place cake (still in the pans) on a wire rack and spoon over the glaze while still hot.
5) To make glaze: Combine brown sugar, butter, vanilla and cream in a medium saucepan. Cook over medium heat, stirring often, until mixture comes to a gentle boil. Then cook for 3-5 minutes.
6) Spoon hot glaze all over hot-from-the-oven cake. Let glazed cake cool completely before serving straight from the pan. Yield: 12 - 16 servings.

You might also enjoy these recipes:
Healthy German Apple Cake - Honey and Soy
Butterscotch Apple Cake - Sugar Plum
Cranberry and Apple Cake - Christie's Corner
French Apple Cake - David Lebovitz
Marie-Helene's Apple Cake - Sea Salt with Food
Cinnamon Apple Cake - Elana's Pantry
The Apple Lady's Apple Cake - One Perfect Bite

Saturday, November 20, 2010

Quick and Creamy Pumpkin Pudding


From the kitchen of One Perfect Bite...I've been known to joke that my house is always ready for company, except when it's not. The phone rang at one of my most "not" moments and left me with about three hours to sanitize, beautify and cook for folks we don't see often, but whose company we really enjoy. In the midst of the ensuing chaos, a plan for an easy but festive meal came together. I fell back on my three fall P's of pork, potatoes and pumpkin. Years ago, I made an icebox cake that was always well received. While I had no time to make or set the cake portion of the dessert, I could make the filling and serve it as a creamy, almost mousse-like, pudding. I think you'll really like this one. It is a novel way to serve pumpkin, but it still is in keeping with the spirit of the season. I've used whole milk and heavy cream to make the dessert, but low-fat and non-dairy products can also be used. I love to serve this with my favorite Swedish gingersnaps. A crackling fire and great coffee are also wonderful accompaniments. Here's the recipe.

Creamy Pumpkin Pudding...from the kitchen of One Perfect Bite

Ingredients:

1 envelope unflavored gelatin
2 cups cold milk, divided
1 package (8-oz.) cream cheese, softened and at room temperature
2 packages (3.4-oz. each) instant vanilla pudding
1 can (15-oz.) pumpkin puree
Spice Mix:
...1 teaspoon ground ginger
...1 teaspoon ground cinnamon
...1/4 teaspoon ground mace
...1/4 teaspoon nutmeg
...1/8 teaspoon ground cloves
1 tablespoon fresh orange zest
1 cup whipped cream

Directions:
1) Place 1/2 cup milk in a small microwave container. Add gelatin. Allow to soften for 2 to 3 minutes. Heat in a microwave oven for about 30 seconds on high power, or until until gelatin is dissolved. Set aside.
2) Beat cream cheese in a large bowl until light and airy. Beat in dissolved gelatin, 1-1/2 cups milk, dry pudding mix, pumpkin, all of spice mix and orange zest. Beat on low speed for 2 minutes until well-blended. Fold in whipped cream. Spoon mixture into individual serving dishes. Chill for at least two hours, or until set. Yield: 4 to 6 servings.

You might also enjoy these recipes:
Pumpkin and Chocolate Layer Cake - Baking Bites
Pumpkin Nut Bars - Eating Out Loud
Rum Spiked Pumpkin Pie - My Gourmet Connection
Spiced Pumpkin Walnut Cake - Little Corner of Mine
Pumpkin Toffee Cheesecake - The Other Side of Fifty
Raisin Pumpkin Bread - The Food Addicts
Pumpkin Roll - What's Cooking Mexico?

Wednesday, November 17, 2010

Aloo Matar Rasedaa - Curried Potatoes and Elephant Safari


Aloo Mater Rasedaa - Curried Potatoes.


They don't get much cuter, but she was a surprise. Her Daddy was a rogue.


This is her teen-age mother.


At home in the jungle.


Conference room.


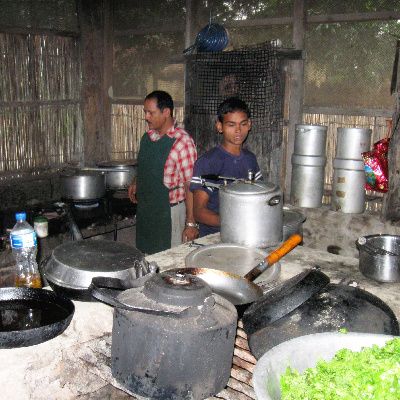
Kitchen.


Termite Colony.


Tiger


Rhino.


Crocodile.


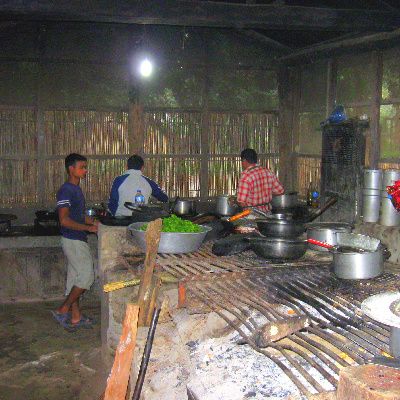
From the kitchen of One Perfect Bite...The Silver Fox loves nature. I love the Silver Fox. The bit about jungles and safari was buried in the fine print of our marriage contract. I missed it. He didn't. That's how I ended up in the middle of a jungle on the back of an elephant who cared a good deal more about her offspring than me or my welfare. We had signed on for a four day stay at a Nepali eco-lodge, hoping that would be enough time to see at least some on the wildlife the camp was famous for. As luck would have it, we got to see everything our first morning on safari. That was wonderful. Folks can spend years trying to catch glimpses of the tigers or white rhinos in the reserve. We hit a homer our first time at bat. Our good luck, however, meant we had to come up with other plans to fill the time we had left in camp. Four days can be an eternity in a place that has only intermittent electricity and hot water. It does not encourage the reading or writing of the great American novel and bubble baths are not de rigueur. I spent my time in the primitive kitchen and at the elephant camp watching the antics of a two year old who was such a minx you couldn't help but love her. She's now old enough to walk behind her mother on expedition. If she's hungry she nurses and everyone waits till she's had her fill. If she finds a pile of dirt or an especially lush leaf, she'll stop and play. Everybody waits. If they're lucky they'll escape the dirt she blows their way as an invitation to play. It's also interesting to watch the behavior of the other elephants when she is around. If they scent boar or other animals that might be dangerous, they close ranks and form a protective circle around her. When I tire of the elephants, I wander down to the primitive kitchen and watch them prepare meals for 40 or so guests. There are no appliances to speak of. There are 5 cooks who report to head chef who barks orders but also cooks. The six of then produce breakfast and two large buffets every day. The food they cook must be walked uphill to the dining room. When the meals are over, dishes are walked to another facility to be washed and stored away. The arrangement is uniquely inefficient but the job gets done, even in rainy season. Eco-tours are not for everyone, but if you love nature and being outdoors you'd love to spend some time on jungle safari. I glad I did it. Once!

The food prepared in the kitchen at Temple Tiger was, of necessity, easy to make. It lacked refinement, but it was delicious and there was always plenty of it. I especially like their recipe for curried potatoes and peas. It can be served with any meal, but it is a wonderful addition to the Nepali set I've been talking about building. It perfectly fits the curry component of the dish. Here is the recipe.


Aloo Matar Rasedaa - Curried Potatoes and Peas...from the kitchen of One Perfect Bite

Ingredients:

2 pounds baby Yukon Gold potatoes, unpeeled and quartered
2 tablespoon ghee or olive oil
1 medium onion, finely minced
1 teaspoon finely minced ginger
1/4 teaspoon salt
1-1/2 teaspoon turmeric
1-1/2 teaspoon cumin powder
1 teaspoon ground coriander
1/4 to 1/2 teaspoon cayenne or ground red pepper
1 teaspoon cumin seed
1 can (15-oz.) chopped tomatoes, undrained
1/4 teaspoon sugar
1 cup frozen peas, thawed
1/4 teaspoon garam masala

Directions:
1) Boil potatoes in lightly salted water until barely tender, about 10 minutes. Drain and set aside.
2) Heat oil in a large pot. Add onions and ginger and cook until softened. Stir in turmeric, cayenne, cumin powder, coriander and cumin seed and cook until fragrant.
3) Add potatoes to skillet and stir to coat with spices. Add tomatoes and sugar and simmer until potatoes are tender, about 20 minutes. Stir in peas and garam masala. Cook 5 minutes longer. Add additional water if sauce becomes too thick. Season with salt to taste. Serve hot. Yield: 4 servings.

You might also enjoy these recipes:
Curried Vegetables With Whole Wheat and Couscous - Simply Recipes
Indian Style Curried Vegetables - What's Cookin, Chicago?
Curried Potato and Vegetable Soup - Simply Recipes
Aloo Gobi - No Recipes
Fresh Vegetable Curry - The Whole Life Nutrition Kitchen
Mixed Vegetable Curry - What's Cooking Today

Monday, November 15, 2010

Dal Bhat - Pokhara


Dal Bhat


From the kitchen of One Perfect Bite...Pokhara is a small Nepalese city tucked into the foothills of the Annapurna range of the Himalayas. Things, including time, move slowly here. Cars are not yet a problem, television transmission is intermittent and the air is fresh and clear. While the area tries to keep a low profile, 100,000 travelers arrive here every year. The city is a mecca for climbers and trekkers who account for 80% of its visitors. The area is also a retirement haven for Gurkha officers whose presence, coincidentally, keeps the crime rate low and the economy healthy. Those who come are charmed and pampered. Many stay. Hence, I can happily report it is possible to get fabulous pizza in the foothills of the Himalayas. The old city is much like the Kathmandu of my imagination, but accommodations are first-rate and are a welcoming place to train for, or recover from, strenuous outdoor activity. Part of the daily panoply is watching helicopters evacuate trekkers who have underestimated the toll that altitude will take on their bodies. Most recover poolside and still have the time of their life. I was completely charmed by Pokhara and its residents. If you are lured by the unusual and enjoy back roads and byways, Pokhara will enchant you as well.

In Nepal there's a entree called a Nepali set. It is an assortment of dishes arranged on a plate especially designed to feature each component of the meal. I'd like to take you through those components a step at a time and, today, we'll start with the two most basic elements of the dish. Rice and lentil are the staples of the Nepali people. They are eaten twice a day in a dish that's called Dal Bhat. The dish may be supplemented with curried vegetables, called Tarkari and pickles, but rice and lentils are always part of the meal. They will also appear on our expanded versions of the Nepali set that we'll build a step at a time. Here is the recipe for the rice and lentils that form the base of the Nepalese diet.


Dal Bhat...from the kitchen of One Perfect Bite

Ingredients:
Plain Rice (Bhat)
2 cups rice (Basmati or Long grain preferred)
4 cups (1 lt) water
1 teaspoon butter (optional)

Lentils (Dal)
1-1/2 cups lentil (any kind)
4 to 5 cups of water (depends preference of your consistency of liquid)
1/2 teaspoon turmeric
1 teaspoon garlic, minced
6 tablespoons clarified butter (ghee)
3/4 cup sliced onions
2 chillies (dried red chilies preferred)
Salt to taste
1 tablespoon fresh ginger paste (optional)

Directions:
1) To prepare rice: Wash rice and soak for 5 minutes. Boil the rice over medium heat for about 10 -15 minutes. Stir once thoroughly. Add butter. Turn the heat to low and cook, covered, for 5 more minutes until done
2) To prepare lentils: Wash lentils and soak lentil for 10 minutes. Remove anything that floats and drain. Place lentil in fresh water and bring to a boil. Add all spices. Reduce heat and simmer, covered, for 20 to 30 minutes until lentils are soft and have the consistency of oatmeal. In a small pan, heat remaining butter and fry onions, chilies and garlic. Stir into lentils a few minutes before you stop boiling. Serve with rice.

You might also enjoy these recipes:
Nepali Dal Bhat - Zack's Travel Musings
Dal Bhat - Experiments in My Kitchen
Dal Bhat - Yeti-Zone Trekking

Sunday, November 14, 2010

The Most Memorable Meal in India - Chole at the Missionaries of Charity Orphanage in Agra


From the kitchen of One Perfect Bite...Tucked behind a gate on Anjmar Road in Agra, is a Missionaries of Charity home. The facility, operated by the order of nuns that Mother Teresa founded, functions as an orphanage and a care facility for the chronic and terminally ill. As I passed through the gate and entered the grounds, I was followed by a young woman who was just completing the first of the ten years required to become a professed member of the community. She was lithe and fair, and her clipped accent indicated she was well-educated and came from a comfortable background. I suspect her task was to see that none of us one wandered into areas where our presence would be intrusive. She, instead, directed us to the right side of the compound and into a room of tiny miracles. Here, in cribs packed back to back, were twenty perfectly formed infants, abandoned, but found before starvation or exposure took their toll. Most of them were sleeping, but here and there you'd find a tiny flirt who'd shyly smile and reach for you. The babies in this room were adoptable and the vagaries of fate would soon take them to homes far from the streets on which they had been found. We passed through a connecting door into another room which told a different tale. Here, the infants and toddlers were dealing with physical or mental limitations that would keep them here until better facilities for their care could be found. Just outside, playing in a courtyard, were healthy children who were too old for adoption. The sisters had assumed responsibility for their education, job training, and, in the case of the girls, the arrangement of suitable marriages when they came of age.

Intent on showing us the others in their care, the young aspirant led us into a shaded courtyard where adult men were having a lunch of Chole and Naan. They were suffering from various mental or physical problems and many were horribly crippled. Off the courtyard was another room for those who were stricken with tuberculosis and AIDS. They were bedridden and obviously very ill. The young woman explained there was no money for the medicine that could effectively treat these men. They were languishing, waiting for a death that would not come quickly. Until it did, the sisters and their volunteers provided as much care and love as they possibly could to ease the final days of these men's existence.

Across the courtyard was a compound for the women that included a small cell-like structure that held some of them under lock and key. They had severe mental problems and the newer arrivals looked malnourished and had open wounds from scratching lice from their scalps and skin. The, soon to be, novice was now walking by my side and I asked how she was able to do this day after day. She smiled, took both my hands in hers and led me back to the children's quarters. There was a quotation hanging on the wall she wanted me to read. I'll share the last few lines of it with you. "I asked Jesus how much He loved me. He answered 'this much.' Then He stretched out His arms and died for me." She asked if I understood. I nodded yes and hugged her.

Today's Recipe

Chole is a North Indian chick pea dish. The base is a tomato gravy to which chick peas are added. Canned chick peas are used in this recipe. Like most Indian curries, spices can be adjusted so the dish is spicy or mild depending on your taste. This recipe will makes a Chole that's on the milder side.

Chole...from the kitchen of One Perfect Bite

Ingredients:
3 tablespoons vegetable oil or ghee
1 pinch asafetida powder (optional)
1/2 teaspoon cumin seeds
1/2 teaspoon ground turmeric
1 medium sized onion, diced
3 cloves garlic, minced
2 medium sized tomatoes, diced
1 teaspoon tomato paste
2 (15-oz.) cans chick peas, drained
1/4 teaspoon sugar
1 to 2 teaspoons salt, depending on taste
1/4 teaspoon finely minced ginger
1/4 to 1/2 teaspoon ground red chili powder
1/4 teaspoon ground coriander
1/4 teaspoon ground cumin powder
1/4 teaspoon teaspoon garam masala
1 cup water

Directions:
1) Heat oil or ghee in a large saucepan. Add cumin seeds and cook until sizzling and seeds begin to turn brown. Add asafetida powder, if using. Asafetida is a gum resin that has a strong onion flavor. Stir in turmeric.
2) Add onions and sauté until golden brown. Add garlic and stir until fragrant.
3) Stir in tomatoes and simmer on medium heat until tomatoes have melted and mixture is fairly uniform. Add 1 teaspoon of tomato paste and mix.
4) Stir in chick peas. Add salt, ginger. chili powder, coriander, cumin powder, garam masala and sugar. Mix thoroughly.
5) Add 1 cup of water. Simmer for 20 minutes with pot partially covered. Serve hot with rice,naan or roti. Yield: 4 to 5 servings.

You might also enjoy these recipes:
Channa (Chole) Masala - Kitchen Gypsies
YRTML: Punjabi Chole - Siri's Corner
Spicy Chole - Niya's World
Chole/Chana Masala - Enriching Your Kid
Chole Masala - Weird Combinations
Teri Wale Chole(Curried Chickpeas) - Annarasa - Essence of Flavor

This post is being linked to:
Smiling Sally - Blue Monday

Friday, November 12, 2010

Kheer - Pink Saturday


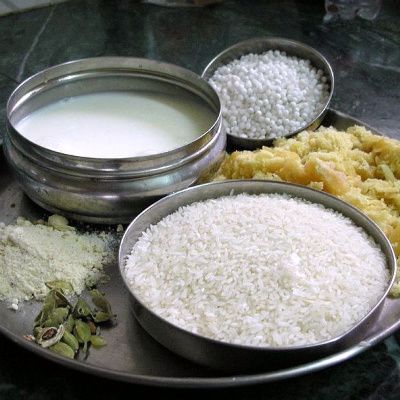
Ingredients for Kheer


Kheer - An Indian and Nepalese Rice Pudding


A Namaste for Pink Saturday

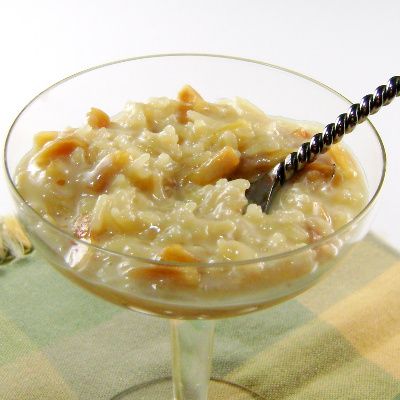
From the kitchen of One Perfect Bite...Kheer, the Indian version of rice pudding, was offered at the end of every evening meal Bob and I had while in India and Nepal. It's a very simple preparation of rice and milk that's flavored with a few spices and cooked down to thicken the mixture to a pudding-like consistency. It lacks the custard quality of its American cousin and can often be almost soupy. It is a very popular dessert and no wedding or festival in India or Nepal would be complete without it. It, fortunately, is very easy to prepare and it's a great dish for a novice cook or one who is just beginning to explore the wonders of Indian cooking. There are literally hundreds of recipes available for kheer. Each region of India or Nepal has a version all its own and families within those areas further modify the recipes to suit their tastes and pocketbooks. The version I'm sharing with you is one I was taught while in India and it's barebones easy to do. You'll find other, more sophisticated, versions of the dish in the recommendations found at the bottom of the this post. I hope you'll give kheer a try. Here's how to make a very simple version of Indian rice pudding.

Kheer...from the kitchen of One Perfect Bite

Ingredients:
1/2 cup Basmati rice
1 tablespoon ghee
6 cups milk
10 tablespoons sugar
A few strands of saffron
1 teaspoon golden raisins
1 teaspoon ground cardamom
1/2 cup cashews or almonds or pistachios (thinly sliced)

Directions:
1) Soak rice in water for 30 minutes before cooking. Drain.
2) Melt ghee in a large pan. Add rice and saute until translucent.
3) Add milk to rice and simmer until liquid has been reduced by half.
4) Stir in sugar and saffron and cook until sugar is dissolved. Add raisins, nuts and cardamom and simmer for a few minutes. Remove from heat and serve warm or cold. Yield: 4 -6 servings.

You might also enjoy these recipes:
Watermelon, Sago and Carrot Kheer - Priya's Easy N' Tasty Recipes
Sweet Potato Kheer - Food for Thought
Firni: Rice Pudding with Saffron and Nuts - eCurry
Badam Kheer - Sounds Spicy
Pressure Cooker Payasam (Kheer) - Niya's World
Carrot Kheer - Maria's Menu

This post is being linked to:
Pink Saturday, sponsored by Beverly at How Sweet the Sound.

Sunday, October 17, 2010

Apple Oatmeal Bread


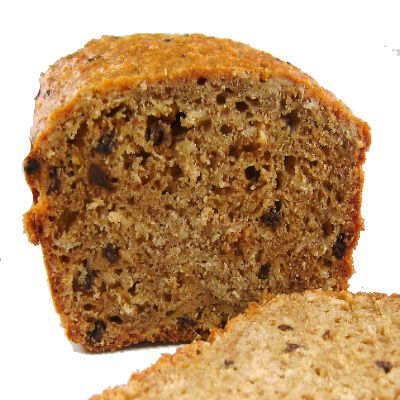
From the kitchen of One Perfect Bite...I know he means well, but sometimes the Silver Fox is not helpful. He has a tendency to comment on works in progress and I really didn't need to hear his, "...that'll grow hair on your chest," as I added oatmeal to my bread mix. As a child I was very literal minded. If someone were to say I'm beside myself, you can bet I checked the room. Old habits die hard. Without thinking, I glanced down and managed to give him his laugh of the day. What can I say? While it's more nutritious than many, the bread is not a cure for male pattern baldness. It is very easy to prepare and it can be quickly made with no special equipment. Needless to say, it perfumes the kitchen as it bakes and the lingering aroma of cinnamon and apples will drive the unsuspecting to distraction. It's a really nice bread that can be made with a wooden spoon. While it is heavier than many quick breads, it's a perfect fall treat. The bread stays fresh for days and it makes wonderful toast. I hope you will try it. Here's the recipe.

Apple Oatmeal Bread
...from the kitchen of One Perfect Bite

Ingredients:
1-1/2 cups flour
2 teaspoons baking powder
1/4 teaspoon baking soda
1 teaspoon salt
2 teaspoons ground cinnamon
1/4 teaspoon ground nutmeg
2/3 cup brown sugar
1 cup rolled oats
1-1/2 cups grated apple
1/4 cup raisins
2 large eggs
1/4 cup whole milk
1/4 cup vegetable oil

Directions:
1) Preheat oven to 350 degrees F. Grease and flour an 8-1/2 x 4-1/2 inch loaf pan. Set aside.
2) Combine flour, baking powder, baking soda, salt, cinnamon, nutmeg, brown sugar, and oats in a large bowl. Add apple, raisins, eggs, milk, and oil. Mix until dry ingredients are moistened. Mixture will be stiff.
3) Put mixture into prepared pan and bake for 55 to 60 minutes, or until done. Let sit for 20 minutes. Remove from pan and continue cooling on a wire rack. Yield: 1 loaf (about 12 slices).

You might also enjoy these recipes:
Pumpkin Chocolate Chip Bread - You Made That?
Glazed Apple, Carrot and Walnut Loaf - The English Kitchen
Banana Nut Bread - Brown-Eyed Baker
Cherry Pecan Bread - Amanda's Cookin'
Coconut Bread - Bored Cook in the Kitchen
Cinnamon Quick Bread - Sugar Plum
Raspberry Almond Swirl Bread - Baking Bites

Monday, October 11, 2010

Zuppa di Finocchio - Creamy Fennel Soup


From the kitchen of One Perfect Bite...I'm still able to buy fennel very cheaply. Last weekend I bought several large bulbs to try an idea I'd been mulling over. I wanted to make a creamy fennel soup that had an unmistakably anise flavor, but had the same grainy texture as a properly made potato soup. How hard could it be? I set to work and did the requisite dicing and slicing and had my pot on the stove in 30 minutes. In addition to fennel, the pot contain a large potato to help with thickening, some celery and, most importantly, finely ground caraway seeds to boost the anise flavor. I let the contents of the pot simmer for about an hour, then pureed the contents of the pot using an immersion blender. I thinned the soup with light cream, garnished it with fennel fronds and served it warm with seeded rye croutons. It was really good and I'll definitely be making it again. I gave it an Italian name to give it more panache. I thought some of you might enjoy the recipe. Here's how it's made.

Zuppa di Finocchio - Creamy Fennel Soup...from the kitchen of One Perfect Bite

Ingredients:
2 tablespoons olive oil
3 large fennel bulbs, trimmed, cored and coarsely chopped
1 (8 to 12-oz.) large Idaho potato, peeled and coarsely chopped
1 large celery stalk, coarsely chopped
1 teaspoon chopped garlic
1/2 to 1 teaspoon teaspoon pulverized caraway seeds
4 cups low-sodium Chicken broth
1 bay leaf
Salt and pepper
1/2 cup milk
1/2 cup light cream
Garnish: fennel fronds

Directions:
1) Heat olive oil in a large (4 to 5-quart) pan. Add fennel, potato, celery, and garlic. Cover pan, reduce heat, and sweat vegetables until soft but not brown, about 10 to 15 minutes. Add pulverized caraway seed, chicken broth, bay leaf and salt and pepper to taste. Simmer, partially covered, for 50 minutes. Remove bay leaf
2) Puree soup with an immersion blender. Strain soup if desired. Ladle into bowls and garnish with fennel fronds. Serve with seeded rye croutons. Yield: 5 servings.

You might also enjoy these recipes:
Mussels in Fennel Cream Sauce - Blissful Bites
Fennel, Olive and Orange Salad - The Creative Pot
Fennel Roasted Carrots - Handle the Heat
Apple Fennel Salad - Jenny Learns to Cook
Bouillabaise de Poulet - One Perfect Bite
Raw Beet and Fennel Salad - For the Love of Food

Tuesday, October 5, 2010

Chunky Plum and Tomato Chutney


From the kitchen of One Perfect Bite...It was a gorgeous day. It was crisp and sunny and early errands provided the perfect excuse to get out for a while. An hour became two and before I knew it the day was done. We picked up visas, had flu shots and filled the prescriptions the CDC insists we need for our adventure. With all of that done, our trip countdown officially began. We are at 12 days and counting. The next destination on the agenda should have been home, where chores aplenty were waiting. I must admit my resolve crumbled. The day was just too lovely to spend inside. We took to our favorite backroads and byways and spent the rest of the day in the country picking, plucking and picnicing. I came home with what will probably be my final stash of locally grown plums, tomatoes and sweet peppers. I also had some gorgeous, fresh from the farm, pork and lamb in my tote. The plums and tomatoes are starting to look dogeared, so I decided to use them in a chutney where their less than perfect appearance could be disguised. The chutney would be perfect with grilled chops and help make an ordinary meal special. Time constraints meant the chutney would have to be served warm, so that helped narrow down my choices. This simple version of the condiment looks best when it is made with firm, just ripe fruit. If you have good knife skills, the chutney is table ready in about 30 minutes. Leftovers can be refrigerated for several weeks or frozen for up to a year. Here's the recipe.

Chunky Plum and Tomato Chutney
...from the kitchen of One Perfect Bite, inspired by Nancy Baggett

Ingredients:
1 small yellow onion, coarsely chopped
1-1/2 tablespoons peeled and finely chopped ginger root
1 (3-inch) piece stick cinnamon
1 teaspoon allspice berries, crushed or 1/2 teaspoon ground allspice
1/2 teaspoon black peppercorns, crushed or a scant 1/2 teaspoon coarsely ground black pepper
1/4 teaspoon salt
1 to 3 pinches dried hot red pepper flakes, crushed, to taste
2 cloves, finely crushed or 1/8 teaspoon ground cloves
3/4 cup sugar
1/2 cup apple cider vinegar
2 tablespoons water
2-1/2 cups pitted and chopped (3/4 inch) unpeeled red or yellow plums
1-1/4 cups slightly underripe peeled tomatoes, chopped into 3/4-inch pieces

Instructions:
1) Have 2 or 3 (8-ounce) jars ready.
2) In a medium-size nonreactive pan over medium-high heat, combine onion, ginger root, cinnamon stick, allspice, black pepper, salt, red pepper flakes, cloves, sugar, vinegar and water. Adjust heat so that the mixture boils briskly and cook, uncovered, 5 minutes. Add plums and reduce heat to simmer gently for 3 minutes. Add tomatoes and cook 3 to 5 minutes longer, or until plum and tomato pieces are cooked through but still hold some shape. Liquid should seem almost syrupy. Remove from the heat.
3) To test for doneness, put about a tablespoon of the chutney in a small, nonreactive bowl and place in freezer about 3 minutes. If syrup is slightly thickened, chutney is done. If it is still runny, boil 2 minutes longer. (The chutney may still seem somewhat fluid but will thicken further when chilled.)
4) Remove from heat. Discard cinnamon stick. Ladle chutney into jars, allowing about 3/4-inch headroom for expansion during freezing. Wipe any drips from jar rims and threads; screw on lids securely. Let stand until barely warm. If lids seem loose after cooling and contracting, check and tighten further, but not so much that seal is broken. May refrigerate for 1 month or freeze up to 1 year. Yield: 3-1/2 cups.

You might also enjoy these recipes:
Mango Chutney - Chasing Delicious
Tomato Onion Garlic Chutney - Niya's World
Fiery Plum Conserve - KO Rasoi
Pear Ginger Chutney - Wives With Knives
Peach Chutney - Sugar Crafter
Cilantro Ginger Chutney with Coconut - One Life to Eat
Five Spices Plum Chutney - Vegalicious
Peach Chutney - Suburban Spoon

Saturday, September 11, 2010

Spaghetti Frittata


From the kitchen of One Perfect Bite...Our nest had been empty for about two weeks when I learned the wisdom of cooking no more than could be eaten in one sitting. That included some of our favorite pasta dishes. I hate waste and am not fond of reheated noodles, so you can imagine the bemusement on the face of the Silver Fox when I started to make a frittata with deliberately left-over spaghetti. A recipe, found in Eating Well Magazine, convinced me to try a spaghetti frittata, but I wanted to adapt and expand it to include ingredients that are also used in spaghetti carbonara. The recipe was touted as a money saver because it minimized waste by using food that might otherwise be thrown away. Apparently, a family of four trashes nearly $600 of food every year. Before I go any further, let me say this is a nice recipe and it produces an unusual dish that might please those with bored palates. There's not a thing wrong with it. If you have half a pound of cooked spaghetti lying around, it's a good way to use it up. I was drawn to the recipe out of curiosity and my curiosity is now satisfied. I probably will not make this again, but if I did, I'd make some changes. I'd use capellini rather than spaghetti and I'd pour the egg mixture over still warm pasta. The theory being the custard would better coat the pasta when it is warm. As with all stovetop frittatas, there is that awful moment of truth when it must be turned. Prayer and/or swearing help. A better solution would be to bake rather than fry it. Here's the recipe.

Spaghetti Frittata...from the kitchen of One Perfect Bite inspired by Eating Well Magazine

Ingredients:

8 ounces spaghetti, (or 4 cups cooked spaghetti)
1 teaspoon olive oil
4 strips uncooked bacon, diced
1-1/2 cups chopped onion
1 teaspoon minced garlic
2 large eggs
2 large egg whites
1/2 cup skim milk
1/3 cup freshly grated Parmesan cheese
2 tablespoons chopped fresh parsley
2 tablespoons chopped fresh basil
1 teaspoon salt
1/2 teaspoon freshly ground pepper
1 tomato, diced (optional)

Directions:
1) Cook spaghetti in a large pot of boiling salted water until tender but firm. Drain and refresh with cold water.
2) Heat oil in a large nonstick skillet over medium heat. Add bacon and cook until browned. Add onions and cook, stirring occasionally, until golden, 10 to 12 minutes. Add garlic and cook until fragrant, about 1 minute. Transfer mixture to a small bowl and let cool slightly. Wipe out pan.
3) Whisk together eggs, egg whites and milk in a large bowl. Stir in the onions, Parmesan, parsley, basil, salt and pepper. Add spaghetti.
4) Spray pan really well with nonstick cooking spray and place over medium heat. Pour in egg mixture and distribute evenly in pan. Cook until underside is golden, moving pan around on burner to ensure even cooking, about 6 minutes. Invert a large platter over skillet, grasp platter and skillet with oven mitts and carefully turn over. Lift off skillet and spray it again with nonstick cooking spray. Slide frittata back into the skillet and cook until bottom is golden. Slide frittata onto a platter. Garnish with tomatoes, if using. Yield: 6 servings.

You might also enjoy these recipes:
Frittata with Zucchini Sun-Dried Tomatoes and Sausage - Kalyn's Kitchen
Ratatouille Frittata - Stacey Snacks
Chicken and Orzo Frittata - Cookbook Confessions
Potato Frittata - The Comfort of Cooking
Green Eggs and Ham Frittata - The Pink Apron
Penne Frittata - The Parsley Thief
Frittata with Spring Herbs and Leeks - One Perfect Bite
Smoked Salmon Frittata - One Perfect Bite

Monday, September 6, 2010

Plum Buckle


From the kitchen of One Perfect Bite...Tucked into that corner of the world occupied by crisps, cobblers and grunts, is yet another treasure called a buckle. The buckle is a rich butter cake that's topped with fruit. It gets its name because the surface of the cake appears to buckle as the cake batter rises around the topping. I think the best and most delicious version of this cake is made with plums. It tastes like a Viennese kuchen but it is much easier to prepare. While I serve this cake for breakfast or for brunch, it also makes a wonderful dessert. It is quite simple to do, though you should be aware there is one irritating problem associated with the cake. It's done when it chooses to be done and the time it requires to bake is variable. Some days the cake bakes in less than an hour, other days it takes more time. I suspect the amount of moisture in the fruit explains the discrepancy but you'll be fine, as long as you keep the cake in the oven until you are sure its center is set. This is a cake that is best served warm and eaten on the day it is made. It stales quickly. This is a treasure that I hope you will try. Here's the recipe.

Plum Buckle
...from the kitchen of One Perfect Bite inspired by Sunset Magazine

Ingredients:
1 cup (2 sticks) butter, at room temperature
1 cup plus 2 tablespoons sugar
2 large eggs
Zest of 1 small lemon
1-1/2 cups all-purpose flour
1 teaspoon baking powder
1/4 teaspoon salt
1/4 teaspoon ground nutmeg
1/3 cup milk
4 cups sliced unpeeled firm-ripe plums (about 4 large)
1/2 teaspoon ground cinnamon
1/4 teaspoon ground mace

Directions:
1) Preheat oven to 325 degrees F. Butter an 8 x 8 x 2-inch pyrex pan. Set aside.
2) Combine butter and 1 cup sugar in bowl of a stand mixer fitted with a paddle attachment. Beat at high speed until smooth. Add eggs, one at a time, beating well after each addition. Beat in lemon peel.
3) Combine flour, baking powder,salt and nutmeg in another bowl. Whisk to combine. Stir half the flour mixture into butter mixture , then add milk followed with remainder of flour mixture. Stir just until incorporated. Scrape batter into prepared pan. Overlap plum slices on top of batter. Combine reserved 2 tablespoons sugar with cinnamon and mace. Sprinkle over plums.
4) Bake in a 325 degree oven until a wooden skewer inserted in the center comes out clean, 45 to 50 minutes (it may take longer than this) . Serve warm or at room temperature. Yield: 9 servings.

You might also enjoy these recipes:
Plum and Hazelnut Crumble Slice - The English Kitchen
Cinnamon Streusel Plum Cake - My Kitchen in the Rockies
Plum Galette/Plum Crostada - My Kitchen Snippets
Plum and Cherry Compote - Nami Nami
Plum Tart - Being Suzy Homemaker
Plum Cardamom Ice Cream - Cristine Cooks

Sunday, August 8, 2010

Lamb Chops Sizzled with Garlic


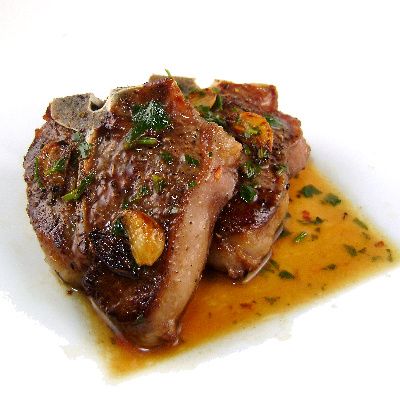
From the kitchen of One Perfect Bite...My family loves lamb in all its iterations, and while they're visiting we'll enjoy it several times. We were out for most of the day, so dinner had to be quick and light enough to overcome the damage done by a lunch of thickly battered fish and chips. Lamb chops are perfect for a quick, light meal. The chops I prepared are based on a dish that is served in the village of Las Pedroneras, which is considered to be the garlic capital of Spain. The recipe was originally developed by Janet Mendel for Food and Wine magazine, and she has given us a classic that I've made over and over again with slight variations. The chops cook very quickly, so it's best to have your sides ready to go before you begin to saute them. I served the chops with a lovely pilaf, that I'll be featuring later in the week, and with an Andalusian Salad that's made with oranges, avocados and almonds. It really was a satisfying dinner that had lovely color and variety of textures as well. While I should have made a flan to end the meal, I decided, instead, to serve a lovely lemon scented iced milk with berries and a wine sauce that been featured here before. The original recipe calls for thin loin chops, but I prefer to use double cut chops instead. Visiting family was made to be spoiled and if you're in for a penny, you may as well be in for a pound. Those who try these chops will love them. Here's how they're made.

Lamb Chops Sizzled with Garlic...from the kitchen of One Perfect Bite, inspired by Janet Mendel

Ingredients:
8 double cut lamb loin chops, trimmed
Salt and freshly ground pepper
1 teaspoon fresh thyme or a pich of dried
3 tablespoons extra-virgin olive oil
10 small garlic cloves, halved
3 tablespoons dry white wine
2 tablespoons fresh lemon juice
2 tablespoons minced parsley
1/8 teaspoon crushed red pepper flakes

Directions:

1) Season lamb with salt and pepper and sprinkle lightly with thyme. In a very large skillet, heat the olive oil until shimmering. Add lamb chops and garlic and cook over moderately high heat until chops are browned on the bottom, about 5 minutes. If garlic looks like it might burn remove it from the pan. Turn over chops and garlic and cook until chops are browned, about 5 minutes longer for medium meat. Transfer chops to plates, leaving the garlic in the skillet.
2) Add wine, lemon juice, parsley and crushed red pepper to pan and cook, scraping up any browned bits stuck to bottom of pan, until sizzling, about 1 minute. Pour garlic and pan sauce over the lamb chops and serve immediately. Yield: 6 servings.

You might also enjoy these recipes:
Lamb and Cucumber Kebabs with Feta Sauce - Ladyberd's Kitchen
Lamb Keftedes - Edible Aria
Greek Lamb Burgers - Guilty Kitchen
Greek Roast Lamb with Potatoes with Feta - Authentic Greek Recipes
Grilled Lamb Kebabs Plus Tzatziki - Smitten Kitchen
Roasted Stuffed Lamb - Poppy Planet

Tuesday, August 3, 2010

Refrigerator Dill Pickles


From the kitchen of One Perfect Bite...Ten years ago, if asked if I put by pickles, my answer was a resounding, "No." Twenty years ago, it was a terse and less polite, "Get real." My response thirty yeas ago is best kept to myself. My failure to get with the program wasn't based on laziness, I've just never cared for preserved pickles. I thought they were salty and limp, and found their color just plain unappetizing. I wasn't a complete snob about them. I did love the brined, unprocessed dills that could occasionally be found in be found in barrels in some markets and delicatessens. I just never took the time to find out how they were made. Shortly after we moved to this area, I began to experiment with refrigerated pickles for certain Thai and Vietnamese dishes, and in the process learned I could make our favorite pickles in much the say way. I first mastered a refrigerator version of bread and butter pickles because my family loved to have them on hamburgers. I worked on garlic dills for several years but couldn't get the flavors right. I was about to give up and admit defeat when I found a recipe by Bobby Flay and decided to try one last time. I'm so glad I did. These are great pickles and they require no special equipment to make. They can be eaten the day after they are made and keep for about two weeks in the refrigerator. My only caution is to make sure you have enough room to store them for that length of time. I hope those of you who are fond of pickles will try these. You won't be sorry. Here's the recipe.

Refrigerator Dill Pickles...from the kitchen of One Perfect Bite courtesy of Bobby Flay

Ingredients:
1-1/2 cups distilled white vinegar
1/4 to 1/3 cup granulated sugar
4 teaspoons kosher salt
1 teaspoon mustard seeds
1 teaspoon coriander seeds
3/4 teaspoon dill seeds
2 cups hot water
2 pounds kirby cucumbers, sliced 1/4-inch thick
3/4 cup coarsely chopped fresh dill
3 cloves garlic, coarsely chopped

Directions:

1) Combine vinegar, sugar, salt, mustard seeds, coriander seeds and dill seeds in a heatproof bowl. Add hot water and stir until sugar dissolves and liquid is clear. Cool to room temperature.
2) Place cucumbers, garlic and dill in a large bowl. Toss to combine. Pour brine over all and turn to coat cucumbers. Cover them with a plate to weigh them down and keep them covered in brine. Cover bowl with plastic wrap and refrigerate overnight, stirring once or twice. Transfer to an airtight container and store for up to two weeks. Yield: 1 quart.

You might also enjoy these recipes:
Italian Giardiniera - Luna Cafe
Dill and Garlic Freezer Pickles - The Other Side of Fifty
Bread and Butter Pickles - Simply Recipes
Pickled Cucumber and Shallots - Indo-Chine Kitchen
Calico Pickled Salad - Drick's Rambling Cafe
Favorite Kosher Dills - Never Enough Thyme
Sweet and Spicy Watermelon Rind Pickles - One Perfect Bite

Thursday, July 29, 2010

Beginner's Whole Wheat Batter Bread


From the kitchen of One Perfect Bite...This is the first yeast bread I was taught to make. I was twelve years old at the time and learned this technique in the kitchen of a neighbor. It is a perfect beginners bread because it truly can't fail, though it does require a stand mixer or a very strong arm to make that miracle happen. This recipe makes a very wet dough that is not kneaded or shaped into loaves. The mixer does all the work. The shaggy dough is dropped into a bread pan and you can, if you wish, smooth the top a bit. Times have changed. When I first made this bread the whole wheat flour on the grocer's shelves was still called graham flour and yeast came in small cakes. I clearly remember we had to use molasses as a sweetener because honey was not yet generally available to folks living in the city. This bread has surprising flavor, a wonderful crumb and it makes great sandwiches. It can also handle the addition of nuts or seeds if you like them in your bread. It stays fresh for several days if it is wrapped and kept at room temperature. If you are new to bread baking, or have a young daughter who is interested in learning how to make bread, this is a wonderful starter recipe. It makes a lovely bread and those of you who try it will be pleased with the loaf you produce. Here's the recipe.

Beginner's Whole Wheat Batter Bread...from the kitchen of One Perfect Bite

Ingredients
:
1-1/2 cups warm water
2-1/4 teaspoons active dry yeast
2 tablespoons honey or molasses
2 cups whole wheat flour
1 cup all-purpose flour
1 teaspoon salt
2 tablespoons room temperature butter

Directions:

1) Place water in bowl of an electric mixer. Add yeast and honey or molasses. Stir to combine. Let sit for 5 minutes.
2) Set mixer to low speed. Beat in 1 cup whole wheat flour, 1/2 cup all-purpose flour, salt and butter. Increase speed to medium and beat for 2 minutes, scraping sides as needed. Reduce speed to low to add reserved 1 cup whole wheat and 1/2 cup all-purpose flour. Beat just until combined. Cover bowl with plastic wrap and let it sit in a warm spot until doubled in volume, about 1 hour.
3) Stir dough down by beating for 25 strokes with a wooden spoon. Spread dough into a greased 9 x 5 x 3-inch bread pan. Cover loosely with a flour rubbed dish towel and let rise until dough rises to top of pan, about 1 hour. A floured towel is used to prevent dough from sticking to it. Do not use plastic wrap. Dough will stick to it and deflate when wrap is removed.
4) Preheat oven to 400 degrees F. Bake bread in center of oven until it is browned and sounds hollow when tapped, about 30 minutes. Cool in pan for 25 minutes. Remove from pan and cool completely on a wire rack. Yield: 1 loaf.

You might also enjoy these recipes:
Blueberry and Lemon Batter Bread - One Perfect Bite
Stout Batter Bread - How to Eat A Cupcake
Four Grain Batter Bread - Safely Gathered In
Old Virginia Batter Bread - Foodista
English Muffin Batter Bread - Baking Bites
Whole Grain Oat-Wheat Batter Bread - More Than Tofu
Parmesan Herb Batter Bread - Adventures with the Woods

Sunday, July 4, 2010

Strawberry Cake a la Martha Stewart - Blue Monday


A touch of small town Americana for Blue Monday.

From the kitchen of One Perfect Bite...I hope you've had the opportunity to visit the beautiful and informative blog, NJ Epicurean. Several days ago, Jen, its creator, featured a strawberry cake that was originally developed by Martha Stewart. Martha's recipe and reviews of it can be found here. Strawberry yields are still high in our community, and abundant and inexpensive berries gave me the incentive I needed to try this very simple cake. We've just finished dessert and I'm happy to report the recipe produces a great snack cake. It can be quickly assembled and works well as a stand-in for strawberry short cake. The only drawback, if there is one, is that cake is very sweet and may be off-putting to those who favor European-style cakes and pastries. The cake is best served warm with a dollop of cream or a scoop of ice cream. Everyone who has reviewed the recipe also reports it is slow to stale. If properly wrapped, it will keep for several days in or out of the refrigerator. The cake takes about 10 minutes to make and that ease of assembly puts it squarely into my recipe files. I hope you will try this. Here's the recipe.

Strawberry Cake...from the kitchen of One Perfect Bite inspired by Martha Stewart

Ingredients:
6 tablespoons unsalted butter, softened, plus more for pie plate
1-1/2 cups all-purpose flour
1-1/2 teaspoons baking powder
1/2 teaspoon salt
1 cup sugar
1 large egg
1/2 cup milk
1 teaspoon grated orange zest
1/2 teaspoon vanilla extract
1/2 teaspoon almond extract
1 pound strawberries, hulled and halved
2 tablespoons pearl sugar

Directions:
1) Preheat oven to 350 degrees. Butter a 10-inch pie plate.
2) Sift flour, baking powder, and salt together into a medium bowl.
3) Place butter and 1 cup sugar in bowl of an electric mixer fitted with a paddle attachment. Mix on medium-high speed until pale and fluffy, about 3 minutes. Reduce speed to medium-low; mix in egg, milk, orange zest and vanilla and almond extracts.
4) Reduce speed to low; gradually mix in flour mixture. Transfer batter to buttered pie plate. Arrange strawberries on top of batter, cut sides down and as close together as possible. Sprinkle pearl sugar over all.
5) Bake cake 10 minutes. Reduce oven temperature to 325 degrees. Bake until cake is golden brown and firm to the touch, about 1 hour. Let cool in pie plate on a wire rack. Cut into wedges. Cake can be stored at room temperature, loosely covered, up to 2 days. Yield: 8 servings.

You might also enjoy these recipes:
Strawberry Glace Tart - One Perfect Bite
Strawberry Yogurt Pie - One Perfect Bite
Strawberry Panna Cotta - One Perfect Bite
Strawberry Frozen Yogurt - Simply Recipes
Strawberry Preserves - Los Angeles Times
White Zin-ful Strawberry Cooler - Poor Girl Eats Well

This post is being linked to:
Smiling Sally - Blue Monday

Tuesday, June 29, 2010

Red Pepper Relish


From the kitchen of One Perfect Bite...The horror! Local berries of all sorts, have simultaneously appeared on the shelves of our farmer's markets and roadside stands. The berries are fully ripened and need immediate attention if their wonderful flavor is to be captured and preserved. I've pushed the raspberries and blueberries to the side for the time being, but I'm up to my elbows, literally, in flats of strawberries. My hands look like those of a surgeon in a trauma unit and words can't begin to describe the chaos that is currently my kitchen. I've been known to chuckle, sometimes discretely, at young managers who measured their own importance by the size of their staffs. I escaped that trap when I was working, but I've succumbed to ego in my kitchen. Forgive me, just this once, as I report my "body count." That would be 18 pints of freezer jam, 12 (1-gallon) bags of flash frozen berries, eight pints of raspberry syrup and five glorious desserts that I'll be sharing with you over the next few weeks. I was making strawberry salsa when I remembered this recipe that is based on one originally developed by Michael Symon. It is a sweet, deliciously spicy relish that can make eggs and sandwiches feel important. It's also great as an alternative topping for burgers or fish. For the record, the only thing it has in common with the strawberries is its glorious red color. I was thinking red today, and it made sense to make this before I restored order to the kitchen. Here's the recipe for a wonderful and uncommon relish. It will keep for a month in the refrigerator.

Red Pepper Relish ...from the kitchen of One Perfect Bite, inspired by Michael Symon

Ingredients:
1 tablespoon olive oil
1/4 cup finely diced red onion or shallot
2 large garlic cloves, finely minced
Kosher salt
2 red bell peppers, cored, seeded and finely diced
2 jalapenos, seeded and finely diced
1 tablespoon toasted coriander seeds
1/4 cup packed brown sugar
1/4 cup white wine vinegar
1/2 cup orange juice
1/2 cup chopped fresh cilantro

Directions:
1) Add olive oil to a medium saucepan. Place over medium heat and warm until oil begins to shimmer. Add onions, garlic and a pinch of salt. Cook until onions begin to soften, about 2 minutes. Add red peppers and jalapenos and cook for 2 minutes longer. Add corainder seeds and cook for 1 minute longer.
2) Add sugar and vinegar to pan and cook, stirring, until sugar dissolves. Add orange juice and simmer, stirring occasionally, until liquid has completely reduced, about 10 minutes. Remove from heat. Cool to room temperature. Add cilantro and season to taste with salt and pepper. Refrigerate. Yield: 2 cups.

You might also like these recipes:
Blueberry Salsa - One Perfect Bite
Watermelon, Black Bean and Corn Salsa - One Perfect Bite
Thai Cucumber Relish - One Perfect Bite
Corn Relish - SlashFood
Green Tomato Relish - Mommy's Kitchen
Mango, Red Pepper and Cilantro Salsa - Cook Sister
Mango Chutney - Ciao Chow Linda