Tuesday, June 30, 2009

Beef or Chicken Wellington - Recipes to Rival Challenge


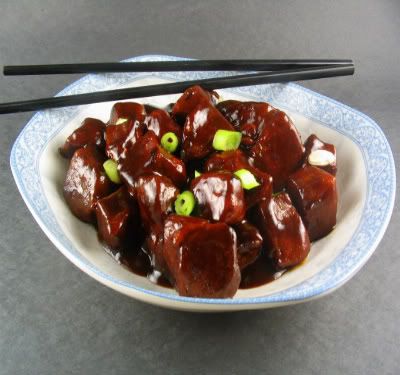
From the kitchen of One Perfect Bite...Another month has passed and it's time to post results for the Recipes to Rival Recipe Challenge for June. The event is sponsored by Lori of Lori's Lipsmacking Goodness and Temperance of High on the Hog. Our host this month was Mz Kitchen of Madame Chow's Kitchen and she picked a wonderful classic for us to try. Her choice was Beef Wellington. We didn't have to use beef tenderloin for the challenge but there could be no substitutes for puff pastry and duxelles. I learned to cook in the late sixties when Julia Child was all the rage. She captured my imagination and I went quickly from meatloaf with mac n' cheese to the cooking of provincial France with an occasional nod to haute cuisine thrown in for good measure. I was toting a baby on my hip when I first made this dish. We've had it often because it's a good dish that's guaranteed to please and impress guests. It sounds difficult to make but nothing could be further from the truth. It can be assembled in stages and popped in the oven to tan while you enjoy an aperitif with your guests. 
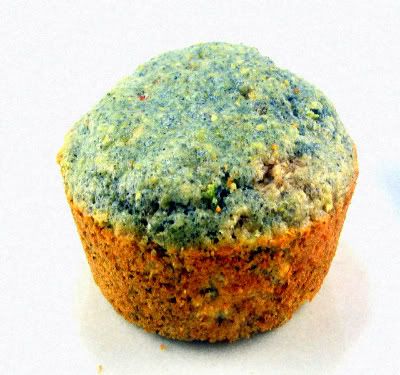
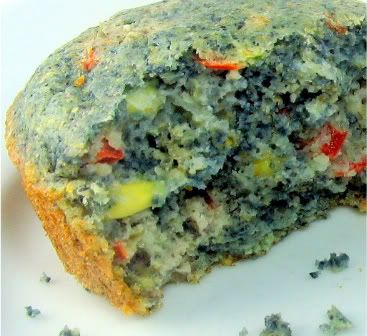
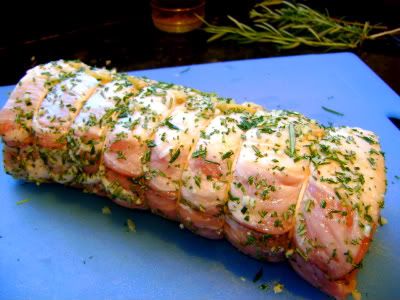
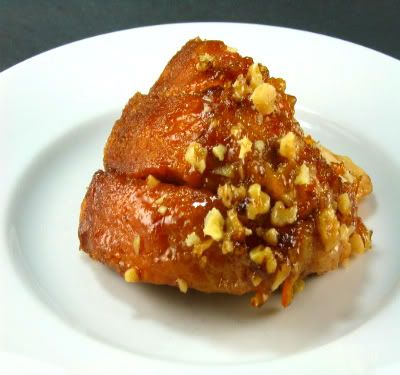
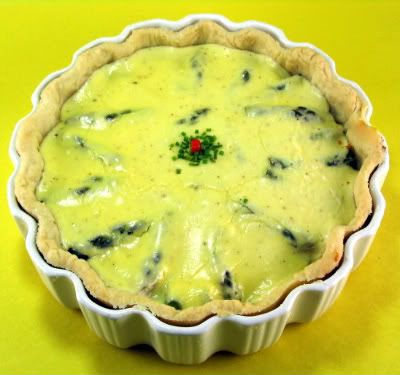
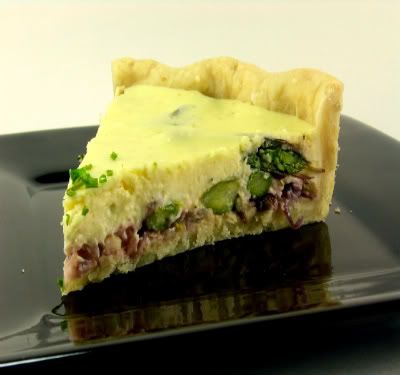
I used butter poached chicken folded around brie cheese and duxelles for the base of my Wellingtons. I have a few tricks that will make the preparation of this dish much easier. Use a potato ricer to extract moisture before sauteing the mushrooms. The duxellles must be as dry as possible in order to prevent soggy pastry. The pastry packets must be icy cold when you put them in the oven to prevent the meat or poultry from overcooking as the pastry browns. This is a dish that belongs to The Little Engine that Could School of Cooking. You need a bit of courage to start, but once you begin if you think you can you'll nail it. I'm going to include the recipe for butter poached chicken and instructions for forming the individual Wellingtons. Instructions for the duxelles can be found in the master recipe.

Butter Poached Chicken...from the kitchen of One Perfect Bite

Ingredients:
4 (6 to 8-oz.) boneless chicken breast halves
4 tablespoons butter
Salt and pepper
1 to 2 tablespoons fresh lemon juice
.
6 oz. brie cheese, softened
1/2 recipe duxelles (see master recipe)
1 package (17.3-oz.) puff pastry sheets, thawed
Egg wash (1 egg beaten with 1 teaspoon water)

Directions:
1) Preheat oven to 400 degrees.
2) Heat butter in an ovenproof casserole large enough to hold chicken in a single layer. Quickly roll chicken in butter and remove from pan. Season both sides of chicken with salt and pepper. Fold each breast in half and tie lightly with kitchen twine. This is necessary to assure chicken can be folded around filling once it's cooked. Return to casserole. Sprinkle lemon juice over chicken. Place a sheet of parchment paper over the chicken and cover with a lid. The parchment paper is used to keep the chicken from browning. Bake for 20 to 25 minutes. Remove from oven and set aside to cool.
3) Remove twine from chicken. Divide brie into 8 equal portions. Divide duxelles into 8 equal portions. Spread a portion of cheese on the inner side of each chicken breast. Cover with an equal portion of duxelles. Fold in half again. Spread a portion of cheese on top side of each breast. Top each with duxelles. Set aside.
4) Cut each pastry sheet into two pieces. Place a breast in the center of each piece and draw up sides to enclose chicken. Place on paper lined tray and refrigerate for several hours.
5) Preheat oven to 425 degrees F. Brush each packet with egg wash. Bake for 40 to 45 minutes, or until chicken is a deep golden brown. Let sit 10 minutes before serving.

Curry Trees and Curry Plants


Do you recognize this plant? It's not aquatic and, while it resembles lavender, its distinctive scent will tell you that's not so. While on a plant expedition, Bob detected the unmistakable aroma of curry and followed the scent to these immature gray plants tucked in a corner of the nursery. He was intrigued and brought them home for me to investigate. Anyone who can boil water knows that curry is a blend of spices, so, I was taken aback when my nose picked up the curry-like scent that came from the plant. A quick bite revealed a taste similar to a blend of black tea and wild greens. The flavor was strong and didn't have much to commend it, but I wanted to learn more. I'd done some rudimentary research on the leaf of the curry tree and how it was used it Asian and Indian cooking. Taste alone told me this was not a curry leaf. I wanted to learn more about the curry plant and how it differed from the tree. Google to the rescue. The curry tree above is an aromatic shrub that can grow to 6 or 7 feet tall. Its leaves are glossy, aromatic and look like bay leaves. They have a mild citrus flavor and are used in curries in India, Bangladesh and Sri Lanka. The gray curry plant shown at the beginning of this entry has little, if any, culinary value. You can blend a very small amount of it with cream cheese or mayonnaise to make a passable spread but it's not a dip you'll dream about or yearn for. It real value lies in its essential oils and those do have some medicinal value. That doesn't do much for gardeners or cooks. That leaves us with that lovely fragrance that's released each time a branch is cut or bruised. If you love the aroma of curry, this plant's for you. Otherwise it's a classic case of caveat emptor.

Monday, June 29, 2009

Parmesan Crisps - Oregon Wine Country - Outdoor Wednesday


From the kitchen of One Perfect Bite...The wineries along the Lorane Highway in Oregon owe much to money that was made by electronic and computer moguls towards the end of the 20th century. That money enabled imagined ventures in Oregon's booming wine industry to become realities. The best, and I must admit most wonderful example of dreams come true, is the vinery at King Estates. When seen from the highway the estate looms above the valley floor. A bit of imagination will transfer you in time and place to the chateaus of the Loire Valley, especially when lavender and sunflowers are in bloom. The estate has been developed in stages and now encompasses a wonderful restaurant as well as a tasting facility. It is a remarkably civilized spot with gorgeous vistas and I love to visit here. The chef has developed an herb garden that is open to the public and it adds another layer of old world charm to the grounds. A few miles down the highway is Chateau Lorane. It sits on the banks of Lake Louise which is part of the winery grounds. No grapes are grow here but wine is made and bottled for distribution throughout the region. The winery and other structures on the property are for sale for 5 million dollars. I've put my family on notice - if I win a lottery this will become their ancestral home. When we serve wine apart from a meal, I like to serve a cheese board and kindred finger food. One of my favorite small plate items is Parmesan crisps. I found the recipe on which these are based at Cook Sister! They're easy to do and any leftover crisps are wonderful salad toppers. Here is the recipe.

Parmesan Crisps...from the kitchen of One Perfect Bite

Ingredients:
3 cups finely grated Parmesan-Reggiano cheese
Caraway seeds or red pepper flakes

Directions:
1) Preheat oven to 400 degrees F. Cover a large baking sheet with parchment paper.
2) Using 2 tablespoons per crisp, form a mound on the baking sheet and flatten slightly with back of spoon. Leave at least an inch between mounds and edges of pan. The baking sheet will hold 8 to 12 crisps depending on how they are spaced. Bake for 5 minutes. Remove from oven and quickly sprinkle with caraway. Allow to cool and carefully remove from parchment paper. Continue process until all cheese has been used. Yield: 24 cheese crisps.

Cook's Note: Any hard grating cheese may be used. Crisp are best eaten the day they are made.

I'm sending this to Outdoor Wednesday, an event sponsored by Susan at A Southern Daydreamer.

Sunday, June 28, 2009

Red Cooked Pork - Girl with Red Ribbon - Ruby Tuesday


From the kitchen of One Perfect Bite...We call her "The Girl with Red Ribbons" and thought she was a fit subject for the Work of the Poet: Ruby Tuesday meme. She was a lovely child. The photograph was taken in an outdoor cafe in the Muslim quarter of Xi'an China. The call to prayer had interrupted her meal and she was fascinated by the stream of believers pouring into the mosque compound. Though the area was a Muslim enclave, the restaurants outside the mosque served an incredible array of food, including pork. Obviously, not all the merchants and visitors were Muslim, so it was only mildly surprising that red cooked pork was a popular item in the cafes. Today's recipe is for an incredibly good version of red cooked pork. When this is made with pork belly or not-to-lean pork ribs you have the makings of an unbelievably easy feast. My friends and teachers, Lily, at Lily's Wai Sek Hong, and Ning, at Heart and Hearth have wonderfully authentic recipes for this great entree. Here's my westernized version of the classic.

Red Cooked Pork...from the kitchen at One Perfect Bite
1-1/2 pounds pork belly or boneless pork ribs cut into two inch cubes
3 tablespoons vegetable oil
2 tablespoons sugar
3 cloves of garlic peeled
3 whole star anise
2 tablespoons soy sauce
1/4 cup Shaoxing wine, mirin or dry sherry
1 can (14.5-oz.) reduced sodium chicken broth
1 teaspoon cornstarch
1 tablespoon water
Garnish: chopped scallions

Directions:
1) Melt sugar in vegetable in a medium pot over medium high heat. Cook, stirring, until sugar is slightly brown, about 3 minutes. Add pork cubes to pan and cook in caramelized sugar until brown on all sides, about 8 minutes.
2) Place garlic, star anise, dark soy sauce, rice wine and broth in pot. Simmer, covered, over low heat for about 40 minutes, stirring occasionally. Transfer meat to a bowl and tent with foil. Boil sauce to reduce by half. Dissolve cornstarch in water and add to pan. Stir until sauce comes to a boil and begins to thicken. Return meat to pan. Toss in sauce until all surfaces are coated. Transfer to a platter, garnish with scallions and serve hot. Yield: 4 servings.

Saturday, June 27, 2009

Blue Corn Muffins - Blue Monday


From the kitchen of One Perfect Bite...
Adventurers climb mountains because they are there, folks who love good food experiment with ingredients for the same reason. My first encounter with blue cornmeal was a dirty looking chip with no cache. It looked terrible but the flavor wasn't bad. While it was grainier than its yellow or white cousins, it was sweet and hearty and had the lingering taste of earth about it. The Native Americans of the Southwest call blue corn Hopi corn and it has spiritual importance to them. It represents the rising sun and the beginning of life, wisdom and understanding. Blue cornmeal comes from the dried blue kernels of corn grown on plateaus and mesas in New Mexico and Arizona. It's not always a true blue and when it's on the cob it has a hue more purple than blue. When ground it appears to be a very pale, almost white, lavender that on close inspection is flecked with grains of blue that are photochromic. The picture to the left has not been doctored in any way. It was taken at noon on a very sunny day and this is what the camera saw. I've been working on Southwestern-style meals for a family gathering planned for later this summer, so it was a natural progression to begin experimenting with blue corn. When I found an old Bobby Flay recipe for blue corn muffins I was hooked and this is what my first foray into the world of blue corn produced. I can't tell you how much I enjoyed these. I will make them any time I can - even for breakfast. They are packed with flavor and have a wonderful moist crumb that's hard to resist. I really hope you'll try these. They are down-home wonderful.

Blue Corn Muffins
...from the kitchen of One Perfect Bite

Ingredients:
2 ounces (1/2 stick) unsalted butter
3 tablespoons onion, finely diced
1 clove garlic, finely chopped
1/2 cup milk
2 large eggs
1/4 cup red bell pepper, finely diced
1 jalapeno peppers, finely diced
1/4 cup fresh or frozen corn, thawed
1 tablespoon finely chopped cilantro leaves
3/4 cup blue cornmeal (can substitute yellow)
1/2 cup all-purpose flour
1 1/2 teaspoons baking powder
1/4 teaspoon baking soda
1/2 teaspoon salt
1 tablespoon granulated sugar

Directions:
1) Adjust a rack to middle-third of oven and preheat to 400 degrees F. Grease a 6 slot muffin pan with non-stick vegetable spray. Set aside.
2) Melt butter in a small saucepan; add onions and garlic and cook until soft. Set aside to cool.
3) In a large mixing bowl, combine milk, eggs, bell pepper, jalapeno, corn and cilantro. Whisk in butter mixture. Set aside.
4)In a separate bowl, combine cornmeal, flour, baking powder, soda, salt and sugar. Whisk to combine. Mix into the liquid mixture.
5) Divide batter evenly among the 6 muffins slots and bake for 16 minutes or until set, turning pan once for even baking. Yield: 6 muffins

I'm send this to Smiling Sally for her Blue Monday event.

Thursday, June 25, 2009

Raspberry Ripple for Foodie Friday and Pink Saturday


From the kitchen of One Perfect Bite...This is a lovely summer dessert that's assembled rather than made. It's perfect for a backyard wedding or a graduation party. I've used raspberries in this version but strawberries would be lovely as well. To make the ripple you'll need six cups of vanilla ice cream, a pint of heavy cream, two cups of raspberries and some patience. It is really simple to do. You'll need to begin this the day before it is to be served. I molded my version in a loaf pan and slice it for serving. If you prefer, an easier option is to scoop the ice cream into cups or cones for serving. Once the berries have been pureed, taste them for sweetness and adjust to taste with sugar. If you have framboise in the house a tablespoon or two would certainly do no harm. I like this dessert for its simple goodness. Your guests will think you've fussed for them and they'll love the way it tastes.

Raspberry Ripple...from the kitchen of One Perfect Bite

Ingredients:
2 cups fresh raspberries
Sugar to taste
Framboise (optional)
2 cups heavy cream
1-1/2 quarts vanilla ice cream
Whole raspberries for garnish

Directions:
1) Line a 9 x 5-inch bread pan with foil.
2) Puree raspberries in a blender. Pour into a medium bowl and set aside. Add sugar to taste. Add framboise if using. Move ice cream from freezer to refrigerator and allow to soften (not run). Beat heavy cream until soft peaks form. Fold cream into the raspberry puree. Pour mixture into a metal pan; place in freezer and chill until mixture thickens and begins to freeze. Do not allow to freeze through. When half frozen remove from freezer and beat well.
3) Spoon mounds of softened ice cream into prepared pan. Spoon raspberry mixture between mounds of vanilla ice cream. Use a sharp knife to swirl layers.
4) Transfer pan to freezer. Freeze for about 2 hours. When half frozen smooth edges of ice cream, then freeze overnight. When ready to serve cut into slices. Garnish with whole raspberries if desired. Yield: 8 to 10 servings.


I'm sending this recipe to Michael at Designs By Gollum for Foodie Friday, the event she sponsors.

I'm also sending it to Beverly at How Sweet the Sound for her Pink Saturday Event.

Wednesday, June 24, 2009

Arista - Tuscan Herbed Roasted Pork


From the kitchen of One Perfect Bite...
A few weeks ago I was notified that my blog had been randomly selected as the winner of a Foodie Blogroll giveaway and that I would receive an autographed copy of Judy Francini's new book, Secrets from My Tuscan Kitchen. When the book arrived I spent an evening paging through it and selecting recipes I wanted to try. Arista - today's recipe - is a Tuscan pork roast similar to the Tuscan Pork Loin, already on my blog. I wanted to compare it to my own. A glance through the ingredient list left no doubt that the pork would be flavorful. A glance at the directions raised a concern. I thought the specified roasting time would produce a dry roast. I was right on both counts. The roast is wonderfully flavorful. It's stuffed with a mixture of garlic and rosemary and basted with wine and olive oil as it cooks. The recipe calls for an hour and forty minutes of roasting. That's way too long for our taste. I pulled the roast from the oven when my meat thermometer read 140 degrees F. At that point the roast had been in the oven for a bit over 60 minutes. I tented it with foil and let it sit for another 15 minutes before slicing it. It was wonderful. There is one other change I'll make the next time I prepare this. The roast is cut, book fashion, almost in half to create a bed for the herb rub. In the future, I cut the roast into thirds to create a larger surface for the herbs. I used a dry French vermouth and a good olive oil for basting the roast. I served it with Parmesan mashed potatoes and roasted asparagus. If you like well flavored foods, I urge you to give this recipe a try. It's easy to do and inexpensive in the great scheme of things. Manga!

Arista - Tuscan Pork Roast...from the kitchen of One Perfect Bite

Ingredients:

2-1/2 pounds boneless pork roast
3 whole cloves of garlic, peeled and sliced
1 large branch fresh rosemary, about 1/2 cup
Kosher or sea salt
Fresh ground black pepper
Optional: sage, fennel seeds
1/4 cup olive oil
1 cup white wine

Directions:
1) Preheat oven to 400 degrees.
2) Remove rosemary leaves from branch an put on a cutting board. Top with garlic, 1 teaspoon salt and 1/4 to 1/2 teaspoon pepper. If you are using sage and fennel seeds they should be added now. Chop finely.
3) With a sharp knife, cut pork in almost in half lengthwise. Rub inside of roast with herb mixture. Close and tie with string. Rub outside of roast with any remaining herbs.
4) Place in oven for 10 minutes. Baste with wine and olive oil. Lower heat to 375 degrees F. Cook for 1-1/2 hours, basting frequently. Tent with foil and let sit for 15 minutes before slicing. Yield: 6 to 8 servings.

Tuesday, June 23, 2009

Buttermilk Tarts - Outdoor Wednesday


From the kitchen of One Perfect Bite...Walking this angular path began a reverie that led me back to the gardens of my childhood. The homes in that neighborhood sat on small city lots whose gardens were nothing more than rectangular borders that repeated from one house to the next. These beds began with a row of white sweet alyssum that was backed in turn by the tiered support of blue argeratum, gold marigolds and red geraniums. The more creative neighbors managed to insert salvia and snapdragons into the borders and that made the riot of colors even more explosive. Occasionally, there'd be a patch of gem toned cannas, the old Victorian type, that towered over tiny four foot gardeners learning how to weed. To the eyes of a child these gardens were like a box of crayons and gorgeous in the order of their rigid symmetry. They were planted from seed, watered by hand and tended with great care. Buried deep within a woman's genome there must be something that drives the creation of beauty where none exists. These old city gardens were proof of that. They were nursed to life with a dollar's worth of seed in gravel, clay and sand. I've seen lots of gardens and created many of my own but none are as treasured or remembered with such fondness as those of my childhood. It is a tender mercy.


Memories of childhood desserts go hand in hand with those of city gardens. There were puddings and myriad pies of fruit and custard, and every once in a while buttermilk pie, a personal favorite, would appear on the table. The pie, while delicious, is not photogenic, so, I decided to use the buttermilk custard as a base for glazed tarts that look more appetizing. The tarts are covered with a thin layer of fruit preserves to add color and make them sparkle. I really prefer the pie au natural, but if you need eye candy the tarts are a better way to go. Buttermilk pie is the economical precursor to cheesecake. It's bite comes from low-fat buttermilk and sour cream that's been perked up with freshly grated lemon zest. That background flavor that plays on the tongue is cardomom. I love to make this at the height of berry season. It's really creamy and delicious.


Buttermilk Tarts...from the kitchen of One Perfect Bite

Ingredients:
Pastry for a 2 crust pie
4 tablespoons melted butter
3 egg yolks
2 cups low-fat buttermilk
1 cup reduced-fat sour cream
Zest of 1 large lemon
1 tablespoon lemon juice
1/2 teaspoon salt
3 tablespoons flour
1 teaspoon cardamom
1 cup sugar
Optional: Fruit glaze

Directions:
1) Preheat oven to 400 degrees F.
2) Roll pastry on a well-floured surface. If making tarts, cut dough to fit 12 4-inch tart pans. If making a pie, cut pastry to fit a 10-inch deep dish pie pan. Set aside.
3) Combine melted butter, egg yolks, buttermilk, sour cream, lemon zest and juice, salt, flour, cardamom and sugar in a large bowl. Whisk to combine.
4) Pour into pie or tart shells and bake for 60 to 75 minutes, or until set. Cool on a wire rack. Topped cooled pastry with fruit glaze, if using. Yield: 1 10-inch pie or 12 4-inch tarts.

Recipe adapted from Saveur magazine.

I'm sending this to Outdoor Wednesday, an event sponsored by Susan at A Southern Daydreamer.

Monday, June 22, 2009

Scallops Provencal


From the kitchen of One Perfect Bite...I love scallops. Of all the things we take from the sea they are my hands down favorite. They have a history that dates back to Marco Polo who talked about them being sold in the markets of China. Not only are they rich, sweet and tender, they're also affordable. The name, by the way, comes from the French word escalope which means shell. Scallops need to move in order to stay alive, so we won't find them in their shells at the fish market. The part we are sold is actually the "adductor" muscle. Their color can range from pale beige to pink and they should look moist and smell fresh. They should never look pure white. White scallops usually have been sitting in water which causes them to lose nutrients as well as color. To assure freshness, I actually prefer to buy them flash frozen at the market and thaw them in the refrigerator. There are three basic sizes of scallops. The sea scallop is the largest; it's followed in size by bay and, finally, the tiny calico scallop. They have the advantage of cooking quickly and adapting themselves to various sauces. This recipe comes from Ina Garten. I think you'll enjoy this dish.

Scallops Provencal
...from the kitchen of One Perfect Bite

Ingredients:
1 pound fresh bay or sea scallops
Kosher salt
Freshly ground black pepper
All-purpose flour for dredging
4 tablespoons (1/2 stick) unsalted butter, divided
1/2 cup chopped shallots (2 large)
1 garlic clove, minced
1/4 cup chopped fresh flat-leaf parsley
1/3 cup dry white wine
1 lemon, cut in half

Directions:
1) If you're using bay scallops, keep them whole. If you're using sea scallops, cut each one in half horizontally. Sprinkle with salt and pepper, toss with flour, and shake off the excess.
2) In a very large sauté pan, heat 2 tablespoons of butter over high heat until sizzling and add a single layer of scallops. Lower the heat to medium and allow scallops to brown lightly on one side without moving them, then turn and brown lightly on the other side. This should take 3 to 4 minutes total. Melt remaining butter in the pan with scallops; add shallots, garlic, and parsley and sauté for 2 more minutes, tossing the seasonings with the scallops. Finally, add wine and cook for 1 minutes longer. Pan sauce will thicken slightly. Adjust seasoning to taste to salt, pepper and lemon juice. Serve immediately: Yield 3 to 4 servings.

Recipe adapted from the Barefoot Contessa in Paris by Ina Garten.

Sunday, June 21, 2009

Morning Glory Petal Bread - Blue Morning Glories for Blue Monday


From the kitchen of One Perfect Bite...I found this sport of a Heavenly Blue Morning Glory in the far green house of an obscure nursery that Bob and I found when we moved to Oregon. The twice retired giant who runs the place won't sell it to me. It was his mother's favorite flower, so each year he captures seeds to propagate and produce vines worthy of her memory. This edgy man now shuffles with stooped shoulders as he goes about his tasks. He's a decorated combat veteran who returned home to raise a family and mind the family business. Age took his wife and mother. Combat took his son. His gardens still remain. I've been privileged to see them. The trellis in the garden behind the house is smothered by artfully twisted, climbing vines overlain with the heavenly blue flowers I so want to be mine. Protected by a willow planted the year his boy was born and engulfed in the fragrance of the rose hedge his wife tended, we have our coffee and repeat the game we've played for years. I ask for seeds I know I won't receive, but learn more each year about this gentle man and his passion for this quiet spot and the land that he has turned. Some folks buy headstones, he propagates flowers and tends the earth. I suspect his family would love the monument he's created for them.


One of life's simple pleasures is morning coffee in the garden. It's made sweeter still with a crusty baguette or sweet pastry. Morning Glory Petal Bread is perfect for breakfast in the garden. It's a wonderful flower shaped confection whose petals are sugar dipped biscuits that are pulled apart for eating. It's assembled rather than made and it's one of my secret weapons for company breakfast or brunch. The recipe first appeared as Orange Marmalade Coffee Cake in the 1999 Ultimate Southern Living Cookbook. I urge you to play with this recipe until you're comfortable with amount of fat and sugar you are using. I've altered the original recipe to use a soft spread that tastes like butter. I also reduced the amount of marmalade used in its preparation. As to sugar, I've used a combination of golden brown and granulated sugar but have not cut back on the original measurement. My changes to the base recipe appear in red. I urge you to try this when you need a special dish for breakfast or brunch. It takes 5 minutes to assemble and its absolutely delicious.

Morning Glory Petal Bread...from the kitchen of One Perfect Bite

Ingredients:
1/2 to 2/3 cup sweet orange marmalade
2 tablespoons (or more to taste) chopped walnuts
1/2 cup granulated sugar
1/2 cup golden brown sugar
1-1/2 teaspoons ground cinnamon
2 (approximately 12 ounce) cans of refrigerated buttermilk biscuits
1/2 cup melted soft spread (i.e. I Can't Believe It's Not Butter)

Directions:
1) Preheat Oven to 350 degrees F. Spray a 12-inch Bundt pan with nonstick baking spray. Set aside.
2) Spread marmalade in bottom of Bundt pan. Sprinkle with walnuts.
3) Melt soft spread and place in a small bowl. Combine sugars and cinnamon in a small bowl. Separate biscuits, dip each into soft spread, dredge in cinnamon-sugar and place, standing up, evenly around the edges of Bundt pan. Drizzle any remaining soft spread over biscuits and sprinkle with any remaining cinnamon-sugar mixture.
4) Bake for 45 to 50 minutes, or until top is a deep golden brown. Cool on a pan on a wire rack for 10 minutes. Invert onto a platter and serve immediately. Yield: 8 servings.

I'm send this to Smiling Sally for her Blue Monday event.

It will also go to Color Outside the Lines for Share A Garden Sunday.

Friday, June 19, 2009

Coleslaw with Creamy Buttermilk Dressing


From the kitchen of One Perfect Bite...When thinking about a salad to accompany a picnic or barbecue, coleslaw is arguably everyone's first choice. It's inexpensive to make and easy to assemble. This version uses a package of shredded cabbage and a simple buttermilk dressing that you can put together in minutes. The dressing is wonderful for any salad. If you'd like to wilt the cabbage before dressing the slaw, put it in a colander, toss it with a teaspoon of salt and let it sit for an hour or so at room temperature. Then rinse it with plenty of cold water and pat it dry. If your packaged slaw contains red cabbage be forewarned that it will bleed into your finished salad if allowed to sit too long. You may or may not want that. Here's the recipe for the slaw and the buttermilk dressing.

Coleslaw with Creamy Buttermilk Dressing...from the kitchen of One Perfect Bite

Ingredients:
1 (10-oz.) package confetti slaw
2 tablespoons finely minced shallots or scallions
1-1/2 tablespoons low-fat sour cream
1-1/2 tablespoons low-fat mayonnaise
1-1/2 teaspoons white wine vinegar
1/4 teaspoon granulated sugar
1/4 cup low-fat buttermilk
1/8 teaspoon freshly ground black pepper

Directions:
1) Place confetti slaw in a large bowl. Set aside.
2) Place shallots, sour cream, mayonnaise, vinegar, sugar, buttermilk and pepper in a 2 cup jar with a lid. Shake to combine.
3) Pour dressing over slaw and toss to combine. Refrigerate until well chilled. Yield: 4 servings.

Thursday, June 18, 2009

Iced Watermelon Drinks - In the Pink for Foodie Friday and Pink Saturday


From the kitchen of One Perfect Bite...For years we thought that watermelon was a source of empty calories. Advances in food science and nutrition have proved that not to be the case. While the typical melon is 92% water we've learned that it also contains nutrients, vitamins and minerals. Best of all, it's low in calories and is no longer just a summer food; it's available year-round and, especially important to green kitchens, almost every part of it is edible. I decided it was time to revisit the watermelon. My culinary adventure worked its way through salads and salsas before moving on to sorbets and smoothies. While experimenting with a slushie, I started to think of summer drinks so cold they could quench the thirst of the steamiest summer day. I did a little searching and with the help of Eating Well Recipes I was able to find two recipes that could do just that. One contains alcohol, the other doesn't. Both are gorgeous to look at and when served icy cold they're potential rivals for iced tea and lemonade. Because melons vary in their sweetness, you'll want to adjust sugar content as you go along. The small amount of sugar in these recipes may not be sufficient to your taste. Add more if needed, but do it cautiously. While you can put more in, you can't take it out. I like both these recipes and will prepare them often this summer. I serve them with cubed frozen watermelon instead of ice. A truc to share; use pitchers of different shapes to store alcoholic and non-alcoholic drinks, so there'll be no surprises as the day wears on.


Watermelon Agua Fresca...from the kitchen of One Perfect Bite

Ingredients:
8 cups cubed seeded watermelon (about 6 pounds with the rind), divided
1 cup water, divided
1/3 cup sugar, divided
1/4 cup fresh lime juice
4 cups club soda or seltzer water, well chilled
Lime slices or mint for garnish (optional)

Directions:
1) Combine half the watermelon, half the water and half the sugar in a blender; puree. Pour through a coarse strainer into a large container. Repeat with the remaining watermelon, water and sugar. Stir in lime juice. Refrigerate until well chilled, about 4 hours.
2) To serve, stir in club soda (or seltzer) and garnish with lime. Yield: 10 cups.

Cook's Note: Watermelon base may be refrigerated for up to 2 days.


Watermelon Gin Fizz...from the kitchen of One Perfect Bite

Ingredients:
5 cups diced watermelon, divided
6 ounces gin, divided
8 tablespoons lime juice, divided
1-1/3 cups ginger ale, divided
Lime wedges or mint for garnish

Directions:
1) Freeze 1 cup watermelon for garnish. Puree the remaining 4 cups watermelon. Strain; divide the juice among 4 ice-filled glasses.
2) Top each with 1 1/2 ounces gin, 2 tablespoons lime juice and 1/3 cup ginger ale. Garnish with the frozen watermelon and mint or lime wedges. Yield: 4 servings.

I'm sending this recipe to Michael at Designs By Gollum for Foodie Friday, the event she sponsors.

I'm also sending it to Beverly at How Sweet the Sound for her Pink Saturday Event.

Wednesday, June 17, 2009

Buttermilk Spice Cake with Cream Cheese Frosting


From the kitchen of One Perfect Bite...
No picnic would be complete without something sweet to eat and I've been waiting for an excuse try this mildly spiced cake from Cook's Illustrated. I made the cake to their specifications and the recipe that appears here is an unaltered copy of the one that appears on their website. It produced a light cake with a tang from the buttermilk and cream cheese that's used in its preparation. While the cake is perfect for picnics or homely affairs on the deck, it's not easy to make and the end result is a good, not great, cake. I will make it again but will increase the quantity of spices that I use. Here's the recipe.

Buttermilk Spice Cake with Cream Cheese Frosting...from the kitchen of One Perfect Bite

Ingredients:
Cake
2 1/4 cups unbleached all-purpose flour (11 1/4 ounces), plus extra for dusting pans
1 tablespoon ground cinnamon
3/4 teaspoon ground cardamom
1/2 teaspoon ground allspice
1/2 teaspoon ground cloves
1/4 teaspoon ground nutmeg
16 tablespoons unsalted butter (2 sticks), softened
1/2 teaspoon baking powder
1/2 teaspoon baking soda
1/2 teaspoon table salt
2 large eggs at room temperature
3 large egg yolks at room temperature
1 teaspoon vanilla extract
1 3/4 cups granulated sugar (12 1/4 ounces)
2 tablespoons light molasses or mild molasses
1 tablespoon grated fresh ginger
1 cup buttermilk , at room temperature
Frosting
5 tablespoons unsalted butter , cut into 5 pieces, softened
1 1/4 cups confectioners' sugar (4 1/2 ounces)
8 ounces cream cheese , cut into 4 pieces , softened
1/2 teaspoon vanilla extract
3/4 cup coarsely chopped walnuts, toasted (optional)

Directions:
1) For the cake: Adjust oven rack to middle position and heat oven to 350 degrees. Grease and flour 13- by 9-inch baking pan. Combine spices in small bowl; reserve 1/2 teaspoon for frosting.
2) Heat 4 tablespoons butter in 8-inch skillet over medium heat until melted, 1 to 2 minutes. Continue to cook, swirling pan constantly, until butter is light brown and has faint nutty aroma, 2 to 4 minutes. Add spices and continue to cook, stirring constantly, 15 seconds. Remove from heat and cool to room temperature, about 30 minutes.
3) Whisk flour, baking powder, baking soda, and salt in medium bowl. In small bowl, gently whisk eggs, yolks, and vanilla to combine. In standing mixer fitted with paddle attachment, cream remaining 12 tablespoons butter with sugar and molasses at medium-high
speed until pale and fluffy, about 3 minutes, scraping down sides and bottom of bowl twice with rubber spatula. Reduce to medium speed and add cooled butter and spice mixture, ginger, and half of egg mixture; mix until incorporated, about 15 seconds. Repeat with remaining egg mixture; scrape down bowl again. Reduce to low speed; add about one-third flour mixture, followed by half of buttermilk, mixing until just incorporated after each addition, about 5 seconds. Repeat using half of remaining flour mixture and all of remaining buttermilk. Scrape bowl and add remaining flour mixture; mix at medium speed until batter is thoroughly combined, about 15 seconds. Remove bowl from mixer and fold batter once or twice with rubber spatula to incorporate any remaining flour.
4) Transfer batter to prepared pan; zigzag tip of metal spatula through batter, pulling it to pan edges. Lightly tap pan against counter 3 or 4 times to dislodge any large air bubbles; smooth surface with spatula.
5) Bake until toothpick inserted in center of cake comes out clean, 32 to 37 minutes. Cool cake to room temperature in pan on wire rack, about 2 hours.
6) For the frosting: In bowl of standing mixer fitted with paddle attachment, beat butter, sugar, and reserved 1/2 teaspoon spice mixture at medium-high speed until light and fluffy, 1 to 2 minutes. Add cream cheese one piece at a time, beating thoroughly after each addition. Add vanilla and beat until no lumps remain, about 30 seconds.
7) Run paring knife around edge of cake to loosen from pan. Using spatula, spread frosting evenly over surface of cake. Sprinkle cake with walnuts, if using. Cut into squares and serve. Yield: 12 to 16 servings.

I'm going on a picnic and I'm bringing Buttermilk Spice Cake. My letter is B.

Tuesday, June 16, 2009

Ultimate Cheater Pulled Pork - International Picnic Day - Outdoor Wednesday


From the kitchen of One Perfect Bite...
Tomorrow is International Picnic Day; a day, that in my book, should be spent communing with nature in places of incredible beauty while consuming food meant for the gods. I'm no slouch when it comes to picnics. I earned my merit badge when the children were small and we'd cycle to the park. My bicycle had the air of an armoured personnel carrier about it. Each child had a bicycle seat; one child rode in front, the other in back and a wicker basket, strapped to the handle bars, held our feast. In retrospect, it's a miracle we all weren't killed, but this was long before bicycle helmets or accident statistics concerned anyone and I did have one spiffy safety feature - a ring-a-ding bell that kept other drivers at bay. Can you hear it? We made lots of PB&J sandwiches back then. Our picnics changed with the times and the repertoire now includes delights from France, Italy, Spain, Vietnam and Texas - yes Texas. Texas barbecue became a favorite of mine once I'd learned how to order and make it. My first foray - in Texas - was a real bust. I asked for, and received, Texas-style barbecue. I expected a warm bun smothered by a pile of shredded pork that dripped barbecue sauce. I received a slice of spongy white bread and a pile of unsauced brisket on a paper plate. Disappointed doesn't begin to describe my reaction. Fortunately, I'm a fast learner and can handle myself pretty well at a Texas barbecue these days. A few months ago I was thrilled to find a crock-pot recipe for pulled pork at The Splendid Table; it's called Ultimate Cheater Pulled Pork and it's extraordinarily good. They reprinted it from Cheater's BBQ: Barbecue Anytime, Anywhere, In Any Weather by Mindy Merrell and R. B. Quinn. Their recipe is so good that I threw away one I'd used for years. The recipe utilizes a rub and does not include a sauce, so you can use your favorite barbecue sauce after the meat has been pulled. The recipe calls for 1/2 cup liquid smoke. That's not a mistake. I've just checked the labels of three brands of smoke because I thought that might be a concern to you. They all contain just 2 ingredients; water and liquid smoke. Liquid smoke is a condensate that forms when wood chips or sawdust is burned. It is passed through water to create a solution that can be bottled. I am not a food chemist, but that seems safe enough to me. I have a large pork butt simmering in the crock-pot for our picnic tomorrow. I'll pack it in an insulated container and reheat it on a grill when we're ready to eat. I really like this recipe. I think you will, too..

Ultimate Cheater Pulled Pork...from the kitchen of One Perfect Bite

Ingredients:
Cheater Basic Dry Rub
1/4 cup paprika (I use sweet and smoky Spanish Pimenton)
2 tablespoons kosher salt
2 tablespoons coarsely ground black pepper
1 tablespoon garlic powder
1 tablespoon dry mustard
Cheater Pulled Pork
1 (5 to 6-pound boneless pork butt
1/4 cup Cheater Basic Dry Rub (see above)
1/2 cup bottled smoke
Barbecue sauce of your choice

Directions:
1) To make Cheater Dry Rub, combine all ingredients in a jar with a tight-fitting lid. Shake to blend. Yield: 2/3 cup.

2) To make Cheater Pulled Pork: Cut pork butt into 3 or 4 large pieces. Place into a 5-quart slow-cooker. Sprinkle meat with 1/4 cup rub, turning pieces to coat evenly. Add bottled smoke. Cover and cook on HIGH for 5 to 6 hours or on LOW for 10 to 12 hours. Using tongs and a slotted spoon, transfer meat to a rimmed platter or baking sheet. Let rest until cool enough to handle. Pull meat into strands. Serve piled on buns with your favorite barbecue sauce. To serve barbecue later, cover and refrigerate meat when it has cooled. Pour meat juice into a separate container and refrigerate. Before reheating juices, skim and discard congealed fat layer that forms on top. To reheat barbecue, place in a saucepan moistened with some reserved juice. Gently heat on medium low, stirring occasionally. Alternatively, place it in a covered casserole with some reserved juice and heat in a 350 degree F oven for 20 to 30 minutes. While meat warms, combine barbecue sauce and some of remaining meat juice in a small saucepan. Heat through and serve with pulled pork. Yield: 10 to 12 servings.

I'm sending this to Outdoor Wednesday, an event sponsored by Susan at A Southern Daydreamer.

I'm also going on a picnic and I'm bringing pulled pork. My letter is U.

Monday, June 15, 2009

Blackberry Sherbet - A Three Ingredient Wonder


From the kitchen of One Perfect Bite... Is it ice cream, gelato, sherbet or sorbet? There're a lot of names for frozen desserts, but do you know the difference between them? Here are the basics. Ice cream is a frozen mixture of cream, milk, flavorings and sweeteners. Air is introduced to the mixture during the whipping process and up to 60% of its volume is air that will give it a light and fluffy texture. Ice creams are divided into categories depending on how much butterfat they contain. A premium ice cream has an 11% to 15% butterfat content. Regular ice cream contains 10% to 11% butterfat. A light ice cream contains 50% less fat or 33% fewer calories than the regular ice cream. Gelato is Italian style ice cream. It differs from American ice cream in the amount of air that is beaten into it during the whipping product. Gelato contains less air than it's American counterpart (20% air for gelato and up to 60% air for ice cream). As a result it is denser and more intensely flavored than ice cream. Sorbet is made from fruit purée that is whipped and frozen and can include additional herbs and flavorings. It contains no milk or cream. Sherbet is a fruit based ice that has milk added for creaminess, but, by law, it can contain no more than 2% butterfat. Today's recipe is a sherbet that's made from a blackberry purée and buttermilk. This cream has an intense berry flavor. While it breaks my heart to say this, this sherbet is really not for children unless they are outdoors and wearing swim suits. It melts quickly and it will stain. The sherbet uses just 3 ingredients and can be made without an ice cream freezer as long as it is kept very cold. The recipe comes from Taste of Home magazine.

Blackberry Sherbet
...from the kitchen of One Perfect Bite

Ingredients:
4 cups fresh or thawed frozen blackberries
1 to 2 cups granulated sugar
2 cups low-fat buttermilk

Directions:
1) Place berries in bowl of a food processor; cover and process until smooth. Add 1 to 2 cups sugar (dependent on your sugar quotient) to puree and process until well combined. Strain mixture, discarding seeds and pulp. Stir in buttermilk. Transfer to a 9 x 13-inch dish. Freeze until edges of mixture begin to firm, about 2 hours. Stir and return to freezer. Freeze until firm, about 2 hours longer.
2) Just before serving, scrape mixture into bowl of a food processor; cover and process until smooth. Scrape mixture into 8 (6-oz.) bowls and serve. Alternatively, return to 9 x 13-inch pan and freeze again. Scoop into bowls with an ice cream scoop. Yield: 8 servings.

Sunday, June 14, 2009

Lemony Buttermilk Bliss Bars - On A Blue Plate for Blue Monday


From the kitchen of One Perfect Bite...I love the contrast of these pale yellow bars on the cobalt blue plate. Its intensity is a lure that will draw you to the plate and the lovely buttermilk and lemon bars that are waiting for you to sample. The flavor of these bars is intense. If you prefer something with a bit less bite use less lemon zest or replace it with the sweeter zest of Meyer lemons. There are three predominant flavors in this dessert; buttermilk, lemon and butter and your palate will identify them in that order. Its hard to believe that anything so easy to make can be this good, but take one bite and you'll become a true believer. The bars take about 20 minutes to assemble and require about 35 minutes to bake. I urge you to try this one. You won't regret it.

Lemony Buttermilk Bliss Bars...from the kitchen of One Perfect Bite

Ingredients:
6 tablespoons unsalted butter at room temperature
1/4 cup granulated sugar, plus 2/3 cup
2/3 cup flour, plus 2 tablespoons
1/8 teaspoon salt
2 large eggs
1 tablespoon lemon zest, finely grated
1/3 cup lemon juice
1/2 cup buttermilk
Confectioners', for dusting

Directions:
1) Move a rack to middle of the oven and preheat to 350 degrees. Butter bottom and e sides of an 8-inch square baking pan.
2) In a large bowl, using an electric mixer on medium speed, beat together butter and 1/4 cup granulated sugar until creamy. Add 2/3 cup flour and salt and mix on low speed until blended. Spoon dough into the prepared pan and press evenly into bottom of pan. Bake until crust is golden, 15-18 minutes.
3) Meanwhile, in a large bowl, using an electric mixer on medium speed, beat eggs and remaining 2/3 cup granulated sugar until blended. Add remaining 2 tablespoons flour, lemon zest and juice, and buttermilk; beat until smooth. Pour filling evenly over the baked crust.
4) Bake until top of filling is set and barely browned at the edges, about 20-25 minutes. Let cool completely in pan set on a wire rack. Cut into 8 bars. To cut into even pieces cut first into quarters and then cut each quarter in half. Dust with confectioners' sugar shaken through a sieve. Yield: 8 bars.

Recipe adapted from Food Made Fast—Baking by Williams Sonoma.

I'm send this to Smiling Sally for her Blue Monday event.

Saturday, June 13, 2009

Blackberry Cobbler


From the kitchen of One Perfect Bite...This recipe is one that everyone claims to be their own. It's often called shiny topped cobbler and I first found it called by that name in The Pittsburgh Post Gazette. It then moved uptown for an appearance in Wine Country Living where it had become Mixed Berry Cobbler, a dessert considered to be worthy of ending a holiday feast. Whatever you call it, I can assure you it is really, really good and amazingly easy to do. Follow directions to a tee, even when they seem counterintuitive, and you'll have no problems. Contrary to popular belief, you may use fresh or frozen fruit to make the cobbler and you are not limited to berries. Any soft fruit may be used. If you don't have this recipe, let me assure you it's a treasure to have on hand when seasonal fruits ripen. If you do have the recipe, consider this a reminder of how very good this cobbler is.

Blackberry Cobbler...from the kitchen of One Perfect Bite

Ingredients:
For the filling:
5 cups whole berries
2 cups flour
1-1/2 cups sugar
2 teaspoons baking powder
1 cup buttermilk
1/3 cup melted butter
For the topping:
1-1/2 cups sugar
2 tablespoons cornstarch
1 teaspoon salt
1 cup boiling water

Directions:

1) Preheat oven to 350 degrees. Coat bottom and sides of a 9- by 13-inch baking dish with nonstick spray. Make an even layer of berries in the bottom of the dish.
2) Mix flour, sugar, baking powder, milk and butter and blend into a batter. Spread batter evenly over the fruit. The batter will be thick.
3) Mix sugar, salt and cornstarch together and sprinkle over batter. Pour boiling water evenly over the sugar and cornstarch mixture. Do not mix.
4) Place baking dish in hot oven. Bake for one hour. For an extra-crusty top, switch the oven from baking to broiling at the end of cooking time and finish cobbler with a minute or so under the broiler.
6) Serve in shallow bowls with vanilla ice cream or whipped cream. Yield: 8 servings.Makes 8 servings

Chinese Dumplings/Pot Stickers


From the kitchen of One Perfect Bite...
The Daring Bakers' June challenge was chosen by Jen from use real butter. She proposed that we make dumplings, boiled, steamed or fried. This was intriguing, but due to time constraints I came down to the wire and almost missed the deadline. Fortunately, it was not a difficult challenge. I've used the dough recipe for many years, primarily as a wrapper for egg rolls, so creating the discs to hold the filling was not a problem. The only trick is allowing the gluten to relax before going at it with a rolling pin. Shaping the dumplings was another story. I did a quick scan of Jaden Hair's wonderful instructions for pleating dumplings to get some idea how this is done manually. I have a small gadget that I normally use for shaping dumplings. I couldn't use it for this challenge because the dumplings had to be made by hand. I decided to use the shrimp filling included in Jen's recipe breakdown for the challenge. The filling is very nice. I decided to steam the dumplings and serve them with a dipping sauce that we often use at our table. I hope you'll try making your own dumplings. It really is fun to do. Here's are the recipes used for this month's challenge.

Chinese Dumplings...from the kitchen of One Perfect Bite

Ingredients:
Dough
2 cups plain flour
1/2 cup warm water
flour for work surface
Shrimp Filling
1/2 lb (225g) raw shrimp, peeled, deveined, and coarsely chopped
1/2 lb (225g) ground pork
3 stalks green onions, minced
1/4 cup (55g) ginger root, minced
1 cup (142g) water chestnuts, minced
1 tsp (5g) salt
3 tbsp (40g) sesame oil
2 tbsp (16g) corn starch
Dipping Sauce
1/3 cup soy sauce
1/3 cup rice wine vinegar
1/3 cup chopped scallions
1 teaspoon dark sesame oil
1 tablespoon sriracha or sambal

Directions:
1) To make the dough: Place the flour in the work bowl of a food processor with the dough blade. Run the processor and pour the warm water in until incorporated. Pour the contents into a sturdy bowl or onto a work surface and knead until uniform and smooth. The dough should be firm and silky to the touch and not sticky.[Note: it’s better to have a moist dough and have to incorporate more flour than to have a dry and pilling dough and have to incorporate more water). Knead the dough about twenty strokes then cover with a damp towel for 15 minutes. Take the dough and form a flattened dome. Cut into strips about 1 1/2 to 2 inches wide. Shape the strips into rounded long cylinders. On a floured surface, cut the strips into 3/4 inch pieces. Press palm down on each piece to form a flat circle (you can shape the corners in with your fingers). With a rolling pin, roll out a circular wrapper from each flat disc. Take care not to roll out too thin or the dumplings will break during cooking - about 1/16th inch. Leave the centers slightly thicker than the edges. Place a tablespoon of filling in the center of each wrapper and fold the dough in half, pleating the edges along one side). Keep all unused dough under damp cloth.
2) To make the filling: Combine all filling ingredients in a large mixing bowl and mix thoroughly . Cover and refrigerate until ready to use (up to a day, but preferably within an hour or two).
3) To make the dipping sauce: Combine all the ingredients in a shaker jar. Shake to combine. For best results, prepare ahead of time to allow the flavors to blend. Store in a sealed container in the refrigerator until ready to use. (Use within 3 to 4 days). Serve with dumplings.
4) To cook dumplings: If boiling, bring a large pot of water to a boil and add dumplings to pot. Boil the dumplings until they float. If steaming, place dumplings on a single layer of napa cabbage leaves or on a well-greased surface in a steamer basket with lid. Steam covered for about 6 minutes. If pan frying, place dumplings in a frying pan with 2-3 tbsp of vegetable oil. Heat on high and fry for a few minutes until bottoms are golden. Add 1/2 cup water and cover. Cook until the water has boiled away and then uncover and reduce heat to medium or medium low. Let the dumplings cook for another 2 minutes then remove from heat and serve. Yield: about 28 dumplings.

Friday, June 12, 2009

Watermelon and Watercress Salad with Ginger


From the kitchen of One Perfect Bite...I've watched this group of women work their way through past challenges in which one member selects an ingredient the others must use. I wanted to join them but I suffered from lack of time or brain drain each time one of their challenges came up. I vowed to jump into the pool this time around only to find that this week's BSI (Blogger Secret Ingredient) is watermelon. I wasn't thrilled. I have a limited watermelon repertoire, but I had committed, so, watermelon it will be. My recipe is for a really lovely salad that's combines watermelon, watercress and mint with a few extras such as cucumber, ginger and feta cheese. The recipe first appeared in Epicurious. I've adapted it slightly to better suit the tastes of my family. The completed salad is chilled and tossed with a lime based dressing just before serving. It is lovely and I think it will please everyone at your table.

Watermelon and Watercress Salad with Ginger...from the kitchen of One Perfect Bite

Ingredients:

2 tablespoons rice vinegar
1 1/2 tablespoons vegetable oil
2 teaspoons minced peeled fresh ginger
1 1/2 teaspoons grated lime peel
1 garlic clove, minced
2 cups 1/2-inch pieces peeled seedless watermelon
1 large bunch watercress, thick stems trimmed (about 2 cups packed)
1 cup 1/2-inch pieces peeled seeded cucumber (about 1/2 large)
4 green onions, thinly sliced diagonally
1/4 cup chopped fresh mint
3 to 4 tablespoons crumbled feta cheese (optional)

Preparation:
1) Whisk vinegar, oil, ginger, lime peel, and garlic in large bowl to blend. Season to taste with salt and pepper.
2) Add watermelon, watercress, cucumber, green onions and mint to bowl; toss to coat. Divide salad among 4 plates. Sprinkle each salad with a portion of feta. Yield: 4 servings.

I'm sending this over to Kim at The Ungourmet for my first entry into BSI (Blogger Secret Ingredient). It's also going to Debbie at Mountain Breaths for her Kick-Off to Summer BBQ event.

Thursday, June 11, 2009

Key Lime and White Chocolate Cake Squares and Foodie Friday


From the kitchen of One Perfect Bite...I needed a cake that would travel well. I wanted a cake that was out of the ordinary. Somewhere between want and need I stumbled on these lovely cake squares by Peggy Trowbridge Filippone. These buttery gems are a perfect mix of sweet and tart. The flavor of key limes combined with the richness of white chocolate produces a dessert that is rich, moist and memorable. For maximum flavor I urge you to use key limes. If they aren't available use Persian limes. The important thing is to give this recipe a try. It is really easy to do. To make them even more delicious, cover the bars with a white chocolate ganache instead of dusting them with powdered sugar. If you are looking for something so simple that it's sophisticated I urge you to give this signature dessert a try.

Key Lime White Chocolate Cake Squares...from the kitchen of One Perfect Bite

Ingredients:

1-3/4 cups all-purpose flour
2 teaspoons baking powder
1/2 teaspoon salt
1 stick (8 tablespoons or 1/2 cup) butter, at room temperature
1 cup sugar
2 large eggs, lightly beaten
1-1/2 teaspoons grated Key lime zest (about 3 Key limes - zest first, then use them for the juice)
1 tablespoon (1 to 2 Key limes) fresh Key lime juice (see Note)
2/3 cup buttermilk
1 cup white chocolate chips

Key Lime Glaze:
1 cup powdered sugar
2 tablespoons (about 3 Key limes) fresh Key lime juice
Additional powdered sugar (optional)

Directions:
1) Preheat oven to 350 F. Line a 9 x 13-inch baking pan with non-stick foil or grease liberally with butter.
2) Blend flour, baking powder, and salt together in a small bowl. Set aside.
3) In a large mixing bowl, cream butter and sugar together with a mixer, beating until blended. Add eggs, 1-1/2 teaspoons Key lime zest, and 1 tablespoon Key lime juice.
4) Into butter-cream mixture in large bowl, add 1/3 of flour mixture, stirring by hand until combined. Add 1/3 of buttermilk, stirring until combined. Continue alternating one-third of each until all is mixed well. Fold in white chocolate chips.
5) Spread batter evenly in pan. It will be thick. Bake 35 to 40 minutes or until wooden pick inserted in center comes out clean. Spread Key Lime Glaze (instructions below) evenly over top of warm cake and cool to room temperature. Just before serving, cut into serving pieces, and sift powdered sugar (optional) over top of the pieces. Serve immediately. Yield: 16 servings.

Key Lime Glaze:
While the cake is baking, whisk powdered sugar and 2 tablespoons Key lime juice together until combined and smooth. Use to glaze warm cake.

I'm sending this recipe to Michael at Designs By Gollum for Foodie Friday, the event she sponsors.

Wednesday, June 10, 2009

Lemon Buttermilk Ice Cream and Candied Lemon Zest


From the kitchen of One Perfect Bite...This week's buttermilk extravaganza continues with a figure friendly dessert that will set your tongue tingling from the combined bite of lemon and buttermilk. You may even be able to claim this ice cream is good for you. Here's why. Cultured buttermilk is lower in fat and calories than regular milk because its fat has already been removed to make butter. It's also higher in potassium, vitamin B12 and calcium and it's more easily digestible than whole milk because of its lactic acid content. The best part of all this is that there are just 2.2 grams of fat in a cup of buttermilk. So, if you have to name your poison this is probably a good one to pick. Having said all that, it means nothing if it doesn't taste good. This tastes good and it's easy to make. I like to garnish it with candied lemon zest. While the zest adds gorgeous color and intensifies flavor, it's a nice, not necessary, addition. I think you'll love the simplicity of this ice cream. It's a decade old creation from Roxanne Gold. Take a look.

Lemon Buttermilk Ice Cream
...from the kitchen of One Perfect Bite

Ingredients:
2 cups granulated sugar
2 teaspoons finely grated lemon zest
1/2 cup fresh lemon juice, strained
1 quart low-fat buttermilk
1/8 teaspoon salt

Directions:
1) Place sugar in a medium-size bowl. Add zest and lemon juice to sugar. Mix well. Add buttermilk and salt. Stir until sugar dissolves. Chill for 4 hours or overnight.
2) Transfer to an ice cream mixer and freeze according to manufacturer's instructions. If not used immediately, transfer to a storage container and freeze.
Yield: 8 (1/2-cup) servings.

Candied Lemon Zest...from the kitchen of One Perfect Bite

Ingredients:
4 lemons
2/3 cup water
2/3 cup sugar + sugar to coat zest strips

Directions:
1) Wash lemons thoroughly. Trim zest from lemons using a vegetable peeler. Cut wide strips, being careful not to cut into the white pith layer below. Cut zest strips lengthwise to create thin julienne strips.
2) Place julienne strips in a small sauce pan and cover with cold water. Cook over medium heat until water comes to a simmer. Continue to simmer for 6 minutes.
3) Remove from heat, drain strips and then return them to sauce pan. Add water and 2/3 cup sugar. Bring mixture to a simmer. Continue to cook over low heat until lemon strips turn translucent. Sugar water will begin to thicken. Cooking time will be approximately 10 to 15 minutes.
4) When done cooking, remove strips from the pan and spread out on a sheet of wax paper. Separate strips on wax paper so they are not in clumps. Cool slightly. Roll in additional granulated sugar to coat. Yield: 8 servings.

Tuesday, June 9, 2009

Savory Asparagus and Goat's Cheese Tart for Outdoor Wednesday


From the kitchen of One Perfect Bite...I love the graceful sway and swish of asparagus as it moves with the wind. The area in which I live is home to an assemblage of asparagus farms so we see a lot of it at this time of year. My love affair with asparagus began in the Victory Garden where I played as a child. I'd use the fronds to make a hula skirt or, on those occasions when I felt more regal, fashion a fan to be used by the Queen of Sheba. My love of the vegetable came much later, but when the connection was made it was a marriage made in heaven. Local asparagus has finally made its way to our green markets and Oregon artisanal cheeses and hazelnuts are again available. For the next few weeks I can dash to Canby Farms for really fresh asparagus and, along the way, pick up goat cheese made by a friend for friends. When both are plentiful this tart is sure to appear on our table. It is wonderfully flavorful but it's not for the faint of heart. If you like the piquancy of goat cheese you'll love this tart. If you're not a fan of strong cheese it's best you take a pass. This is really easy to make and it's quite pretty to look at. That's a hard combination to beat. Here are the pictures of the tart. The recipe follows.


Asparagus and Goat's Cheese Tart...from the kitchen of One Perfect Bite

Ingredients:
1 ready-made pie crust
3/4 pound fresh asparagus
1 tablespoon vegetable oil
1 cup minced red onion
1/4 cup toasted chopped hazelnuts
1-3/4 cup crumbled goat cheese
2 large eggs, lightly beaten
4 tablespoons low-fat buttermilk
Salt and pepper to taste

Directions:
1) Preheat oven to 375 degrees F. Roll pie dough to fit a 9-inch loose-bottomed quiche pan. Line pan with pastry; prick base with fork and chill for 30 minutes. Fit a piece of foil into the the pie pan and fill with dried beans or rice. Blind bake for 15 minutes. Remove foil and beans and bake for 15 minutes longer, or until crust is a light golden brown.
2) Place asparagus on a plate; sprinkle with water. Cover loosely with microwavable plastic wrap. Cook on HIGH power for 3 minutes. Let cool slightly. Cut into 1-inch pieces. Set aside.
3) Place oil in a medium skillet and saute onion until soft. Spoon onion, hazelnuts and asparagus into the prepared pie crust.
4) Place cheese, eggs and buttermilk in jar of a blender. Process until smooth. Adjust seasoning to taste. Pour mixture over pie filling.
5) Bake for 15 to 20 minutes, or until cheese filling is just set. Serve warm or at room temperature. Yield: 6 servings.

I'm sending this to Outdoor Wednesday, an event sponsored by Susan at A Southern Daydreamer.

Monday, June 8, 2009

Bulgur Salad with Pomegranate Dressing and Toasted Nuts


From the kitchen of One Perfect Bite...This cracked wheat salad comes from the Middle East. It's a bit like tabbouleh but it's more complex and made uniquely flavorful by the addition of toasted nuts and pomegranate molasses. I found the recipe in the New York Times where it had been adapted from one developed by Claudia Roden who wrote the Book of Jewish Food and Arabesque. The bulgur wheat used in this recipe is coarser than that used in tabbouleh. The recipe also uses pomegranate molasses, a tart but sweet reduction of pomegranate juice that has the consistency of maple syrup. It is available in most grocery stores and it can be made at home if you're feeling adventurous. A recipe for Pomegranate Molasses can be found at Simply Recipes. I like to serve this salad with Greek and Lebanese meals. It's also wonderful for alfresco dining and picnics - there are no eggs or mayonnaise to worry about going bad. I like to make this several hours before I plan to serve it. Here's the recipe.

Bulgur Salad with Pomegranate Dressing and Toasted Nuts
...From the kitchen of One Perfect Bite

Ingredients:

2-3/4 cups bulgur, preferably coarse-ground
Salt
3/4 cup olive oil
6 tablespoons pomegranate molasses, available at Middle Eastern markets
Juice of 2 lemons, or to taste
6 tablespoons tomato paste
2 teaspoons ground cumin
2 teaspoons ground coriander
1 teaspoon ground allspice
1/2 teaspoon cayenne, or more to taste
Pepper
2 cups walnuts, coarsely chopped
1/4 cup pine nuts, lightly toasted
1 bunch flat-leaf parsley, finely chopped, about 1 cup

Directions:
1) Put bulgur in a large bowl and cover with cold, lightly salted water. Let soak until tender, from 30 minutes to 2 hours, depending on coarseness of bulgur. Drain in a sieve, firmly pressing out excess water, and transfer to a serving bowl.
2) Whisk olive oil with pomegranate molasses, lemon juice, tomato paste and spices. Add salt and pepper and taste; mixture should be pleasingly tangy. Add more pomegranate molasses and lemon juice as needed.
3) Pour half the dressing over bulgur and mix well. Set aside to absorb for about 10 minutes. Taste for salt, adding more if needed. Add half the remaining dressing, all the nuts and parsley, and mix well. Before serving, taste again and add more dressing as needed. Yield: 8 to 10 servings.

Sunday, June 7, 2009

Buttermilk Cluster with Blue Poppy Seeds and Blue Ribbons for Blue Monday


From the kitchen of One Perfect Bite...It was one of those calls you wish could be frozen in time. The words aren't as important as the excitement they engender. Our oldest grandson, heading to middle school next year, had just received a President's Award at his graduation ceremony. He's not yet old enough to be cool, so you could hear the excitement in his voice as he talked. I swear I could hear him smile and it didn't take much imagination to picture the crooked grin on his face as we were speaking. Next came his brother who dutifully reported his "boring" grades. I was thrilled, not by the grades, but by the measured and balanced way in which these two special guys have achieved their personal best. It was a blue ribbon day for the boys and their parents. Kudos and kisses for all. You get to stay in the will.

The developer of this buttermilk cluster also deserves a blue ribbon. Excellence should be recognized in all pursuits and this recipe is a winner. It's a great place to start our buttermilk bonanza - the bonanza being a series of recipes that will expose you to more buttermilk than you ever dreamed existed. If you are looking for a soft and delicious roll for large gatherings, this recipe has your name on it. The rolls are easy to make and when served warm from the oven they'll enhance your reputation as a cook and hostess. The recipe is one of the many standouts from the book Country Breads of the World. The only alteration I've made was to increase amount of buttermilk and honey called for in the original recipe. I also used blue poppy seeds as the topping for my rolls. Yes, these seeds do come from the opium poppy, but - and it is a big but - the seeds that are bought and sold come from mature capsules that no longer contain narcotic substance. Only unripe seed capsules contain the milky substance from which opium is extracted. Having said that, do not eat foods that contain or are sprinkled with poppy seeds before taking a drug test. False positive results have been reported and there's no reason to beg trouble that can be avoided. The blue poppy seeds used in baking are minuscule kidney shaped gems that impart a sweet nutty flavor to breads, cakes and pastries. They are very popular in European cooking and, while their primary use is for baking, the seeds can also be crushed to extract their flavorful oil. If poppy seeds put you off, use sesame seeds or serve the cluster without a topping. Here's the recipe for truly outstanding dinner rolls; they're just waiting for you to pull them apart.

Buttermilk Cluster with Blue Poppy Seeds
...from the kitchen of One Perfect Bite

Ingredients:
6 to 6 1/2 cups all-purpose unbleached flour
1/2 tablespoons salt
2-1/2 teaspoons active dry yeast
1 tablespoon lukewarm water
2 cups warm buttermilk
2 tablespoons honey
1 egg, lightly beaten with 1 teaspoon water
1 to 2 tablespoons seeds (poppy, sesame) or grains (cracked wheat, wheat bran, rolled oats)

Directions:
1) Combine flour and salt in a large bowl. Combine warm water and yeast in a small cup and allow to proof for 10 minutes.
2) Pour yeast, buttermilk, and honey into flour mixture and mix well. If dough is so dry that some of flour won’t stick, add a bit more buttermilk or water. If the dough is too sticky to knead, more like a batter, add more flour, a tablespoon at a time, until correct consistency is achieved.
3) Knead by machine or hand for approximately 10 minutes. Return dough to bowl, cover, and set aside to rise until dough has doubled in size, approximately 90 minutes.
4) Divide dough into 16 pieces. Shape each piece into a neat ball and place in a 12-inch round dish or a 12-inch spring-form pan close together. Cover again with plastic wrap or a damp towel and set aside to rise again for 45 minutes to an hour. Meanwhile, preheat oven to 425 degrees F.
5) Uncover rolls and brush gently with egg wash. Sprinkle with seeds or grains, if using. Bake for 30 minutes, or until are firm and spring back when tapped. Transfer to a rack and cool for 15 minutes. Remove from pan. Serve warm if possible. Yield: 16 rolls.

Other Recipe Links

Buttermilk Cluster at The Fresh Loaf

Buttermilk Cluster at Toxo Bread


I'm send this to Smiling Sally for her Blue Monday event.