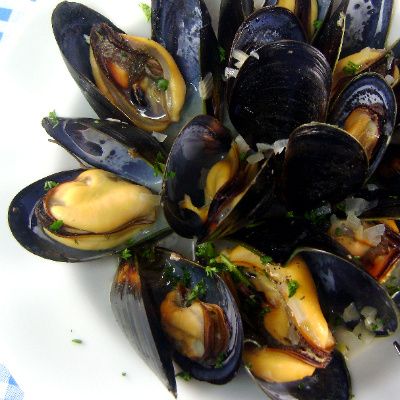
Saturday, July 31, 2010

Moules Mariniere - Blue Mussels - Blue Monday


Blue Mussels


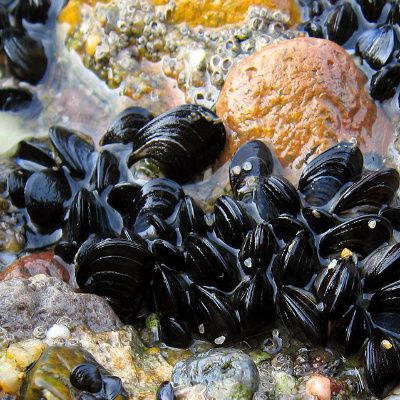
This photo courtesy of Andreas Trepte

From the kitchen of One Perfect Bite...This lovely dish is another that comes from the French peasant kitchen and it is one for which I have a special fondness. Julia Child introduced Bob and I to moules mariniere the year our eldest daughter was born. At that time mussels had no cache and could only be found in ethnic markets where they sold for pennies on the dollar. The first time I made this dish I bought three pounds of mussels for a dollar. That same quantity cost fifteen dollars this afternoon. Once the mussels have been cleaned and purged of sand, the dish can be on the table in ten minutes. Fortunately, most of the mussels available in the supermarket today are farmed and not harvested in the wild. That makes the task of cleaning them much easier. Farmed mussels need to be scrubbed before being debearded and set to soak. The "beard" is the fibrous hairy thing hanging from one side of the shell. Pull it off with a side-to-side motion. Most experts recommend soaking mussels for about an hour to assure they will disgorge their sand. Should you have wild mussels, add 1/4 cup of flour to a container of salted water and allow the mussels to soak for two to three hours before cooking. The thought here is that the mussels will eat the flour and purge themselves of debris, as well as plump up. Discard any mussels that refuse to close when pressed. Nowadays, it's also important to know where your mussels have come from. Be sure to ask. I use a really good dry French vermouth to make this dish. There are three that I can recommend to you. My preference is Dolin, but Lille and Noilly Prat also work well. This makes for a lovely light supper. I served ours with a romaine and watercress salad and a crusty baguette to help mop up the sauce. Our meal ended with a warm lemon pudding. I do hope you'll give this recipe a try. You won't regret it. Here's how I make moules mariniere. Bon appetit.

Moules Mariniere...from the kitchen of One Perfect Bite

Ingredients:
3 tablespoons butter
1/4 cup finely minced shallots
1 minced garlic clove
1/2 cup dry white French vermouth or 1 cup dry white wine
1/2 bay leaf
1/4 teaspoon thyme
1/8 teaspoon pepper
3 pounds scrubbed, soaked mussels
1/4 cup coarsely chopped flat leaf parsley

Directions:
1) Melt butter in a 6 to 8-quart stockpot set over medium heat. Add shallots and garlic and saute until fragrant, about 1 minute. Add vermouth or wine and stir in bay leaf, thyme and pepper. Bring to a boil and simmer for 2 to 3 minutes.
2) Add mussels to pan. Cover and boil over high heat for 5 minutes, shaking pan occasionally to redistribute mussels and assure even cooking.
3) Transfer mussels to a large serving bowl or to shallow soup bowls. Ladle cooking liquid over mussels, sprinkle with parsley and serve hot. Yield: 4 servings.

This recipe was featured in the Food News Journal Best of the Bogs feature on August 2, 2010.

You might also enjoy these recipes:
Coconut Curry Mussels - Simply Recipes
Cedar Planked Mussels - Steamy Kitchen
Steamed Mussels with Coconut Milk and Thai Chiles - Food and Wine
Mussels in Red Chili Sauce - Rasamalaysia
Salmon Soup with Tomato and Dill - One Perfect Bite
Spring Salmon and Leek Soup - One Perfect Bite
Salmon Chowder - One Perfect Bite

This post is being linked to:
Smiling Sally - Blue Monday

Friday, July 30, 2010

Watermelon Limeade - Pink Saturday


From the kitchen of One Perfect Bite...I spent some time today perusing new cook books in our library. I found Emeril Lagasse's latest book, Farm to Fork: Cooking Local, Cooking Fresh and brought it home with me. I've not always been a fan of his, and it's only in the past few years that I've come to appreciate the work he does. I never doubted his ability as a chef or business man, but his antics as a showman made me uncomfortable and I tuned him out. Then, in the final episode of the first America's Next Food Network Star, I saw him perform an act of kindness that changed my mind about the man. When the winner was announced, everyone, save Emeril, swarmed around the couple who had won. The loser, who had obviously not been told what to do should she lose, just stood there, stunned, and unfortunately the cameras stayed trained on her. Emeril came to the aid of the visibly shaken young woman and gave her a squeeze, distracting her until she regained her composure. He was genuinely sympathetic and I became more interested in the man and his cooking after that. Who knew? The guy's a mensch. This wonderful version of limeade is in his new book and I can attest to how good it is. It's very easy to prepare and, while this version of the recipe contains no alcohol, this, mixed with white tequila, has the makings of a fabulous margarita. If you don't feel like cutting watermelon, the watermelon juice that's available in supermarkets will also work in this recipe. That juice, by the way, makes wonderful ice cubes, as well as popsicles for the kids. This is a lovely new take on classic limeade. I think you'll love this. Here's the recipe.

Watermelon Limeade...from the kitchen of One Perfect Bite courtesy of Emeril LaGasse

Ingredients:
8 cups cubed watermelon (seedless), or 1 quart watermelon juice
1 cup freshly squeezed lime juice
1/2 cup sugar, or more to taste
Lime slices, for garnish (optional)

Directions:
1) Place half of watermelon cubes in a blender and process until smooth. Strain through a fine-mesh sieve set over a large bowl; discard solids. Repeat with remaining watermelon cubes. You should end up with about 1 quart of watermelon juice.
2) Add lime juice and sugar to watermelon juice, and stir until sugar has dissolved. Taste, and add more sugar if necessary. Transfer limeade to a nonreactive pitcher and refrigerate until thoroughly chilled.
3) Serve over ice in tumblers, with lime slices for garnish. Yield: 5 cups.

You might also enjoy these recipes:
Homemade Ginger Ale - One Perfect Bite
Limeade Concentrate - One Perfect Bite
Watermelon Smoothie - One Perfect Bite
Iced Coffee Recipes - Yummy
Pineapple Limeade - Real Mom Kitchen
Coconut Iced Tea and Coffee - Jenn Cuisine

This post is being linked to:
Pink Saturday, sponsored by Beverly at How Sweet the Sound.

Thursday, July 29, 2010

Beginner's Whole Wheat Batter Bread


From the kitchen of One Perfect Bite...This is the first yeast bread I was taught to make. I was twelve years old at the time and learned this technique in the kitchen of a neighbor. It is a perfect beginners bread because it truly can't fail, though it does require a stand mixer or a very strong arm to make that miracle happen. This recipe makes a very wet dough that is not kneaded or shaped into loaves. The mixer does all the work. The shaggy dough is dropped into a bread pan and you can, if you wish, smooth the top a bit. Times have changed. When I first made this bread the whole wheat flour on the grocer's shelves was still called graham flour and yeast came in small cakes. I clearly remember we had to use molasses as a sweetener because honey was not yet generally available to folks living in the city. This bread has surprising flavor, a wonderful crumb and it makes great sandwiches. It can also handle the addition of nuts or seeds if you like them in your bread. It stays fresh for several days if it is wrapped and kept at room temperature. If you are new to bread baking, or have a young daughter who is interested in learning how to make bread, this is a wonderful starter recipe. It makes a lovely bread and those of you who try it will be pleased with the loaf you produce. Here's the recipe.

Beginner's Whole Wheat Batter Bread...from the kitchen of One Perfect Bite

Ingredients
:
1-1/2 cups warm water
2-1/4 teaspoons active dry yeast
2 tablespoons honey or molasses
2 cups whole wheat flour
1 cup all-purpose flour
1 teaspoon salt
2 tablespoons room temperature butter

Directions:

1) Place water in bowl of an electric mixer. Add yeast and honey or molasses. Stir to combine. Let sit for 5 minutes.
2) Set mixer to low speed. Beat in 1 cup whole wheat flour, 1/2 cup all-purpose flour, salt and butter. Increase speed to medium and beat for 2 minutes, scraping sides as needed. Reduce speed to low to add reserved 1 cup whole wheat and 1/2 cup all-purpose flour. Beat just until combined. Cover bowl with plastic wrap and let it sit in a warm spot until doubled in volume, about 1 hour.
3) Stir dough down by beating for 25 strokes with a wooden spoon. Spread dough into a greased 9 x 5 x 3-inch bread pan. Cover loosely with a flour rubbed dish towel and let rise until dough rises to top of pan, about 1 hour. A floured towel is used to prevent dough from sticking to it. Do not use plastic wrap. Dough will stick to it and deflate when wrap is removed.
4) Preheat oven to 400 degrees F. Bake bread in center of oven until it is browned and sounds hollow when tapped, about 30 minutes. Cool in pan for 25 minutes. Remove from pan and cool completely on a wire rack. Yield: 1 loaf.

You might also enjoy these recipes:
Blueberry and Lemon Batter Bread - One Perfect Bite
Stout Batter Bread - How to Eat A Cupcake
Four Grain Batter Bread - Safely Gathered In
Old Virginia Batter Bread - Foodista
English Muffin Batter Bread - Baking Bites
Whole Grain Oat-Wheat Batter Bread - More Than Tofu
Parmesan Herb Batter Bread - Adventures with the Woods

Wednesday, July 28, 2010

Curried Egg Salad


Today's featured recipe....


and the day's distraction.

From the kitchen of One Perfect Bite...How many people are needed to take a good photograph of curried egg salad? Obviously, more than are in our home. We really did try, but this was the best of the worst photos. I just couldn't overcome the muddy cast the curry shed on the egg salad. The photo of our youngest grandsons, who will be visiting in August, is a ruse designed to draw your eye away from the delicious, but unphotogenic, sandwich filling. I've been experimenting with making my own curry powder since I learned we'd be traveling to India this fall. Once I had a powder Bob and I both liked, I needed to test it in recipes where it could be used. Egg salad was the simplest and most logical place to start. This salad is mildly spiced and has a really smooth and creamy texture that is pleasing to the tongue. That last is food gibberish that means it is pleasant and tastes good. It receives additional flavor from the juice and pulp of a small shredded onion, and it is delicious spread on a grainy bread. More finely chopped, it would also be perfect for crustless tea sandwiches. I like to make and refrigerate the salad about an hour before I plan to serve it. That gives the flavors an opportunity to blend while the salad chills. This is a very simple recipe that is dependent on the quality of the ingredients used to assemble it. I recommend the use of a mild curry powder and a good mayonnaise. When I don't make my own mayonnaise, I use the reduced fat brand that is sold at Trader Joe's. If you love egg salad as much as I do, I know you'll love this one. Here's the recipe.

Curried Egg Salad
...from the kitchen of One Perfect Bite courtesy of Nancie McDermott

Ingredients:
8 hard-boiled eggs, finely chopped
1/3 cup mayonnaise
1 teaspoon fresh lemon juice
2 teaspoons mild curry powder
1/2 teaspoon granulated suga
1/2 teaspoon dry mustard
1/2 teaspoon salt
1/4 teaspoon freshly cracked black pepper
3 drops hot pepper sauce (i.e. Tabasco)Tabasco sauce
1 small onion, grated to yield 2 tablespoons puree
2 tablespoons minced fresh parsley

Directions:
Combine chopped eggs, mayonnaise, lemon juice, curry powder, sugar, mustard, salt, pepper. hot pepper sauce, onion puree and parsley in a large bowl. Mix well. Cover and chill until shortly before serving time. Yield: 8 sandwich size servings.

You might also enjoy these recipes:
Piperada Bocadillo - One Perfect Bite
Tuna Salad Sandwiches - Sea Salt with Food
Cherry Walnut Chicken Salad - Amy's Diner
Ribbon Sandwiches - My Delicious Blog
Curried Chicken Salad Sandwich - Life's Ambrosia
Apricot and Lavender Chicken Salad - Karista's Kitchen
Chickpea Curry Salad Sandwich - Tasty Easy Healthy Green

Tuesday, July 27, 2010

Israeli Salad


From the kitchen of One Perfect Bite...I was introduced to this salad in a tourist hotel that sat at the edge of a hutong in Bejing, China. A group of Israeli tourists was also staying at the hotel and most mornings I'd have breakfast with them. I'm a very early riser and would sneak to the dining room for a cup of coffee rather than disturb Bob with my restlessness. It bothered these kind folks to see me sitting by myself and they insisted I join them at their table. Breakfast in a Chinese tourist hotel is a multicultural affair that features food, usually served buffet style, that will appeal to all the groups who are guests of the hotel. My friends, although not worried about keeping kosher, had a separate dining area with an array of food that centered on salads and other foods our hosts thought more typical of an Israeli or Mediterranean diet. My companions would gather various vegetable elements from the buffet and bring them back to the table where they were tossed with chopsticks and dressed with fresh lemon and whatever oil was available. Though not accustomed to salad at six in the morning, I was charmed into sharing theirs for the duration of my stay. Although there is some chopping involved, the salad is very easy to assemble and it's perfect for a summer meal when tomatoes and cucumbers are abundant. If you haven't had this salad, I hope you will give it a try. While the salad is delicious, it does not keep well, so dress it just before serving and make no more than you will use in one sitting. Here's how it's made.

Israeli Salad...from the kitchen of One Perfect Bite

Ingredients:
1 large green bell pepper
3 (6-to 8-ounce) tomatoes, halved, seeded, cut into 1/2-inch dice
1 large English cucumber, peeled, halved lengthwise, seeded, cut into 1/2-inch dice
3/4 cup oil-cured black olives, pitted, quartered
2/3 cup chopped red onion
1/3 cup chopped fresh Italian parsley
5 tablespoons extra virgin olive oil
3 tablespoons fresh lemon juice

Directions:
1) Char pepper over gas flame or in broiler until blackened. Enclose in plastic bag 15 minutes. Peel, seed, and cut pepper into 1/3-inch cubes. Place in large bowl.
2) Add tomatoes, cucumber, olives, onion, and parsley. Whisk oil and lemon juice in small bowl to blend; season with salt and pepper, then mix into vegetables. Let vegetables marinate at least 15 minutes but not more than 3 hours before serving. Cover and chill. Yield: 6 servings.

You might also enjoy these recipes:
Mediterranean Orzo Salad - Andrea Meyers
Summer Tomato Salad with Goat Cheese, Basil Vinaigrette and Herbs - Kalyn's Kitchen
Strawberry Tomato Salad with Balsamic - Jungle Frog Cooking
Israeli Salad - Phoo-d
The Quintessential Salad - Nosh and Tell
Cherry Tomato Salad - Tastes Like Home

Monday, July 26, 2010

Red Peppers Stuffed with Orzo and Feta Cheese


From the kitchen of One Perfect Bite...Our weather continues to be uncharacteristically warm and Bob has been uncharacteristically hungry. Despite the heat, he's been felling trees and that kind of work demands calories to stoke the fire. I decided to do a mini Mediterranean feast for his supper tonight. I pan grilled double cut lamb chops and served them with an Israeli salad and orzo stuffed peppers that are reminiscent of those served in the Greek isles. The peppers are lovely and add great color to the table. While they take time to cook, they are really easy to do and they are a relative bargain at this time of year. I can't help but add they would also be wonderful entree for Meatless Monday. Sweet peppers are slowly making their way to our green markets and in another month we'll be able to buy them four to the dollar. Even now they are a bargain when compared to their winter prices. I had six gorgeous bright red bell peppers that needed attention and this dish was a perfect way to enjoy their luscious summer flavor. The recipe on which the peppers are based was developed by Gordon Hamersley for Fine Cooking Magazine over a decade ago. I keep very few recipes for that length of time, so you know in my book it's a keeper. This is one of those recipes I play with. I suspect you will to. There are times I add pine nuts and sun-dried tomatoes to the mix, and others where green olives, raisins and orange zest best suit my fancy of the day. Now, I don't mean to shock you, but I've even been known to follow the recipe exactly as it's was written. If you don't have or like kale, substitute spinach or arugula. If you can't use wine, use water or vegetable stock. I use a white French vermouth to make mine, hearkening back to the days when Julia Child suggested using a good vermouth in place of a mediocre white wine for cooking. I really hope you'll try the peppers. You really can't go wrong. Here's the recipe.

Red Peppers Stuffed with Orzo and Feta Cheese...from the kitchen of One Perfect Bite inspired by Gordon Hamersley

Ingredients:

4 tablespoons olive oil, divided use
1 medium red onion, cut into large dice
2-1/2 ounces kale, washed and torn into bite-size pieces (2 cups lightly packed)
Kosher salt and freshly ground black pepper
1-2/3 cups cooked orzo, cooled (from 3/4 cup raw orzo)
Grated zest from 1/2 lemon
1 to 2 tablespoons fresh lemon juice (from about 1/2 lemon)
1/4 pound feta cheese
1 teaspoon chopped fresh oregano or 1/2 teaspoon dried
1-1/2 teaspoons chopped fresh thyme
1 tablespoon chopped fresh flat-leaf parsley
8 Kalamata olives, pitted and chopped
6 medium red bell peppers
1-1/2 cups dry white wine or water

Directions:
1) Heat oven to 350 degrees F. Heat 2 tablespoons oil in a large skillet until moderately hot. Add red onion and cook over moderate heat, stirring occasionally until soft, about 5 minutes.. Add kale and cook, stirring often, until wilted and tender, about 5 to 7 minutes. Season lightly with salt and pepper. Set aside.
2) Combine onion and kale with the orzo, lemon zest, lemon juice, feta cheese, oregano, thyme, parsley, and olives in a large bowl. Toss gently until combined and season with salt and pepper.
3) Slice off top 1/2 inch of each pepper and reserve. With a paring knife, cut away ribs and discard. Turn pepper upside down and pat it to get all the seeds to fall out. Divide orzo filling among peppers. Replace top of each pepper.
4) Place peppers in a medium baking dish and sprinkle them with reserved 2 tablespoons olive oil. Season again with salt and pepper. Pour wine in pan. Bake until peppers are very tender and slightly blackened on top, about 1-1/2 hours. Yield: 6 servings.

You might also enjoy these recipes:
Stuffed Green Peppers: Healthy and Delicious - Zesty Flavors
Stuffed Peppers - I Eat Trees
Classic Stuffed Peppers - What's Cookin Chicago
Indian Stuffed Bell Peppers - Sugar Pies
Mediterranean Style Stuffed Peppers - Elle's New England Kitchen
Blast of Color Mexican Stuffed Peppers - Mother Rimmy's Cooking Light Done Right

Sunday, July 25, 2010

Pasta with Zucchini, Parmesan and Garlic Oil


From the kitchen of One Perfect Bite...What do you get when finely shredded zucchini is tossed with Aglio e Olio? In my kitchen it becomes an easy entrée that's perfect for a Meatless Monday meal. If you have a julienne peeler to use for shredding the zucchini, you can have this dish on the table in about 20 minutes. I'm not much for kitchen gadgets, but this is one I heartily recommend you add to your inventory. If you haven't seen one of these, you can find one here. I'm not affiliated with these people and my purpose in featuring the peeler is to simplify food preparation rather than sell a kitchen tool. Zucchini that is finely julienned needs no cooking and can be tossed with hot pasta without additional fussing. It helps, however, to have the vegetables at room temperature if you take this route. It's important when you make a dish as simple as this to use ingredients of the highest possible quality. Fortunately, that does not always mean the most expensive. I always serve this pasta with focaccia bread and a crisp green salad to add a bit of texture to the meal. I know you'll enjoy this very easy dish. Here's the recipe.

Pasta with Zucchini, Parmesan and Garlic Oil...from the kitchen of One Perfect Bite

Ingredients:

3/4 lb. dried spaghetti
1 (8-oz.) zucchini, finely julienned
1 (8-oz.) yellow squash, finely julienned
Salt and freshly ground pepper
1/2 cup extra-virgin olive oil
2 tablespoons fresh minced garlic
1/4 teaspoon red pepper flakes
1/3 cup chopped Italian parsley or fresh basil
1/2 cup + 2 tablespoons freshly grated Parmesan cheese

Directions:

1) Bring large pot of water to boil; add salt. Add pasta. Cook until al dente, about 10 minutes.
2) Season zucchini and squash with salt and pepper. Set aside.
3) Heat 1/4 cup olive oil in small skillet over medium-high heat until hot. Add garlic. Sauté briefly, until light brown. Add pepper flakes and basil or parsley. Mix well. Remove from heat.
4) When pasta is done, drain, reserving about 1/2 cup cooking water. Return pasta to pan. Add zucchini, reserved 1/4 cup oil, garlic mixture from step 3, and 1/2 cup cheese. Toss well, adding cooking water as needed to make a smooth sauce. Taste for seasoning and add salt and pepper as needed. Sprinkle with remaining 2 tablespoons cheese and serve at once. Yield: 4 to 5 servings.

You might also enjoy these recipes:
Fusilli with Walnuts and Garlic Sauce - One Perfect Bite
Penne with Asparagus and Lemon Sauce - One Perfect Bite
Pasta Puttanesca - One Perfect Bite
Fresh Garden Vegetables with Pasta - Living the Gourmet
Cold Sesame Noodles - The Parsley Thief
Rigatoni Peperonata - The Comfort of Cooking

Saturday, July 24, 2010

Blueberry Buckle - Cowboy Camp Meeting for Blue Monday


Blueberry Buckle


Cowboy Church Camp Meeting


Pastor Tom's Right-Hand Man

From the kitchen of One Perfect Bite...Bob and I happened on the camp meeting while looking for decent blueberries. The blue striped tent, positioned along the river and abutting the bridge couldn't be missed. I'll admit to being cat curious and instigating a trip down the embankment to the the camp grounds. We took a few pictures before being joined by Jeb, who handles security and parking for the event. He was as curious about our presence as we were about the revival meeting. Jeb kindly led us through the intricacies of the event and how it came to be. More information about events such as these can be found here. While a man of few words, when asked about attendance he ventured, "Some nights it's a healthy handful, some nights we're packed." Ever the good disciple, he clearly hoped we'd be back and spoke of that a bit, but then shared with us locations of berry fields and farms we would have otherwise missed. I had promised Bob I'd make a blueberry buckle if we could find fruit that had any flavor. Thanks to Jeb, I was able to keep that promise and we had a lovely dessert. Bob loves it because of its thick sugar topping. The topping cracks as the dish cooks and the craters in it surface are how this buckle got its name. The recipe I use was originally developed by Martha Stewart and the topping is based on one made by her mother. Both recipes are delicious and I think best of kind. I really think you love this buckle. Here are the recipes.

Blueberry Buckle...from the kitchen of One Perfect Bite courtesy of Martha Stewart

Ingredients:
Streusel Topping
1 cup all-purpose flour
1/4 cup packed light-brown sugar
1 teaspoon ground cinnamon
1/4 teaspoon salt
6 tablespoons unsalted butter, room temperature
Cake
1/2 cup (1 stick) unsalted butter, room temperature, plus more for pan
2 cups all-purpose flour, plus more for pan
1-1/2 teaspoons baking powder
1/2 teaspoon salt
3/4 cup sugar
1 large egg
1 teaspoon pure vanilla extract
1/2 cup milk
5 cups wild or cultivated blueberries
Streusel Topping

Directions
1) To make streusel topping: In a medium bowl, combine flour, sugar, cinnamon, and salt. Using a pastry blender or fork, cut in butter until fine crumbs form. Using hands, squeeze together most of mixture to form large clumps. Topping be frozen in an airtight container for up to 6 months.
2) Heat oven to 350 degrees. Butter a springform baking pan, and dust with flour, tapping out excess. Set aside.
3) In a medium bowl, sift together the flour, baking powder, and salt; set aside.
4) In the bowl of an electric mixer fitted with the paddle attachment, cream butter and sugar on medium speed until light and fluffy, about 3 minutes. Reduce mixer speed to low, and add egg and vanilla, beating until fully combined.
5) Add reserved flour mixture, alternating with the milk, a little of each at a time, starting and ending with the flour mixture. Remove from mixer. Gently fold in blueberries.
6) Pour batter into prepared pan; sprinkle streusel topping over cake. Bake until cake tester comes out batter-free, 60 to 70 minutes. Transfer to a wire rack to cool for 10 minutes. Remove from pan; cool for 15 minutes before serving. Yield 8 to 10 servings.

You might also enjoy these recipes:
Blueberry Glace Pie - One Perfect Bite
Blueberry Flognarde - One Perfect Bite
Old-Fashioned Blueberry Crumb Bars - One Perfect Bite
Blueberry Ebelskiver - Baking Bites
Blueberry Zucchini Bread - Closet Cooking
Red Rice Salad - Lisa Is Cooking

This post is being linked to:
Smiling Sally - Blue Monday

Friday, July 23, 2010

Watermelon Smoothie - Pink Saturday


From the kitchen of One Perfect Bite...I found myself alone for lunch today and didn't really feel like cooking. I wanted to stay away from sandwiches and thought a smoothie would be filling enough to carry me through the afternoon. I had a large piece of watermelon sitting in the refrigerator and decided to use it as the base for a smoothie. I have, in the past, found the National Watermelon Promotion Board to be a great source of recipes and, sure enough, they had a recipe for a simple smoothie that was just what I was looking for. There are a lot of recipes floating in cyberspace that sound more like milk shakes than smoothies and I really was looking for something lighter and more healthy. I liked the recipe because it uses yogurt as a thickener. It took five minutes to assemble this version of a watermelon smoothie. It was time well-spent. It's a delicious drink when made with ripe watermelon. I look forward to having it again. I think you might enjoy it as well. Here's the recipe.

Watermelon Smoothie...from the kitchen of One Perfect Bite courtesy of the National Watermelon Promotion Board

Ingredients:
2 cups seeded watermelon chunks
1 cup cracked ice
1/2 cup plain yogurt
1-2 tablespoons sugar
1/2 teaspoon ground ginger
1/8 teaspoon almond extract

Directions:
Combine all ingredients in blender container. Blend until smooth. Yield: 2 to 3 servings.

You might also enjoy these recipes:
Watermelon, Cucumber and Tomato Salad - One Perfect Bite
Iced Watermelon Drinks - One Perfect Bite
Watermelon, Black Bean and Corn Salsa
Watermelon and Feta Salad - Two Peas and Their Pod
Watermelon Gazpacho - The Perfect Pantry
Strawberry Watermelon Slush - Real Mom Kitchen

This post is being linked to:
Pink Saturday, sponsored by Beverly at How Sweet the Sound.

Thursday, July 22, 2010

London Broil with Garlic and Parsley Sauce


From the kitchen of One Perfect Bite... I first sampled this dish at the deli counter of Central Market in Austin, Texas. That was over ten years ago, but I have yet to see it featured in delis or markets here. I'm going to assume there are other areas of the country where the dish is also unknown and proceed with a recipe for this toothsome steak. This is a simple way to prepare cuts that are normally served for London Broil. London broil refers to a method of cooking rather than a specific cut of meat. This recipe was developed to be used with thin cuts such as flank or flat iron steaks. Cuts from the round and shoulder can be used, but cooking time will vary and the meat may not be as tender. Regardless of the cut, I always tenderize the meat. I use a jaccard, but piercing the steak at intervals with a fork will also work. The steaks are not marinated and they are seasoned only with kosher salt and fresh cracked pepper. I've found that marination isn't necessary when a strong sauce is used at the end of cooking. The sauce used here is an adaption of the Argentinian chimichurri. Earlier this week we featured a recipe for a parsley salad and any leftovers from that dish are perfect for use in this application. When there are no leftovers to be had, I used chopped flat leaf parsley to make the sauce. Whenever possible I use a flat iron steak for this recipe. It has become my favorite among the affordable steaks for grilling. While the recipe was developed to be cooked on an outdoor grill, it can be made stovetop in a grill pan or broiled. Here's the recipe for this surprising delicious dish.

London Broil with Garlic and Parsley Sauce...from the kitchen of One Perfect Bite adapted from Cook's Country magazine

Ingredients:
1/2 cup minced flat leaf parsley or leftover parsley salad
1/4 cup minced red onion
2 teaspoons minced garlic
1/4 cup red wine vinegar
1/4 cup extra-virgin olive oil
1-1/4 teaspoons salt, divided use
1-1/4 teaspoons cracked black pepper, divided use
1/8 teaspoon red pepper flakes
1-1/2 pounds Flat-iron or flank steak

Directions:
1) Combine parsley, onion, garlic, vinegar, olive oil, 1/4 teaspoon each salt and pepper and pepper flakes in a small bowl. Season both sides of steak with remaining salt and pepper.
2) Grill steak over very hot grill until both sides are brown, about 5 minutes per side.
3) Transfer steak to a shallow pan and coat with parsley sauce. Tent dish with foil and allow meat to rest for 5 to 10 minutes. Slice steak thinly against grain and serve with parsley sauce if desired. Yield: 4 servings

You might also enjoy these recipes:
North African Steak Pimenton - One Perfect Bite
Stuffed Flank Steak Spirals - One Perfect Bite
Asian-Style London Broil - One Perfect Bite
Chicken-Fried Flank Steak with Country Gravy - Chewing the Fat
Charmoula Strip Steaks with Pomegranate Glaze - Annie Bakes
Herbed Flank Steaks - 400 Calories or Less

Wednesday, July 21, 2010

Sweet Potato Biscuits


From the kitchen of One Perfect Bite...This is not the food of my people. I was raised on sour dough, seeded rye and grain so whole it could crack your teeth. Biscuits, save for shortbread, were not in my purview and I was well into my thirties before I figuratively crossed the Mason-Dixon line and had a true cream biscuit. I loved it, vowed to master its making, but, instead, went home and again made cinnamon buns and kaiser rolls. The foods of a lifetime are the ones learned in the kitchen's of our childhood. Biscuit had no place in my early memories, so they slid from my culinary radar. Then fate intervened and sent a Southern son-in-law my way. Biscuits and their mastery became important as we tried to weave the traditions of his childhood into those of our table. While striving for mastery, I came across a feature that caught my eye and changed the direction in which I was heading. Adam Ried, in an article written for The Boston Globe, claimed, "The wedding of biscuit to sweet potato is an occasion of culinary bliss." Pushing hyperbole aside, I was intrigued by his claim and decided to try his recipe. It makes moist and tender biscuits with a riveting color that comes from roasted and caramelized sweet potatoes. I really like these, but they are not a mix and bake affair. Their execution requires planning and they are a poor choice for a busy kitchen with limited hands to help. If you make these at a time you are not under stress, I think you'll be delighted with the results. Here's the recipe.

Sweet Potato Biscuits...from the kitchen of One Perfect Bite courtesy of Adam Ried

Ingredients:

1 medium-large sweet potato, about 14 ounces
1/4 cup cold buttermilk
2 cups all-purpose flour, plus extra for patting out dough and cutting biscuits
1 tablespoon baking powder
1/2 teaspoon baking soda
1 tablespoon light brown sugar
Pinch cayenne
Salt and black pepper
8 tablespoons (1 stick) cold unsalted butter, cut into roughly 1/2-inch cubes

Directions:

1) Set oven rack in middle position and heat the oven to 425 degrees. Line a large baking sheet (roughly 18 by 13 inches) with parchment paper or a silicone liner, and set aside.
2) Prick sweet potato in several spots with a fork. Place it on a small baking sheet, and bake until tender, about 1-1/4 hours. Cut potato open, peel back skin (to release steam), cool it to room temperature, about 40 minutes. Peel off skin, and roughly mash flesh (you should have about 1-1/2 cups). Add buttermilk, mix very well, and set aside. Again preheat oven to 425 degrees F.
3) In a food processor, process 2 cups flour, baking powder, baking soda, brown sugar, cayenne, 1 teaspoon salt, and 1/2 teaspoon black pepper until well blended. Scatter butter pieces evenly over flour mixture in food processor and pulse until mixture resembles coarse cornmeal, about 6 2-second pulses. Add sweet potato mixture in dollops in several spots over flour and butter mixture, and pulse until flour and sweet potato mixtures combine and just begin to come together into a light-orange dough mass, 10 to 15 2-second pulses.
4) Generously flour a clean work surface, turn out dough, and sprinkle top with flour. Knead dough gently, folding it in half and rotating it 3 or 4 times, just until it is uniform and cohesive (try to keep the kneading to a minimum). Sprinkle a little bit more flour on the work surface and dough to prevent sticking, if necessary, and gently pat the dough into a circle that is roughly 8 inches in diameter and 1 inch high (the height is more important than the shape or diameter, which may vary). Dip a sharp 2-1/2-inch biscuit cutter into flour and using brisk, decisive, straight-down punches (avoid rotating or twisting cutter in dough), cut out rounds of dough as close to one another as possible (to maximize the number of rounds), dipping cutter into flour before each new cut. Transfer dough rounds to prepared baking sheet, positioning them about 1 inch apart. Push dough scraps together and knead them gently once or twice until cohesive. Again pat out the dough until it is 1 inch high, dip cutter into flour, and in same manner as before, cut out as many dough rounds as possible, and transfer them to the baking sheet with first batch.
5) Bake until biscuits are puffed, light golden on top, and deep brown on bottom, 15 to 17 minutes, rotating sheet halfway through baking time for even cooking. Transfer biscuits to a wire rack, cool for about 15 minutes, and serve warm. Yield: 10 to 12 biscuits.

Cook's note: Variations of sweet potato biscuits can be found here.

You might also enjoy these recipes:
Drop Biscuits with Cheddar Cheese and Garlic - One Perfect Bite
Blueberry Biscuits - The Runaway Spoon
Cinnamon Raisin Biscuits - Salad in a Jar
Berry Biscuit Cups - Cooking Stuff
Biscuits in Sausage Gravy - Chaos in the Kitchen
Jalapeno Cheddar Biscuits - Foodie Memoirs
Southern Buttermilk Biscuits - Katy's Kitchen

Tuesday, July 20, 2010

Raspberry Kuchen


From the kitchen of One Perfect Bite...This is a lovely old fashioned cake that's completely without pretense. Chances are your mother or grandmother made a cake quite similar to this one. It was codified by Better Homes and Gardens and it's been around for a while, fading in and out of fashion as eating habits change. The original recipe can be found in the no longer new, Better Homes and Gardens: New Baking Book. We used to call it "Poor Man's Cheese Cake," but it's officially called a Raspberry Kuchen. A kuchen is a cake-like dessert that has a soft dough crust and a topping of custard or cheese that contains berries or other fruits. I love this recipe for many reasons. There are no stray egg whites or yolks left to deal with when the cake is finished. What's not used in the crust is used in the custard and that appeals to my "green" instincts. The cake, which can be made without a mixer, is very easy to do and has the added advantage of being low in fat and only moderately sweet. Best of all, it can be made with fresh or frozen berries of any type. Frozen berries will produce a creamier cake because of the liquid they exude as the cake bakes. Cane berries of all sorts have come to market here in Oregon, but to tell the truth, they're not up to speed this year. Hopefully, they'll improve this week and we'll have something worth putting by. Until then, I'm relying on the stash in my freezer. I used frozen berries to make the cake today, so it's wonderfully creamy in taste and appearance. I hope those of you who are not familiar with this cake will give it a try. Here's the recipe.

Raspberry Kuchen
...from the kitchen of One Perfect bite inspired by Better Homes and Gardens: New Baking Book

Ingredients:
Base
1 cup all-purpose flour
1/2 cup sugar
1/8 teaspoon salt
1 teaspoon baking powder
1/4 cup butter, melted
2 egg whites
1 teaspoon vanilla

2 cups fresh or frozen cane berries

Filling
1-1/2 cups plain low-fat or nonfat yogurt
2 tablespoons all-purpose flour
1/2 cup sugar
2 slightly beaten egg yolks
1 slightly beaten whole egg
1-1/2 teaspoons finely shredded lemon zest
1 teaspoon vanilla

Directions:
1) Preheat oven to 350 degrees F. Lightly grease bottom and sides of a 9-inch springform pan. If using frozen raspberries, thaw at room temperature for 15 minutes; drain.
2) In food processor bowl or medium mixing bowl, stir together 1 cup flour, the first 1/2 cup sugar, salt and baking powder. Add melted butter, 2 egg whites and first teaspoon vanilla. Cover; process or stir by hand until mixed.
3) Spread onto the bottom of springform pan; sprinkle with berries. Set aside.
4) For filling, place yogurt in a large mixing bowl; sprinkle with 2 tablespoons flour. Add remaining sugar, yolks, whole egg, zest and remaining vanilla. Mix until smooth; pour over berries.
5) Bake for about 55 minutes or until center appears set when shaken gently. Cool for 15 minutes; remove sides of pan. Cover; chill until serving time, up to 24 hours. If you are feeling brave, you can remove pan bottom. Transfer to a serving plate. Yield: 10 - 12 servings.

You might also enjoy these recipes:
Orange Yogurt Cake - One Perfect Bite
Yogurt Cheese Cake - One Perfect Bite
Greek-Style Yogurt Pie with Fruit Preserves - One Perfect Bite
German Rahm Kuchen - A Feast for the Eyes
Cheese Kuchen - Madame Chow's Kitchen
Grandma's Pear Kuchen - Jules Food

Monday, July 19, 2010

Flaked Parsley Salad with Black Olives and Cheese


From the kitchen of One Perfect Bite...Those of you who have traveled the backroads and byways of the Mediterranean are probably familiar with this salad. I learned of it ten years ago while paging through an article written by Paula Wolfert, a respected food writer and teacher with expertise in the food of the region. The recipe was unusual enough to catch my eye and simple enough to hold my attention. While I love to serve the salad with grilled meat or fish, I also like to incorporate it as an ingredient in other recipes that will be featured later in the week. Its main ingredient is fresh curly parsley. Lots of it. The parsley leaves are removed from the stems and torn into tiny bits. It's really important that no short cuts be taken with this step. Large clumps and stems will spoil this salad and make it quite ordinary. Once you have about four cups of shredded parsley flakes they are combined will olives and shallots and tossed with the simplest of oil and vinegar dressings. The resulting salad is delicious when it's made with really fresh parsley. It's not worth your while to make it with parsley of an uncertain age. Older parsley is tough and the salad will taste like rabbit fodder. It's also important not to dress the salad until just before serving. The salad becomes compacted if it sits too long after the oil and vinegar have been added. I first made this out of curiosity, but what began as an experiment has become a regular feature of my summer table despite its pains and pitfalls. I know that many of you share my passion for the unusual, so I decided to post this recipe despite its simplicity. I really think you'll like it. Here's the recipe.

Flaked Parsley Salad with Black Olives and Cheese...from the kitchen of One Perfect Bite, inspired by Paula Wolfert

Ingredients:
1/4 pound very fresh curly parsley, washed and thoroughly dried
1/2 cup (about 24) Kalamata olives, rinsed, drained pitted and slivered
1/4 cup minced shallots or red onion
1/2 teaspoon Worcestershire sauce
3 tablespoons extra virgin olive oil
1 tablespoon cider vinegar
Salt and freshly ground pepper to taste
1/4 cup coarsely grated Pecorino-Romano cheese

Directions:

1) Remove parsley from stems. Discard stems and tear each leaf into tiny bits. You should have four cups of loosely packed parsley flakes.
2) Combine parsley, olives, shallots, Worcestershire, oil, vinegar in a medium bowl. Add salt and pepper to taste. Toss gently to combine. Transfer to a serving bowl and sprinkle with cheese. Yield: 6 servings.

You might also enjoy these recipes:
Corn and Radish Salad - One Perfect Bite
Mediterranean Radish Salad - One Perfect Bite
Asparagus and White Bean Salad - One Perfect Bite
Moroccan Carrot Salad - The Perfect Pantry
Feta and Watermelon Salad - Girlichef
Heirloom Tomato Salad - Chef Tom's Blog
Spicy Lentil, Radish and Parsley Salad - Cook Sister
Greek-Style Zucchini Salad - Closet Cooking

Sunday, July 18, 2010

Bow Ties with Sausage and Leek Sauce


Farfalle or Butterflies with Sausage and Leek Sauce


...and a very beautiful Morpho butterfly from Brazil for Blue Monday.

From the kitchen of One Perfect Bite...I had a backlog of leeks in the refrigerator and needed to clear space for other produce that's being harvested. To that end, I made a leek tart and a large batch of potato soup that was destined for the freezer and fall lunches. There were still, however, several large leeks that had to be dealt with. A quick search took me to the recipe that I'm featuring today. I am a huge fan of Lidia Bastanich and have nothing but good things to say about the food she prepares. This recipe is one she developed and I'm happy to report that those who follow it will have a pasta that's delicious, inexpensive and easy to make. The original recipe comes from her book Lidia's Italian Table which can be found here. This dish appealed to me on several levels. We are trying to eliminate some of the meat in our diet, and while the dish is not vegetarian, it uses far less meat than is found in most pasta sauces. While strongly flavored, it is also very light do to the absence of cream or a tomato base. The flavor of leeks dominates the other ingredients in the dish. I do not recommend using onions in their stead. The leeks add a sweetness that is missing in onions and they would really change the nature of this dish. I know those of you who try this will like it. Here's my version of the recipe.

Bow Ties with Sausage and Leek Sauce
...from the kitchen of One Perfect Bite, adapted from Lidias Italian Table

Ingredients:
6 quarts salted water
2 large leeks (about 1 pound)
2 tablespoons extra virgin olive oil
2 sweet Italian sausages (about 6 ounces), casing removed
1 tablespoon minced shallots
2 tablespoons unsalted butter, divided use
1 cup young peas, blanched in boiling water for 2 minutes, or defrosted and drained frozen baby peas
1 cup canned low-sodium chicken broth
Salt and freshly ground pepper
12 ounces bow-tie pasta (farfalle)
1/2 cup freshly grated Parmigian-Reggiano cheese, plus more for serving, if you like

Directions:

1) Bring salted water to a boil. Cover pot to speed up the boiling time.
2) Meanwhile, prepare leeks: Cut off and discard top third of rough green portion and root ends. Remove any brown or wilted outer layers. Slice remaining green and white parts into 1/2-inch-thick rounds. Rinse leek slices in several changes of cold water, swishing them around to remove all soil and grit.
3) In a large skillet, heat olive oil over medium heat. Crumble sausage meat into skillet and cook, breaking up lumps, until golden, about 5 minutes. Add leeks to skillet and cook, stirring, until wilted, about 5 minutes. Stir in shallots and cook for 1 minute. Add 1 tablespoon of butter, peas and stock. Heat to a boil, reduce heat to medium-low, and simmer gently for 5 minutes. Season with salt and pepper, cover skillet, and set aside.
4) While sauce simmers, stir bow ties into boiling water. When water returns to a boil, uncover pot. Cook pasta, stirring occasionally, until al dente (tender, but firm), about 12 minutes. Drain bow ties well and return them to pot over low heat.
5) Add sausage and leek sauce to the pasta and toss well until pasta is coated. Remove pot from heat, add remaining 1 tablespoon of butter and grated cheese. Toss well. Serve immediately, passing additional grated cheese if desired. Yield: 6 servings.

You might also enjoy these recipes:
Capellini Capricciosa - One Perfect Bite
Pasta Puttanesca - One Perfect Bite
Penne with Asparagus and Lemon Sauce
Orzo Pasta with Shrimp - The Wicked Noodle
Fruity Chicken Pasta Salad - The Kitchen Witch
Caramelized Pepper and Sausage Pasta - Cinnamon Spice and Everything Nice

This post is being linked to:
Smiling Sally - Blue Monday

Saturday, July 17, 2010

Coconut Bubble Tea


From the kitchen of One Perfect Bite...We spent the day panning for gold. Really! Each year the town of Cottage Grove holds a Bohemia Mining Day celebration to commemorate the discovery of gold in the area. The event is much like a county fair and it's a wonderful family activity. What is less known, is that while the mine is closed, there are still active claims in the area. That makes it possible for the more adventurous to pan for gold. Ever up to a challenge, Bob and I trekked into the area and did some panning. We found no gold, but had a wonderful day and burned a lot of calories. That, of course, meant a special sweet treat could be enjoyed without any feelings of guilt. We decided to spend the expended calories on large glasses of bubble tea. Now, I can't begin to tell you how a day in a Bohemian community led to a drink of Chinese origin. It just did. The drinks are cold and frothy and they just seemed like a perfect way to end the day. Bubble tea was created in Taiwan in the 1980's. It spread across Asia and made its way to Canada before finally reaching the United States. While the drink has a frothy texture, its called bubble tea because it contains pearl-sized tapioca balls, bobas, that are dispersed throughout the drink. The balls have very little flavor, but they are gummy and are sipped through an oversize straw to be chewed between sips of tea. The base of the drink is tea and it can have milk or fruit flavors added to it. I prefer the milk-flavored version. The tapioca pearls have little flavor of their own, so they are soaked for about 30 minutes in sugar or honey after being boiled. I found a recipe at the New York Times: Dining and Wine site that can be used to make a really nice bubble tea at home. If you're curious you might want to give it a try. Here's my version of the recipe.

Coconut Bubble Tea
...from the kitchen of One Perfect Bite, adapted from The New York Times: Dining and Wine

Ingredients:
1 cup light brown sugar
1 cup white sugar
2 cups tapioca pearls (1/4-inch wide)
For each bubble tea:
1/2 cup chilled tapioca pearls
1 cup crushed ice
1 cup coarsely chopped mango
3/4 cup coconut milk
1/4 cup milk
1 to 2 teaspoons fresh lime juice

Directions:
1) Combine sugars and 2 cups of water in a medium saucepan. Bring to a boil. Torn off heat. In a second pot, bring 4 quarts of water to a boil. Add tapioca and cook until tender using time suggested on box. Drain. Mix tapioca with sugar mixture and chill.
2) To make a drink, spoon pearls into a large glass. Place ice, mango, coconut milk, milk and lime juice in a blender jar. Puree. When frothy, pour over pearls and stick in a wide straw. If straws are not available, serve with a spoon.

You might also enjoy these recipes:
Ginger Tea - One Perfect Bite
Homemade Vanilla Chai Tea - The Mother Load
Indian Chai Hot Chocolate-Tea Recipe - Tea Escape - Tea Blog
Russian Friendship Tea - Bake It Pretty
The Ultimate Iced Tea Recipe - Cooking By the Seat of My Pants
Lemon Almond Iced Tea - Elite Tea
Herbal Iced Tea - Oprah.com
California Iced Tea - Lifestyle Food.com

Friday, July 16, 2010

Shrimp and Cheesy Grits - Pink Saturday


From the kitchen of One Perfect Bite...One of the benefits of having family spread across the country is the opportunity to sample regional foods and meet with like-minded folks who also enjoy the kitchen. Today's recipe is the kidnapped offspring of one that was developed by chef Jon Bonnell for a side dish that was to be served in his Texas restaurant. Under normal circumstances, I would have nothing to do with a dish like this. Years ago, while traveling in the South, I developed an active dislike of grits which appeared, unrequested and unseasoned, on my breakfast plate - over and over again. I equated them with paste. Truth be told, I thought paste had more flavor. At any rate, this past year I was given a copy of Bonnell's book, on the condition I make a version of his shrimp and grits. I should be ashamed I know, but I wanted the book, so my version of shrimp and grits was born. For the uninitiated, grits are coarsely ground dried corn that's served boiled, or boiled and then fried. While they're related to corn meal, they are more coarsely ground. They can be found on the cereal aisles in all large food markets. I've used quick cooking grits in my recipe and my directions are based on those that come on the box of grits I buy. If you make this dish, check the instructions on your box to make sure there are not vastly different from the ones I give here. You may also want to increase the heat by adding more hot pepper sauce. Be careful if you do that. The dish can quickly turn to fire if too much is used. This is a wonderfully easy recipe. It is, unfortunately, high in calories because of the amount of cream used to assemble the dish. While you can cut back to half-and-half, the dish really is not the same. Despite my initial reservations, I've really come to love this dish and serve it as an entree for family and close friends. I think you might like it too. Here's the recipe.

Shrimp with Cheesy Grits...from the kitchen of One Perfect Bite inspired by Jon Bonnell

Ingredients:
Grits
1/2 cup chopped yellow onion
1 teaspoon minced garlic
1 teaspoon butter
1 teaspoon hot pepper sauce (i.e. Tabasco)
1 cup heavy cream
1 cup chicken stock
1 tablespoon Creole seasoning
1/2 cup quick grits
1/2 cup grated Monterey or Pepper Jack cheese
Shrimp
12 ounces Andouille sausage, cut in 1/2-inch dice
1 teaspoon butter
1 pound large (16 - 20) count shrimp, peeled and deveined
1/2 cup heavy cream
1 teaspoon hot pepper sauce (i.e.Tabasco)
Salt and pepper to taste

Directions:
1) To make the grits: Melt butter in a medium nonstick skillet set over medium heat. Add onions and saute until soft, about 3 to 5 minutes. Add garlic and saute until fragrant, about 30 seconds longer. Add hot sauce, heavy cream and chicken stock and bring just to a simmer. Whisk in Creole seasoning and grits. Cook, stirring constantly until mixture begins to thicken, about 5 minutes. Remove from heat. Fold in cheese and let sit, covered, for 5 minutes.
2) To make shrimp: Melt butter in a large nonstick skillet set over medium heat. Add sausage and saute in butter until lightly browned. Add shrimp and cook for two minutes. Pour in cream and add hot sauce. Reduce heat and cook until cream thickens slightly and shrimp is cooked through, about 3 minutes. Season to taste with salt and pepper.
3) To serve: Spread grits on a small platter. Pour shrimp and sauce over grits. Yield: 4 servings.

You might also enjoy these recipes:
Blue Corn Muffins - One Perfect Bite
Spoon Bread with Leeks and Gruyere Cheese - One Perfect Bite
Oven Baked Polenta - One Perfect Bite
Garlic Shrimp and Cheddar Grits - A Dose of Frosting
Shrimp and Andouille Sausage - Framed: My Life One Picture at a Time
Grits and Grillades - Deep South Dish

This post is being linked to:
Pink Saturday, sponsored by Beverly at How Sweet the Sound.

Thursday, July 15, 2010

Cowboy Caviar


From the kitchen of One Perfect Bite...Cowboy Caviar is a simple dish with an interesting history. You know, I'm sure, that black-eyed peas are served throughout the Southern United States on New Year's Day. Some, in a curious mix of tradition and superstition, believe that consumption of black-eyed peas on that day will bring luck and prosperity in the coming year. Cowboy, or Texas, caviar is an offshoot of that tradition. The dish was developed by Helen Corbitt, a Yankee, who did not like black-eyed peas. She was the head chef at Nieman Marcus and was asked to create an all-Texas menu that would include black-eyed peas. Athens, Texas is, after all, the black-eyed pea capital of the world. Hard pressed to find an existing recipe that met her high standards, she decided to pickle them, and created a dish that could be eaten with a fork or scooped up to the mouth on a tortilla chip. Nowadays, Texans like their "caviar" year round and serve it at barbecues and other informal gatherings. While the name remains a mystery, cowboy caviar is a a nice change of pace from standard bean salads that are usually served on those occasions. It's easy to make and, like all pickled salads, can be made well ahead of serving. The original recipe consists of black-eyed peas and onions that are marinated in a vinaigrette. That sounded a bit stark to me,so I decided to use a recipe I found in the Saveur magazine. It is only slightly more complicated and produces a lovely dish that uses less oil than the original. I like to serve this as a salad option for picnics and barbecues. Culinary reputations are not built on this kind of dish, but it will do your good name no harm. Here's the recipe.

Cowboy Caviar...from the kitchen of One Perfect Bite, inspired by Saveur magazine

Ingredients:

2 ( 15-oz.) cans black-eyed peas, drained and rinsed
1/4 cup roughly chopped cilantro
1/4 cup extra-virgin olive oil
1/4 cup red wine vinegar
1 teaspoon chopped garlic
1 serrano or jalapeno chile, stemmed, seeded and finely chopped
1/2 red bell pepper, cored, seeded and finely chopped
1/4 chopped red onion
Kosher salt and freshly ground black pepper to taste

Directions:
1) Combine beans, cilantro, olive oil, vinegar, garlic, chiles, bell pepper and onion in a large bowl. Toss well.
2) Refrigerate for several hours or overnight. Adjust salt and pepper to taste. Yield: 6 servings.

You might also enjoy these recipes:
Asparagus and White Bean Salad - One Perfect Bite
Mexican Black Bean Salad - One Perfect Bite
Kidney Bean Salad - Lisa's Kitchen
Spring Fava Bean and Fennel Salad - Simply Recipes
Mediterranean White Bean Salad - Budget Bytes
Diner's Journal: Bean Salad - New York Times

Wednesday, July 14, 2010

Pastitsio - Lamb and Eggplant Casserole


From the kitchen of One Perfect Bite...Casseroles are a bit like life. They're not always pretty, they can be messy and full of surprises, but when all is said and done, they are enormously satisfying. Casseroles have been with us since women began tending pots suspended over fire, but the idea of the casserole as a one-dish meal was initiated in America during the Great Depression. They became really popular in the 1950's when new materials for cooking appeared on the market and advertisers began touting the virtues of one-dish meals that freed women from kitchen drudgery. They remained popular through the 1970's but fell into disfavor as diner's became more sophisticated and diet conscious. I still have several casseroles in my permanent recipe rotation, but today's recipe was a test run. My family will be visiting in August and our two oldest grandsons are beginning to display symptoms of, what we call, "hollow leg syndrome" - they are always hungry. I like to have a casserole or two available to supplement regular meals while they're here. I'd seen this recipe in Gourmet magazine years ago. I clipped it because it was so much lighter than my version of this Greek classic. Pastitsio is a Greek casserole that contains layers of macaroni and chopped meat that are topped with a cream sauce. I made it this evening and must say I found it to be a nice, but not great, casserole. I expected more from this multi-step recipe than it could deliver. None of the steps are hard, but this is not a dish that you can throw together in minutes. I expect recipes this involved to be great and it missed the mark. I am, however, going to keep and recommend the recipe because it is a nice alternative to lasagna when you have a crowd to feed. Here's the recipe. You be the judge.

Pastitsio - Lamb and Eggplant Casserole...from the kitchen of One Perfect Bite, courtesy of Gourmet Magazine

Ingredients:
Lamb Sauce
1 large onion, chopped
1 tablespoon olive oil
1 pound lean ground lamb
1 teaspoon minced garlic
1-1/2 teaspoons salt
1 teaspoon dried oregano, crumbled
1/2 teaspoon cinnamon
1/4 teaspoon sugar
1/4 teaspoon black pepper
1 pound eggplant, peeled and cut into 1/2-inch cubes
1 (28- to 32-oz) can crushed tomatoes
Cheese Sauce
2 tablespoons unsalted butter
2 tablespoons all-purpose flour
2 cups milk
1 garlic clove
1 whole clove
1/2 lb feta, crumbled
1/2 teaspoon salt
1/4 teaspoon black pepper
2 large eggs
Pasta
10 ounces penne (3 cups)

Directions:
1) To make lamb sauce: Cook onion in oil in a 4-quart heavy pot over moderately low heat, stirring, until softened, 3 to 5 minutes. Add lamb and sauté over moderately high heat, stirring and breaking up lumps, until no longer pink, about 5 minutes. Add garlic, salt, oregano, cinnamon, sugar, and pepper and sauté, stirring, 2 minutes. Stir in eggplant and tomatoes and gently simmer, covered, stirring occasionally, until eggplant is just tender, about 40 minutes. Remove lid and simmer, stirring occasionally, until sauce is thickened, about 15 minutes more. Season with salt and pepper. Remove from heat. Preheat oven to 425°F.
2) To make cheese sauce: While lamb is simmering, melt butter in a 2-quart heavy saucepan over moderate heat. Stir in flour and cook, stirring, 2 minutes. Whisk in milk and add garlic clove and whole clove, then bring to a boil, whisking constantly. Reduce heat and simmer, whisking occasionally, 5 minutes. Add feta, salt, and pepper and cook, whisking vigorously, until cheese is well incorporated. Remove from heat. Discard garlic clove and whole clove. Beat eggs in a large bowl and gradually add sauce to eggs, whisking.
3) To make pasta: Cook pasta in a large pot of boiling salted water until just al dente, then drain in a colander. Toss half of pasta with lamb sauce and half with cheese sauce.
4) To assemble pastitsio: Pour pasta with lamb sauce into a wide shallow 3-quart baking dish, spreading evenly. Spoon pasta with cheese sauce on top, spreading evenly. Bake pastitsio, uncovered, in middle of oven until bubbling and top is golden, 25 to 30 minutes. Let stand 5 minutes before serving. Yield: 6 to 8 servings.

You might also enjoy these recipes:
Moroccan Shepherd's Pie - One Perfect Bite
Arroz con Pollo - One Perfect Bite
Microwave: Smoked Sausage Casserole - One Perfect Bite
Cheesy Squash and Tomato Casserole - Sugar and Spice by Celeste
Spinach Macaroni Casserole - Served with Love
Pierogi Casserole - Neo-Homesteading

Tuesday, July 13, 2010

Shrimp and Rice Salad with Cucumbers


From the kitchen of One Perfect Bite...The heat wave here has broken and we are again enjoying the more temperate weather that this area is known for. It is, in a word, beautiful. The days are pleasantly warm, but once the sun sets we cool down quickly. When the temperatures soared, I pulled out some of the recipes I used when we were living in Illinois and New Jersey. Summers in both areas could be unpleasantly warm, and this recipe and others like it were a godsend on hot nights when I was working. I should be ashamed to admit it, but when this was on the menu, I'd stop to pick up steamed shrimp and carry-out rice to make short work of the meal. Once home, I spread the rice on a cookie sheet and put it in the freezer for a quick cool down. It took all of five minutes to make the dressing and once it was done, I'd combine it with shrimp, cucumbers and rice and give it all a good toss. The salad went back into the freezer for another half hour to chill a bit more before before serving. It was a light, easy and delicious meal for blistering summer nights. It still is. While it's not necessary, I try to use day old rice to make this salad. The rice has more substance and holds it shape better than fresh rice when tossed. I'm not a fan of mayonnaise, so I've dressed the salad with oil and vinegar to cut back a bit on calories. I also use garden cucumbers, but remove the seeds before chopping and adding to the salad. The recipe can be doubled to feed a crowd or halved to feed just one or two, and you can, of course, substitute brown rice for white. I think you will like this easy summer entree. Here's the recipe.

Shrimp and Rice Salad with Cucumbers...from the kitchen of One Perfect Bite

Ingredients:

2 cups cooked white or brown rice
1/4 cup finely chopped shallots or red onion
1 large cucumber, peeled, seeded and chopped
1 pound cooked shrimps, shelled, deveined and cut in half lengthwise
Dressing
Juice and julienned strips of peel from 1 lemon
1 teaspoon minced garlic
1/2 teaspoon salt
1 teaspoon Dijon mustard
2 teaspoons red wine vinegar
1/3 cup extra virgin olive oil
1/2 teaspoon freshly ground pepper
1/4 cup chopped fresh parsley

Directions:

1) Place rice, shallots, cucumber, shrimp and lemon zest in a large bowl. Toss to combine.
2) Mash garlic and salt in bottom of a small bowl. Add mustard, lemon juice, vinegar and oil. Whisk to combine.
3) Pour dressings over salad and toss gently to mix. Add pepper and parsley and toss again. Chill slightly. Yield: 4 servings.

You might also enjoy these recipes:
Thai Tuna Salad - One Perfect Bite
Asian Chicken or Shrimp Salad - One Perfect Bite
Curried Turkey Salad - One Perfect Bite
Grilled Chicken Salad with Spicy Pineapple Dressing - For the Love of Cooking
Thai Beef Salad - The Cooking Addicts
Shrimp Salad with Lime Vinaigrette - Sauce and Sensibility

Monday, July 12, 2010

Mediterranean Radish Salad


From the kitchen of One Perfect Bite...A commitment to support community agriculture can have unexpected consequences. Produce that's locally grown can be unfamiliar or something that you have, in the past, avoided eating. Greens and beans and peppers I never dreamed of cooking a few short years ago, now regularly appear on our table. The only downside to this, is the occasional scramble to find ways in which to cook the new offerings, or the inevitable backlog that occurs with some of the vegetables. Scallions and radishes seem to procreate in my vegetable crisper, so it should come as no surprise that I recently found myself with a glut of radishes that simply had to be addressed. Fortunately, I remembered a recipe for a salad that had originally come from a nutritional program at the University of Texas, Southwestern Medical Center. I had made it once before, and the fact that I still had the recipe was an indication that we enjoyed the salad. While a radish salad may not be to everyone's liking, I can heartily recommend this one for its flavor, crispness and wholesome goodness. It's also easy to make if you have a food processor. The only thing to keep in mind is that the radishes will bleed if made too soon before serving. Here's the recipe.

Mediterranean Radish Salad...from the kitchen of One Perfect Bite and the University of Texas Southwestern Medical Center

Ingredients:
4 bunches radishes (about 48 radishes), cleaned, trimmed and thinly sliced
2 tablespoons fresh lemon juice
2 tablespoons extra virgin olive oil
1/4 to 1/2 teaspoons cayenne pepper
2 tablespoons chopped fresh parsley
Salt to taste
8 leaf lettuce leaves

Directions:

1) Place radishes in a large bowl.
2) Combine lemon juice, olive oil and cayenne in a small bowl.
3) Pour dressing over radishes, add parsley and mix well. Season with salt to taste.
4) Place one lettuce leaf on each of 8 salad plates. Mound a portion of radish mixture over top of each. Serve immediately. Yield: 8 servings.

You might also enjoy these recipes:
Cucumber and Radish Salad with Feta Cheese- Kalyn's Kitchen
Cucumber and Radish Salad - Cooking By the Seat of My Pants
Radish and Grapefruit Salad - Diet Dessert and Dogs
Radish, Cucumber and Beet Salad - Two Fat Als
Simple Radish Salad - Chubby Panda
Healthy Green Bean and Radish Salad - Serious Eats
Radish Salad - Mark Bittman

Sunday, July 11, 2010

Lavender Sugar, Butter and Salad Dressing - Blue Monday


From the kitchen of One Perfect Bite...While folks more sensible than Bob and I were enjoying their air conditioned homes or breezy decks, we were traipsing through fields of lavender doing our part to make the Oregon Lavender Festival a success. Our intent was to tour several operations and find a good local source for culinary lavender. I was easy to spot. Fair skin demands full sun protection on these hot sunny days. I was the gal who looked liked a bee keeper. High temperatures and blazing sun aside, we had a glorious day, met some kindred spirits and even picked up a few recipes that I can share with you today. The recipes are very easy to make and use less lavender than many of the recipes floating in cyberspace. Lavender has a distinctive taste that borders on bitter if too much of it is used. If you like its flavor, you might want to increase the amounts I have suggested in each of the recipes below. The first recipe is for lavender sugar. I've also included recipes for lavender butter and a salad dressing. I use dried flower buds in all these dishes because of the seasonal nature of fresh lavender. If you'd like to dry your own lavender, instructions can be found here. English lavender is the best to use for culinary purposes. Here are the recipes.

Lavender Sugar
1 cup granulated sugar
2 tablespoons coarsely ground dried lavender buds

Combine lavender and sugar. Store in an airtight container for at least 3 days. Strain before using. Yield: 1 cup.

Lavender Butter

1/2 cup unsalted butter, softened
1 tablespoon honey
1-1/2 teaspoons dried lavender buds, whole or lightly ground

Combine butter, honey and lavender in a small bowl. Mix well. Shape as desired. Refrigerate until firm. Serve with sweet bread. Yield: 1/2 cup.

Lavender Salad Dressing
3/4 cup extra virgin olive oil
1/4 cup balsamic vinegar
2 tablespoons lemon juice
2 teaspoons minced garlic
2 tablespoons Dijon mustard
1/4 cup honey
1-1/2 tablespoons dried lavender buds, ground
Salt and Pepper to taste

Combine oil, vinegar, lemon juice, garlic, mustard, honey, lavender, salt and pepper in the jar of an electric blender. Pulse to combine. Transfer to a serving container. Chill for at least 1 hour before serving. Yield: 1 cup.

You might also enjoy these recipes:
Peach-Lavender Cobbler - Delish
Apricot Clafouti with Lavender and Pecans - Cooking with Corey
Lavender White Chocolate Cookies - Life Lightly Salted
Brandy Tuiles with Lavender Cream - My Easy Kitchen
Bouquet Cupcakes: Lilac and Lavender - The Conscious Kitchen
Raspberry Lavender Lemonade - Kahakai Kitchen

This post is being linked to:
Smiling Sally - Blue Monday