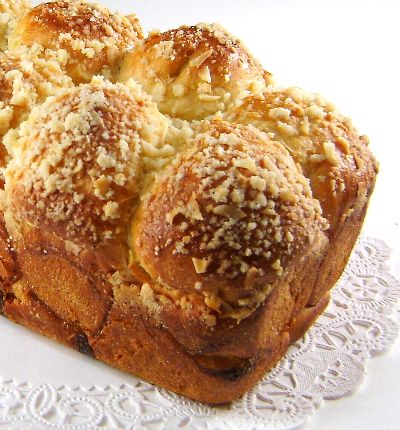
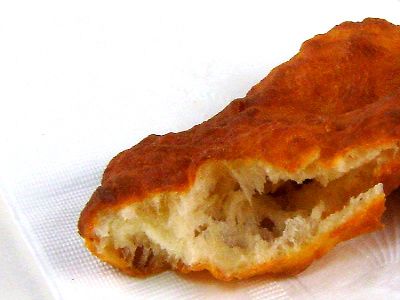
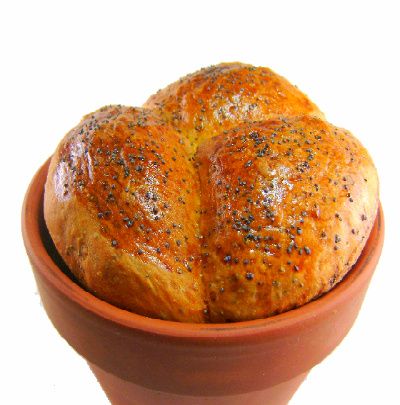
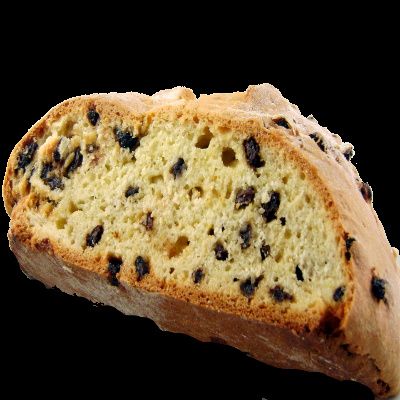
Showing posts with label bread. Show all posts

Thursday, December 9, 2010

Quick and Crusty Hard Rolls


From the kitchen of One Perfect Bite...For over a year now, I've been testing recipes for hard rolls. I've been trying to find buns that are similar to those used to make authentic Vietnamese bánh mì. The best of these rolls have crusts that shatter when you bite into them and their interiors are pillowy soft. While I have yet to have that "Eureka" moment, this last effort did yield wonderful rolls that I know your family will love. If you have a stand mixer with a dough hook, this recipe defines simplicity. All ingredients get thrown into a bowl and the contents are beaten until everything is mixed and a dough is formed. The dough goes into the refrigerator for at least 24 hours before it is shaped and left to rise again. That's it. The original recipe came from King Arthur Flour and I found it on a food board whose name I no longer remember. The slow rise in the refrigerator actually improves the flavor of the rolls, so don't be tempted to cut it short. The dough can be kept for up to five days before it begins to sour. This recipe calls for instant yeast which is slightly more potent than active dry yeast. A discussion of the two types of yeast can be found here. You can substitute one for the other if you wish. Like all breads of this type, the rolls are best eaten the day they are made. They lose their crackle if they sit over night and stale very quickly. The stale rolls do, however, make wonderful stuffing for pork chops or a small chicken. I hope you'll give these a try. Here's the recipe.

Quick and Crusty Hard Rolls
...from the kitchen of One Perfect Bite courtesy of King Arthur Flour

Ingredients:
4 to 4-1/2 cups all-purpose flour
1-1/2 cups water
2 teaspoons salt
1/2 teaspoon instant yeast

Directions:
1) Combine all of the ingredients and mix till cohesive. Knead dough, by hand or mixer, about 5 to 10 minutes, till it's soft and somewhat smooth; it should be cohesive, but surface should still be a bit rough. Place kneaded dough in a greased bowl, cover it, and refrigerate at least overnight, or for up to 5 days.
2) Remove dough from refrigerator, fold it over gently a few times, and cut off desired amount; you'll need golf-ball size pieces for dinner-size rolls and egg size pieces for sandwich buns. Return any remaining dough to refrigerator.
3) Form rolls by shaping the pieces into balls, then rolling them under your lightly cupped fingers on an unfloured work surface. Place shaped rolls onto a greased or parchment-lined baking sheet, cover, and let them rise for 1 1/2 to 2 hours, until they're very puffy.
4) Bake rolls in a preheated 425 degree F oven for 15 to 18 minutes, till they're golden brown. Yield: 9 sandwich buns or 18 dinner rolls.

You might also enjoy these recipes:
Rockin' Rolls - Food Gal
Soft Garlic Bread Sticks - Cookery Corner
Dinner Rolls - A Little Bit of Everything
Addictive Parker House Rolls - Sublime Hodge Podge
Multigrain Rolls - Annie's Eats
Sweet Potato Rolls - Coconut and Lime

This recipe is being linked to:
Designs By Gollum - Foodie Friday

Monday, November 22, 2010

Coconut Bubble Bread


From the kitchen of One Perfect Bite...I've been searching for something new to serve for the Thanksgiving and Christmas holidays. When you've cooked as long as I have, novelty can be a problem. I've whisked and woked my way through lots of kitchens and have seen food fads come and go, then come and go again. Ming Tsai, Emeril Lagasse and, worse yet, Jamie Oliver have aged before my eyes, so perhaps you can understand why I'm vexed that it's so hard to find something really new for the holidays this season. It once was a very easy thing to do. Alas, that is no longer true. I decided I'd have to cast a wider net to find what I was looking for this year. If it could be eaten, didn't bite back and came with a readable recipe, it became fair game in my hunt for the new or novel. A fairly general query led me to a wonderful site called The Knead for Bread and there I found this lovely yeasted coconut bread. While there are many recipes for coconut quick breads, this was the first I'd seen for one leavened with yeast. I wanted a sweet bread that could be toasted for a holiday breakfast and this recipe was perfect for my needs. I did make some minor changes to the recipe after tasting the first of the loaves I baked. I added coconut extract to the ingredient list to give the bread a more pronounced coconut flavor. I also removed the grated coconut from the dough but left it in the topping. The bread is delicious and it has a wonderful crumb. It makes marvelous toast and will be perfect for a holiday breakfast. If you prefer, the bread can be pulled off in hunks and eaten out of hand, gorilla style. I know you will like this. Here's the recipe.

Coconut Bubble Bread...from the kitchen of One Perfect Bite, courtesy of The Knead for Bread

Ingredients:
Dough
2/3 cup coconut milk
2/3 cup lukewarm water
2 tablespoons melted butter
1 to 2 teaspoons coconut extract
1/2 cup sugar
2 tablespoon milk powder
4 teaspoons instant yeast
1 teaspoon salt
1 beaten egg
4 cups all-purpose flour
Topping
1 egg white
1 tablespoon water
3 tablespoon flour
2 tablespoon sugar
2 tablespoon butter, soft
2 tablespoon coconut(finely chopped)

Directions:
1) In a large bowl add coconut milk, lukewarm water, butter, coconut extract, sugar, milk powder, yeast, salt and egg. Mix well with a wooden spoon. Add half of flour and continue to mix till smooth. Gradually add in remainder of flour. When it becomes difficult to mix, dump onto a work surface and knead for 8 to 10 minutes. Oil bottom and sides of a bowl. Add dough and turn to coat all sides with oil. Cover with plastic wrap and let rise for about 1 hour, or until double in bulk. Cut dough into two equal pieces. Take one piece and cut into 16 more pieces. Roll the first eight piece of dough into a ball and place into the bottom of an 4-1/2 X 8 greased loaf pan. Now, roll out the other 8 pieces of dough and place them on top of those already in pan. Do the same with the other large piece of dough and you should end up with two loaves. Cover with plastic wrap and allow to rest for about an hour or till the dough reaches about 1 inch from the top of the pan.
2) To make the topping, mix flour, butter, sugar and coconut together in a small bowl. Using your fingers mix till the mixture becomes a crumble. In a separate bowl combine the egg white and the tablespoon of water. Beat with a wire whisk till foamy. Brush the tops of the loaves with the foam and then sprinkle with the crumble topping. Place into a 350 degree preheated oven for about 25-30 minutes. Remove from pan and cool on a wire rack. Yield: 2 loaves.

You might also enjoy these recipes:
Christmas Stollen - The English Kitchen
Cranberry Orange Cinnamon Rolls - Two Peas and Their Pod
Lemon Pull-Apart Loaf - Buttercream Barbie
Quick Brioche - Piece of Cake
Day Before Cinnamon Rolls - Cookie Madness
Hot Cross Buns - Buttercream Barbie

This post is being linked to:
Wild Yeast - Yeast Spotting

Thursday, November 18, 2010

Paratha


From the kitchen of One Perfect Bite...While we were in India, Bob and I were entertained by three young families who opened their homes and kitchens to us. These were atypical families and the meals we shared with them were those that would be found on the tables of the upper middle class. They were all marvelous hosts and I learned a great deal about the Indian kitchen during visits in their homes. One of our hostesses was a cooking instructor who loved to share her knowledge with other people. She was a woman with a mission. Most visitors to India don't realize that an average Indian homemaker spends at least a third of her day preparing meals for her family. She wanted to help reduce that time by simplifying classic recipes and techniques. The Indian kitchen bears no resemblance to yours or mine. Freshness is of paramount importance, so refrigerators are quite small. Fruits and vegetables are purchased daily from vendors who bring produce to the homes for selection. Meats and dairy products are purchased in the same fashion. That means that the Indian kitchen is also very seasonal. There are no peas if peas are not in season. The kitchens in which the cooking is done are Spartan. The ones I saw did not have built-in ovens or cooktops. Meals were cooked on portable gas burners or in small ovens that were set on countertops. Each of the kitchens had an auxillary table, a running bank of lower cabinets and a large sink. Family meals were always served in the dining room. Our hostesses all had help to assist with cooking and serving when they had guests. The help was generally male, though the children's nannies might be called on to cook treasured family recipes. While members of the family wore shoes, the kitchen help and servers did not. It was an interesting distinction. We quickly learned that curry is a sauce, not a powder and that masala is a combination of spices that can very from one region to another. I personally learned that the breads of India are the glory of its tables. Served hot from the grill, these breads can make grown men weep and put women on perpetual diets. They are really lovely. Today's recipe is for an Indian flatbread called paratha. You may have seen it stuffed. This is a much simpler version of that bread. I hope you'll give it a try.

Paratha...from the kitchen of One Perfect Bite

Ingredients:

2 cups all-purpose flour + 1/2 cup for dusting
2 cups whole wheat flour
3/4 cup scallion, cut up into 1 inch pieces
3 tablespoons mint leaves
1/2 teaspoon red pepper flakes
1 teaspoon freshly cracked black pepper
1 teaspoon salt
1-1/2 cups warm water
1 tablespoon oil
2 tablespoons ghee for brushing parathas

Directions:

1) Place both flours, scallions, mint leaves red pepper flakes, black pepper and salt in bowl of a food processor. Pulse until mixture is thoroughly mixed and onions and mint are finely chopped. Add warm water through feed tube and pulse until dough gathers into a ball. Remove, knead and rub with oil. Cover and let rest at room temperature several hours before proceeding.
2) Form dough into 12 equal size balls. On a well floured surface, roll dough into a very thin disc. Heat a cast iron griddle or frying pan over medium-high heat and cook paratha until brown spots appear on both sides. Brush with ghee and stack. Serve hot. Yield: 12 pieces.

You might also enjoy these recipes:
Puffy, Fluffy Spinach and Green Chili Puris - KO Rasoi
Tandoori Rotis - Healthy and Delicious
Whole Wheat Chapati - Anja's Food 4 Thought
Naan - Closet Cooking
Multi-Grain Roti/Chipati - A2Z Vegetarian Cuisine
Chapatis and Pooris - One Perfect Bite

Thursday, November 4, 2010

Autumn Date and Hazelnut Bread


From the kitchen of One Perfect Bite...The hazelnut harvest is underway here in Oregon. Every fall, stores and farm stands greet us with bins that are brimming with this meaty treasure. They are an important part of the local economy and I use them whenever I can. A local grower actually sells his hazelnuts chopped, roasted and ready for the freezer. It gets even better. If you have the foresight to ask, he also mill the nuts to a fine powder that's perfect for flourless baking. The downside to all this is there is no excuse for not baking cakes and breads that require hazelnuts. I love this particular quick bread. The recipe was developed by Susan Loomis for the French Farmhouse Cookbook and it is the only version of date nut bread that I still make today. It's wonderful for church gatherings or coffees where you have to provide something a little sweet. The bread is extremely easy to make , but if you want the best of flavors let it age for at least a day before slicing. I actually wait 2 days before cutting mine. The crust is what keeps me coming back to this recipe. It is soft and buttery and the loaf has a remarkable aroma that I find irresistable. If you haven't made this bread I hope you'll give it a try. There will be no regrets. Here's the recipe.

Autumn Date and Hazelnut Bread...from the kitchen of One Perfect Bite, courtesy of Susan Loomis

Ingredients:
1-3/4 cup all-purpose flour
1 teaspoon baking powder
3/4 teaspoon salt
11-1/2 (eleven and one-half) tablespoons unsalted butter, at room temperature
1/3 cup granulated sugar
3 large eggs
1 teaspoon vanilla or hazelnut extract
1/2 cup hazelnuts, toasted, skinned and coarsely chopped
1 cup dates, pitted and coarsely chopped

Directions:
1) Preheat oven to 375 degrees F. Butter and flour a 9 x 5 x 3-inch loaf pan. Set aside.
2) Sift flour, baking powder and salt together on a piece of waxed paper.
3) In bowl of an electric mixer, blend butter and sugar until mixture is light and pale yellow. Add eggs, one at a time, beating after each addition. Beat in vanilla or hazelnut extract. Turn mixer to low speed and add the flour, mixing just until combined. Add hazelnuts and dates and mix to distribute through batter.
4) Scrape batter into prepared pan, rapping it sharply on a hard surface to release any air bubbles in batter. Bake in center of oven until the loaf has puffed and a knife inserted into center of cake comes out clean, about 50 minutes.
5) Remove pan from oven and immediately remove it from pan. Cool on a wire rack. Yield: 1 loaf - 8 servings.

You might also enjoy these recipes:
Mango Nut Bread - Chef in You
Fruit and Nut Loaf - Anja's Food 4 Thought
Chocolate and Hazelnut Bread - Chef in You
Cherry and Almond Scones - The English Kitchen
Medjool Date and Walnut Bread - Closet Cooking
Date Nut Spice Bread - Brown Eyed Baker
Three Savory Quick Breads - One Perfect Bite

Sunday, October 24, 2010

Pumpkin Pecan Bread with Streusel Topping


From the kitchen of One Perfect Bite...While spring is my favorite season, I love the aromas that drift from the fall kitchen. This bread is wonderfully fragrant and it's as tasty as its aroma promises. While it is delicious, I must warn you the bread is very sweet and that may be off-putting to some. The recipe was develop by Rebecca Rather, of Rather Sweet Bakery and Cafe, and it can be found in her The Pastry Queen cookbook. The recipe makes two loaves of bread or enough muffins to feed the third world. Properly rapped the breads stays fresh for days and it freezes beautifully. I have several loaves in the freezer waiting for meetings and coming holiday parties. It is very easy to prepare and can be made without special equipment. The bread was new to me this season and I consider it to be a wonderful addition to my fall kitchen. Here's the recipe.

Pumpkin Pecan Bread with Streusel Topping ...from the kitchen of One Perfect Bite, courtesy of Rebecca Rather

Ingredients:
Bread
1-1/2 cups pecan pieces, divided use
1 cup vegetable oil
3 cups sugar
4 large eggs
1 (15 ounce) can pure pumpkin
1 cup water
3 cups all purpose flour
2 teaspoons baking soda
1-1/2 teaspoons ground nutmeg
1-1/2 teaspoons ground allspice
1-1/2 teaspoons ground cinnamon
1-1/2 teaspoons ground cloves
1/2 teaspoon salt
Topping
1/2 cup firmly packed golden brown sugar
1/4 cup (1/2 stick) unsalted butter, melted and slightly cooled
2 teaspoons ground cinnamon
1/2 cup toasted pecan pieces (above)

Directions:
1) To make bread: Preheat oven to 350 degrees F. Arrange pecans on a baking sheet in a single layer and toast them in oven for 7 to 9 minutes, until golden brown and aromatic. Reserve 1/2 cup of toasted pecans for topping.
Grease two 9 by 5-inch pans or 36 standard-size muffin cups with butter or cooking spray.
Whisk oil and sugar in a large bowl. Add eggs, pumpkin, and water and whisk until combined. Stir in flour, baking soda, spices, and salt. Gently stir in 1 cup of the pecan pieces. Divide batter evenly between two pans or fill muffin pans almost to top with batter.
2) To make the topping: Stir sugar, butter, cinnamon, and the reserved 1/2 cup of pecan pieces in a medium bowl. Sprinkle topping liberally over the loaves or the muffins before baking.
3) To bake: Bake the loaves for 1 hour, or until a toothpick inserted into center comes out clean. Bake muffins for 30 to 35 minutes.

You might also enjoys these recipes:
Raw Apple Bread - Living the Gourmet
Apple Caraway Bread - Eclectic Recipes
Okanagan Apple Bread - One Perfect Bite
Pumpkin Apple Bread - One Perfect Bite
Pumpkin Chocolate Chip Bread - Two Peas and Their Pod
Pumpkin Molasses Bread - Tasty Eats at Home
Walnut Topped Pumpkin Bread - LA Easy Meals
Pumpkin Bread with Raisins and Pecans - That's Not What the Recipe Says
Pumpkin Bread with Dried Cranberries - No Fear of Entertaining

Sunday, October 17, 2010

Apple Oatmeal Bread


From the kitchen of One Perfect Bite...I know he means well, but sometimes the Silver Fox is not helpful. He has a tendency to comment on works in progress and I really didn't need to hear his, "...that'll grow hair on your chest," as I added oatmeal to my bread mix. As a child I was very literal minded. If someone were to say I'm beside myself, you can bet I checked the room. Old habits die hard. Without thinking, I glanced down and managed to give him his laugh of the day. What can I say? While it's more nutritious than many, the bread is not a cure for male pattern baldness. It is very easy to prepare and it can be quickly made with no special equipment. Needless to say, it perfumes the kitchen as it bakes and the lingering aroma of cinnamon and apples will drive the unsuspecting to distraction. It's a really nice bread that can be made with a wooden spoon. While it is heavier than many quick breads, it's a perfect fall treat. The bread stays fresh for days and it makes wonderful toast. I hope you will try it. Here's the recipe.

Apple Oatmeal Bread
...from the kitchen of One Perfect Bite

Ingredients:
1-1/2 cups flour
2 teaspoons baking powder
1/4 teaspoon baking soda
1 teaspoon salt
2 teaspoons ground cinnamon
1/4 teaspoon ground nutmeg
2/3 cup brown sugar
1 cup rolled oats
1-1/2 cups grated apple
1/4 cup raisins
2 large eggs
1/4 cup whole milk
1/4 cup vegetable oil

Directions:
1) Preheat oven to 350 degrees F. Grease and flour an 8-1/2 x 4-1/2 inch loaf pan. Set aside.
2) Combine flour, baking powder, baking soda, salt, cinnamon, nutmeg, brown sugar, and oats in a large bowl. Add apple, raisins, eggs, milk, and oil. Mix until dry ingredients are moistened. Mixture will be stiff.
3) Put mixture into prepared pan and bake for 55 to 60 minutes, or until done. Let sit for 20 minutes. Remove from pan and continue cooling on a wire rack. Yield: 1 loaf (about 12 slices).

You might also enjoy these recipes:
Pumpkin Chocolate Chip Bread - You Made That?
Glazed Apple, Carrot and Walnut Loaf - The English Kitchen
Banana Nut Bread - Brown-Eyed Baker
Cherry Pecan Bread - Amanda's Cookin'
Coconut Bread - Bored Cook in the Kitchen
Cinnamon Quick Bread - Sugar Plum
Raspberry Almond Swirl Bread - Baking Bites

Sunday, August 22, 2010

Chapatis and Pooris: One Dough Two Breads - Blue Monday


Chapatis


Pooris


From the kitchen of One Perfect Bite...With our trip to India, Nepal and Tibet just weeks away, I thought I'd start to experiment with some of the more common foods of the region. I do this before all of our adventures begin and, more often than not, the first dish I attempt to make is the bread of the area. I adore bread and was delighted to find that the dough I worked with for this post actually makes two Indian classics. In India, a whole-wheat flour called atta is traditionally used make these breads. The flour can be hard to come by, but a reasonable facsimile of it can be made by combining three parts of whole-wheat flour with two part of white flour. The difference between chapatis and pooris lies in how they are cooked. Chapatis, which resemble tortillas, are a flatbread that is cooked on a griddle. Pooris are deep fried to produce hollow and delicious pillows that are perfect for scooping up food. Both breads are best eaten shortly after they are made, but the dough can be made up to a day before it is cooked, if it is refrigerated in an airtight container. Here's the recipe for these tasty and easy to make breads.

Chapatis and Pooris
...from the kitchen of One Perfect Bite inspired by Nancie McDermott

Ingredients:
3/4 cup whole-wheat flour
1/2 cup white flour
1/2 teaspoon salt
1/2 cup warm water

Directions for Chapatis:
1) Sift both flours and salt into a medium bowl.
2) Add water and mix with hands to form a soft dough. Turn onto a lightly floured board and knead, adding flour as needed, until no longer sticky and dough is smooth and elastic. Cover with a damp cloth and let rest for 30 minutes.
3) To cook chapatis, roll dough into a thin cylinder and cut into 12 pieces. Roll each piece into a smooth ball. Cover balls until ready to roll. Flatten each piece into a disk and place on a floured board. Roll it into a thin disk that is 4 to 5 inches in diameter.
4) Using a medium frying pan set over medium-high heat, cook chapatis one at a time, turning after 1 minute and cooking second side for another 30 to 60 seconds. Press quickly and firmly at various spots on the surface to encourage it to puff.
5) Remove and set aside. Cover with a kitchen towel to keep warm. Continue with remainder of dough balls, stacking them together until ready to serve. Yield: 12 chapatis.

Directions for Pooris:

1) Sift both flours and salt into a medium bowl.
2) Add water and mix with hands to form a soft dough. Turn onto a lightly floured board and knead, adding flour as needed, until no longer sticky and dough is smooth and elastic. Cover with a damp cloth and let rest for 30 minutes.
3) To cook pooris, roll dough into a thin cylinder and cut into 16 pieces. Roll each piece into a smooth ball. Cover balls until ready to roll out. Place a cookie sheet on work surface to hold pooris as they are rolled.
4) Flatten a ball into a thin disk. Place on a floured work surface and roll into a pancake 3-inches in diameter. It should be 1/4-inch thick. Place on cookie sheet and continue to roll remainder of dough.
5) In a medium frying pan set over medium heat, bring 2 cups vegetable oil to 360 degrees F. Slide a pooris into oil. When it begins to puff, use a slotted spoon to press it into oil. Move spoon around the edges to help it puff. Turn it over when first side browns, about 15 to 30 seconds. Remove pooris from pan when second side is browned. Drain on paper towels. Continue with remainder of disks. Serve while hot. Yield: 16 small pooris.

You might also enjoy these recipes:

Puffy, Fluffy Spinach and Green Chilli Pooris - Ko Rasoi
Naan Indian Bread - Food Lovers
Bhatura - Tigers and Strawberries
Parantha: Onion Stuffed Indian Bread - Cook @ Ease
Garlic-Chard Roti - eCurry
Indian Dosas - One Perfect Bite

This post is being linked to:
Smiling Sally - Blue Monday

Sunday, August 15, 2010

Pumpkin Yeast Rolls - Blue Monday


From the kitchen of One Perfect Bite...While it may sound strange to those whose families live in close proximity to one another, we are spread over the globe and celebrate Thanksgiving whenever we can all get together to celebrate the feast. The Eastern contingent of the family, which includes our younger grandsons, will be joining our very full house on Tuesday. That will be the night we celebrate our family Thanksgiving. These lovely rolls, for now safely ensconced in the freezer, will be one of the things that we serve. The recipe belonged to my husband's mother who was raised in Southern Illinois. They were part of her childhood and fairly typical of the farm breads that were served in that region at the time. They were served at bridge luncheons, probably because the original recipe made dainty rolls that were only 1-inch in diameter. The smaller size doesn't work for my trenchermen, so I double the size of our rolls. This dough, by the way, would make a wonderful cinnamon bread. The pumpkin keeps the rolls moist and there is just a hint of cinnamon to confound the tongue. I use canned pumpkin puree to make these because it's easier to use than fresh puree which can be stringy. I make these rolls for sentimental reasons. Some of you might enjoy them for their novelty. Here's the recipe.

Pumpkin Yeast Rolls...from the kitchen of One Perfect Bite

Ingredients:

1-1/2 teaspoons active dry yeast
1 teaspoon granulated sugar
1/4 cup lukewarm water
3 cups all-purpose flour
3-1/2 tablespoons unsalted butter
2 tablespoons light brown sugar
1/4 teaspoon salt
1 cup pureed pumpkin
1 egg, lightly beaten
1/4 cup maple syrup
1/4 teaspoon ground cinnamon
1 cup whole wheat flour

Directions:

1) Combine yeast, sugar and water in a large bowl. Let sit until foamy, about 5 minutes. Stir in 1/2 cup all-purpose flour. Cover and let risein a warm spot until double, about 1 hour
2) Melt 2 tablespoons butter and pour into a medium bowl. Add brown sugar, salt, pumpkin, egg, maple syrup and cinnamon. Add to yeast mixture and beat until smooth. Add whole wheat flour and 2-1/4 cups all-purpose flour to make a stiff dough.. Knead in pan. Cover and let rise in warm place until double in size, about 2 hours.
3) Punch dough down and turn onto a floured board. Knead briefly and roll to a sheet about 1/2-inch thick. Cut into 2-inch circles and place circles on a floured baking sheet. Cover loosely with a towel and let rise again for 1 hour.
4) Preheat oven to 425 degrees F. Melt reserved 1-1/2 tablespoons butter and brush on top of rolls. Bake for 15 to 20 minutes. Yield: 1 dozen 2-inch rolls.

You might also enjoy these recipes:
Quick Yeast Dinner Rolls - Christine's Cuisine
Honey-Oatmeal Dinner Rolls - Salad in a Jar
Buttered Rosemary Rolls - Sugar Crafter
Dinner Rolls for a Crowd - Noble Pig
Classic Dinner Rolls - Beach Lover's Kitchen
Dark Dinner Rolls - Canela and Comino

This post is being linked to:
Smiling Sally - Blue Monday

Maple Syrup World

Sunday, August 1, 2010

Schnecken


Top


Bottom

From the kitchen of One Perfect Bite..."Snails" or schnecken were a delight of my childhood. Our German and Swedish neighbors, Hannie and Mrs. P, both made them on regular basis. One made them in crescent form, the other shaped them as snails. While they look like sticky buns to the untrained eye, they are really more like a rugelach or crisp Danish. Yes, they're a bother to make, but I promise you'll find them to be worth every second you'll spend on them. I've just finished making a squirrel's stash of them for breakfasts while my family is here. I have two recipes for schnecken and both of them are delicious. Over time, I've settled on a dough that can be used for both types. It simplifies things a bit. I am going to provide two types of filling and two types of topping and let you select which you would prefer to use. One filling is made with almond paste, the other with cinnamon and sugar. I use a streusel topping for the almond filled buns and a nut topping for the others. Lest any of you think Bob and I always walk in lockstep, I love the almond-streusel buns while he prefers the more traditional cinnamon and nut topping. These rolls are not meant for folks new to yeast doughs, even old hands will need a goodly measure of patience to handle the wait times involved in this recipe. I shape my schnecken in snail form because I find that shape the easiest to work with. If you try these, I know you'll love them. It's like visiting a Viennese pastry shop in the comfort of your own kitchen. Here's the recipe.

Schnecken
...from the kitchen of One Perfect Bite inspired by a recipe in the New York Times

Ingredients:
Dough
1/2 cup whole milk
1-1/2 teaspoons instant yeast
2 large eggs, room temperature
1/3 cup sugar
2-3/4 cups unbleached all-purpose flour
12 tablespoons unsalted butter, room temperature
3/4 teaspoon salt
Almond Filling
2 ounces almond paste
3 tablespoons unsalted butter, room temperature
1/4 cup powdered sugar
1 teaspoon cornstarch
1/8 teaspoon salt
1/8 teaspoon almond extract
1/2 teaspoon vanilla extract
1 large egg yolk
Cinnamon Sugar Filling
1/2 cup firmly packed light brown sugar
1 tablespoon ground cinnamon
4 tablespoons unsalted butter
Streusel Topping
1/2 cup unbleached all-purpose flour
2 tablespoons packed light brown sugar
2 tablespoons granulated sugar
1/4 teaspoon ground cinnamon
Pinch salt
4 tablespoons unsalted butter, melted and lukewarm
Glaze for Streusel Topping
1 cup powdered sugar, sifted
Pecan Topping
Topping:
3/4 cup firmly packed light brown sugar
4 tablespoons unsalted butter
3 tablespoons honey
1 tablespoon light corn syrup
1-1/2 cups (6 ounces) coarsely chopped pecans

Directions:
1) To make the dough: Heat milk in a small saucepan until bubbles form around edges. Remove from heat and cool to lukewarm. Pour milk into a large mixing bowl, sprinkle yeast over milk, stir and let stand 5 minutes. Crack eggs into mixing bowl and whisk to combine. Stir in sugar and flour with a wooden spoon. Knead ingredients together in bowl until scrappy dough forms. Turn dough onto counter and knead briefly. Turn mixing bowl over dough and rest 20 minutes.
2) While dough rests, place 12 tablespoons butter and salt in a mixer bowl with a paddle attachment and beat until fluffy, pausing once to scrape down bowl, 30 seconds. Set aside.
3) Knead dough until smooth, 5 minutes. Pull into sections and add to mixer bowl with butter. Mix on medium speed until butter is mostly incorporated, scraping down bowl as necessary, about 3 minutes. Transfer dough with a plastic scraper or a spatula to counter. Work by hand, using short, pulling motions, until dough is smooth but still very soft, about 20 minutes. Shape dough into a round and place in a clean mixing bowl and tightly cover with plastic wrap. Rise at cool room temperature until spongy, 4 to 5 hours.
4) Sprinkle counter lightly with flour. Press fist into center of dough and deflate gently. Gather dough up and place on floured counter. Sprinkle top of dough lightly with flour and press into rectangle 10 inches wide by 14 inches long. Fold top third of dough down to center and bottom third up to cover it. Pinch edges to seal. Rotate dough on countertop one-quarter turn to the right so that it resembles a closed book. Press and stretch dough into rectangle 6 inches wide by 10 inches long. Repeat stretching and folding until dough resembles closed book 4 inches wide by 6 inches long. Press edges to seal. Sprinkle lightly on both sides with flour, wrap tightly in plastic wrap and refrigerate overnight.
5) To make almond filling: Combine almond paste, butter, powdered sugar, cornstarch, salt and extracts in a food processor bowl and process until smooth, pausing once to scrape down bowl, about 1 minute. Add egg yolk and process until smooth. Transfer filling to a small bowl, cover well and refrigerate until 30 minutes before using.
6) To make cinnamon and sugar filling: Combine brown sugar and cinnamon in a small bowl. Melt butter but do not mix with sugar.
7) To make streusel topping: Combine ingredients in a small bowl and fluff with fork until combined. Squeeze streusel between fingers to create pieces of varying size. Cover with plastic wrap and refrigerate until ready to use.
8) To make pecan topping: In a 1-quart saucepan, combine brown sugar, butter, honey and corn syrup over low heat; stir until sugar and butter are melted. Set aside.
9) To shape dough: Remove almond filling and dough from refrigerator. Sprinkle counter and top of dough lightly with flour, and whack dough with a rolling pin to flatten it. Roll dough evenly into a 20-inch square. Continue to loosen from counter and roll until dough relaxes, using as little flour as possible.
10) To fill with almond filling: Spread almond filling evenly over dough. Trim edges with a bench scraper or a chef's knife. Roll dough tightly and evenly from bottom, jellyroll-style. You should have a cylinder 18 inches long and about 4 inches in diameter. Transfer jellyroll to a sheet pan lined with parchment paper and refrigerate 20 minutes.
11) To fill with cinnamon-sugar: Brush dough with melted butter and sprinkle with cinnamon- sugar mixture. Roll dough tightly and evenly from bottom, jellyroll-style. You should have a cylinder 18 inches long and about 4 inches in diameter. Transfer jellyroll to a sheet pan lined with parchment paper and refrigerate 20 minutes.
12) To apply streusel topping: Remove jellyroll from refrigerator and slice into 20 1/2-inch rounds with an electric knife or a sharp serrated knife. Transfer 10 rounds each to 2 11 -1/2 x 17-inch parchment-lined sheet pans. Spray surface lightly with water. Sprinkle generously with streusel, pressing streusel into surface. Cover schnecken lightly with plastic wrap and let rise until light and spongy, about 90 minutes.
13) To apply pecan topping: Pour pecan topping into a greased 11-1/2 x 17-inch pan and sprinkle with pecans. Remove jellyroll from refrigerator and slice into 20 1/2-inch rounds with an electric knife or a sharp serrated knife. Transfer to pan. Cover lightly with plastic wrap and let rise until light and spongy, about 90 minutes.
14) Adjust oven rack to lowest position and heat oven to 400 degrees F. Place a shallow pan on bottom of oven and pour boiling water into pan. Bake schnecken one sheet pan at a time. After 5 minutes, lower oven to 350 and bake until nicely risen and deep golden brown, 15 to 20 minutes more. Pecan rolls may need more baking time.
15) If you are using streusel topping, whisk powdered sugar and 2 tablespoons hot water in a small bowl to make glaze while rolls are baking. Remove sheet pan from oven and brush schnecken lightly with glaze. Transfer schnecken to a cooling rack. Bake second sheet pan as you did the first.
16) If you are using the pecan topping, remove sheet pan from oven and immediately invert onto a serving plate.
17) Regardless of topping, this recipe makes 20 4-inch schnecken.

Cook's Note: Pecan schnecken can be also be baked in large-size muffin pans.

You might also enjoy these recipes:
Lemon Cheese Buns - One Perfect Bite
St. Lucia Buns - One Pefect Bite
Cinnamon Rolls - One Perfect Bite
Blueberry Cream Cheese Rolls - Inspired2Cook
Pumpkin Five Spice Sweet Rolls -Coconut and Lime
Pan de Mallorca Mallorcan Sweet Rolls - Always Order Dessert

Wednesday, July 21, 2010

Sweet Potato Biscuits


From the kitchen of One Perfect Bite...This is not the food of my people. I was raised on sour dough, seeded rye and grain so whole it could crack your teeth. Biscuits, save for shortbread, were not in my purview and I was well into my thirties before I figuratively crossed the Mason-Dixon line and had a true cream biscuit. I loved it, vowed to master its making, but, instead, went home and again made cinnamon buns and kaiser rolls. The foods of a lifetime are the ones learned in the kitchen's of our childhood. Biscuit had no place in my early memories, so they slid from my culinary radar. Then fate intervened and sent a Southern son-in-law my way. Biscuits and their mastery became important as we tried to weave the traditions of his childhood into those of our table. While striving for mastery, I came across a feature that caught my eye and changed the direction in which I was heading. Adam Ried, in an article written for The Boston Globe, claimed, "The wedding of biscuit to sweet potato is an occasion of culinary bliss." Pushing hyperbole aside, I was intrigued by his claim and decided to try his recipe. It makes moist and tender biscuits with a riveting color that comes from roasted and caramelized sweet potatoes. I really like these, but they are not a mix and bake affair. Their execution requires planning and they are a poor choice for a busy kitchen with limited hands to help. If you make these at a time you are not under stress, I think you'll be delighted with the results. Here's the recipe.

Sweet Potato Biscuits...from the kitchen of One Perfect Bite courtesy of Adam Ried

Ingredients:

1 medium-large sweet potato, about 14 ounces
1/4 cup cold buttermilk
2 cups all-purpose flour, plus extra for patting out dough and cutting biscuits
1 tablespoon baking powder
1/2 teaspoon baking soda
1 tablespoon light brown sugar
Pinch cayenne
Salt and black pepper
8 tablespoons (1 stick) cold unsalted butter, cut into roughly 1/2-inch cubes

Directions:

1) Set oven rack in middle position and heat the oven to 425 degrees. Line a large baking sheet (roughly 18 by 13 inches) with parchment paper or a silicone liner, and set aside.
2) Prick sweet potato in several spots with a fork. Place it on a small baking sheet, and bake until tender, about 1-1/4 hours. Cut potato open, peel back skin (to release steam), cool it to room temperature, about 40 minutes. Peel off skin, and roughly mash flesh (you should have about 1-1/2 cups). Add buttermilk, mix very well, and set aside. Again preheat oven to 425 degrees F.
3) In a food processor, process 2 cups flour, baking powder, baking soda, brown sugar, cayenne, 1 teaspoon salt, and 1/2 teaspoon black pepper until well blended. Scatter butter pieces evenly over flour mixture in food processor and pulse until mixture resembles coarse cornmeal, about 6 2-second pulses. Add sweet potato mixture in dollops in several spots over flour and butter mixture, and pulse until flour and sweet potato mixtures combine and just begin to come together into a light-orange dough mass, 10 to 15 2-second pulses.
4) Generously flour a clean work surface, turn out dough, and sprinkle top with flour. Knead dough gently, folding it in half and rotating it 3 or 4 times, just until it is uniform and cohesive (try to keep the kneading to a minimum). Sprinkle a little bit more flour on the work surface and dough to prevent sticking, if necessary, and gently pat the dough into a circle that is roughly 8 inches in diameter and 1 inch high (the height is more important than the shape or diameter, which may vary). Dip a sharp 2-1/2-inch biscuit cutter into flour and using brisk, decisive, straight-down punches (avoid rotating or twisting cutter in dough), cut out rounds of dough as close to one another as possible (to maximize the number of rounds), dipping cutter into flour before each new cut. Transfer dough rounds to prepared baking sheet, positioning them about 1 inch apart. Push dough scraps together and knead them gently once or twice until cohesive. Again pat out the dough until it is 1 inch high, dip cutter into flour, and in same manner as before, cut out as many dough rounds as possible, and transfer them to the baking sheet with first batch.
5) Bake until biscuits are puffed, light golden on top, and deep brown on bottom, 15 to 17 minutes, rotating sheet halfway through baking time for even cooking. Transfer biscuits to a wire rack, cool for about 15 minutes, and serve warm. Yield: 10 to 12 biscuits.

Cook's note: Variations of sweet potato biscuits can be found here.

You might also enjoy these recipes:
Drop Biscuits with Cheddar Cheese and Garlic - One Perfect Bite
Blueberry Biscuits - The Runaway Spoon
Cinnamon Raisin Biscuits - Salad in a Jar
Berry Biscuit Cups - Cooking Stuff
Biscuits in Sausage Gravy - Chaos in the Kitchen
Jalapeno Cheddar Biscuits - Foodie Memoirs
Southern Buttermilk Biscuits - Katy's Kitchen

Friday, July 2, 2010

Strawberry Bread Pudding - Pink Saturday


From the kitchen of One Perfect Bite...I know it's summer, and I know that 2010 has been declared The Year of the Pastry Chef. I'm okay with all that. It's not my intent to buck culinary trends, or the calendar for that matter. I know that sensible people don't make bread pudding in July and I suspect that most pastry chefs and food snobs feel this homely dish is not worthy of their attention. They're dead wrong. The Marquess de Queensbury Rules of the Kitchen clearly state that any dish, however homely, can be made at any time of year. The only condition attached to its execution is that the dish must be delicious. A stale loaf of bread and a glut of fresh field strawberries were my inspiration. My muse led me to a site called The Daily Loaf - The CL Cookbook where I found a recipe for strawberry bread pudding. I made a few minor changes to the recipe, put it in the oven and 40 minutes later had a wonderful dessert. The original recipe uses a caramel sauce for garnish. I thought that to be at odds with the strawberries, so I served ours with French vanilla ice cream. I really loved this and will use frozen berries to make it in the winter as well. I hope you'll try this simple dessert. It is wonderful. Here's the recipe.

Strawberry Bread Pudding...from the kitchen of One Perfect Bite, inspired by the Daily Loaf

Ingredients:

4 eggs
2 cups whole milk
1/2 cup white granulated sugar
1/4 cup golden brown sugar
1 teaspoon vanilla extract
2 teaspoons ground cinnamon
1/2 teaspoon ground nutmeg
1/2 teaspoon ground ginger
1/4 teaspoon salt
12 ounces crusty stale bread, torn or cut in bite-size pieces
2 cups fresh or frozen (thawed) strawberries, sliced

Directions:
1) Preheat oven to 350 degrees. Lightly grease an 8 x 8 x-2-inch pan. Set aside.
2) Combine eggs, milk, sugar (white and brown, vanilla extract, spices and salt in a small bowl. Whisk until blended.
3) Place bread pieces into a large bowl. Pour milk mixture over bread and toss to combine. Let sit for 15 minutes to allow milk to be absorbed into bread.
4) Fold in strawberries and pour mixture into baking dish.
5) Bake for 30 to 40 minutes, or until raised and puffy. Insert a toothpick into center and if it comes out fairly clean, it’s done. Let cool for a few minutes before serving. Yield: 8 to 10 servings.

Caramel Sauce

Ingredients:
1/2 stick of butter
1/2 cup of brown sugar

Directions:

1) Put butter in a small pan or sauce pan over medium heat and let it melt.
2) Add brown sugar and stir until it’s combined. Lower heat. Stirring constantly, let sauce slightly simmer until sugar is completely dissolved and it is slightly thickened, about 5 minutes. Remove from heat. Serve drizzled over warm bread pudding.

You might also enjoy these recipes:
Cranberry Bread Pudding - One Perfect Bite
Chocolate Bread Pudding - One Perfect Bite
Chocolate Bread Pudding - Beyond Salmon
Bread Pudding - Simply Recipes
Summer Pudding - David Lebovitz
Bread Pudding with Kahlua Sauce - Ravenous Couple
Nutella Bread Pudding - Su Good Sweets

This post is being linked to:
Pink Saturday, sponsored by Beverly at How Sweet the Sound.

Sunday, May 30, 2010

Blue Cheese Bread


From the kitchen of One Perfect Bite...It was a busy day. Commercial growers in our area open their fields and display gardens to the public at this time of year. We spent the day touring acres and acres of peonies, iris and hostas and, when the crowds became too much, enjoyed the respite of the grower's gardens. A few peeks at the fields and gardens follow today's recipe. A brief sunshower, called a "monkey's wedding," dampened our clothing but not our spirits and the reward for our good nature was the promised rainbow. Dinner, which came from the freezer, was a late affair of tomato soup and blue cheese bread. The combination goes extremely well together and I thought those of you who love blue cheese might want to try the bread. It is much like a garlic bread or ripped baguette and is really easy to make. Here's the recipe.

Blue Cheese Bread...from the kitchen of One Perfect Bite

Ingredients:
1/2 cup butter, softened
4 ounces crumbled blue cheese
2 tablespoons grated Parmesan cheese
1 tablespoon minced chives
1 teaspoon garlic powder
1 loaf (1 pound) unsliced French bread

Directions:
1) Preheat oven to 350 degrees F.
2) Combine butter, blue cheese, Parmesan cheese chives and garlic powder in a small bowl. Mix well. Cut bread into 1-inch slices but leave slices attached at bottom of loaf. Spread cheese mixture between slices.
3) Wrap loaf in a large piece of heavy-duty foil. Fold foil around bread and seal tightly. Bake for 20 minutes or until heated through. Serve warm. Yield: 10 servings.

You might also enjoy these recipes:
My Dad's Garlic Bread - 101 Cookbooks
Roasted Garlic Bread - Vanilla Icing
Cheesy Ramp Garlic Bread - Closet Cooking


Adelman's Peony Gardens Salem, Oregon


Schreiner's Iris Gardens Salem, Oregon


Schreiner Family Garden


Schreiner Family Gardens


Seabright Hosta Display Garden Salem, Oregon

Monday, May 10, 2010

Spoon Bread with Leeks and Gruyere Cheese


From the kitchen of One Perfect Bite...I rarely make fish and chips, but I had some catfish fillets that had to be used and thought a Southern-style fish fry would be a nice change of pace for our supper. Bob and I completed the river walk at a brisk pace this morning, so I felt less guilty about frying than might otherwise have been the case. I did rule out French fries, but only because I had two other Southern recipes that I wanted to try. We Northern gals rarely have spoon bread. As a matter of fact, I'll wager there are some Northern gals who have never had spoon bread. I'd only had it once before tonight's dinner. Although it's called a bread, it's really more like a cornmeal souffle or savory pudding than a bread. It has a moist, custard-like interior. That interior is probably what led to the practice of always serving the pudding with a spoon. I'm told Southerners wouldn't dream of using a knife and fork to move a serving from the casserole to a plate. The true history of spoon bread is not well documented, so I think some conjecture is fair. Corn was used because it was more readily available than flour. Leaveners, other than yeast, were not generally available until the middle part of the 19th century. Yeast breads take time to make. Cooks, early on, discovered that eggs could be used to quickly leaven certain dishes. Early versions of spoon bread used eggs as a leavener and that moved it into the category of a colonial quick bread. Quick breads, then and now, are popular. This recipe takes spoon bread to another level. It is flavored with leeks and cheese and it is altogether delicious. It's also very easy to make. If you like polenta, I think you'll love this. While Gruyere cheese adds a lovely nutty flavor to the dish, Swiss cheese can also be used. Here's the recipe.

Spoon Bread with Leeks and Gruyere Cheese
...from the kitchen of One Perfect Bite, adapted from Savoring America

Ingredients:

2 tablespoons unsalted butter
1 cup chopped leeks (white and tender green of 3 leeks)
2 cups whole milk
1/2 cup water
1 teaspoon salt
1/2 teaspoon freshly ground black pepper
1 cup yellow cornmeal
2/3 cup sour cream
4 eggs
1-1/2 cups shredded Gruyere cheese
2 scallions (white and tender green), chopped

Directions:

1) Preheat oven to 350 degrees F. Spray a 1-1/2-quart casserole with nonstick cooking spray. Set aside.
2) Melt butter in a 3-quart saucepan set over medium-high heat. Add leeks and saute until soft and translucent, about 5 minutes. Add milk, water,salt and pepper and bring to a boil. Slowly whisk in cornmeal and return mixture to a boil. Reduce heat to medium and continue to stir until mixture thickens and pulls away from sides of pan. Remove from heat and stir in sour cream.
3) In bowl of an electric mixer, beat eggs until thick and pale lemon yellow in color, about 5 minutes. Stir 1/4 cup of cornmeal mixture into eggs. Then fold egg mixture into remaining cornmeal mixture, stirring constantly to prevent eggs from scrambling. Fold in cheese and scallions.
4) Scrape mixture into prepared pan. Bake for 35 to 40 minutes, or until a toothpick inserted into center comes out clean. Serve at once directly from casserole. Yield: 6-8 servings.

You might also enjoy these recipes:
Lemon Poppy Seed Bread - One Perfect Bite
Three Savory Quick Breads the French Way - One Perfect Bite
(Almost) Irish Soda Bread - One Perfect Bite

Wednesday, May 5, 2010

Parker House Rolls


From the kitchen of One Perfect Bite...I was raised in an apartment that was in one of four buildings set around a central courtyard. The buildings each contained four duplex and two garden units. The complex had twelve courtyards that, when viewed from the air, resembled military housing, save for the extensive landscaping and oversized buildings that housed the large apartments. During the war years, a scant male presence created a community of women who, of necessity, learned to fend for themselves. They formed tightly knit groups and established support systems that I haven't seen the likes of since, and there were times that it was impossible to distinguish neighbors from family members. Holidays tended to be communal affairs. You've already met Hannie and Mrs. P. who lived in the duplexes to the left of ours. You have yet to meet Anita who lived across the hall in our half of the building. She was young, married, but childless, and was a mathematician working on a project at the University of Chicago. More interesting to me at the time was the Christmas tree she kept in her living room. It was put up the year her husband was sent to North Africa and remained there until his homecoming. The tree was by then an ornamented stick, but it stood watch like a sentinel connecting her to him while he was away. Anita was no match for the cooking of Hannie or Mrs. P., but she did her share of work for our parties which were held in the basement laundry room. It was an expanse of about 75 feet that separated the two garden apartments from each other. The basement was whitewashed and curtained and, under the eagle eye of Mrs. P., a deliberate effort was made to keep it immaculate. On special occasions, a wringer washer, shared by all the neighbors, was rolled away and wash tubs were boarded and draped to hold the evenings bounty. Fels Naptha and bleach competed with the wonderful aromas that wafted down the stairs to the basement. Anita usually brought her Parker House rolls. They were all the rage back then and considered to be quite stylish. The rolls were first served at the Parker House Hotel in downtown Boston in the mid 1870's. While the rolls were sold to other hotels and restaurants, the ingredients were kept secret until 1933 when the recipe was requested by President Roosevelt. Anita's rolls were delicious. They were light and fluffy and the aroma as they baked could drive you mad. While I suspect memory plays tricks with reason, I've never had rolls that tasted quite as good as hers. This recipe is the closest I've ever come to matching them. I hope you enjoy them.

Parker House Rolls...from the kitchen of One Perfect Bite


Ingredients:

2-1/4 teaspoons active dry yeast
2 tablespoons sugar, divided use
1/2 cup warm water
1-1/2 cups scalded milk, cooled to room temperature
1 tablespoon salt
1/2 cup melted butter, divided use
6 cups all-purpose flour

Directions:
1) Combine yeast, 1 tablespoon sugar and water in the bowl of an electric stand mixer. Let sit until frothy, about 5 minutes. Add milk, reserved 1 tablespoon sugar and 1/4 cup melted butter to yeast. Add 1-1/2 cups flour and beat at medium speed for 3 minutes. With mixer at low speed, add 4 cups of flour, a cup at a time, beating until a soft dough forms. Turn onto a lightly floured board and knead until smooth and elastic, 8 to 10 minutes. Transfer to a greased bowl, cover with plastic wrap and let double in volume, about 1 hour.
2) Punch down dough and turn onto a lightly floured board. Let rest for 5 minutes. Roll dough into a sheet 1/2-inch thick. Cut into 3-inch rounds. Crease each round in the middle with the back of a knife. Brush exposed surfaces with reserved butter. Fold dough over and press lightly to seal. Place rolls 2-inches apart on ungreased baking sheets. Cover lightly and allow to rise again until nearly double in volume,
about 35 minutes.
3) Meanwhile preheat oven to 425 degrees F. Bake until rolls are golden brown, about 12 to 15 minutes. Cool on racks. Yield: 36 rolls.

You might also enjoy these recipes:
Torpedo Rolls - One Perfect Bite
Kaiser Rolls - One Perfect Bite
Buttermilk Cluster with Blue Poppy Seeds - One Perfect Bite

This post is being linked to:
Wild Yeast - Yeast Spotting

Wednesday, April 28, 2010

Fry Bread - School Project


From the kitchen of One Perfect Bite...It's not much of a recipe, but it comes with a fascinating history that curious minds and my older grandsons might find interesting. Fry bread is the politically correct name that has been given to what was once called squaw bread. For my friends in Asia, Africa and Europe, and others not schooled in American history, the word squaw was once used to describe native American women in an insulting and derogatory way. Native tribes across the United States have been working for decades to remove this, and other demeaning words used to describe their people, from the English lexicon. They are slowly making progress. The bread that carried that offending name was not part of their diet until the tribes were forcibly removed from their ancestral lands and placed on reservations. The Navajo call this period of their history the "Long Walk", while the Cherokee, also subject to the forced march, referred to it as the "Trail of Tears". To supplement meager food stores and prevent starvation, they were given allotments of white flour, baking powder, salt and lard by the army. They used it to fashion a simple skillet bread that became a staple of their diets while they were kept on the reservations. While no longer commonplace, it is still served at tribal feasts and gatherings and some believe that eating the bread is a sacred tradition that must be continued until the earth is again purified. Bob and I first had fry bread at a ceremony called a Tsalila that is held on the Oregon coast. The bread is traditionally made with lard and its texture depends on how it is fried. When deep fried it is fluffy and has a texture similar to Yorkshire pudding or popovers. When shallow fried, it is crisp and has a decided cracker-like crunch when bitten. This bread, like all fried doughs, is best eaten straight from the fryer. The dough can, however, be made ahead of time and be stored in the refrigerator for a day or so before cooking. The finished bread can be split and filled with meat or other fillings, but most prefer it spread with jam or sprinkled with cinnamon sugar. It is very easy to make and would be wonderful for a school project. Here's the recipe.

Fry Bread
...from the kitchen of One Perfect Bite

Ingredients:

2 cups all-purpose flour
1 tablespoon baking powder
1/2 teaspoon salt
1-1/2 tablespoons lard, melted (butter may be substituted)
1/2 cup warm water
1/4 cup room temperature milk
4 cups oil for deep frying

Directions:

1) Combine flour, baking powder and salt in a large bowl. Set aside.
2) Combine water, milk and lard or butter in a large measuring cup.
3) Slowly add liquids to flour and mix just until dough forms a ball. Knead in the bowl, about 10 times, to form a smooth ball that is not sticky. A small amount of flour may be added if needed. Cover dough with a damp towel or plastic wrap and let sit for 30 minutes.
4) Heat oil in a deep fryer or a high-sided pan. If using an electric pan set thermostat to 350 degrees F.
5) Divided dough into 8 approximately equal pieces. Pat on a floured board or with floured hands to form circles about 5 to 6-inches in diameter. Place dough, a piece at a time, into hot oil and cook for 2 minutes per side. Drain on paper towels. Repeat until all dough is used. Yield: 8 pieces.

You might also enjoy these recipes:
Indian Pudding - Simply Recipes
Navajo Fry Bread and Navajo Tacos - Commonplace Kitchen
Cherokee Fry Bread - Bake Space

Wednesday, April 14, 2010

Chocolate Babka


From the kitchen of One Perfect Bite..."The Queen is dead. Love live the Queen." I've long fancied myself a babka expert. It was a proud product of the Swedish and German kitchens in which I leaned to cook and I became reacquainted with it as a bride living in the South Shore and Hyde Park areas of Chicago. For the uninitiated, babka is a sweet bread that is a bit like a light textured coffee cake. It is made from a butter rich dough that rises slowly and is then rolled around a filling of nuts, fruit or chocolate. Traditional versions of the bread originally came from the shtetls of Eastern Europe and were filled with fruit and nuts. The more popular modern versions is filled with a nut paste and really good chocolate. Last week I had some extra time and was surfing through some blogs that had been recommended to me. One of them was Trissalicious. It happened that a chocolate babka from the "Australian Gourmet Traveller" was being featured and it looked gorgeous. I was, of course, hooked and it was just a matter of time before I tried the recipe. This is its maiden voyage and I'm really happy to report that it is delicious. The chocolate and hazelnut filling is marvelous, but the dough is what makes this loaf stand head and shoulders above any I've had to this point. It is quite simply wonderful. It should be served warm if at all possible. The babka will stay fresh for about 3 days if it is properly wrapped. I hope you will try this. Here's the recipe.

Chocolate Babka
...from the kitchen of One Perfect Bite courtesy of Trissalicios and Australian Gourmet Traveller

Ingredients:
3/4 cup lukewarm milk
4-1/2 teaspoons active dry yeast
1/2 cup granulated sugar, divided use
1/4 teaspoon salt
3-1/4 cups all-purpose flour
2 whole eggs + 1 egg yolk
1 cup softened butter, divided use
1 cup coarsely chopped, toasted hazelnuts
1 bar (4-oz.) dark or bittersweet chocolate, coarsely chopped
For glaze:
Eggwash
Coarse sugar

Directions:
1) Combine milk, yeast and 1 tablespoon sugar in bowl of a stand mixer fitted with a paddle attachment. Let sit until foamy, about 5 minutes. Add 1/2 cup flour and mix on low speed to combine. Add whole eggs and yolk, reserved sugar and salt and mix to combine. Turn mixer to low speed. Gradually add reserved flour. When combined, add 2/3 cup butter, a little at a time, beating until smooth and elastic, about 5 minutes. Turn soft dough into a greased bowl, cover, and let rise until double in bulk, about 1-1/2 hour.
2) Place hazelnuts in a food processor with reserved 1/4 cup butter. Process until a paste is formed. Set aside.
3) Grease 2 (3-1/2 x 8-inch) loaf pans. Line bottom with parchment paper and grease again. Punch dough down and divide into two pieces. Working with one piece at a time, roll dough on a lightly floured surface to an 8 x 14-inch rectangle. Working from long side nearest you, spread half the hazelnut paste over dough to within 1-1/2 inches of all sides. Scatter with half of chopped chocolate. Roll into a cylinder, brush ends with eggwash and join ends to form a loop, then twist into a figure eight and place in prepared pan. Repeat with remaining dough. Cover pans with plastic wrap and let rise until loaves reach top of pans, about 1 hour.
4) Preheat oven to 350 degrees F. Brush loaves with eggwash and sprinkle with coarse sugar. Bake for 35 to 40 minutes. Remove from oven. Let cool in pans for 10 minutes before turning onto cooling racks. Serve warm or at room temperature. Yield: 2 loaves.

This post is being linked to:
Wild Yeast - Yeast Spotting

You might also enjoy these recipes:
Sugar Crusted Viennese Nut Bread - One Perfect Bite
Very Berry Lemon and Blueberry Sweet Bread - One Perfect Bite
Lemon Poppyseed Bread - One Perfect Bite

Sunday, March 21, 2010

Flower Pot Bread - Blue Monday


From the kitchen of One Perfect Bite...Saturday was a beautiful day in the Willamette Valley. We spent the morning at the Junction City Daffodil Festival, but the day was so lovely, that Bob and I couldn't bring ourselves to return home and attend to the chores we should be doing. We headed, instead, to some local nurseries to check out new stock. I also needed clay pots to use as molds for ornamental breads that would be used as centerpieces for a luncheon. I've made flower pot breads before and they are really not hard to do. While a lovely sweet bread or brioche could be used to fill the pots, I planned to use a reasonably plain white bread dough. The loaves were to be used for decoration only and it didn't make much sense to spend a lot of time or money on something that wouldn't be eaten. I hasten to add that the bread is edible, but in its unwrapped state it will stale quickly. The bread I used is simple to make and, as luck would have it, I could pass the finished loaves on to others for final decorating. Actually, the only difficult part of my chore was seasoning the pots to make them fit for baking. It's tedious work but not hard. I set aside 3 hours to season twelve pots and get the bread ready for its first, and only, rise. I'm including instructions for seasoning the flower pots, along with the recipe for the very easy bread I used to make them. Here's how it's done.

Flower Pot Bread...from the kitchen of One Perfect Bite, courtesy of Recipezaar

Directions for seasoning Terra Cotta Flower Pots:
1) Take two (6-inch) new terra cotta flower pots. Wash thoroughly, drain dry and grease them inside and outside, with shortening, butter or oil. Make sure to coat the rims as well
2) Heat pots in a pre-heated oven at 375 degrees F. for 25-30 minutes. Remove. Let cool. Repeat process two or three more times to create a non-stick surface on flower pots. Be careful not to burn yourself.

Flower Pot Bread

Ingredients:
3-3/4 cups all-purpose flour
3 teaspoons sugar, divided use
1-1/2 teaspoons salt
1/4 cup vegetable oil
2-1/4 teaspoons active dry yeast
1 cup warm water
Egg wash: 1 egg + 1 teaspoon water or milk
Optional Extras
2 tablespoons poppy seeds
2 tablespoons mixed seeds
2 tablespoons pumpkin seeds
2 tablespoons chopped walnuts


Directions:

1) Grease inside and rim of 2 (6-inch) flower pots with shortening, oil or butter. Set aside.
2) Combine water and 1 teaspoon sugar in a small bowl. Sprinkle dry yeast over water. Let sit until frothy, about 10 minutes.
3) Combine flour, salt and reserved 2 teaspoons sugar in a large bowl. Add any extras you want to use. Add yeast mixture and oil. Mix to form a smooth dough. Turn onto floured board and knead until smooth and no longer sticky, about 10 minutes.
4) Cut dough into 6 equal pieces. Form each piece into a ball. Place 3 balls in the bottom of each flower pot. Place on a baking sheet. Cover with plastic wrap and let rise until doubled in size, about 1 hour.
5) Meanwhile preheat oven to 400 degrees F. Brush top of loaves with egg wash. sprinkle with seeds if desired. Bake loaves in middle of oven for 30 minutes, or until bread is a rich golden brown and sounds hollow when tapped. Remove bread from oven. Cool on rack for 10 minutes. Remove from pots and continue cooling on wire racks until bread is at room temperature. Bread can be served in flower pots or decoratively wrapped. Yield: 2 loaves.

You might also enjoy these recipes:

Kaiser Rolls - One Perfect Bite
Anadama Rolls - One Perfect Bite
St. Lucia Buns - One Perfect Bite


This post is being linked to:
Smiling Sally - Blue Monday

This post is being linked to:
Wild Yeast - Yeast Spotting

Friday, March 19, 2010

Ciambellone - Italian Easter Bread - Pink Saturday


From the kitchen of One Perfect Bite...I had some fun testing recipes for the Italian Easter Bread that's called Ciambellone. I'm not going to talk about the two recipes that failed, other than to say my evil eye is now trained on the developers and, once they recover, they'll get with the program and do a better job. I am happy to report that I did find a workable recipe. This link, Chef's Line , will take you to a pod cast that demonstrates exactly how Easter Bread is made. Ciambellone falls somewhere between a cake and bread on the culinary periodic table. It tastes like soft biscotti and that, of course, makes it perfect to serve with coffee or tea. It also requires no special equipment to make. Flour is piled onto an immaculately clean board and the remainder of the ingredients are added to a fist-made well and mixed into the flour using your equally immaculate fingers. It's then formed into rings and baked. I prefer to make one large ring and use a ring mold to enhance the appearance of the Ciambellone. The recipe appears below the next photo.

I also want to share a great recipe for Soft Sugar Cookies with you. It comes from Denise at Cottage Sisters. I stumbled on it while searching for the Italian Easter Bread. She was kind enough to share the recipe and photo with me so I could pass them on to you. I hope you'll take a look at her fabulous site.


Photo courtesy of Cottage Sisters


Ciambellone - Italian Easter Bread
...from the kitchen of One Perfect Bite, courtesy of Kitchen Guy at Chef's Line

Ingredients:

4 cups flour
3 large eggs
1 teaspoon vanilla
1 cup granulated sugar
1 cup milk
1 teaspoon cinnamon
1/2 cup vegetable oil or melted butter
1 teaspoon baking powder
1 tablespoon finely grated lemon zest
1 egg for egg wash
Confectioners' sugar for dusting

Directions:
1) Preheat oven to 350 degrees F. Grease and flour a large baking sheet or a 9-inch tube pan. Set aside.
2) Mound flour on a board. Create a well in center of mound. Using your fingers, begin alternating liquid and other dry ingredients into well, mixing until all ingredients are combined. Knead, adding additional flour if needed, to form a smooth dough.
3) Divide into one or two parts and shape into fat rings. Beat additional egg with a teaspoon of water. Brush top of ring with egg wash. Place on baking sheet or into tube pan. Bake 40 minutes, or until golden brown. Cool. Dust with confectioners' sugar. Yield: 1 or 2 coils.

You might also enjoy these recipes:

Lemon Tea Cookies - One Perfect Bite

Chinese-Style Almond Cookies - One Perfect Bite
Kona Coffee Cookies - One Perfect Bite

This post is being linked to:
Pink Saturday, sponsored by Beverly at How Sweet the Sound.

Tuesday, March 9, 2010

(Almost) Irish Soda Bread


From the kitchen of One Perfect Bite...Ina Garten has develop a recipe for the best soda bread I've ever eaten. Unfortunately, it's inaptly named and bares only the slightest resemblance to a true Irish soda bread. The Irish began to use baking soda in the mid 1800's. Bread was made mostly in the summer months when potato stores had been exhausted and grains were needed to carry the poor through to the next harvest. They called the summer months "meal months" . Irish peasants lived, for the most part, on a diet of potatoes, grains and milk. Eggs, butter, zests, currants and nuts appeared only in the breads of English landholders or successful Irish emigres. True soda bread was a mix of flour, baking soda, salt and buttermilk. It was cooked in a bastible, a lidded cast-iron pot that was put right into the coals or on a turf fire. In the Southern part of the country, the bread was shaped into a round loaf that was scored with a cross that was made to "let the devil out" as the bread cooked. In Northern Ireland, the bread was baked in a flat circle called a farl. What is, today, called Irish Soda bread should really be called "Spotted Dog". Now, please understand, I don't fault Ina for not calling her bread that. It lacks panache and would be hard to sell even the most devoted of her followers. I just wanted to set the record straight before giving you the recipe for the best soda bread you'll ever have.

(Almost) Irish Soda Bread...from the kitchen of One Perfect Bite, courtesy of Ina Garten

Ingredients:
4 cups all-purpose flour, plus extra for currants
4 tablespoons sugar
1 teaspoon baking soda
1-1/2 teaspoons kosher salt
4 tablespoons cold unsalted butter, cut into 1/2-inch dice
1-3/4 cups cold buttermilk, shaken
1 extra-large egg, lightly beaten
1 teaspoon grated orange zest
1 cup dried currants

Directions:
1) Preheat oven to 375 degrees F. Line a sheet pan with parchment paper. Set aside.
2) Combine flour, sugar, baking soda, and salt in bowl of an electric mixer fitted with the paddle attachment. Add butter and mix on low speed until butter is mixed into the flour.
3) Lightly beat buttermilk, egg, and orange zest together in a measuring cup. Set mixer to low speed and slowly add buttermilk mixture to flour. Toss currants with 1 tablespoon of flour and mix into dough.
4) Dump wet dough onto a well-floured board and knead it a few times into a round loaf. Place loaf on the prepared sheet pan and lightly cut an X into top of bread with a serrated knife. Bake for 45 to 55 minutes, or until a cake tester comes out clean and loaf has a hollow sound when tapped. Serve warm or at room temperature.Yield: 1 loaf.

You might also like these recipes:
Barmbrack - One Perfect Bite
Boxty and Latkes - One Perfect Bite
Colcannon - One Perfect Bite