Showing posts with label dessert. Show all posts

Monday, December 13, 2010

Coconut Macaroons


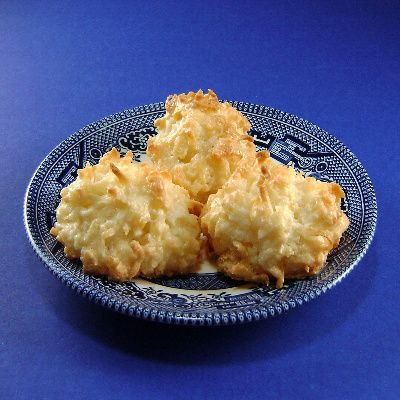
From the kitchen of One Perfect Bite...It's been years since I made macaroons. My original recipe called for sweetened condensed milk and I thought the cookies made with it were cloyingly sweet. Despite that, I made the cookies each Christmas for Bob's dad who really loved them. When we lost Andy, macaroons, and his favorite chocolate covered cherries, were dropped from my Christmas baking list. I was browsing through the Joy of Baking website the other day when I happened on the recipe I'm featuring today. It is substantially different from the one I had used in the past. I had coconut in the pantry, so I decided to give this version a try. I'm glad I did. While the cookies are way too sweet for my taste, Bob and one of our neighbors loved them. The cookies are very easy to make and the only problem I had was getting them to brown in the time suggested by the recipe. My cookies were still pale at the 20 minute mark and I had to bake them for an additional 10 minutes to get some color. I also suggest adding a small amount of almond extract to the cookie dough. If you have a sweet tooth I think you'll love this recipe. The cake flour gives the cookies a texture that is quite different from that of the usual macaroon and they are slightly less sweet. Here's the recipe.

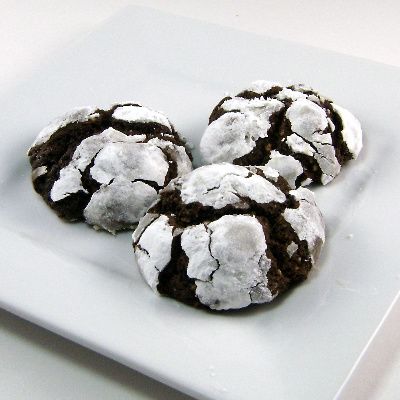
Coconut Macaroons...from the kitchen of One Perfect Bite courtesy of Joy of Baking.Com

Ingredients:
4 large egg whites, at room temperature
1 cup granulated white sugar
1/4 teaspoon salt
1 teaspoon pure vanilla extract
1/4 teaspoon almond extract
1/2 cup cake flour, sifted
3 cups sweetened shredded coconut

Directions:

1) Combine egg whites, sugar and salt in top of a double boiler set over simmering water. Whisk until mixture feels warm and is creamy. Stir in vanilla and almond extract and then add coconut and cake flour. Mix well. Cover and refrigerate for about two hours, or until firm.
2) Preheat oven to 325 degrees F and line two baking sheets with parchment paper.
3) Place small mounds (heaping tablespoons) of batter on parchment-lined baking sheet, spacing several inches apart. Bake for about 20 to 30 minutes, or until golden brown. Remove from oven and let cool on baking sheet for about 10 minutes. Transfer to a wire rack to cool completely. Yield: 2 dozen macaroons.

You might also enjoy these recipes:
Black Bottom Coconut Bars - Gonna Want Seconds
Coconut Almond Macaroons - Dish by Trish
Coconut Vanilla Lime Shortbread - Luna Cafe
Chocolate Coconut Cookies - Alessandra Zecchini
Lime Glazed Coconut Snowballs - A Bountiful Kitchen
Lacy Coconut Cookies - Family Spice

Tuesday, November 30, 2010

Cranberry Layered Cheesecake


From the kitchen of One Perfect Bite...I was seduced by its color and because I'm weak, this five layered cranberry confection ended up on my table. I normally don't make desserts that are this involved. As a matter of fact, I rarely make cheesecakes at all. I love them, mind you. I just can't convince myself that the protein packed into all that cream cheese offsets the fat and calories that keep the protein company. The first time I saw this cake was on the table of an accomplished cake decorator. It was gorgeous and its garnet glow snared me before reason could take hold. I made a homely version of the cake, one precious time consuming layer at a time, and thought that would be the end of it. I never dreamed Bob would like it. He did and now I'm dealing with a case of unintended consequences. I'll have to make the cake again. The cake begins with an almond flavored crust that is partially filled with a sweetened cheese custard and then topped with a cranberry filling. The garnet layer is then smothered with the rest of the custard before being topped with sweetened sour cream. The cake bakes a considerable while, and then is cooled and chilled for a considerable while, before a final layer of cranberries crown the cake and decorations of almond whipped cream are applied. It is a lovely tangy cake that provides irresistible color on the holiday table. The recipe was developed by Teri Rasey for Taste of Home magazine. Despite the work, I'm glad to recommend this cake to you. I've made a few changes to the original recipe. which you can find here. My version of the recipe appears below. I suggest that you add salt and almond extract to the crust and that you eliminate the ground almonds from the whipped cream. Let the cake chill for 24 hours before serving. This is a very nice recipe and, if you like cheesecake, it will be a great addition to your files. Here's how it's made.

Cranberry Layered Cheesecake...from the kitchen of One Perfect Bite courtesy of Teri Rasey and Taste of Home magazine

Ingredients:
Pastry Layer
1/2 cup dried cranberries
2 cups cake flour
1/2 cup ground almonds
1/4 cup confectioners' sugar
1/4 teaspoon salt
1/4 teaspoon almond extract
1/2 cup cold butter, cubed
Cranberry Layer
3/4 cup sugar
2 tablespoons cornstarch
1/4 cup cranberry juice
2 cups fresh or frozen cranberries
Cream Cheese Layer
4 packages (8 ounces each) cream cheese, softened
1-1/2 cups sugar
1 teaspoon vanilla extract
4 eggs, lightly beaten
Sour Cream Topping
2 cups (16 ounces) sour cream
1/4 cup sugar
2 teaspoons vanilla extract
Whipped Cream Topping
1 cup heavy whipping cream
1 tablespoon sugar
1/4 teaspoon almond extract

Directions:
1) In a food processor, finely chop dried cranberries. Add flour, almonds and confectioners' sugar, salt and almond extract; process until blended. Add butter; pulse just until crumbly.
2) Press onto the bottom and 1-1/2 in. up sides of a greased 10-in. springform pan. Place on a baking sheet. Bake at 350° for 10 minutes.
3) In a small saucepan, combine 3/4 cup sugar and cornstarch; stir in cranberry juice until smooth. Add berries. Cook and stir until thickened and bubbly. Set aside.
4) In a large bowl, beat cream cheese, vanilla and sugar until smooth. Add eggs; beat just until combined. Pour half of batter into crust. Carefully spoon 3/4 cup berry mixture over batter; top with remaining batter.
5) Bake for 45 minutes. Reduce heat to 250°. Bake 25-30 minutes longer or until center is almost set. Combine sour cream, sugar and vanilla; spread over top. Bake 20-30 minutes or until set. Cool on a wire rack for 10 minutes. Run a knife around edge of pan to loosen; cool 1 hour longer. Spread remaining berry mixture over the top. Refrigerate overnight.
6) Beat cream with sugar and almond extract until stiff peaks form. Pipe around top edge of cheesecake. Yield: 16 servings.

You might also enjoy these recipes:
Caramel Cheesecake - Wild Yeast
Mini Bourbon Pumpkin Cheesecakes - Dessarts
Caramel Apple Cheesecake Pie - The Sweet's Life
German Cheesecake - Anja's Food 4 Thought
Pumpkin Toffee Cheesecake - The Other Side of 50
Pumpkin Cheesecake - Simply Recipes

Saturday, November 27, 2010

Chocolate Rosettes


From the kitchen of One Perfect Bite...It's sometimes a mistake to try and improve on an old favorite recipe. Last year, I shared my recipe and memories of Christmas Rosettes with you. I know that these cookies have lost cache, but they will forever remain one of my favorite treats. My love for them is enhanced, of course, by the sweetness of memory. I think that's OK. We all are creations of time and place and those memories are what make us unique and set our place at the table. Several years ago, Bob and I were in Hawaii for several weeks leading up to the Christmas holiday. The people of the islands know how to celebrate the holiday in an unabashed fashion and it is impossible not to get into the spirit of the season if you are there. Let's say Hawaii, unconcerned with political correctness, bolstered my somewhat flagging Christmas spirit with its exuberant sense of season. We arrived home on Christmas Eve and, despite the hour, I decided we couldn't have Christmas without rosettes on the table. One of the beauties of these cookies is that they require no special ingredients. Another is the ease with which they come together. Ease and simplicity made the cookies possible that Christmas, so I'm not quite sure what possessed me to try this gussied up version of the recipe. It was a mistake. Truth be told, this chocolate version is lacking in flavor and, save for color, has nothing to commend it. It is neither sweet nor chocolatey. Please view me as your early warning system. If you are tempted to try this recipe, pinch yourself and move on. You deserve better.

Chocolate Rosettes...from the kitchen of One Perfect Bite

Ingredients:
1/2 cup cornstarch
2 tablespoons all purpose flour
1 teaspoon cocoa powder (any type)
2 teaspoons sugar
1/2 teaspoon salt
1 egg
1/4 cup milk
Vegetable shortening
Powdered sugar

Directions:
1) Combine cornstarch, flour, cocoa, sugar and salt in a bowl. Beat egg lightly, combine
with milk, and add to dry ingredients. Stir until smooth.
2) Heat rosette iron in deep, hot oil (350 to 375 F) for two minutes. Drain excess oil from iron; dip in batter about 1/2 way. Fry rosette while counting to 10. Wiggle iron so rosette falls off into oil and continue to fry until golden brown. Lift out with tongs. Drain on paper towels. Reheat iron 1 minute before making next rosette. Yield: 18 rosettes.

You might also enjoy these recipes:
Stained Glass Cookies - Baking and Boys
Pecan Strips - Louanne's Kitchen
Lemon Glazed Christmas Wreath Cookies - Barbara Bakes
Chocolate Chip Biscotti - Mom's Cooking Club
Chocolate Peppermint Bark Cookies - The Recipe Girl
Peppermint Meringue Cookies - Sugarcrafter

Saturday, November 20, 2010

Quick and Creamy Pumpkin Pudding


From the kitchen of One Perfect Bite...I've been known to joke that my house is always ready for company, except when it's not. The phone rang at one of my most "not" moments and left me with about three hours to sanitize, beautify and cook for folks we don't see often, but whose company we really enjoy. In the midst of the ensuing chaos, a plan for an easy but festive meal came together. I fell back on my three fall P's of pork, potatoes and pumpkin. Years ago, I made an icebox cake that was always well received. While I had no time to make or set the cake portion of the dessert, I could make the filling and serve it as a creamy, almost mousse-like, pudding. I think you'll really like this one. It is a novel way to serve pumpkin, but it still is in keeping with the spirit of the season. I've used whole milk and heavy cream to make the dessert, but low-fat and non-dairy products can also be used. I love to serve this with my favorite Swedish gingersnaps. A crackling fire and great coffee are also wonderful accompaniments. Here's the recipe.

Creamy Pumpkin Pudding...from the kitchen of One Perfect Bite

Ingredients:

1 envelope unflavored gelatin
2 cups cold milk, divided
1 package (8-oz.) cream cheese, softened and at room temperature
2 packages (3.4-oz. each) instant vanilla pudding
1 can (15-oz.) pumpkin puree
Spice Mix:
...1 teaspoon ground ginger
...1 teaspoon ground cinnamon
...1/4 teaspoon ground mace
...1/4 teaspoon nutmeg
...1/8 teaspoon ground cloves
1 tablespoon fresh orange zest
1 cup whipped cream

Directions:
1) Place 1/2 cup milk in a small microwave container. Add gelatin. Allow to soften for 2 to 3 minutes. Heat in a microwave oven for about 30 seconds on high power, or until until gelatin is dissolved. Set aside.
2) Beat cream cheese in a large bowl until light and airy. Beat in dissolved gelatin, 1-1/2 cups milk, dry pudding mix, pumpkin, all of spice mix and orange zest. Beat on low speed for 2 minutes until well-blended. Fold in whipped cream. Spoon mixture into individual serving dishes. Chill for at least two hours, or until set. Yield: 4 to 6 servings.

You might also enjoy these recipes:
Pumpkin and Chocolate Layer Cake - Baking Bites
Pumpkin Nut Bars - Eating Out Loud
Rum Spiked Pumpkin Pie - My Gourmet Connection
Spiced Pumpkin Walnut Cake - Little Corner of Mine
Pumpkin Toffee Cheesecake - The Other Side of Fifty
Raisin Pumpkin Bread - The Food Addicts
Pumpkin Roll - What's Cooking Mexico?

Friday, November 19, 2010

Nānkhatāi - Diwali - Pink Saturday


From the kitchen of One Perfect Bite...All of today's pictures are linked to Diwali, the Hindu holiday that celebrates the return of Lakshmi, the goddess of prosperity. The holiday is much like our Christmas with odd bits of Independence Day and Halloween thrown in. Please understand, I mean no disrespect. Lanterns are lit, families gather and gifts are exchanged during this joyous celebration of light. Firecrackers are used to frighten away evil spirits that might threaten the return of the goddess and children go door to door seeking a reward for the entertainment they provide. The cookie, called a Nānkhatāi, is an eggless shortbread that has a sandy texture. It is sold during the holiday by street vendors who specialize in sweetmeats and other treats. The pigeon is another story. The bird is not a mutant. He is one of many that have been tinted for Diwali. Why? I'm clueless and have been unable to find anyone who can give me a sensible answer. The design being created on the street outside the fence is called a rangoli and it's meant to welcome visiting deities. It, and thousands like it in other Hindu homes, will be lit at night with myriad small lanterns that will give streets the appearance of being swarmed by fireflies or glow worms. It is quite a sight. While I was able to sample most of the foods associated with Diwali, I missed these cookies and wanted to try them once I returned home. I made them today and I must say I'm not thrilled with the results. The cookie is fine, but, with so much good shortbread around, it merits only a lukewarm review. I decided to post it with reservations because it is a Indian dessert and I wanted to conclude my tour of India with something sweet. I'll let you be the judge of its merits. Here's the recipe.

Nānkhatāis...from the kitchen of One Perfect Bite courtesy of Culinary Annonations

Ingredients:

1/2 cup confectioners’ sugar
1/2 cup refrigerated ghee (clarified butter) or unsalted butter
1/2 teaspoon pure vanilla extract
1/2 cup unbleached all-purpose flour (maida)
1/2 cup semolina flour (rava)
3/4 teaspoon ground cardamom [or 1/4 teaspoon ground nutmeg]
3/4 teaspoon baking powder
2 tablespoons chopped nuts for topping

Directions:
1) Line a cookie sheet with parchment or wax paper. Pre-heat oven to 325 degrees F.
2) Sift confectioners' sugar into a mixing bowl. Add refrigerated ghee/butter and cream mixture until fluffy. Add vanilla and mix to incorporate.
3) Sift flour, semolina and baking powder into another bowl. Whisk in cardomom. Add flour mixture to creamed mixture in two parts. Once a cookie dough forms, transfer it to a cold working surface and knead a few times. Break dough into 20 equal-sized portions and shape into flattened rounds. Make a thumb impression in center of each and press in a few pieces of nuts.
4) Bake cookies for about 20 to 25 minutes. Check at 20 minute interval to ensure that cookies do not brown or develop any deep color. Be aware that these cookies will crack slightly. That is as it should be. Cool on wire racks. Store airtight. Yield: 18 to 20 cookies.

You might also enjoy these recipes:
Semolina and Almond Salwa - eCurry
Gulab Jamun - Phem Fatale
Strawberry Busundi - Food Lyrics
Milk Cake - The Vegetarian Way
Pumpkin Kulfi - Eggless Cooking
Rasmalai - The Inner Gourmet

This post is being linked to:
Pink Saturday, sponsored by Beverly at How Sweet the Sound.

Friday, November 12, 2010

Kheer - Pink Saturday


Ingredients for Kheer


Kheer - An Indian and Nepalese Rice Pudding


A Namaste for Pink Saturday

From the kitchen of One Perfect Bite...Kheer, the Indian version of rice pudding, was offered at the end of every evening meal Bob and I had while in India and Nepal. It's a very simple preparation of rice and milk that's flavored with a few spices and cooked down to thicken the mixture to a pudding-like consistency. It lacks the custard quality of its American cousin and can often be almost soupy. It is a very popular dessert and no wedding or festival in India or Nepal would be complete without it. It, fortunately, is very easy to prepare and it's a great dish for a novice cook or one who is just beginning to explore the wonders of Indian cooking. There are literally hundreds of recipes available for kheer. Each region of India or Nepal has a version all its own and families within those areas further modify the recipes to suit their tastes and pocketbooks. The version I'm sharing with you is one I was taught while in India and it's barebones easy to do. You'll find other, more sophisticated, versions of the dish in the recommendations found at the bottom of the this post. I hope you'll give kheer a try. Here's how to make a very simple version of Indian rice pudding.

Kheer...from the kitchen of One Perfect Bite

Ingredients:
1/2 cup Basmati rice
1 tablespoon ghee
6 cups milk
10 tablespoons sugar
A few strands of saffron
1 teaspoon golden raisins
1 teaspoon ground cardamom
1/2 cup cashews or almonds or pistachios (thinly sliced)

Directions:
1) Soak rice in water for 30 minutes before cooking. Drain.
2) Melt ghee in a large pan. Add rice and saute until translucent.
3) Add milk to rice and simmer until liquid has been reduced by half.
4) Stir in sugar and saffron and cook until sugar is dissolved. Add raisins, nuts and cardamom and simmer for a few minutes. Remove from heat and serve warm or cold. Yield: 4 -6 servings.

You might also enjoy these recipes:
Watermelon, Sago and Carrot Kheer - Priya's Easy N' Tasty Recipes
Sweet Potato Kheer - Food for Thought
Firni: Rice Pudding with Saffron and Nuts - eCurry
Badam Kheer - Sounds Spicy
Pressure Cooker Payasam (Kheer) - Niya's World
Carrot Kheer - Maria's Menu

This post is being linked to:
Pink Saturday, sponsored by Beverly at How Sweet the Sound.

Sunday, November 7, 2010

Tuscan Cheese Cake - Torta di Ricotta


From the kitchen of One Perfect Bite...We've had lots of pasta this fall, so with my kitchen in Italian mode, it was only a matter of time before I remembered this cake and pulled the recipe from my files. This dessert is not to everyone's liking, and while I hate to admit it, I have dissenters in my own family. They grouse the entire time they're eating the cake, but because no one here is force fed, that always makes me smile. The cake does have an unusual texture. It's a cross between a sponge cake and a cheesecake but it lacks the creamy sweetness of its American counterpart. If I had to compare it to something we all have eaten, a custardy bread pudding comes to mind. It's also been compared to a heavy souffle, the type you wouldn't want to drop on your foot. If you can, make this with fresh ricotta cheese, it really is worthwhile in this particular recipe. The cake has a faint undertone of lemon that makes it perfect to serve with macerated berries. I think the addition of almond flavor would also be wonderful. I refrigerate the cake for a full day before I plan to slice and serve it. I don't think it holds up well so my rule for it is a day to sit, a day to eat. I rarely have enough leftovers for that to be a problem. The recipe originally came from the Silver Spoon cookbook. Here's how they make this.

Torta di Ricotta - Tuscan Cheese Cake...from the kitchen of One Perfect Bite, courtesy of the Silver Spoon cookbook

Ingredients:
Butter for the pan
2-1/4 cups all purpose flour; extra for dusting the pan
4 eggs
1/2 cup light brown sugar; extra for sprinkling
1-3/4 cups ricotta cheese
Grated zest of 1/2 lemon
5 tablespoons olive oil
3/4 cup milk
1 tablespoon baking powder

Directions:
Preheat oven to 350 degrees Fahrenheit. Grease a deep tart or springform pan with butter and dust with flour. Whisk eggs and brown sugar together until light and foamy. Stir in ricotta cheese, lemon zest, olive oil and milk. Sift flour and baking powder over egg mixture, mix well and pour into cake pan. Sprinkle generously with additional brown sugar. Bake for 40 minutes. Remove from oven, cool and turn out. Serves 6.

You might also enjoy these recipes:
Yogurt Cheesecake - One Perfect Bite
Margarita Cheesecake - One Perfect Bite
Lavender Cheesecake Bars - One Perfect Bite
Caramel Apple Cheesecake - The Foodie/Nutritionist
Blueberry Japanese Cheesecake - Flour on Her Nose
Almond Cheesecake - Anncoo Journal
Fig and Almond Cheesecake - Brown Eyed Baker

Sunday, October 31, 2010

Double Chocolate Zucchini Bread


When things are quiet here, I browse through food blogs the way others do magazines. I admire some and learn from others, always gleaning tips and tidbits that have the potential to make our next meal something really special. As a result, my bookmark folder is an embarrassment of riches that I'd be ashamed to let others see. While not talking numbers, I can happily report that I'm now current through the summer of 2009. While it took a while, I was finally able to make this wonderful Double Chocolate Zucchini Bread, originally featured at Baking Bites that summer. If you're not familiar with the site, stop by and see what's happening. You'll be happy that you did. This lovely cake-like bread was worth waiting for. It is moist. It is flavorful. It is chocolate. I know you'll love it, so rather than gab I'll get right to it. Here's the recipe for one of the best zucchini breads I've ever had. I did say chocolate, didn't I?


Double Chocolate Zucchini Bread
...from the kitchen of One Perfect Bite, courtesy of Baking Bites

Ingredients:
2 cups all purpose flour
1/2 cup unsweetened cocoa powder, sifted
1 cup sugar
2 teaspoons baking powder
1/2 teaspoon salt
2 large eggs
1/3 cup vegetable oil
3/4 cup buttermilk
1 teaspoon vanilla extract
2 medium zucchini, shredded to equal 1-1/4 cups
1 cup chocolate chips

Directions:
1) Preheat oven to 350F. Lightly grease a 9×5-inch loaf pan. Set aside.
2) Sift flour, cocoa powder, sugar, baking powder and salt into a large bowl.
3) Whisk eggs, vegetable oil, buttermilk and vanilla together in a medium bowl.
4) Add wet to dry ingredients and stir until almost fully combined. Add zucchini and chocolate chips and stir until evenly distributed in batter (batter should be fairly thick).
5) Bake for 50-55 minutes, or until a toothpick inserted into center comes out clean or with only moist crumbs attached. Turn loaf out of pan and cool on a wire rack before slicing. Yield: 1 loaf.

You might also enjoy these recipes:
Chocolate Zucchini Cake - One Perfect Bite
Double Chocolate Zucchini Bread (Low Card Gluten Free) - All Day I Dream About Food
Chocolate Zucchini and Sweet Potato Bread - Anna's Table
Chocolate Zucchini Muffins - Cookie Madness
Vegan Chocolate Banana and Zucchini Bread - Anja's Food 4 Thought
Chocolate Zucchini Bread - Closet Cooking
Chocolate Zucchini Spelt Cake - Anja's Food 4 Thought

Thursday, October 28, 2010

Chocolate Peanut Crinkles


From the kitchen of One Perfect Bite...This cookie recipe kept making the rounds and each time I saw it I became "curiouser and curiouser." Chocolate crinkles, I call them snowballs, are a favorite of mine, so it was only a matter of time before I actually tried the recipe. It was developed by Bill Yosses, a White House pastry chef, and I wanted to see how his cookies differed from the old classic I've grown to love. They are, indeed, different. Their texture is far more cakelike than what I'm familiar with. They are also huge in size. Whether that's good or bad is a subjective call. The nuts add a subtle taste to the finished cookie, but they don't overpower the chocolate, and the bit of added texture they provide is not unpleasant. I'm glad I made these cookies, though I don't plan on making them them again. They are delicious to be sure, but delicious comes on a sliding scale. The classic recipe I use can be found here. I think it makes a better cookie. I don't want to dissuade you from trying Chocolate Peanut Crinkles. Your opinion my differ from mine. Here's the recipe.

Chocolate Peanut Crinkles...from the kitchen of One Perfect Bite, courtesy of Bill Yosses and Melissa Clark

Ingredients:
2/3 cup toasted, skinned unsalted peanuts
2 tablespoons granulated sugar
6 ounces bittersweet chocolate, coarsely chopped
2-3/4 cup all-purpose flour
2 tablespoons Dutch-processed unsweetened cocoa powder
2 teaspoons baking soda
3/4 teaspoon salt
1-1/2 cups light brown sugar
8 tablespoons unsalted butter, softened
2 large eggs, room temperature
1/4 cup whole milk
1 teaspoon pure vanilla extract
3/4 cup confectioners’ sugar

Directions:

1) Place nuts and granulated sugar in bowl of a food processor fitted with a blade attachment. Pulse to finely chop.
2) Melt chocolate in the top of a double boiler set over a pot of simmering water.
3) Sift flour, cocoa powder, baking soda and salt together in a large bowl. Place butter and brown sugar in bowl of an electric mixer fitted with a paddle attachment. Cream until light and fluffy. Add eggs, one at a time, until incorporated. Beat in the melted chocolate, stopping mixer to scrape down sides before beating again. Mix in milk and vanilla. Add flour mixture in three additions, and mix until just combined. Fold in nuts.
4) Form dough into a ball and cover tightly with plastic wrap. Refrigerate dough for 3 hours or overnight.
5) When you are ready to bake, preheat oven to 350°F. Line two baking sheets with parchment paper, or lightly butter them, and set aside.
6) Place confectioners’ sugar in a wide, shallow bowl. Scoop out a heaping tablespoon of dough and roll into a ball. Coat generously with sugar and transfer to a baking sheet, placing them at least 2-inches apart. Repeat with remaining dough and sugar.
7) Bake cookies, turning sheets from back to front and swapping racks halfway through, until cracked but not completely firm, 12-15 minutes. Cool cookies on the sheets for about 2 minutes, then use a spatula to transfer to wire racks to cool further. They may be stored airtight at room temperature for up to 2 days. Yield: 3-1/2 dozen.

You might also enjoy these recipes:
Chocolate Cookies n' Cream Cookies - Baking Bites
Dark and Bitter Orange Chocolate Cookies - The Technicolor Kitchen
Flourless Peanut Chocolate Cookies - Culinary in the Country
Double Chocolate Dream Cookies - Cookie Madness
Chocolate Sables: World Peace Cookies - Deep South Dish
Triple Chocolate Cookies - Une Gamine dans la Cuisine
Totally Chocolate Chocolate Chip Cookies - Sweet and Savory Tooth
Thick and Chewy Triple Chocolate Cookies - Brown Eyed Baker

Friday, October 22, 2010

Cinnamon Candy Apples - Pink Saturday


From the kitchen of One Perfect Bite...It's hard to imagine a fall harvest without candied apples. While caramel apples have become more popular, the cinnamon variety predates them by 50 years. Candied apples were created at the turn of the 20th century by William Kolb, a New Jersey candy maker. He made them to use as part of his Christmas display and they rapidly became popular with his customers. His approach was simple. He dipped apples into a candy made from sugar, corn syrup, red dye and cinnamon oil. As the candy hardened it formed a glistening shell around the apple and the candied apple as we know it was born. The apples are still prepared in this way. If you are comfortable working with a candy thermometer you'll find these easy to make. There are, however, a few pitfalls that you want to avoid. For openers, make sure your apples are wax free. Since this is not a recipe that can be tasted as it cooks, be generous with the amount of flavoring you use up front. You should be able to find bottled cinnamon flavoring in the spice aisle of major grocery chains. It can also be ordered online. Make sure you use a pot that is deep enough to allow dipping the apples and that sticks inserted into the apples are strong enough to hold them. If the syrup becomes too thick don't be afraid to reheat it and when you're finished dipping, make sure you put the apples down on a buttered baking sheet or parchment paper. Wax paper will melt. Finally, these are best eaten within 24 hours of making. Their appearance begins to deteriorate after that. This recipe will make enough syrup to coat 12 small apples. It may be doubled. Here's the recipe.

Cinnamon Candy Apples...from the kitchen of One Perfect Bite inspired by Paula Deen

Ingredients:
1 cup water
1/2 cup corn syrup
2 cups sugar
1 teaspoon cinnamon flavoring
1 teaspoon red coloring
1 dozen wooden craft sticks
1 dozen small firm apples

Directions:
Boil water, syrup, and sugar together until a brown caramel color is reached (at about 250 degrees F on a candy thermometer). Remove from heat and add cinnamon and red coloring. Cool slightly. Meanwhile force a stick into the core of each apple. Dip apples 1 at a time into heavy red syrup, drain well, and place on a buttered baking sheet or parchment paper to cool. Yield: 12 small candied apples.

You might also enjoy these recipes:
Caramel Corn - Chasing Delicious
Making Candy in the Spirit of Halloween - The Food Addicts
Mummy Munch - Picky Palate
Caramel Apples - Annie Eats
Candy Compost Bars - Sugar Plum
Cakespy: Homemade Candy Corn - Serious Eats

This post is being linked to:
Pink Saturday, sponsored by Beverly at How Sweet the Sound.

Thursday, October 21, 2010

Soft and Chewy Peanut Butter Cookies


From the kitchen of One Perfect Bite...While I carry no lantern, my quest for the world's best peanut butter cookie has kept me searching with a determination that rivals that of the old cynic who went looking for an honest man. I have a taste memory, and while I've been looking for years, I've yet to duplicate it. Mine is not a loving or romantic tale. The cookie I remember was served in the cafeteria of a school I attended as a child. It had an intense peanut flavor and was so dense and crisp that it held its shape when dunked into a glass of milk. This year, I thought I'd use a different approach and decided to try a soft and chewy cookie that received rave reviews at allrecipes.com. I made a few minor changes to the recipe I found there. I added a cup of coarsely chopped salted peanuts to the ingredient list and replaced the mix of light and dark sugars with my current favorite, golden brown. Before I go any further, I must tell you that these cookies are delicious. I must also tell you I'm still looking for the cookie that will put my memories to rest. I encountered one issue as I made these that I want to share with you. I had to chill the cookie dough before it could be rolled into balls. This may have to do with the way in which flour is measured. I fluff and scoop and may have used less flour than someone using a different technique. At any rate, the dough was workable after being chilled and made exactly 3 dozen cookies. If you like your peanut butter cookies on the soft and chewy side, give this recipe a try. You won't regret it. Here's the recipe.

Soft and Chewy Peanut Butter Cookies...from the kitchen of One Perfect Bite adapted from allrecipes.com

Ingredients:
1 cup peanut butter
1/2 cup butter, softened
1 cup golden brown sugar
1 egg
3 tablespoons milk
1 teaspoon vanilla extract
1-1/4 cups all-purpose flour
3/4 teaspoon baking powder
1/4 teaspoon salt
1 cup coarsely chopped salted peanuts

Directions:
1) Preheat oven to 375 degrees F.
2) In a large bowl, cream together peanut butter, butter, golden brown sugar, and brown sugar until well blended. Beat in egg, milk, and vanilla one at a time. Combine flour, baking powder, and salt; stir into creamed mixture. Fold chopped nuts into dough. Chill dough if necessary to roll. Roll tablespoonfuls of dough into balls. Place cookies 2 inches apart onto ungreased cookie sheets. Press each ball once with fork tines.
3) Bake for 8 to 10 minutes in the preheated oven, or until edges are lightly browned. Let sit for 2 minutes on cookie sheet. Remove and cool on wire racks. Yield: 36 cookies.

Your might also enjoy these recipes:
Top Chef Worthy Peanut Butter Cookies - Cookie Madness
Tuesday's with Dorie: Peanut Butter Crisscrosses - A Whisk and A Spoon
Honey Peanut Butter Cookies - Baking Bites
Big, Super Nutty Peanut Butter Cookies - The Culinary Chronicles
Flourless Peanut Butter Cookies - Within the Kitchen
Gluten Free Peanut Butter Cookies - The Baking Beauties
Over the Top Reese's Peanut Butter Cookies - Real Mom Kitchen
Peanut Butter Cookies with Ketchup - Cookie Madness
Oatmeal Peanut Butter Cookies - Gonna Want Seconds
Peanut Butter Chocolate Kiss Cookies - The Comfort of Cooking

Friday, October 15, 2010

Cherry Cupcakes - Pink Saturday


Photo courtesy of Photobucket - Creative Commons Attribution

From the kitchen of One Perfect Bite...A bit of chocolate is good for the soul and mine is happy right now. These cupcakes go together quickly and are better for you than most. That's not to say they're better for you than an apple might be, but the folks at Eating Well have managed to reduced the fat and calories and still deliver something you'll enjoy. If you need to take the edge off a sweet tooth, give these a try. I'm happy to report that despite what's been taken from them, enough remains to make these a really nice snack. If you object to the use of food coloring, by all means omit it. It adds nothing but a lovely pink hue to the cupcakes. It is Pink Saturday, so I decided to use it. Here's the recipe.

Chocolate Cherry Cupcakes...from the kitchen of One Perfect Bite courtesy of Eating Well

Ingredients
:
Cake
3/4 cup whole-wheat pastry flour (see Note)
3/4 cup cake flour
1/2 cup unsweetened cocoa powder
1-1/2 teaspoons baking powder
1/2 teaspoon baking soda
1/2 teaspoon salt
3/4 cup granulated sugar
1/4 cup canola oil
1 large egg
1 teaspoon vanilla extract
1/2 cup nonfat buttermilk
1-1/2 cups chopped pitted cherries, fresh or frozen (thawed and drained), plus 12 fresh cherries with stems for garnish
Frosting
6 ounces reduced-fat cream cheese (Neufchâtel), at room temperature
1 /2 cup reduced-fat sour cream
1 cup packed confectioners’ sugar
Red Food coloring
Milk for thinning

Directions:
1) Preheat oven to 350 degrees F. Line 12 (1/2-cup) muffin cups with paper liners.
2) Whisk whole-wheat flour, cake flour, cocoa, baking powder, baking soda and salt in a medium bowl.
3) Beat granulated sugar and oil in a large mixing bowl with an electric mixer on medium speed until combined. Beat in egg and vanilla until well combined. With mixer on low, alternately mix in dry ingredients and buttermilk, starting and ending with dry ingredients and scraping sides of the bowl as needed, until just combined. Fold in chopped cherries until just combined. Divide batter among prepared cups (they will be full).
4) Bake the cupcakes until a toothpick inserted into the center comes out clean, 22 to 26 minutes. Transfer to a wire rack and let cool completely.
5) Meanwhile, beat cream cheese, sour cream and confectioners’ sugar with an electric mixer until smooth. Add a drop or two of red food color to tint icing. Refrigerate frosting until very cold, about 2 hours. Thin with milk if necessary to spread on cooled cupcakes. Garnish with a cherry on top. Yield: 12 cupcakes.

You might also enjoy these recipes:
Pumpkin Cupcakes with Maple Cream Frosting - One Perfect Bite
Boston Cream Pie Cupcakes - Sugar Plum
Raspberry Cup Cakes - My Kitchen Treasures
Red Velvet Cupcakes - What's for Dinner Across State Lines
Carrot Cupcakes - Christine's Cuisine
Owl Cupcakes - Sinfully Southern Sweets
German Chocolate Cupcakes - Barbara Bakes

This post is being linked to:
Pink Saturday, sponsored by Beverly at How Sweet the Sound.

Tuesday, October 12, 2010

Apple Cider Quatre Quarts Cake


From the kitchen of One Perfect Bite...I'm told this cake comes from the orchard regions of Quebec. Those who speak French call cakes of this type quatre quart, which literally means 4 fourths. The rest of us call them pound cake because they were originally made with a pound each of flour, butter, eggs, and sugar. This is a seasonal version of the cake and it may not be to everyone's liking. It is lightly spiced and flavored with an apple cider reduction. Those who enjoy cider donuts will love this cake, others probably not so much. I must admit the cake grew on me and I liked it better on day three than I did on one. It was moist and fragrant , but it certainly was not as light or tender as I had been told it would be. For what it's worth, were I to make this again, and I probably won't, I'd used a mulled cider reduction for stronger flavor. The cake, with current spicing, offers the promise of cider season but really does not deliver. It was a disappointment. Here's the recipe.

Apple Cider Quatre Quarts Cake...from the kitchen of One Perfect Bite, courtesy of about.com

Ingredients:
3 cups apple cider
2 tablespoons maple syrup
2 cups sugar
1-1/2 cups butter, room temperature
2 teaspoons vanilla extract
6 eggs, room temperature
3 cups all-purpose flour
1 teaspoon ground cinnamon
1/2 teaspoon baking powder
1/2 teaspoon ground allspice
1/2 teaspoon grated nutmeg
1/4 teaspoon ground cloves
1/4 teaspoon salt

Directions:

1) Bring apple cider to a boil in a medium saucepan over medium-high heat. Boil cider for 25 to 35 minutes, or until it has reduced to slightly less than 1 cup. Remove cider from heat and add maple syrup. Set aside.; set the mixture aside.
2) Preheat and oven to 325 degrees F. Lightly grease a 10-inch bundt cake pan and set it aside.
3) Cream butter, sugar, and vanilla until mixture is light and fluffy. Add eggs, one at a time, to mixture, beating for a few seconds after each addition. Stir together remaining dry ingredients (flour, spices, baking powder, and salt) and then add half to creamed butter-egg mixture and beat until most of flour is incorporated.
4) Add cooled apple cider-maple syrup reduction to batter, beat it for 30 seconds, and then beat in remainder of dry ingredients. Spread batter into prepared pan and bake for 1 hour and 10 minutes, or until a toothpick inserted near the center comes out clean.
5) Cool cake in pan on a wire rack for 10 minutes. Shake it from side to side to loosen cake from pan (you should hear and feel a light thumping), and use a small rubber spatula to loosen any stubborn sides. Place a serving platter over top of cake and invert it, removing pan to allow cake to cool completely. Yield: 12 to 14 servings.

You might also enjoy these recipes:
Chocolate Buttermilk Pound Cake - Passionate About Baking
Blueberry Pound Cake - Keep Learning, Keep Smiling
Russian Pound Cake - Brown Eyed Baker
Best Sour Cream Pound Cake - Sweet Kat's Kitchen
Lime Buttermilk Pound Cake - Passionate About Baking
Citrus Almond Pound Cake - Cookie Madness

Monday, October 4, 2010

Chocolate Zucchini Cake


From the kitchen of One Perfect Bite...This is a wonderful cake, but it's one that falls into my "hate to love it" category. The cake is delicious and fairly easy to make, but I have a problem with its baking time. I've made it several times and on each occasion the baking time has varied. In all three instances, it has taken longer to bake than the recipe suggests. My oven has just been recalibrated, so I doubt there is a problem with the thermostat, and I'm using the specified pan-size, so I know there is no problem there. I can tell you that my cakes still shimmy at the end of the 30 minute time suggested by the recipe. Mine require a minimum of 50 minutes to assure a stable center. I suspect the difference is attributable to the amount of moisture in the zucchini, but I really don't know for sure. At any rate, the cake is good enough that I'm willing to keep an eye on it while it bakes. The cake is based on a recipe developed in the Ghiradelli kitchens and the original recipe can be found here. This version of the cake, created by Kate Westburg, was a winner in a Ghiradelli competition held at the DuPage County Fair this past summer. I've changed the recipe slightly and if you'd like to see the original it can be found here. The cake is delicious, even if it drives me crazy. I hope you will try it. It's worth the aggravation. Here's the recipe.

Chocolate Zucchini Cake ( 3-G Stealth Zucchini Cake)...from the kitchen of One Perfect Bite, inspired by Kate Westburg

Ingredients:

3 large eggs
1 cup + plus 1/2 teaspoon vegetable oil, divided use
2 teaspoons vanilla extract
2 cups sugar
1/2 cup unsweetened cocoa
2 cups all-purpose flour
2 teaspoons baking soda
1 teaspoon baking powder
1 teaspoon salt
1 tablespoon cinnamon
2 cups grated zucchini
1 cup semisweet chocolate chips
4 ounces baking milk chocolate

Directions:

1) Preheat oven to 350 degrees F. Lightly grease bottom and sides of (9-by-13-inch) pan or 2 (3-by-6-by-9-inch) loaf pans.
2) Combine eggs, 1 cup vegetable oil, vanilla, and sugar in a large bowl. Beat to combine, about 1 to 2 minutes.
3) Sift together cocoa, flour, baking soda, baking powder, salt and cinnamon; add 1/2 cup at a time to wet ingredients. Mix until well combined.
4) Stir in zucchini and chocolate chips. Pour into prepared pan; bake 30 minutes for (9-by-13-inch) cake pan (approximately 50 minutes for loaf pans), or until cake tester comes out clean. Using a 9 x 13 x 2-inch pan, I still needed a minimum of 50 minutes to bake the cake.
5) Melt baking milk chocolate in double boiler or in microwave over water (being careful not to scorch). Whisk in 1/2 teaspoon canola oil. Drizzle ribbon topping over cooled cake. Yield: 16 servings.

You might also enjoy these recipes:
Zucchini Cookies - The Local Cook
Hazelnut Zucchini Cake - My Kitchen in the Rockies
Chocolate Zucchini Cake - Eat At Allie's
Zucchini Cake with Lime Cream Cheese Frosting - Baking Bites
Chocolate Streusel Zucchini Cake - Let's Dish
Zucchini Cake with Crunchy Lemon Glaze - David Lebovitz
Apple Zucchini Cake with Walnuts - Anja's Food 4 Thought

Thursday, September 23, 2010

White Chocolate Lime Cookies and Other Absurdities


From the kitchen of One Perfect Bite...At the bottom of the hill on which our house is perched, there's a community of townhomes whose name always makes me smile.
I suspect that at some point in my life, my sense of the absurd was overly stimulated and I was left with a heightened appreciation of the ridiculous. I also smile when I see a recipe that calls for white chocolate or I'm served a glass of white sangria. Can sangria or chocolate be white? Sangria, whose name comes from the Spanish word for blood, should be that deep color. White sangria, its counterpart, is colorless, like plasma. We all know that white chocolate, which is nothing more than cocoa butter mixed with milk and sugar, is quite unlike the real thing. They both, however, have benefited from thoughtful naming and good marketing. You'd probably never take a bite of something called cocoa butter cheese cake and would never dream of ordering a glass of you know what. What's in a name? Sometimes quite a lot. I have a handful of recipes that use white chocolate. Most of them combine white chocolate with lime. I love the combination and actively seek it out. I found this recipe for cookies that use both at The Fresh Loaf and at Evil Shenanigans. I've made minor changes to the recipe. After baking the first batch, I doubled the amount of lime juice and zest used to make the cookies. These are really quite nice and I think you'll enjoy them. Here's the recipe.

White Chocolate Lime Cookies...from the kitchen of One Perfect Bite, inspired by Evil Shenanigans

Ingredients:

1 cup unsalted butter, softened
3/4 cup sugar
3/4 cup light brown sugar
2 eggs
1 teaspoon vanilla
Zest of 2 limes
2 teaspoons lime juice
2 1/2 cups all-purpose flour
1 teaspoon baking soda
1/4 teaspoon baking powder
1/4 teaspoon salt
1 (12-oz.) bag white chocolate chips

Directions:
1) Preheat oven to 350 degrees F. Line three cookie sheets with parchment paper.
2) Combine butter and sugar in bowl of an electric stand mixer. Beat until combined but not fluffy. Add eggs, one at a time, beating just to incorporate. Add vanilla, lime juice and zest and mix to combine.
3) Combine flour,baking soda, baking powder and salt in a separate bowl. Whisk to combine and lighten. Mix into creamed mixture just until combined. Fold in white chocolate chips.
4 ) Shape dough into 36 balls. Place them 3-inches apart on cookie sheets. Bake until edges are golden and centers are just set, about 12 to 13 minutes. Let sit in pan for 3 minutes before moving to cooling racks. Yield: 3 dozen cookies.

You might also enjoy these recipes:
Key Lime and White Chocolate Cake Squares - One Perfect Bite
Chunky White Chocolate and Almond Oatmeal Cookies - Gourmeted
Macaron with White Chocolate - My Kitchen Treasures
Sour Cherry, White Chocolate and Almond Scones - The English Kitchen
White Chocolate and Macadamia Nut Blondies - Squirrel Bakes
Caramelized White Chocolate Cake - E L R A
Raspberry White Chocolate Scones - Playing House
Raspberry White Chocolate Cake - Sweet Kat's Kitchen

This post is being linked to the Cookie Exchange at Relatively Unique

Sunday, September 19, 2010

Glazed Cream Cake


From the kitchen of One Perfect Bite...This lovely dessert is one of my personal favorites. Despite my love for it, I don't make it all that often. It's not hard to do, but it's time consuming to assemble and I tend to prepare it only for close friends or special occasions. The cake has the same elements as Boston cream pie, but over the years it's been refined and its various components now represent the "best of show" from different places. The sponge layers, génoise, come from Italy, the crème pâtissière is, of course, French, as is the glaze, a rich dark chocolate ganache that's interpreted here by Alton Brown. It is a thoroughly satisfying dessert that I think you'll really enjoy. Final assembly is simple. Two sponge layers are filled with pastry cream and glazed with ganache. Here are the recipes for all three of its elements.

Génoise...from the kitchen of One Perfect Bite, courtesy of Jacques Torres

Ingredients:
8 large eggs
3 large egg yolks
1 cup granulated sugar
2-1/2 tablespoons honey
2 cups unbleached, pastry flour, sifted

Directions:
1) Preheat oven to 350 degrees F. Butter and line two 8-inch cake pans with parchment paper. Set aside.
2) Place a 1-quart saucepan half filled with water over high heat and bring it to a simmer. Make a double boiler by setting a large mixing bowl over simmering water. Place whole eggs, egg yolks, sugar, and honey in mixing bowl and make an egg foam by whisking mixture to 113 degrees on a candy thermometer, about 7 to 10 minutes. When it is thick, it will be hot to the touch, tripled in volume, and light in color and sugar will have completely dissolved. If you dip a whisk into mixture and pull it out, batter should fall back into bowl in a thick ribbon.
3) Remove mixing bowl from heat and whip batter with an electric mixer on medium-high speed until it cools, increases in volume, stiffens slightly and becomes pale yellow, about 7 to 10 minutes. Very, very carefully, fold in flour with a rubber spatula until it is no longer visible, making sure to fold to bottom of bowl. Do not over mix or batter will deflate. Fill prepared pans with batter.
4) Transfer to oven and bake on center rack until well-risen and golden brown, about 30 minutes. Remove from oven. Let layers cool slightly. Unmold, remove parchment paper and finish cooling on a wire rack. Layers can be stored in the freezer for 2 to 3 weeks if well wrapped in plastic wrap. Return it to room temperature before using it.

Crème Pâtissière - French Pastry Cream
...from the kitchen of One Perfect Bite, courtesy of Julia Child

Ingredients:
6 egg yolks
1/2 cup granulated sugar
1/2 cup all-purpose flour
2 cups hot milk
2 tablespoons butter
1 tablespoon vanilla extract or 1/2 tablespoon vanilla combined with 2 tablespoons dark rum

Directions:
1) Place egg yolks in a 2-1/2 quart saucepan. Gradually beat in the sugar with a wire whip and beat until mixture is thick, pale yellow, and forms ribbons. Beat in flour, then beat in hot milk in a thin stream.
2) Set over moderately high heat and stir slowly and continuously with a wire whip, reaching all over bottom and sides of pan, until mixture thickens. As it turns lumpy, beat vigorously to smooth it out.
3) Lower temperature and continue stirring for several minutes to cook flour and thicken cream. Be very careful about scorching cream in bottom of pan; be sure your pan is heavy, be sure to keep stirring, and do not use high heat, particularly after cream has started to thicken.
4) Remove from heat; beat in butter and the flavoring. Clean off sides of the pan with a spatula. Film top of the pastry cream with 1/2 tablespoon milk, rum or kirsch to prevent crusting. Chill. (Pastry cream will keep 3 to 4 days refrigerated.)

Ganache...from the kitchen of One Perfect Bite, courtesy of Alton Brown

Ingredients:
3 tablespoons corn syrup
6 ounces heavy cream
12 ounces dark chocolate, chopped into small pieces
1/2 teaspoon vanilla extract

Directions:
Combine corn syrup and heavy cream in a small saucepan. Bring to a simmer and add chocolate. Stir until smooth. Remove from heat and add vanilla extract. Cool to room temperature. Pour over cold cake.

You might also enjoy these recipes:
Boston Cream Pie - Felice in the Kitchen
Boston Cream Whoopie Pies - Baking and Boys!
Individual Boston Cream Pies - Pastry Studio
Boston Cream Pie Cupcakes - Baking Powders
Deluxe Boston Cream Pie - Eat Me, Delicious
Boston Cream Pie - Annie's Eats

Thursday, September 16, 2010

Mincemeat Tart with Apple annd Streusel Topping


From the kitchen of One Perfect Bite...It stands to reason that those who make and preserve mincemeat would have plans to use it. That's pretty much the case here, save for this one tart. I never plan to make it, but it always ends up on our table, You see, Bob and I are of two minds when it comes to desserts like this. He loves them and I don't. Don't get me wrong, I love mincemeat, but I have a barely sweet tooth and find this particular pie almost treacly in its sweetness. I snipped the recipe from Family Circle magazine some thirty years ago, but I suspect is roots are firmly planted in the kitchens of Mennonite and Amish communities. On reflection, it is very much like the Funeral Pie I featured here several months ago. Over the years, less and less mincemeat seems to make it into the jars that are sold for the holidays. There was a time when a jar could make a lovely 9-inch pie, but when you shave an ounce here and an ounce there, pies that are suppose to celebrate abundance get mighty stingy. I'm convinced that the apples and streusel that are piled onto this tart were devised to camouflage the scant amount of filling in the pie shell. The original recipe called for piling apples onto the mincemeat and then covering them with streusel. It was a bit of a mess to look at , so I decided to use spirals of overlapping apple slices and less of the streusel topping. It's still awfully sweet , too sweet for my tastes, but at least it looks more planned and festive. I use two, rather than the three, apples called for in the original recipe and I cut the streusel ingredients in half. Those among you who love mincemeat and highly sweetened desserts will love this tart. Here's the recipe.

Mincemeat Tart with Apples and Streusel Topping...from the kitchen of One Perfect Bite inspired by Family Circle magazine

Ingredients:
1 unbaked pastry shell for a 9-inch pie or tart pan
2 cups homemade or bottled mincemeat
2 apples, pared cored and thinly sliced
6 tablespoons granulated sugar
1 tablespoon lemon juice
1/4 cup all-purpose flour
1/4 cup firmly packed brown sugar
2 tablespoons butter

Directions:

1) Preheat oven to 425 degrees F. Line a pie or tart pan with pastry.
2) Spread mincemeat evenly in pie shell. Place apples in a medium bowl. Add lemon juice and granulated sugar and toss to coat. Spread in an overlapping pattern of concentric rings on top of mincemeat filling.
3) Combine flour and brown sugar in a small bowl. Cut in butter until coarse crumbs form. Sprinkle over apples.
4) Place pie or tart pan on a baking sheet to catch spills. Bake for 40 to 50 minutes. Yield: 6 to 8 servings.

You might also enjoy these recipes:
Mince Pies - The English Kitchen
Mincemeat Gingerbread - Cooking with K
Mincemeat - Felice in the Kitchen
Christmas Flavor Ice Cream - Antics of a Cycling Cook
Cranberry Port Mincemeat Brioche Rolls - What's for Lunch Honey?
Funeral Pie - One Perfect Bite
Green Tomato Mincemeat - One Perfect Bite

Thursday, September 9, 2010

Plum Tart with Streusel Topping


From the kitchen of One Perfect Bite...We do our green market loop every weekend when farm stands are open. The trail begins in the produce section of our Saturday Market and then heads past the city limits to farms, where we can actually measure the growth of food from one week to the next. The weekly run for provisions usually works well, but I occasionally find fruits and vegetables ganging up on me. This week I had to deal with surplus corn and plums before new stores could be brought in. I decided to use the plums to make a tart, and because I was using red and blue varieties of varying sweetness, I thought it best to use a streusel topping to assure they would not be too tart when baked. Even with that, you'll find this to be a just sweet tart and scheduling trumpet practice following dessert would be unwise. In order to proceed you will need pastry for a one crust pie. Homemade is, of course, best, but use whatever is easiest and most convenient for you. This dessert is about the plums, not the pastry. This is really easy to do and if you are fond of European desserts you'll love this tart tart. It is very juicy and I think it's best served warm. Here's the recipe.

Plum Tart wit Streusel Topping...from the kitchen of One Perfect Bite, inspired by The Cookworks

Ingredients:

Pastry for 1 9-inch tart or pie pan
8 large purple plums, pitted and thinly sliced
1/3 cup brown sugar
1 teaspoon ground cinnamon
Streusel Topping
1 cup all-purpose flour
1/3 cup sugar
1 teaspoon ground cinnamon
1/2 cup unsalted butter, cold

Directions:
1) Preheat oven to 425 degrees F. Line a pie or tart pan with pastry. Set aside.
2) Toss plums with brown sugar and cinnamon. Pile plum mixture into pastry shell.
3) Combine flour, sugar and cinnamon together in a bowl. Cut butter into flour mixture until it resembles cornmeal. Sprinkle streusel evenly over plums.
4) Bake for 20 minutes. Reduce oven temperature to 350 degrees F and bake for 20 minutes longer. Serve warm. Yield: 6 to 8 servings.

You might also enjoy these recipes:
Plum Jam with Ginger and Vanilla - Cotto e Crudo
Plum Honey - How I Cook
Plum Buckle - One Perfect Bite
Plum Custard Pie with Almond Crust
Cinnamon Streusel Plum Cake - My Kitchen in the Rockies
Double Crusted Plum Crisp - Two Peas and Their Pod
Plum and Raspberry Clafouti - Cafe Leilee

Monday, September 6, 2010

Plum Buckle


From the kitchen of One Perfect Bite...Tucked into that corner of the world occupied by crisps, cobblers and grunts, is yet another treasure called a buckle. The buckle is a rich butter cake that's topped with fruit. It gets its name because the surface of the cake appears to buckle as the cake batter rises around the topping. I think the best and most delicious version of this cake is made with plums. It tastes like a Viennese kuchen but it is much easier to prepare. While I serve this cake for breakfast or for brunch, it also makes a wonderful dessert. It is quite simple to do, though you should be aware there is one irritating problem associated with the cake. It's done when it chooses to be done and the time it requires to bake is variable. Some days the cake bakes in less than an hour, other days it takes more time. I suspect the amount of moisture in the fruit explains the discrepancy but you'll be fine, as long as you keep the cake in the oven until you are sure its center is set. This is a cake that is best served warm and eaten on the day it is made. It stales quickly. This is a treasure that I hope you will try. Here's the recipe.

Plum Buckle
...from the kitchen of One Perfect Bite inspired by Sunset Magazine

Ingredients:
1 cup (2 sticks) butter, at room temperature
1 cup plus 2 tablespoons sugar
2 large eggs
Zest of 1 small lemon
1-1/2 cups all-purpose flour
1 teaspoon baking powder
1/4 teaspoon salt
1/4 teaspoon ground nutmeg
1/3 cup milk
4 cups sliced unpeeled firm-ripe plums (about 4 large)
1/2 teaspoon ground cinnamon
1/4 teaspoon ground mace

Directions:
1) Preheat oven to 325 degrees F. Butter an 8 x 8 x 2-inch pyrex pan. Set aside.
2) Combine butter and 1 cup sugar in bowl of a stand mixer fitted with a paddle attachment. Beat at high speed until smooth. Add eggs, one at a time, beating well after each addition. Beat in lemon peel.
3) Combine flour, baking powder,salt and nutmeg in another bowl. Whisk to combine. Stir half the flour mixture into butter mixture , then add milk followed with remainder of flour mixture. Stir just until incorporated. Scrape batter into prepared pan. Overlap plum slices on top of batter. Combine reserved 2 tablespoons sugar with cinnamon and mace. Sprinkle over plums.
4) Bake in a 325 degree oven until a wooden skewer inserted in the center comes out clean, 45 to 50 minutes (it may take longer than this) . Serve warm or at room temperature. Yield: 9 servings.

You might also enjoy these recipes:
Plum and Hazelnut Crumble Slice - The English Kitchen
Cinnamon Streusel Plum Cake - My Kitchen in the Rockies
Plum Galette/Plum Crostada - My Kitchen Snippets
Plum and Cherry Compote - Nami Nami
Plum Tart - Being Suzy Homemaker
Plum Cardamom Ice Cream - Cristine Cooks

Saturday, September 4, 2010

Toasted Coconut and Lime Layer Cake


From the kitchen of One Perfect Bite...This cake is a melange of bits and pieces taken from other places. The first time I assembled it, the planets must have been aligned and Lady Luck deemed to smile my way. I wanted to make a coconut cake but needed a way to beat back its sweetness. I happen to have lime curd in the refrigerator and decided to use it to fill the cake. The next step was to find an icing that was compatible with coconut and lime. I found a lovely cream cheese frosting that was perfect once its taste was heightened with the addition of coconut extract. The frosted cake looked awfully white, so I decided to add color by toasting the coconut that is classically used to cover its surfaces. While the pros have nothing to fear, this cake has become a favorite of ours. I made it for this weekend because it is fairly easy to transport and does not need constant refrigeration. The layers are a cross between a sponge and a pound cake, so it is more dense than many of the layer cakes that are currently so popular. It can handle a little jostling without collapsing and spots can be covered with additional toasted coconut. The next time I make this, I plan to split the layers in order to use more of the lime curd I so love. I hope you'll try this cake. It really is quite lovely. Here's the recipe.

Toasted Coconut and Lime Layer Cake...from the kitchen of One Perfect Bite

Coconut Layer Cake courtesy of Bon Appetit
Ingredients:
2-3/4 cups cake flour
1 teaspoon baking powder
1/2 teaspoon baking soda
1/2 teaspoon salt
1-3/4 cups sugar
1 cup (2 sticks) unsalted butter, room temperature
1 cup canned sweetened cream of coconut (such as Coco Lépez)*
4 large eggs, separated
1 teaspoon vanilla extract
1 teaspoon coconut extract
1 cup buttermilk

Directions:
To make layer cake:
1) Preheat oven to 350°F. Butter and flour two 9-inch-diameter cake pans with 2-inch-high sides. Whisk flour, baking powder, baking soda and 1/2 teaspoon salt in medium bowl to blend. Using electric mixer, beat sugar, butter and sweetened cream of coconut in large bowl until fluffy. Beat in egg yolks and vanilla and coconut extracts. On low speed, beat in dry ingredients and then buttermilk, each just until blended.
2) Using clean dry beaters, beat egg whites with pinch of salt in another large bowl until stiff but not dry. Fold beaten egg whites into batter.
3) Divide cake batter between prepared pans. Bake cakes until tester inserted into center comes out clean, about 45 minutes. Cool cakes in pans on rack 10 minutes. Run small sharp knife around pan sides to loosen cakes. Turn cakes out onto racks and cool completely. Yield: 10 to 12 servings.

Lime Curd Filling - recipe found HERE

Coconut Cream Cheese Frosting courtesy of One Perfect Bite
Ingredients:
2 (8-oz.) packages cream cheese, room temperature
1/2 stick unsalted butter, room temperature
2 to 3 cups powdered sugar
1 teaspoon vanilla extract
1 teaspoon coconut extract

Directions:
Place cream cheese in a medium bowl and beat until smooth and fluffy. Add butter and beat to blend. Add sugar and vanilla and coconut extracts and beat until well blended. Add drops of milk or cream, if needed, to make a spreadable consistency. Yield: 3 cups.

Final Assembly
Ingredients:
2 cups toasted sweetened shredded coconut

Directions:
Place 1 cake layer on cake plate. Spread 1 cup lime curd over cake layer. Top with second cake layer. Spread frosting over top and sides of cake. Sprinkle toasted coconut over cake, gently pressing into sides to adhere. The cake can be prepared 24 hours before serving. Cover with plastic wrap and refrigerate. Let stand at room temperature 2 hours before serving.

You might also enjoy these recipes:
Key Lime and White Chocolate Cake Squares - One Perfect Bite
Coconut Banana Cream Pie - Coconut Recipes
Strawberry Coconut Thumbprints - Big Black Dog
White Mountain Coconut Cupcakes - Cookie Madness
Coconut Bread - Bored Cook in Kitchen
Coconut Pistachio Truffles - Anja's Food 4 Thought
French Coconut Pie - Home Cooking and Baking