Showing posts with label side dish. Show all posts

Tuesday, December 7, 2010

Hong Kong-Style Broccoli


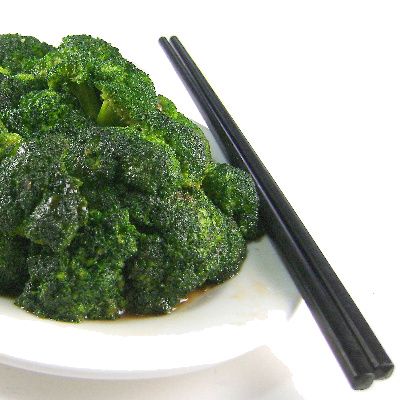
From the kitchen of One Perfect Bite...I suspect only Bob is more grateful than you to see I've come to the end of the broccoli trilogy. My final effort is patterned after a dish we had in Hong Kong several years ago. Before I get too far into the recipe, I want you to know that Hong Kong is an extremely cosmopolitan city where you can get any type of food you crave, including pizza and paella. That something is called Hong Kong-style really doesn't mean too much and, if you are interested, information about all eight of the regional cuisines of China can be found here. Samples of all those cuisines can be found in Hong Kong. Generally speaking, Hong Kong-style refers to any dish that is stir-fried and mildly spiced, much like Cantonese food here in the U.S. This is a quick and easy way to prepare broccoli. It is also delicious and works well as a side for non-Chinese meals. If you are looking a new way to prepare broccoli, I think you love the crispness, color and taste of this one. Here's the recipe.

Hong Kong-Style Broccoli...from the kitchen of One Perfect Bite

Ingredients:
Sauce
1/4 cup water
2 tablespoons oyster sauce
1 tablespoon Chinese rice wine or dry sherry
2 teaspoons cornstarch
Broccoli
2 tablespoons vegetable oil for stir-frying
1 clove garlic, very finely chopped
2 quarter-sized pieces of ginger, very finely chopped
1 pound broccoli florettes
2 teaspoons sugar
Salt to taste
1/4 cup water

Directions:
1) To prepare sauce: Combine water, oyster sauce, wine and cornstarch in a small bowl. Mix well. Set aside.
2) To prepare broccoli: Heat wok or large frying pan. Add oil and heat until it shimmers. Add garlic and ginger and stir-fry until fragrant, about 30 seconds. Add broccoli and stir fry until bright green. Add sugar and salt. Pour in water, cover pan, and cook for about 2 minutes. Make a well in center of pan and pour in sauce. Stir until thickened. Toss broccoli in sauce. Transfer to a serving bowl. Serve hot. Yield: 4 servings.

You might also enjoy these recipes:
Roasted Broccoli Rabe with Garlic - Gina's Skinny Recipes
Broccoli Cheese Souffle - Tasty Eats at Home
Broccoli and Rice Casserole - Deep South Dish
Chicken Divan - Annie Bakes
Broccoli, Dried Cranberry and Smokey Bacon Salad - La Bella Vita
Grilled Broccoli - Elana's Pantry

Wednesday, November 17, 2010

Aloo Matar Rasedaa - Curried Potatoes and Elephant Safari


Aloo Mater Rasedaa - Curried Potatoes.


They don't get much cuter, but she was a surprise. Her Daddy was a rogue.


This is her teen-age mother.


At home in the jungle.


Conference room.


Kitchen.


Termite Colony.


Tiger


Rhino.


Crocodile.


From the kitchen of One Perfect Bite...The Silver Fox loves nature. I love the Silver Fox. The bit about jungles and safari was buried in the fine print of our marriage contract. I missed it. He didn't. That's how I ended up in the middle of a jungle on the back of an elephant who cared a good deal more about her offspring than me or my welfare. We had signed on for a four day stay at a Nepali eco-lodge, hoping that would be enough time to see at least some on the wildlife the camp was famous for. As luck would have it, we got to see everything our first morning on safari. That was wonderful. Folks can spend years trying to catch glimpses of the tigers or white rhinos in the reserve. We hit a homer our first time at bat. Our good luck, however, meant we had to come up with other plans to fill the time we had left in camp. Four days can be an eternity in a place that has only intermittent electricity and hot water. It does not encourage the reading or writing of the great American novel and bubble baths are not de rigueur. I spent my time in the primitive kitchen and at the elephant camp watching the antics of a two year old who was such a minx you couldn't help but love her. She's now old enough to walk behind her mother on expedition. If she's hungry she nurses and everyone waits till she's had her fill. If she finds a pile of dirt or an especially lush leaf, she'll stop and play. Everybody waits. If they're lucky they'll escape the dirt she blows their way as an invitation to play. It's also interesting to watch the behavior of the other elephants when she is around. If they scent boar or other animals that might be dangerous, they close ranks and form a protective circle around her. When I tire of the elephants, I wander down to the primitive kitchen and watch them prepare meals for 40 or so guests. There are no appliances to speak of. There are 5 cooks who report to head chef who barks orders but also cooks. The six of then produce breakfast and two large buffets every day. The food they cook must be walked uphill to the dining room. When the meals are over, dishes are walked to another facility to be washed and stored away. The arrangement is uniquely inefficient but the job gets done, even in rainy season. Eco-tours are not for everyone, but if you love nature and being outdoors you'd love to spend some time on jungle safari. I glad I did it. Once!

The food prepared in the kitchen at Temple Tiger was, of necessity, easy to make. It lacked refinement, but it was delicious and there was always plenty of it. I especially like their recipe for curried potatoes and peas. It can be served with any meal, but it is a wonderful addition to the Nepali set I've been talking about building. It perfectly fits the curry component of the dish. Here is the recipe.


Aloo Matar Rasedaa - Curried Potatoes and Peas...from the kitchen of One Perfect Bite

Ingredients:

2 pounds baby Yukon Gold potatoes, unpeeled and quartered
2 tablespoon ghee or olive oil
1 medium onion, finely minced
1 teaspoon finely minced ginger
1/4 teaspoon salt
1-1/2 teaspoon turmeric
1-1/2 teaspoon cumin powder
1 teaspoon ground coriander
1/4 to 1/2 teaspoon cayenne or ground red pepper
1 teaspoon cumin seed
1 can (15-oz.) chopped tomatoes, undrained
1/4 teaspoon sugar
1 cup frozen peas, thawed
1/4 teaspoon garam masala

Directions:
1) Boil potatoes in lightly salted water until barely tender, about 10 minutes. Drain and set aside.
2) Heat oil in a large pot. Add onions and ginger and cook until softened. Stir in turmeric, cayenne, cumin powder, coriander and cumin seed and cook until fragrant.
3) Add potatoes to skillet and stir to coat with spices. Add tomatoes and sugar and simmer until potatoes are tender, about 20 minutes. Stir in peas and garam masala. Cook 5 minutes longer. Add additional water if sauce becomes too thick. Season with salt to taste. Serve hot. Yield: 4 servings.

You might also enjoy these recipes:
Curried Vegetables With Whole Wheat and Couscous - Simply Recipes
Indian Style Curried Vegetables - What's Cookin, Chicago?
Curried Potato and Vegetable Soup - Simply Recipes
Aloo Gobi - No Recipes
Fresh Vegetable Curry - The Whole Life Nutrition Kitchen
Mixed Vegetable Curry - What's Cooking Today

Tuesday, November 16, 2010

Alu Ki Tikki (Potato Patties) - Kalakho and Camel Caravans


Alu Ki Tikki.


From the kitchen of One Perfect Bite...There are two Indias. One is modern and vibrant, the other is mired in poverty and tradition. My first real exposure to the dichotomy came while visiting a farm village outside the town of Kalakho in the state of Rajasthan. The villagers invited us into their homes and the men entertained us with local music and dancing. While much of what we saw was well orchestrated showmanship, the journey to and from local villages gave some insight into what was really happening in these remote areas of the country. We traveled in camel caravans and the slow pace made close observation possible. Despite best efforts by the government, much work still needs to be done. Women here are little more than chattels and a headcount while at a local school confirmed an unintended male bias. Old ways die very hard, yet these people do not seem to be unhappy. Television, with its exposure to undreamed of freedom and material goods, has not reached their villages and they remain a serene and patient people, seemingly lost in another century. I don't know how much longer that can last.

In the midst of all that, we were housed in a lovely resort that overlooked a monsoon lake. Our meals were regular and delicious and I brought several recipes home with me. These potato patties were part of our breakfast buffet each morning. They are a simple mix of seasoned potatoes, combined with peas and spices, that is held together with chickpea or all-purpose flour. Despite their appearance they really are delicious. Here's the recipe.


Alu Ki Tikki...from the kitchen of One Perfect Bite

Ingredients:
1 pound potatoes, peeled and cut in 1-inch cubes
2 teaspoons salt
1 bay leaf
1 cup frozen peas, thawed
1/2 teaspoon salt
1/2 red onion, finely diced
1 (1-inch) piece ginger, peeled and finely diced
1/4 to 1/2 teaspoon dried red pepper flakes
1 tablespoon vegetable oil
1 teaspoon ground cumin
1 teaspoon ground coriander
1 teaspoon ground turmeric
2 tablespoons chickpea (besan) flour (all-purpose flour can be substituted)
1 tablespoon lemon juice
1/2 teaspoon garam masala
3 tablespoons vegetable oil or a mixture of vegetable oil and ghee

Directions:
1) Cover potatoes with cold water, add salt and bay leaf and bring to a boil. Then turn heat down to a simmer and let cook until soft enough to mash, about 15 minutes or so. Drain potatoes and return to pot.
2) Heat 1 tablespoon oil in a saute pan. Add onions, ginger and pepper flakes. Saute until soft. Add salt, cumin, coriander, turmeric and cook for a few seconds longer.
3) Mash potatoes. Gently fold in peas, onion-spice mixture, chickpea flour and lemon juice.
4) Using a 1/4 cup measures, form into patties.
5) Heat 3 tablespoons oil in a large nonstick skillet. When hot, add patties and cook until a deep golden brown, turn and continue cooking until reverse side is golden. Remove and drain on several layers of paper toweling. Serve warm or at room temperature with tomato or mint chutney. Yield: 12 to 14 patties.

You might also enjoy these recipes:
Aloo Palak - eCurry
Spicy and Seedy Indian Potatoes - Herbivoracious
Chickpea Potato Curry - Simply Recipes
East Indian Potato Chops - Foodista

Friday, October 29, 2010

Roasted Red Pepper and Tomato Soup - Pink Saturday


From the kitchen of One Perfect Bite...This soup is a wonderful way to use the last of summers bounty. It's flavorful, quite easy to assemble and its wonderful color belongs on an artist's palette. The only downside to all this is that you'll need a blender or food processor to puree the vegetables. If you are fastidious you'll also want to pour the soup through a fine mesh strainer to capture those odd bits and bobs that escape the blender blades. The soup can be served warm or cold and it's perfect to pack in a thermos to offer as a warmer at the game. I prefer to serve the soup warm, but it was actually developed to be served cold. Remember cold soups require more salt than those that are served warm, so adjust seasonings accordingly. Hot or cold the soup should be allowed to rest and ripen before it is served. I think you'll enjoy this. Here's the recipe.

Roasted Red Pepper and Tomato Soup...from the kitchen of One Perfect Bite

Ingredients:
2-1/4 pounds Roma tomatoes, halved lengthwise
3 large red bell peppers, quartered, seeded
1 onion, cut into thin wedges
4 large garlic cloves, peeled
2 tablespoons extra virgin olive oil
1 teaspoon fresh thyme leaves or 1/2 teaspoon dried
2 cups water (approximate measure)
Heavy cream (optional)
Fresh thyme sprigs (optional)

Directions:
1) Preheat oven to 450°F. Arrange tomatoes (cut side up), bell peppers, onion and garlic cloves on large baking sheet. Drizzle oil over; sprinkle generously with salt and pepper. Roast vegetables until brown and tender, turning peppers and onion occasionally, about 40 minutes. Remove from oven. Cool.
2) Transfer vegetables and any accumulated juices to processor. Add thyme leaves. Puree soup, gradually adding enough water to thin soup to desired consistency. Chill soup for 3 to 24 hours. Reheat if serving warm. If soup becomes too thick, thin with additional water.
3) Adjust seasoning. Ladle soup into bowls. Drizzle with heavy cream if desired. Garnish with thyme sprigs, if using. Yield: 4 servings.

You might also enjoy these recipes:
Bacon and Potato Soup - Yum Sugar
Black Bean and Pumpkin Soup - Smitten Kitchen
Split Pea Soup with Pancetta - Bread and Honey
Spinach White Bean and Turkey Sausage Soup - Closet Cooking
Pureed Sweet Potato Soup - Saveur
Bacon and Cabbage Soup - Epicurious


This post is being linked to:
Pink Saturday, sponsored by Beverly at How Sweet the Sound.

Sunday, September 26, 2010

Kinpira Gobo - Japanese Burdock


From the kitchen of One Perfect Bite...I stumbled on burdock quite by accident. While looking for celeriac in the produce section of my market, I found a stash of dirt encrusted roots that were about 18 inches long. I was intrigued enough to do some research, and learned that what had aroused my curiosity was actually the edible taproot of a plant belonging to the thistle family. While I had never seen it before, the root, called burdock, is popular throughout Asia, where it is still eaten and also used for medicinal purposes. Armed with that basic information, I went ahead and did an extensive search for ways in which to cook it. Strangely, there were few to be found and I found myself dealing with multiple occurrences of the same recipe. I really wanted to try this, but I wanted to get it right first time at bat. The roots were $9 a pound and that didn't leave much room for experimentation. A larger concern was how few of the roots the store actually had in stock. I went back and bought a pound which effectively delpleated their supply. Once home, I decided to use the recipe supplied by a group of expats living in Japan. They have a wonderful site called Tokyo Work Life where, among other things, they maintain a collection of Japanese recipes which you can find here. Their recipe differed from the others in that they used a hot dried chili, rather than miso, to flavor the dish that is called kinpira gobo. Their version of gobo is also cooked in dark sesame oil, rather than being sprinkled with sesame seeds before serving. The first task was to clean and peel the roots. A good scrub with a vegetable brush took care of the encrusted dirt and I used the dull edge of a knife to peel the burdock. A peeler would have removed too much of the flesh. I did cheat a bit with the next step. The recipe called for cutting the roots into a very thin julienne. I used a julienne peeler to do this, so I ended up with lovely, but long, strips of burdock that would be difficult to eat with chopsticks. In a perfect world, the strips would have been cut to a uniform julienne about 2 inches long and 1/16 of an inch wide. I quickly learned that the strips need to go into cold water once they're cut to prevent them from turning black. Soaking in water helps to remove the minerals that cause oxidation to occur. I let mine sit for about 30 minutes in several changes of water. Burdock has a deep earthy flavor, like that of wild mushrooms, but it has a very fibrous texture that can be stringy if you don't cook it correctly or long enough. "Kinpira" describes a dish that is both sauteed and braised. The dual process produces a vegetable that is slightly fibrous and crunchy rather than tough. In Japan this is served as an accompaniment to a main course and rice. It is surprisingly pleasant. If you like to experiment and are in the market for something different, be fearless and give this a try. Here's the recipe.

Kinpira Gobo...from the kitchen of One Perfect Bite, inspired by Tokyo Work Life

Ingredients:
1 pound burdock root, peeled and julienned
1 large carrot, peeled and julienned
1/8 teaspoon red pepper flakes
1 tablespoon dark sesame oil
1-1/2 tablespoons tamari or soy sauce
1-1/2 tablespoons mirin( rice wine)
Vegetable oil
Salt and pepper

Directions:

1) Peel and julienne burdock and carrot into 2-inch matchsticks. Soak in several changes of water for 30 minutes to remove excess minerals that would could cause oxidation. Drain well.
2) Heat pan or wok until hot. Add sesame oil, 1 tablespoon vegetable oil and pepper flakes to pan. Add drained burdock and carrots to pan and saute/stir-fry for about 6 minutes stirring constantly. Add tamari, mirin and 3 tablespoons water to pan. Toss. Lower heat and cook, covered, for 5 to 10 minutes longer depending on how crunchy you like your vegetables. Serve warm with rice: Yield: 4 servings.

You might also like these recipes:
Kinpira Gobo - No Recipes
Cooking with Gobo - Edible Earthscapes
How to Make Kinpira Gobo - Eating Japan
Kinpira - Umami: What's for Dinner?
Kinpira Gobo - mmm-yoso!!!

This recipe is being linked to Regional Recipes - Japan, sponsored by Joanne of Eats Well with Others

Tuesday, September 21, 2010

Zucchini Fritters


From the kitchen of One Perfect Bite...Zucchini and fruit cake have one thing in common. They both are passed around a lot. Though we don't grow zucchini, generous friends and neighbors keep our cupboards full and we never want for it. While I've lots of recipes for zucchini, I still keep my eyes open for new or different ways in which to prepare it. That's how I happened upon this fritter recipe developed by Michael Symon. Recipes for fritters abound, but his has a Greek flair that makes it especially interesting. The addition of mint and dill and a healthy portion of feta cheese set his fritters apart from others I have tried. You will love these, but if you decide to make them there is a potential problem you should be aware of.

Watery zucchini will spoil the fritters.To avoid that, I use a potato ricer to squeeze as much liquid from them as I possibly can. If the fritter mixture is too damp, the fritters will separate while being fried and leave you with a greasy mess. While these can be made ahead of time and reheated, I don't recommend doing that. My preference is to serve them freshly fried and hot. They can be served with Greek yogurt, or tzatziki if you prefer. They are a bit of work to assemble, but the fritters are delicious and worth the effort. Here's the recipe.


Zucchini Fritters...from the kitchen of One Perfect Bite inspired by Michael Symon

Ingredients:
2 pounds zucchini
1 teaspoon salt
1 tablespoon chopped mint
1-1/2 tablespoon chopped dill
1 large scallion, white and green parts sliced thinly on the bias
2 teaspoons minced garlic
Zest of one lemon
1/4 teaspoon black pepper
1 cup (4-oz.) feta cheese, roughly chopped
1 egg
3 tablespoons flour
Canola oil for frying
Optional:
Tzatziki
Greek yogurt
Fresh dill, to garnish
Additional lemon zest, to garnish

Directions:

1) Grate zucchini onto a clean kitchen towel using the large holes of a box grater. Sprinkle with salt. Set aside for 30 minutes. Wring as much liquid out of the zucchini as possible, discarding liquid. I use a potato ricer for this task.
2) In a medium bowl, combine zucchini, mint, dill, scallion, garlic, lemon zest, pepper and feta. Stir in egg and flour and mix until well combined.
3) Heat enough canola oil in a pan over medium high heat to come halfway up sides of fritters. Form fritters, using 1/4 cup measure, and place gently into hot oil. Fry, turning once, until fritters are golden brown on each side, about 4 to 6 minutes. Remove from pan and drain on paper towels for a minute. Plate and garnish with a dollop of Greek yogurt or tzatziki, fresh dill and lemon zest. Yield: 8 fritters.

You might also enjoy these recipes:
Zucchini Gratin - One Perfect Bite
Stuffed Zucchini Slices - Sugar Crafter
Zucchini Carrot Muffins - Real Mom Kitchen
Zucchini and Carrot Soup - Tobias Cooks
Zucchini-Pineapple Muffins - Kahakai Kitchen
Zucchini Pancakes - Delicious Dishings
Zucchini Bread - Fresh4Five

Friday, September 17, 2010

Hannibal's Roasted Tomato Pilaf


From the kitchen of One Perfect Bite...While the rice and barley simmered, my mind wandered and Hannibal and the armies of Carthage came to mind. I think the color of the grains triggered my reverie. I was looking at a decidedly hot mess and needed some distraction until everything in that pot came together. I comforted myself with the knowledge that those armies, fueled by grains such as these, crossed the Alps and challenged the power of Rome. That they lost was beside the point. I was determined, at the very least, to tame the contents of my pot. As it turned out, I worried needlessly. My plan included the addition of roasted tomatoes, and a quick taste at the end of cooking revealed a pleasantly flavored, nutty surprise that was brightened by the flavor and color of the fruit. I'm still relatively new to meatless cooking and I'm always taken aback when dishes like this actually work. In order to assure the brown rice was cooked, I staggered the addition of the barley and orzo. I was afraid that if everything went into the pot at the same time the orzo and barley would become gummy before the rice was done. That meant one extra pan, but I'm glad I took the time to do it that way. The roasted tomatoes were great, but I think garlic sauteed zucchini would have worked as well. Even my committed carnivore enjoyed the dish, though he ate it with a chop on the side. Whether you have it as a main course or a side dish, I think you'll like this, too. Here's the recipe.

Hannibal's Roasted Tomato Pilaf...from the kitchen of One Perfect Bite

Ingredients:

1-1/2 cup baby tomatoes
3 tablespoons olive oil, divided use
2/3 cup brown rice
2/3 cup barley
2/3 cup orzo pasta
3-3/4 cups chicken or vegetable broth
1 teaspoon salt
Optional: Basil leaves for garnish

Directions:
1) Preheat oven to 400 degrees F. Place tomatoes on a baking sheet and toss with 1 tablespoon olive oil. Bake for 20 minutes. Set aside.b
2) While tomatoes bake, add 1 tablespoon olive oil to a skillet and heat until warm. Add brown rice and sauteed until grains are coated and lightly brown. Add salt and broth. Bring to a boil. Reduce heat and simmer, covered, for 10 minutes.
3) Add reserved 1 tablespoon olive oil to a second skillet and heat until warm. Add barley and orzo and cook until grains are coated and lightly brown.
4) Stir barley and orzo into brown rice. Bring to a boil, then reduce heat and simmer, covered, until water is absorbed and mixture is tender, about 20 minutes longer.
5) Lightly toss pilaf mixture with roasted tomatoes. Season to taste. Garnish with basil if desired. Serve warm or cold. Yield: 6 servings.

You might also enjoy these recipes:
Stuffed Bell Peppers with Moroccan Rice Pilaf - The Heritage Cook
Garlic Rice Pilaf - Christine's Cuisine
Dirty Rice - Simply Recipes
Mushroom Rice Pilaf - What's Cookin Chicago
Rice Pilaf with Spinach and Bacon - The Teacher Cooks
Bulgur Pilaf - Koko's Kitchen
Rice and Red Lentil Pilaf - One Perfect Bite

Sunday, September 12, 2010

Zucchini Gratin - Blue Monday


From the kitchen of One Perfect Bite...If ever you've wondered why I don't review restaurants, this snippet from my notes might help you understand. "The best part of lunch was the al fresco setting. That, unfortunately, wasn't edible. Neither was the food." I'm by nature easy to please and hate to find a recipe or restaurant wanting. I envy reviewers who can handle negatives in a less blunt fashion than my own. If you want to read wonderful restaurant reviews, I urge you to read those written by Jeroxie or the distaff side of Pig Pig's Corner. Good or bad, they deliver their opinions in a far more tactful manner than my own, but you still know where they are coming from and they speak truth to power. It's my hope that folks who stake their reputations on the contents of a plate, will learn that kitchen and staff must be supervised at all times. Reputations made at dinner can be lost at lunch and, with no dearth of restaurants, "eternal vigilance" just might pay next months rent. I'd name the restaurant at which I ate, but it will be gone within 6 months so there's no reason to cause ill-will in my small community. A bad lunch, however, means dinner must be PDG. To help ours along, I fell back on a wonderfully simple dish created by Patricia Wells. I can honestly say I've never had a bad experience with her recipes and she is one of my favorite food writers. The dish is a zucchini gratin and it is a wonderful accompaniment to plain grilled meat or poultry. It is easy to assemble, quick to cook and altogether delicious. I hope you'll try it. You're going to love the way it tastes. Here's the recipe.

Zucchini Gratin...from the kitchen of One Perfect Bite courtesy of Patricia Wells

Ingredients:
2 tablespoons olive oil
4 cloves garlic, peeled and halved
1 pound yellow and green zucchini, trimmed and cut into chunks
1/4 cup light cream or half-and-half
1 teaspoon kosher or sea salt
1/4 teaspoon freshly ground black pepper
1/4 cup (1-oz.) freshly grated Gruyere cheese

Directions:
1) Preheat broiler. Grease a 1-quart gratin dish. Set aside.
2) Heat oil in a large skillet set over moderate heat until it is hot but not smoking. Add e garlic and zucchini, and brown for about 5 minutes. Reduce heat to low, cover, and cook until soft, about 8 minutes more.
3) Transfer zucchini to prepared gratin dish. Drizzle light cream all over. Season with salt and pepper. Adjust seasoning to taste. Sprinkle with cheese. Place under broiler and broil until the cheese is melted and golden, 2 to 3 minutes. Yield: 4 servings.

You might also enjoy these recipes:
Summer Summer Pasta with Zucchini and Tomatoes - Je Mange la Ville
Zucchini Relish - The Local Cook
Zucchini Pancakes - Delicious Dishings
Zucchini Pistou Pasta - Closet Cooking
Zucchini Bake with Feta and Thyme - Real Mom Kitchen
Zucchini and Goat's Cheese Pizza - The Purple Foodie
Zucchini Caponata - Inspired 2 Cook
Pasta with Zucchini, Parmesan and Olive Oil - One Perfect Bite

This post is being linked to:
Smiling Sally - Blue Monday

Thursday, September 2, 2010

Corn Timbale


From the kitchen of One Perfect Bite...To market, to market to buy a fat pig, but I came home without one jiggity jig. That's not to say I came home empty handed. Corn, at twelve ears for a dollar, was an unprecedented bargain, even for markets in this area. I loaded my basket with 24 ears and hatched a plan to do some recipe testing that I've postponed for a long time now. I've been holding on to two very old recipes that I wanted to try, and corn, at that price, provided the incentive I needed to finally proceed. Both recipes are variants of corn pudding. One of them turned out to be very pedestrian and is not worth your time. The other is Julia Child's corn timbale and it is interesting only because the recipe is hers. I must admit a prejudice going into this. I have never understood why it's necessary to take a delicious vegetable and try to make something of it that it's not. Corn is a very basic thing. A timbale usually is not. A timbale is a molded dish that holds a custard that's used to bind a mixture of cheese and vegetables or meat together. A true mold has high sides and is closed at the bottom, much like a charlotte pan. The dish is baked in a hot water bath and allowed to sit briefly before unmolding. The corn timbale is a good looking dish, but it takes a lot of butter and cream to get it to the table and I'm not much into showmanship these days. I'll let you read the recipe and decide if you want to proceed with it on your own. I found it to be pleasant, but strangely bland for one of Julia's recipes. If you don't have a corn creamer, you can use the large holes of a box grater to scrape the ears and make corn milk. Here's Julia's recipe. Bon Appetit! Kinda! Sorta! Maybe!

Corn Timbale
...from the kitchen of One Perfect Bite, courtesy of Julia Child

Ingredients:

3 cups corn milk (scraped from the cob with a corn creamer)
6 large eggs
3 tablespoons minced onion
1 teaspoon salt
1/4 cup chopped parsley
2/3 cup fresh breadcrumbs
2/3 cup grated swiss cheese
2/3 cup heavy cream
1/8 teaspoon cayenne pepper
1/4 teaspoon freshly-ground black pepper

Directions:

Butter an 9-cup charlotte mold or high-sided baking dish and line the bottom with a round of parchment paper. Whisk together corn, eggs, onion, salt, parsley, breadcrumbs, cheese, cream, red pepper, and black pepper. Pour into prepared charlotte mold. Set mold in a larger dish and pour boiling water around it to come two-thirds of the way up its sides. Bake at 350 degrees for 30 minutes, then turn down the oven to 325 and bake for 45 minutes. Let rest for 10 minutes, then unmold onto a serving plate. Yield: 6 to 8 servings.

You might also enjoy these recipes:
Spoon Bread with Leeks and Gruyere Cheese - One Perfect Bite
Summer Corn Pudding - Stacey Snacks
Southwestern Corn Pudding - Janet is Hungry
Baked Corn Casserole - Never Enough Thyme
Corn Spoon Bread - Deep South Dish
Classic Corn Pudding with Cheddar and Chives - The Runaway Spoon
Corn Pudding - Closet Cooking

Wednesday, August 25, 2010

Savory Rice Squares with Poblano Peppers and Pepper Jack Cheese


It's been a deadly quiet day. The last of our visitors left this morning and it is, once again, just the Silver Fox and I sitting at this large round table. By late tomorrow I'll appreciate the perfect order of our home, but right now I'm missing squealing babies, errant Legos and the sometimes probing questions of our older grandsons. I treasure each of these summers and especially my daughters who care so much about sharing family with their own children. I am blessed. Tonight's recipe was developed on the fly, years ago, when I had more impromptu guests than food and had to do the cook's version of loaves and fishes. It wasn't a miracle but it was more than passably good food. The recipe is really easy to prepare and I used to make it as an entree for myself when I was alone for dinner. The only trick to this recipe is properly roasting the peppers. I've found the easiest way to do this is to rub the peppers with olive oil and roast them at 500 degrees for 20 minutes before transferring them to a paper bag to cool before peeling. It is also important to serve the rice squares while they are still warm. This will probably involve sacrificing the first square that is cut, but I always view that one errant slice as food for the kitchen gods. I do hope you'll try this recipe. I think you'll enjoy it. Here's the recipe.


Savory Rice Squares with Poblano Peppers and Pepper Jack Cheese
...from the kitchen of One Perfect Bite

Ingredients:
2 tablespoons olive oil
1 cup uncooked basmati rice
1/2 cup finely chopped onion
2 fresh poblano peppers, roasted, peeled , seeded, deveined and chopped
1 bunch small green onions
1 teaspoon minced garlic
1 teaspoon salt
1/4 teaspoon ground cumin
1-3/4 cups low-sodium chicken broth
1-1/2 cups shredded pepper jack cheese
1/2 cup coarsely chopped cilantro

Directions:
1) Preheat oven to 375 degrees F. Grease a shallow 1-1/2 quart baking dish. Set aside.
2) Heat oil in a large pan set over medium heat. When oil shimmers add rice. Cook and stir until rice turns opaque. Stir in onions and cook for 1 minute. Add Chilies, green onions, garlic, salt and cumin. Cook, stirring, for about 30 seconds. Stir in broth. Bring to a boil over high heat. Reduce heat to low and simmer, covered, for 15 minutes. Remove pan from heat.
Add cilantro and 1 cup cheese. Toss to combine. Transfer to prepared baking pan. Top with remaining 1/2 cup cheese.
3) Bake, uncovered, 15 minutes or until rice is tender and cheese topping melts. Let sit 10 to 15 minutes. Cut into squares and serve. Yield: 6 to 8 servings.

You might also enjoy these recipes:
Risotto Veronese:Rissoto with Ham - Karista's Kitchen
Peanuts and Brown Rice with Asian Dressing - eCurry
Quick and Easy Pilau Rice - Deb Cooks
Honey Rice - Malaysian Delecacies
Rice with Chutney - Ruchii
Coconut Rice - Edible Garden

Thursday, August 19, 2010

Mexican Rice


Events in our corner of the world move quickly and prove, yet again, that the indefatigable Murphy is alive and well and looking for any excuse to further test his law and all its corollaries. To wit, the washing machine stopped mid-cycle this morning, no doubt aping the control panel of the oven which chose to go black during preparations for last night's dinner. I sought solace at the computer, only to find that several small pair of hands had created a screen resolution previously unseen by mankind. My composure remained intact until dinner this evening, when our 3 year old grandson, whose dad is a minister, announced, following grace, that "Opa talks to Jesus lots." That, of course, caused me to choke on my water before finally surrendering to the limitations of the day. Now, back at the computer with the strange resolution, I have another rice recipe to share with you. Anyone who spent a portion of their childhood in the late forties and early fifties can tell you about Spanish rice. It was a commonly served dish that was as good or bad as the cook who made it. Most versions of the rice were made with tomato soup and ground beef that could be quickly assembled and on the table in minutes. A few lucky souls got to have a more authentic Mexican rice which was considerably more flavorful than its Spanish cousin. There is a fine line that separates the two. Most people believe Spanish rice gets its color from saffron, and that Mexican rice gets its color from cumin and tomato. If you look at the large number of recipes that exist for both types, I'm not so sure that's really true. At least not anymore. The recipe I used as my inspiration was developed by Emeril Lagasse and he really blurred the lines between the two. I have altered his recipe to suit our tastes and eliminated ingredients such as lard and saffron. This is a great dish for lunch and I've yet to come across a teen age boy who does not love it. They accept it for what it is. Good basic food that's inexpensive and easy to prepare. I hope you'll give this dish a try. It's really good. Here's the recipe.

Mexican Rice...from the kitchen of One Perfect Bite inspired by Emeril Lagasse

Ingredients:
2 tablespoons vegetable oil
1/2 cup ground pork
1/4 pound chorizo, halved lengthwise and cut into 1/4-inch pieces
1/2 cup chopped white onions
1/4 cup chopped green bell peppers
2 teaspoons minced garlic
2 cups long grain rice
1 large tomato, peeled, seeded and chopped
4 cups chicken stock, or water
3/4 teaspoon salt
1/4 teaspoon turmeric
1 teaspoon chopped fresh oregano leaves
1 teaspoon chopped fresh cilantro leaves
1/4 cup chopped green onions

Directions:
1) Heat oil in a medium-size heavy saucepan set over medium-high heat until it shimmers. Add pork and cook, stirring until no longer pink. Add sausage and cook, stirring, for 1 minute. Add onions and bell peppers, and cook, stirring, until soft, about 3 minutes. Add garlic and cook for 30 seconds. Add rice and cook, stirring, for 1 minute. Add tomatoes and cook, stirring, for 1 minute. Add the stock, salt, and turmeric, and stir well. Bring to a boil. Lower heat to low, cover, and cook undisturbed until all liquid is absorbed, about 20 minutes.
2) Remove from heat and let sit, covered, for 10 minutes. Uncover and fluff rice with a fork. Add the oregano and cilantro, and stir to incorporate. Turn into a decorative bowl and garnish with green onions. Serve immediately. Yield: 6 to 8 servings.

You might also enjoy these recipes:
Beans and Rice Salad - Eclectic Recipes
Saffron and Red Pepper Risotto - Sugar Crafter
Rice and Olive Salad - La Fuji Mama
Shrimp Risotto - Coco Cooks
Spicy Tomato and Vegetable Rice - Chow and Chatter
Spanish Rice - Taste Tempters

Bistro Potato Salad


From the kitchen of One Perfect Bite...I love French bistro food. Coincidentally, I also love potatoes and potato salad. Over the years, I've moved away from a mayonnaise based salad and developed one that more closely resembles the salad that's served with sausage in French bistros. I've made some major changes to the recipe to accommodate the tastes of my family, so while it can no longer be called "French", I'm quite comfortable in labeling it "bistro". One of the tricks to making this type of salad is to dress on the potatoes while they are still warm. The potatoes should be lightly tossed with a seasoned dressing that coats, rather than drowns, the warm potatoes. The flavors of the dressing will not permeate cold potatoes, so if you decide to make this dish, plan accordingly. While a true French potato salad is flavored with wine and herbs, I use an oil and vinegar dressing and a handful of vegetables to season mine. The sweet pepper and parsley are used as much for the color they provide, as for the flavor they impart to the finished salad. I also use the microwave to cook my potatoes. I've found that it consistently produces potatoes that are tender, rather than mushy and water logged. They are easy to slice and the texture is perfect for a salad. I use small new potatoes for my salad and "nuke" them for 10 to 12 minutes before slicing them into a waiting bowl of dressing. While this salad can be served warm, I generally prefer to chill it before serving. It really is a delightful change from its calorie laden cousin. I think you enjoy this. Here's the recipe.

Bistro Potato Salad...from the kitchen of One Perfect Bite

Ingredients:
Dressing
1/2 cup extra-virgin olive oil
1/4 cup tarragon vinegar
1 teaspoon sugar
1 teaspoon minced garlic
1 teaspoon kosher salt
1/2 teaspoon pepper
Salad
2 pounds (about 6 medium or 18 small) red potatoes, scrubbed
1/4 cup diced red bell pepper
1/4 cup finely chopped shallots
2 - 4 tablespoons parsley
Salt
Directions:
1) Combine oil, vinegar, sugar, garlic, salt and pepper in a shaker jar or blender and shake or pulse to combine. Pour into bottom of a large mixing bowl. Set aside.
2) Add water to just cover bottom of a large microwave container. Add potatoes in a single layer and cook, covered, on HIGH power for 10 to 12 minutes, or until potatoes can be easily stabbed with a fork. When cool enough to handle cut into 1/4-inch slices. Add potatoes, sweet peppers, shallots and parsley to bowl containing salad dressing. Toss lightly to combine. Adjust to taste with salt. Refrigerate. Yield: 6 servings.

You might also enjoy these recipes:
Japanese Potato Salad - Just Hungry
Sour Cream Ranch Potato Salad - Shamrock's and Shenanigans
Asian-Style Warm Potato Salad - Pham Fatale
Gourmet Red Potato Salad - Pham Fatale
Potato Salad with Herb Yogurt Dressing - Vegetarian Perspective
Kimchi Sweet Potato Salad - Closet Cooking
Roasted Potato Salad - The Dog's Breakfast

Wednesday, August 18, 2010

Orzo and Rice Pilaf with Pignoli and Parmesan Cheese


From the kitchen of One Perfect Bite...This is an old family favorite that we love to serve with grilled or roast meat. It is our version of a commercial rice product that was quite popular years ago. Appetites are hardy in our family and it reached a point where the prepared mix cost nearly as much as the meat it was supposed to accompany. That didn't compute, so we came up with our own rice mix. Pilaf is one of those dishes that spans cultures and geographical regions. A more thorough examination of its rootless nature can be found here. This recipe is quite simple and if your family enjoys rice-based dishes I think they'll like this one. The cheese topping is optional but it is a very nice addition that you probably will want to try. The recipe can easily be doubled. Here's how it's made.

Orzo and Rice Pilaf with Pignoli and Parmesan Cheese...from the kitchen of One Perfect Bite

Ingredients:

2 tablespoons extra virgin olive oil
1/4 cup finely chopped yellow onion
1 teaspoon minced garlic
3/4 cup raw basmati rice
1/2 cup orzo
2 cups chicken broth
1 teaspoon kosher salt
1/4 cup toasted pignoli (pine-nuts)
Optional: 1/4 cup freshly grated Parmesan cheese

Directions:

1) Heat oil in a large skillet or saucepan over medium-low heat. Add onion and saute until golden, about 5 minutes. Add garlic and cook until fragrant, about 1 minute.
2) Add rice and orzo and cook for 2 minutes. Add chicken broth and salt. Heat to boiling. Cover pan, reduce heat to medium-low and cook for 15 minutes longer, or until broth is absorbed. Remove pan from heat. Let sit, covered, for 10 minutes before serving.
3) Add toasted pignoli and cheese (if using) to pilaf. Serve immediately. Yield: 4 servings.

You might also enjoy these recipes:
Rice and Red Lentil Pilaf: Kichiri - One Perfect Bite
Southwestern Cilantro Rice Salad - One Perfect Bite
Shrimp Risotto - Coco Cooks
Spanish Rice - Taste Tempters
Mexican Rice - Chef in You
Paella Rice Salad - Eclectic Recipes
Radish Rice -Aayi's Recipes
Zesty Rice and Barley - Living the Gourmet

Wednesday, August 11, 2010

Gingered Noodle Salad


Zach and Drew at Delta Ponds


The Silver Fox

From the kitchen of One Perfect Bite...We've had a wonderful day. Our final destination was a place called Delta Ponds, which is a habitat that's been created adjacent to a stretch of the Willamette River here in town. The ponds are teeming with life at this time of year. So are our grandsons. They needed to burn a little excess energy, so we hiked about five miles of the river trail to get there. They were good, though tired, sports when they realized we could have driven to the ponds directly and they had been tricked. They'll sleep well tonight. So will I. Tucked into the picnic hamper were the remains of the noodle salad I talked about earlier in the week and promised to share with you today. This is very easy to make and uses ingredients that can be found in any major supermarket. If you are unable to find seasoned rice wine vinegar, combine three parts rice wine or cider vinegar with one part of sugar and a big pinch of salt and you'll be fine. If you are unable to find a mango, substitute thin slices of fresh pineapple. The pineapple is not traditional, but it's PDG and works well in this salad. The salad can be held for a day or two before it becomes unappetizing. It works really well as a base for the Chicken Rissoles we featured yesterday. As you skim through the ingredient list, you see that this gorgeous salad is low in fat and calories, as well as being delicious. It is, however, a bit more sour than most salads of this type. I hope you'll give this recipe a try. Paired with a small portion of meat or poultry it makes for a wonderful light summer meal. Here's the recipe.

Gingered Noodle Salad...from the kitchen of One Perfect Bite inspired by Gourmet magazine

Ingredients:
Vinaigrette
6 tablespoons rice vinegar
2 tablespoons granulated sugar
1/2 teaspoon kosher salt
1-1/2 tablespoons vegetable oil
1-1/2 to 3 teaspoons chopped peeled fresh ginger
1 teaspoon minced fresh jalapeño chile, including seeds, or to taste
2 teaspoons chopped garlic
Noodles
8 ounces bean thread (cellophane) noodles
1 English cucumber, halved lengthwise and thinly sliced diagonally
1 bunch scallions, thinly sliced diagonally (1 cup)
1 firm-ripe mango, peeled, pitted, and thinly sliced
2 thin carrots, very thinly sliced diagonally
1 cup fresh cilantro sprigs

Directions:
1) To make vinaigrette: Blend all vinaigrette ingredients in a blender until smooth.
2) To make noodles: Soak noodles in cold water in a bowl until pliable, about 15 minutes, then drain in a colander. Cut noodles in half with scissors. Cook noodles in a 4-quart pot of boiling salted water, stirring occasionally, until just tender, about 2 minutes. Drain noodles in colander and rinse under cold water to stop cooking. Drain noodles again well, then spread out on paper towels and blot excess liquid.
3) To assemble salad: Toss noodles with dressing in a bowl. Add cucumber, scallions, mango, and carrots and gently toss until just combined. Serve topped with cilantro sprigs. Yield: 6 servings.

You might also enjoy these recipes:
Long Life Noodles with Pickled Cucumbers - One Perfect Bite
Thai Sweet Chili Noodles - One Perfect Bite
Garlic and Cashew Noodle Salad - Bitchin' Camero
Asian Noodle Salad - Gourmet Traveller
Sesame Soba Noodle Salad - Herbivoracious
Ramen Noodle Salad - Chaos in the Kitchen
Lynne Rossetto Kasper's Rice Noodle Salad - The Wednesday Chef
Moosewood's Soba Noodle Salad - Table and Spoon

Wednesday, August 4, 2010

Broccoli and Cauliflower Gratin


From the kitchen of One Perfect Bite...This is a quick and delicious dish that I stumbled on while looking for new ways to cook broccoli and cauliflower. The recipe was developed by Laura Chenel for Food and Wine magazine. There tends to be a sameness to recipes that are written for the more strongly flavored vegetables. This one is a delightful departure from the norm. While I love the recipe as it is written, I would suggest you omit the broccoli and double the the amount of cauliflower the recipe calls for. I think the mix of ingredients is better suited to cauliflower and it makes for a much prettier dish than when the two are combined. I promise I'll give broccoli equal time at a later date. I love it, just not in this particular dish. This gratin is strongly flavored and is probably best served with plain grilled chicken or meat, though I must say I liked this enough to have the leftovers for my breakfast the last time I made it. "Gratin" is one of those culinary oddities that identifies a pan in which to cook, as well as a method of cooking. The pan is a shallow vessel that is used to hold a mixture that is topped with breadcrumbs and cheese and quickly broiled or flashed to produce a crunchy crust. They are usually easy to prepare, high in calories and absolutely delicious. This one is no exception, though it healthier than most. This is a really nice, serviceable recipe that you'll use over and over again once you've tried it. I hope that will be soon. Here's the recipe.

Broccoli and Cauliflower Gratin...from the kitchen of One Perfect Bite, courtesy of Laura Chenel

Ingredients:
4 cups broccoli florets (from 2 small heads)
4 cups cauliflower florets (from 1 small head)
1/4 cup extra-virgin olive oil
2 large garlic cloves, minced
1/8 teaspoon crushed red pepper
1/2 pound sharp Cheddar cheese, coarsely shredded (2 cups)
1/4 cup pitted oil-cured green or black olives, coarsely chopped
1 cup coarse plain dry bread crumbs
Salt and freshly ground pepper

Directions:
1) Preheat oven to 400 degrees F. Butter a 2-inch-deep 2-quart baking dish. Bring a large saucepan of salted water to a boil, add broccoli and cauliflower and cook until crisp-tender, about 3 minutes. Drain thoroughly.
2) In a large skillet, heat 2 tablespoons of oil over moderate heat. Add garlic and crushed red pepper and cook just until fragrant. Remove pan from burner. Add broccoli and cauliflower and toss. Toss olives and half of cheese with vegetables. Transfer to a baking dish and sprinkle with remaining cheese.
3) In a small bowl, toss crumbs with remaining 2 tablespoons of olive oil; season with salt and pepper. Sprinkle crumbs over cheese. Bake in upper third of oven for about 12 minutes, or until cheese is bubbling and crumbs are golden. Serve hot. Yield: 4 to 6 servings.

You might also enjoy these recipes:
Spring Vegetable Ragout - One Perfect Bite
Summer Vegetable Gratin - Delicious Dishings
Winter Root Vegetable Gratin - Playing House
Vegetable Au Gratin - eCurry
Root Vegetable Gratin - The Bitten Word
Summer Vegetable Gratin - Erin Cooks

Tuesday, July 27, 2010

Israeli Salad


From the kitchen of One Perfect Bite...I was introduced to this salad in a tourist hotel that sat at the edge of a hutong in Bejing, China. A group of Israeli tourists was also staying at the hotel and most mornings I'd have breakfast with them. I'm a very early riser and would sneak to the dining room for a cup of coffee rather than disturb Bob with my restlessness. It bothered these kind folks to see me sitting by myself and they insisted I join them at their table. Breakfast in a Chinese tourist hotel is a multicultural affair that features food, usually served buffet style, that will appeal to all the groups who are guests of the hotel. My friends, although not worried about keeping kosher, had a separate dining area with an array of food that centered on salads and other foods our hosts thought more typical of an Israeli or Mediterranean diet. My companions would gather various vegetable elements from the buffet and bring them back to the table where they were tossed with chopsticks and dressed with fresh lemon and whatever oil was available. Though not accustomed to salad at six in the morning, I was charmed into sharing theirs for the duration of my stay. Although there is some chopping involved, the salad is very easy to assemble and it's perfect for a summer meal when tomatoes and cucumbers are abundant. If you haven't had this salad, I hope you will give it a try. While the salad is delicious, it does not keep well, so dress it just before serving and make no more than you will use in one sitting. Here's how it's made.

Israeli Salad...from the kitchen of One Perfect Bite

Ingredients:
1 large green bell pepper
3 (6-to 8-ounce) tomatoes, halved, seeded, cut into 1/2-inch dice
1 large English cucumber, peeled, halved lengthwise, seeded, cut into 1/2-inch dice
3/4 cup oil-cured black olives, pitted, quartered
2/3 cup chopped red onion
1/3 cup chopped fresh Italian parsley
5 tablespoons extra virgin olive oil
3 tablespoons fresh lemon juice

Directions:
1) Char pepper over gas flame or in broiler until blackened. Enclose in plastic bag 15 minutes. Peel, seed, and cut pepper into 1/3-inch cubes. Place in large bowl.
2) Add tomatoes, cucumber, olives, onion, and parsley. Whisk oil and lemon juice in small bowl to blend; season with salt and pepper, then mix into vegetables. Let vegetables marinate at least 15 minutes but not more than 3 hours before serving. Cover and chill. Yield: 6 servings.

You might also enjoy these recipes:
Mediterranean Orzo Salad - Andrea Meyers
Summer Tomato Salad with Goat Cheese, Basil Vinaigrette and Herbs - Kalyn's Kitchen
Strawberry Tomato Salad with Balsamic - Jungle Frog Cooking
Israeli Salad - Phoo-d
The Quintessential Salad - Nosh and Tell
Cherry Tomato Salad - Tastes Like Home

Monday, July 26, 2010

Red Peppers Stuffed with Orzo and Feta Cheese


From the kitchen of One Perfect Bite...Our weather continues to be uncharacteristically warm and Bob has been uncharacteristically hungry. Despite the heat, he's been felling trees and that kind of work demands calories to stoke the fire. I decided to do a mini Mediterranean feast for his supper tonight. I pan grilled double cut lamb chops and served them with an Israeli salad and orzo stuffed peppers that are reminiscent of those served in the Greek isles. The peppers are lovely and add great color to the table. While they take time to cook, they are really easy to do and they are a relative bargain at this time of year. I can't help but add they would also be wonderful entree for Meatless Monday. Sweet peppers are slowly making their way to our green markets and in another month we'll be able to buy them four to the dollar. Even now they are a bargain when compared to their winter prices. I had six gorgeous bright red bell peppers that needed attention and this dish was a perfect way to enjoy their luscious summer flavor. The recipe on which the peppers are based was developed by Gordon Hamersley for Fine Cooking Magazine over a decade ago. I keep very few recipes for that length of time, so you know in my book it's a keeper. This is one of those recipes I play with. I suspect you will to. There are times I add pine nuts and sun-dried tomatoes to the mix, and others where green olives, raisins and orange zest best suit my fancy of the day. Now, I don't mean to shock you, but I've even been known to follow the recipe exactly as it's was written. If you don't have or like kale, substitute spinach or arugula. If you can't use wine, use water or vegetable stock. I use a white French vermouth to make mine, hearkening back to the days when Julia Child suggested using a good vermouth in place of a mediocre white wine for cooking. I really hope you'll try the peppers. You really can't go wrong. Here's the recipe.

Red Peppers Stuffed with Orzo and Feta Cheese...from the kitchen of One Perfect Bite inspired by Gordon Hamersley

Ingredients:

4 tablespoons olive oil, divided use
1 medium red onion, cut into large dice
2-1/2 ounces kale, washed and torn into bite-size pieces (2 cups lightly packed)
Kosher salt and freshly ground black pepper
1-2/3 cups cooked orzo, cooled (from 3/4 cup raw orzo)
Grated zest from 1/2 lemon
1 to 2 tablespoons fresh lemon juice (from about 1/2 lemon)
1/4 pound feta cheese
1 teaspoon chopped fresh oregano or 1/2 teaspoon dried
1-1/2 teaspoons chopped fresh thyme
1 tablespoon chopped fresh flat-leaf parsley
8 Kalamata olives, pitted and chopped
6 medium red bell peppers
1-1/2 cups dry white wine or water

Directions:
1) Heat oven to 350 degrees F. Heat 2 tablespoons oil in a large skillet until moderately hot. Add red onion and cook over moderate heat, stirring occasionally until soft, about 5 minutes.. Add kale and cook, stirring often, until wilted and tender, about 5 to 7 minutes. Season lightly with salt and pepper. Set aside.
2) Combine onion and kale with the orzo, lemon zest, lemon juice, feta cheese, oregano, thyme, parsley, and olives in a large bowl. Toss gently until combined and season with salt and pepper.
3) Slice off top 1/2 inch of each pepper and reserve. With a paring knife, cut away ribs and discard. Turn pepper upside down and pat it to get all the seeds to fall out. Divide orzo filling among peppers. Replace top of each pepper.
4) Place peppers in a medium baking dish and sprinkle them with reserved 2 tablespoons olive oil. Season again with salt and pepper. Pour wine in pan. Bake until peppers are very tender and slightly blackened on top, about 1-1/2 hours. Yield: 6 servings.

You might also enjoy these recipes:
Stuffed Green Peppers: Healthy and Delicious - Zesty Flavors
Stuffed Peppers - I Eat Trees
Classic Stuffed Peppers - What's Cookin Chicago
Indian Stuffed Bell Peppers - Sugar Pies
Mediterranean Style Stuffed Peppers - Elle's New England Kitchen
Blast of Color Mexican Stuffed Peppers - Mother Rimmy's Cooking Light Done Right

Monday, July 19, 2010

Flaked Parsley Salad with Black Olives and Cheese


From the kitchen of One Perfect Bite...Those of you who have traveled the backroads and byways of the Mediterranean are probably familiar with this salad. I learned of it ten years ago while paging through an article written by Paula Wolfert, a respected food writer and teacher with expertise in the food of the region. The recipe was unusual enough to catch my eye and simple enough to hold my attention. While I love to serve the salad with grilled meat or fish, I also like to incorporate it as an ingredient in other recipes that will be featured later in the week. Its main ingredient is fresh curly parsley. Lots of it. The parsley leaves are removed from the stems and torn into tiny bits. It's really important that no short cuts be taken with this step. Large clumps and stems will spoil this salad and make it quite ordinary. Once you have about four cups of shredded parsley flakes they are combined will olives and shallots and tossed with the simplest of oil and vinegar dressings. The resulting salad is delicious when it's made with really fresh parsley. It's not worth your while to make it with parsley of an uncertain age. Older parsley is tough and the salad will taste like rabbit fodder. It's also important not to dress the salad until just before serving. The salad becomes compacted if it sits too long after the oil and vinegar have been added. I first made this out of curiosity, but what began as an experiment has become a regular feature of my summer table despite its pains and pitfalls. I know that many of you share my passion for the unusual, so I decided to post this recipe despite its simplicity. I really think you'll like it. Here's the recipe.

Flaked Parsley Salad with Black Olives and Cheese...from the kitchen of One Perfect Bite, inspired by Paula Wolfert

Ingredients:
1/4 pound very fresh curly parsley, washed and thoroughly dried
1/2 cup (about 24) Kalamata olives, rinsed, drained pitted and slivered
1/4 cup minced shallots or red onion
1/2 teaspoon Worcestershire sauce
3 tablespoons extra virgin olive oil
1 tablespoon cider vinegar
Salt and freshly ground pepper to taste
1/4 cup coarsely grated Pecorino-Romano cheese

Directions:

1) Remove parsley from stems. Discard stems and tear each leaf into tiny bits. You should have four cups of loosely packed parsley flakes.
2) Combine parsley, olives, shallots, Worcestershire, oil, vinegar in a medium bowl. Add salt and pepper to taste. Toss gently to combine. Transfer to a serving bowl and sprinkle with cheese. Yield: 6 servings.

You might also enjoy these recipes:
Corn and Radish Salad - One Perfect Bite
Mediterranean Radish Salad - One Perfect Bite
Asparagus and White Bean Salad - One Perfect Bite
Moroccan Carrot Salad - The Perfect Pantry
Feta and Watermelon Salad - Girlichef
Heirloom Tomato Salad - Chef Tom's Blog
Spicy Lentil, Radish and Parsley Salad - Cook Sister
Greek-Style Zucchini Salad - Closet Cooking

Thursday, July 15, 2010

Cowboy Caviar


From the kitchen of One Perfect Bite...Cowboy Caviar is a simple dish with an interesting history. You know, I'm sure, that black-eyed peas are served throughout the Southern United States on New Year's Day. Some, in a curious mix of tradition and superstition, believe that consumption of black-eyed peas on that day will bring luck and prosperity in the coming year. Cowboy, or Texas, caviar is an offshoot of that tradition. The dish was developed by Helen Corbitt, a Yankee, who did not like black-eyed peas. She was the head chef at Nieman Marcus and was asked to create an all-Texas menu that would include black-eyed peas. Athens, Texas is, after all, the black-eyed pea capital of the world. Hard pressed to find an existing recipe that met her high standards, she decided to pickle them, and created a dish that could be eaten with a fork or scooped up to the mouth on a tortilla chip. Nowadays, Texans like their "caviar" year round and serve it at barbecues and other informal gatherings. While the name remains a mystery, cowboy caviar is a a nice change of pace from standard bean salads that are usually served on those occasions. It's easy to make and, like all pickled salads, can be made well ahead of serving. The original recipe consists of black-eyed peas and onions that are marinated in a vinaigrette. That sounded a bit stark to me,so I decided to use a recipe I found in the Saveur magazine. It is only slightly more complicated and produces a lovely dish that uses less oil than the original. I like to serve this as a salad option for picnics and barbecues. Culinary reputations are not built on this kind of dish, but it will do your good name no harm. Here's the recipe.

Cowboy Caviar...from the kitchen of One Perfect Bite, inspired by Saveur magazine

Ingredients:

2 ( 15-oz.) cans black-eyed peas, drained and rinsed
1/4 cup roughly chopped cilantro
1/4 cup extra-virgin olive oil
1/4 cup red wine vinegar
1 teaspoon chopped garlic
1 serrano or jalapeno chile, stemmed, seeded and finely chopped
1/2 red bell pepper, cored, seeded and finely chopped
1/4 chopped red onion
Kosher salt and freshly ground black pepper to taste

Directions:
1) Combine beans, cilantro, olive oil, vinegar, garlic, chiles, bell pepper and onion in a large bowl. Toss well.
2) Refrigerate for several hours or overnight. Adjust salt and pepper to taste. Yield: 6 servings.

You might also enjoy these recipes:
Asparagus and White Bean Salad - One Perfect Bite
Mexican Black Bean Salad - One Perfect Bite
Kidney Bean Salad - Lisa's Kitchen
Spring Fava Bean and Fennel Salad - Simply Recipes
Mediterranean White Bean Salad - Budget Bytes
Diner's Journal: Bean Salad - New York Times

Monday, July 12, 2010

Mediterranean Radish Salad


From the kitchen of One Perfect Bite...A commitment to support community agriculture can have unexpected consequences. Produce that's locally grown can be unfamiliar or something that you have, in the past, avoided eating. Greens and beans and peppers I never dreamed of cooking a few short years ago, now regularly appear on our table. The only downside to this, is the occasional scramble to find ways in which to cook the new offerings, or the inevitable backlog that occurs with some of the vegetables. Scallions and radishes seem to procreate in my vegetable crisper, so it should come as no surprise that I recently found myself with a glut of radishes that simply had to be addressed. Fortunately, I remembered a recipe for a salad that had originally come from a nutritional program at the University of Texas, Southwestern Medical Center. I had made it once before, and the fact that I still had the recipe was an indication that we enjoyed the salad. While a radish salad may not be to everyone's liking, I can heartily recommend this one for its flavor, crispness and wholesome goodness. It's also easy to make if you have a food processor. The only thing to keep in mind is that the radishes will bleed if made too soon before serving. Here's the recipe.

Mediterranean Radish Salad...from the kitchen of One Perfect Bite and the University of Texas Southwestern Medical Center

Ingredients:
4 bunches radishes (about 48 radishes), cleaned, trimmed and thinly sliced
2 tablespoons fresh lemon juice
2 tablespoons extra virgin olive oil
1/4 to 1/2 teaspoons cayenne pepper
2 tablespoons chopped fresh parsley
Salt to taste
8 leaf lettuce leaves

Directions:

1) Place radishes in a large bowl.
2) Combine lemon juice, olive oil and cayenne in a small bowl.
3) Pour dressing over radishes, add parsley and mix well. Season with salt to taste.
4) Place one lettuce leaf on each of 8 salad plates. Mound a portion of radish mixture over top of each. Serve immediately. Yield: 8 servings.

You might also enjoy these recipes:
Cucumber and Radish Salad with Feta Cheese- Kalyn's Kitchen
Cucumber and Radish Salad - Cooking By the Seat of My Pants
Radish and Grapefruit Salad - Diet Dessert and Dogs
Radish, Cucumber and Beet Salad - Two Fat Als
Simple Radish Salad - Chubby Panda
Healthy Green Bean and Radish Salad - Serious Eats
Radish Salad - Mark Bittman