Showing posts with label appetizer. Show all posts

Monday, November 29, 2010

Stuffed Mushrooms


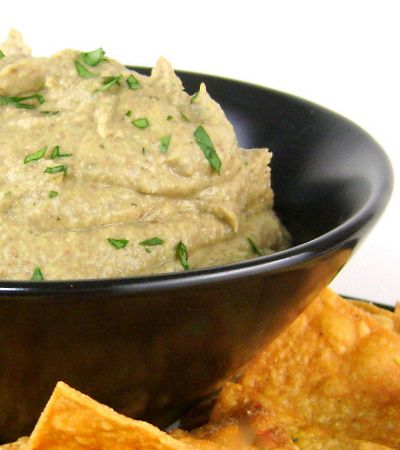
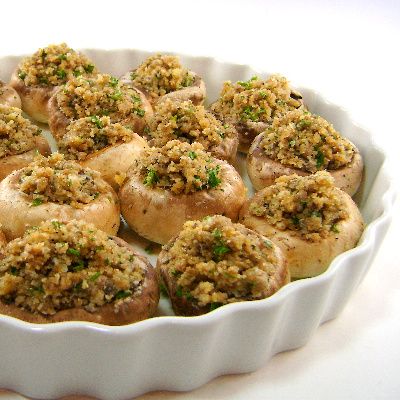
From the kitchen of One Perfect Bite...Stuffed mushrooms are one of my favorite hot appetizers. I've collected an impressive assortment of recipes for them and, over time, you'll probably get to see them all. However, today I'm only going to feature one. I chose this one to serve over the weekend because it's so easy to do, and, when you're into day four of a long weekend, easy assumes an importance it might otherwise not have. I think the original recipe, found here, was developed by Giada De Laurentis, but I found another that is similar in an online book, called Almost Italian, which is a compilation of recipes and stories from Italian immigrant communities across America. Those of you who love Italian food might find the book really interesting. I know I did. I've changed the recipe slightly to avoid waste. I've included finely chopped mushroom stems in my stuffing and changed the herb mix a bit. I think the mushrooms help keep the stuffing, which can be dry, moist and I replaced the mint, which I found to be off-putting, with additional parsley. Here's my version of the recipe.

Stuffed Mushrooms...from the kitchen of One Perfect Bite inspired by Giada De Laurentis

Ingredients:

28 large (2 1/2-inch-diameter) white mushrooms, stems removed and finely chopped
5 tablespoon extra-virgin olive oil, divided use
2 garlic cloves, peeled and minced
1/2 cup Italian-style dried bread crumbs
1/2 cup grated Parmesan cheese
1/4 cup chopped fresh Italian parsley
Salt and freshly ground black pepper


Directions:

1) Heat 1 tablespoon olive oil in a frying pan. Add chopped mushroom stems and cook just until softened, about 3 minutes. Stir in garlic and cook until fragrant, about 15 seconds longer. Remove from heat and cool to room temperature.
2) Preheat the oven to 400 degrees F.
3) Add 2 tablespoons olive oil, bread crumbs, cheese, parsley and salt and pepper to taste to mushroom mixture in skillet. Mix with a spoon to blend.
4) Coat bottom of a large baking sheet with about 1 tablespoon olive oil. Spoon filling into the mushroom cavities and arrange on baking sheet, cavity side up. Drizzle remaining oil over filling in each mushroom. Bake until mushrooms are tender and filling is heated through and golden on top, about 25 minutes. Serve immediately. Yield: 7 servings.

You might also enjoy these recipes:
Caprese Skewers - Culinary Cory
Savory Herbed Glazed Nuts - Mz. Tasty Kitchen
Parmesan Crusted Baked Zucchini Strips with Marinara Sauce - Closet Cooking
Easy Olive Tapenade - Annie Bakes
Honey Walnut and Brie Tartletts - What's Cookin, Chicago?
Tiny Gougeres with Scallions Parsley and Lemon - She's in the Kitchen
Parmesan Cheese Sticks - Easy Appetizers

Sunday, November 21, 2010

Herb Cheese Dip - Blue Monday


From the kitchen of One Perfect Bite...It's drip and dip season here in Oregon. Rain and football seem to go hand in hand and those games are a great excuse to make a dip whose roots can be found in Lyons, France. There the dip is made with fromage blanc. Rest easy in the knowledge that cottage cheese will work nearly as well and that the herbs needed to make it can all be found in your neighborhood grocery store. It was originally intended to be used as a dip for raw vegetables, but I've found it to be a wonderful sandwich spread as well. As you scan the recipe ingredients you'll find it to be a healthy and figure friendly addition to your snack repertoire. The recipe, developed by Patricia Wells, is easy to make, but the cheese needs to drain for a day or two before it is served, so wait time will have to be factored into your game plan. This also gives the flavors of the herbs an opportunity to permeate the cheese. If you have a particularly macho crew for game day, you might want to omit the vegetables and serve the dip as a spread on rounds of rye bread that are topped with salami or other deli meats. It would also be wonderful as a spread on thick slices of crusty peasant bread. The dip can be made several days in advance of serving and you probably won't have leftovers to worry about. Here's the recipe.

Herb Cheese Dip
...from the kitchen of One Perfect Bite courtesy of Patricia Wells

Ingredients:

2 cups full-fat or low-fat cottage cheese
2 shallots, peeled and minced
1 plump, fresh garlic clove, peeled and minced
3 tablespoons fresh chives, snipped with a scissors
3 tablespoons fresh tarragon leaves, snipped with a scissors
3 tablespoons fresh parsley leaves, snipped with a scissors
1/2 teaspoon fresh thyme leaves, carefully stemmed
Fine sea salt and freshly ground black pepper to taste
1 tablespoon dry white wine
1 teaspoon best-quality sherry wine vinegar
1 tablespoon extra-virgin olive oil
Mixed fresh herbs, for garnish (optional)

Directions:
1) Place cottage cheese in bowl of a food processor and pulse once, just long enough to break up cheese curds. Add shallots, garlic, chives, tarragon, parsley, and thyme, and process very briefly, pulsing only to blend. Season to taste with salt and pepper. Pulse once again to distribute the seasonings.
2) Transfer mixture to a cheesecloth-lined large sieve set over a bowl. Cover and refrigerate for at least 24 hours and up to 48 hours.
3) Remove cheese from refrigerator. Discard any liquid that has drained from the sieve. Transfer cheese to bowl of a food processor. Add wine, vinegar, and oil, and pulse to blend. Taste for seasoning. Transfer to a small bowl. Serve at room temperature. Yield: 2 cups.

You might also enjoy these recipes:
Blue Cheese and Bacon Dip - Easy Appetizers
Smoked Salmon Cheese Spread - Drick's Rambling Cafe
Hummus - Anja's Food 4 Thought
Taramosalata - Kalofagas
Warm Black Bean Dip - One Perfect Bite
Blue Cheese Dip - One Perfect Bite

This post is being linked to:
Smiling Sally - Blue Monday

Wednesday, November 10, 2010

Cheese Straws


From the kitchen of One Perfect Bite...The holidays aren't far away and that means it's time to start planning meals and snacks for family and friends who inevitably drop by when there's a long weekend. I've a general idea of what to serve for what will be a nontraditional Thanksgiving dinner and have started formalizing my attack plan for the snacks that I want to have available for visitors. I like to make these cheese straws because they can be prepared well ahead of time and frozen to be baked off as needed. While these are intended as snacks, they are also a wonderful accompaniment to soups, particularly those that are tomato based.


Australian Busters


Tomato Jam


I've also made a batch of Busters which I featured here last year and will be making a tomato jam to be served with a good goat cheese on thinly sliced baguettes. There will, of course, be other treats, but I can relax once these are set to go. I prefer to use an Asiago cheese to make these but you can use any hard cheese that you like. It's best to use a microplane to grate the cheese. If it's too soft put it in the freezer for an hour or so and then proceed. The straws can be shaped by hand or formed with a cookie press if you prefer a fancy more uniform appearance. I've done mine by hand and lightly scored the tops with the dull edge of a knife. Be forewarned that this is a very soft dough and it can be difficult to shape. Refrigerate dough if needed. If you freeze the straws, freeze them in a single layer and then transfer to a storage bag. Baked straws will keep in an airtight container for up to 5 days though they will become more brittle as they age. This is a really simple recipe that produces a lot of bang for the buck. I hope you'll give them a try. Here's the recipe which I've adapted from one developed by William-Sonoma.

Cheese Straws...from the kitchen of One Perfect Bite and the William Sonoma test kitchen

Ingredients:
8 ounces Asiago Cheese, finely grated
12 tablespoons (1-1/2 sticks) unsalted butter
1 large egg
1-3⁄4 cups all-purpose flour
1⁄2 teaspoon salt
1⁄4 teaspoon cayenne pepper

Directions:

1) Bring all ingredients to room temperature. Preheat oven to 300 degrees F.
2) Combine cheese, butter, egg, flour, salt and cayenne pepper in bowl of food processor fitted with a metal blade. Process until smooth.
3) Fill a cookie press with the dough according to the manufacturer's instructions and fit with the star-shaped disk. Holding the cookie press at an angle on an ungreased or Silpat-lined cookie sheet, press the trigger twice, dragging the press away to make straws 3 inches long. Space the straws 1 inch apart. To make straws the length of the cookie sheet, continually press the trigger and drag the press away, spacing the straws 1 inch apart. Alternatively, break dough into 60 equal sized pieces and roll until 3-inches long. Place 1-inch apart on an ungreased cookie sheet.
4) Bake until straws are light golden, 20 to 25 minutes. Transfer straws to wire racks and let cool. Straws may be stored in an airtight container at room temperature for up to 5 days. Yield: 60 three-inch straws.

You might also enjoy these recipes:
Tiny Gougeres with Scallions, Parsley and Lemon - She's in the Kitchen
Parmesan Cheese Sticks - Easy Appetizers
Cheesy Pepperoni Bites - The Other Side of Fifty
Basil Parmesan Crackers - The Sweet's Life
Pesto Palmiers - What's Cookin, Chicago?
Pear and Goat Cheese Crostinis - Grillin Fool

Tuesday, November 2, 2010

Light and Chunky Clam Dip


From the Kitchen of One Perfect Bite...Dips and spreads were all the rage in the 60's and the 70's. Cookbooks had whole sections devoted to them and during the holiday season you'd be hard pressed to find a magazine that didn't feature them. The dips were not gourmet affairs and nearly all of them had a base of sour cream and mayonnaise. They were calorie laden and as bad for you as they were delicious. As times and tastes changed, the rich and creamy dips seemed to disappear, replaced, instead, with ubiquitous bowls of salsa or more exotic fare from the Mediterranean or Middle East. If, however, you looked really carefully, you'd find at least some of the golden oldies tucked safely in the fridge away from prying eyes. They hadn't gone away, they had been lightened. I'm not at all sure that's a good thing. As I look at the chemical feast that are food is becoming, I sometimes question the approach we are taking to eat in a more healthy way. That, however, is a topic for another day. Now, before I drift too far afield, I want to share this recipe with those of you who still enjoy the classic dips. It come from from America's Test Kitchen and it is awfully nice. Here's the recipe.

Light and Chunky Clam Dip...from the kitchen of One Perfect Bite, courtesy of Cook's Illustrated

Ingredients:

4 strips bacon (about 4 ounces), cut into 1/4-inch pieces
3/4 cup light sour cream
3/4 cup light mayonnaise
1 teaspoon lemon juice
1 teaspoon Worcestershire sauce
2 (6-1/2-oz. each) cans minced clams, drained
2 medium scallions, sliced thin
Pinch cayenne pepper

Directions:
1) Fry bacon in small skillet over medium heat until crisp, 6 to 8 minutes. Remove from skillet and drain on paper towels.
2) Whisk sour cream, mayonnaise, lemon juice, and Worcestershire sauce together in a medium bowl. Stir in minced clams, scallions, and bacon. Season to taste with salt, pepper, and cayenne. Cover and chill for at least an hour. Refrigerated dip can be kept for up to 2 days. Yield: 2 cups.


You might also enjoy these recipes:
Blue Cheese and Bacon Dip - Easy Appetizers
Roasted Red Pepper Hummus - Eat Real
Chile con Queso - Drick's Ranbling Cafe
Peperonata - Sweet Bites
Bulghur and Walnut Kibbeh - Anja's Food 4 Thought
Easy Appetizer: White Bean Dip - Spoonful
Roasted Olive and Grape Crostini - The Daily Dish
Dips and Spreads - The Spicy Skillet
Zucchini, Mint and Yogurt Spread - The Kitchen
Red Pepper Cannellini Dip - Have Fork Will Eat
Grilled Eggplant Spread with Fresh Herbs - Open Salon

Monday, November 1, 2010

Stracciatella - Roman Egg Drop Soup


From the kitchen of One Perfect Bite...This soup makes a delightfully easy and delicious light meal. It is not substantial enough for everyone, but most folks enjoy the soup as a separate course or as part of a larger meal. While this recipe is Roman, the Chinese and the Greeks have nearly identical soups in their repertoires and I sense we'd be in trouble if we try to assign the soup a country of origin. There's not much to this. It consists of a good broth into which eggs, mixed with semolina and grated cheese, are dropped. The eggs are stirred vigorously, causing them to break them into the characteristic flakes or shards that resemble rags. The rags, called straccetti in Italian, are what give the soup its name. Years ago, the soup was eaten at least once a week, but it popularity has waned in recent years. That's a shame. It is a lovely restorative soup. I hope you'll try it at least once. Here's the recipe.

Stracciatella - Roman Egg Drop Soup...from the kitchen of One Perfect Bite

Ingredients:
2 quarts chicken broth
4 eggs
3 tablespoons freshly grated Parmigiano
1 tablespoon very finely minced parsley (optional)
3-4 tablespoons semolina (optional)
A pinch of freshly ground nutmeg (optional)

Directions:
1) Combine eggs, semolina, grated cheese, parsley and nutmeg in a small bowl. Add a ladle of cold broth and beat mixture lightly with a fork or whisk.
2) Bring remainder of broth to a boil. Add egg mixture all at once, stirring vigorously with a whisk or fork so as to break egg mass into small flakes or shards. Simmer for another 2-3 minutes, stirring constantly, and serve, passing additional grated cheese. Yield: 6 servings.

You might also enjoy these recipes:
Lemon Soup - 400 Calories or Less
Soupa Avgolemono - Living the Gourmet
Chinese Egg Drop Soup - Sea Salt with Food
Mushroom Egg Drop Soup - Simply Life
Stracciatella alla Roma - Memorie di Angelina
Enoki Miso Soup - Indonesia Eats
Avgolemono - One Perfect Bite
Ginger Egg Drop Soup - White On Rice Couple

Friday, October 29, 2010

Roasted Red Pepper and Tomato Soup - Pink Saturday


From the kitchen of One Perfect Bite...This soup is a wonderful way to use the last of summers bounty. It's flavorful, quite easy to assemble and its wonderful color belongs on an artist's palette. The only downside to all this is that you'll need a blender or food processor to puree the vegetables. If you are fastidious you'll also want to pour the soup through a fine mesh strainer to capture those odd bits and bobs that escape the blender blades. The soup can be served warm or cold and it's perfect to pack in a thermos to offer as a warmer at the game. I prefer to serve the soup warm, but it was actually developed to be served cold. Remember cold soups require more salt than those that are served warm, so adjust seasonings accordingly. Hot or cold the soup should be allowed to rest and ripen before it is served. I think you'll enjoy this. Here's the recipe.

Roasted Red Pepper and Tomato Soup...from the kitchen of One Perfect Bite

Ingredients:
2-1/4 pounds Roma tomatoes, halved lengthwise
3 large red bell peppers, quartered, seeded
1 onion, cut into thin wedges
4 large garlic cloves, peeled
2 tablespoons extra virgin olive oil
1 teaspoon fresh thyme leaves or 1/2 teaspoon dried
2 cups water (approximate measure)
Heavy cream (optional)
Fresh thyme sprigs (optional)

Directions:
1) Preheat oven to 450°F. Arrange tomatoes (cut side up), bell peppers, onion and garlic cloves on large baking sheet. Drizzle oil over; sprinkle generously with salt and pepper. Roast vegetables until brown and tender, turning peppers and onion occasionally, about 40 minutes. Remove from oven. Cool.
2) Transfer vegetables and any accumulated juices to processor. Add thyme leaves. Puree soup, gradually adding enough water to thin soup to desired consistency. Chill soup for 3 to 24 hours. Reheat if serving warm. If soup becomes too thick, thin with additional water.
3) Adjust seasoning. Ladle soup into bowls. Drizzle with heavy cream if desired. Garnish with thyme sprigs, if using. Yield: 4 servings.

You might also enjoy these recipes:
Bacon and Potato Soup - Yum Sugar
Black Bean and Pumpkin Soup - Smitten Kitchen
Split Pea Soup with Pancetta - Bread and Honey
Spinach White Bean and Turkey Sausage Soup - Closet Cooking
Pureed Sweet Potato Soup - Saveur
Bacon and Cabbage Soup - Epicurious


This post is being linked to:
Pink Saturday, sponsored by Beverly at How Sweet the Sound.

Tuesday, October 26, 2010

Warm Black Bean Dip


From the kitchen of One Perfect Bite...I love to make this dip for Friday movie nights or watching weekend games. It's one of those dishes that everyone seems to love and you'll never have to worry about leftovers when you serve it. It is really easy to make and involves little more than opening cans and thawing vegetables. It can be made in advance and then baked just before you want to serve it. Serve it with warm tortilla chips and your guests will follow you anywhere. To warm chips, spread them in a single layer on a cookie sheet or baking pan and bake in a 350 degree F. oven for about 5 minutes. Dump them into a bowl and serve, repeating as often as is necessary. The recipe was developed by Tony Rosenfeld for Fine Cooking magazine. I have made only minor changes to his creation. Specifically, I use less vinegar than he calls for. Here's the recipe.

Warm Black Bean Dip...from the kitchen of One Perfect Bite courtesy of Tony Rosenfeld

Ingredients:
2 tablespoons extra-virgin olive oil + more for baking dish
2 medium tomatoes, cored and cut into medium dice
2 teaspoons kosher salt, divided use
1 large yellow onion, finely diced
3 large cloves garlic, minced
1 tablespoon chili powder
2 (15.5-oz.) cans black beans, rinsed and drained well
2 canned chipotles en adobo, minced (about 1 tablespoon), plus 3 tablespoons adobo sauce from can
1 to 3 tablespoons cider vinegar
1-1/2 cups fresh or frozen corn kernels (if frozen, thaw first)
1-1/2 cups (6 oz.) grated sharp cheddar cheese
1-1/2 cups (6 oz.) grated Monterey Jack cheese
3/4 cup chopped fresh cilantro
Freshly ground black pepper
Tortilla chips for serving

Directions:
1) Heat oven to 425 degrees F. Grease a 1-1/2 qt. baking dish with oil and line a baking sheet with foil. Set the tomatoes in a colander over the sink and sprinkle with 1 teaspoon salt.
2) Heat oil in a large (12-inch) skillet over medium-high heat until shimmering hot. Reduce heat to medium, add onion, sprinkle with reserved 1 teaspoon salt, and cook, stirring, until softened and translucent, about 4 to 6 minutes. Add garlic and chili powder and cook, stirring, for 1 minute. Add half of black beans, chipotles and adobo sauce, and 3/4 cup water and bring to a boil. Cook until liquid reduces by about half, 2 to 3 minutes.
3) Transfer bean mixture to a food processor, add vinegar (I used only 1 tablespoon), and process until smooth. Let cool for a couple of minutes and then transfer to a large bowl. Add rest of beans, tomatoes, corn, half of each of cheeses, and 1/2 cup of cilantro. Mix well and season to taste with salt and pepper.
4) Transfer to baking dish and sprinkle with remaining cheese. Bake on a foil-lined baking sheet (to catch drips) until cheese melts and browns around edges, about 15 minutes (longer if refrigerated). Sprinkle with remaining cilantro and serve with warm tortilla chips for dipping.
Yield: 10 to 12 servings.

You might also enjoy these recipes:
Spicy White Bean Dip - Never Enough Thyme
Hot Clam Dip - One Perfect Bite
Bleu Cheese and Bacon Dip - Easy Appetizers
Mississippi Sin Dip - Deep South Dish
Edamame Dip - The Baking Barrister
Pan Fried Onion Dip - Brown Eyed Baker
Roasted Eggplant Dip - Melbo's Toast
Cucumber Yogurt Dip - Eclectic Recipes
Homemade Onion and Herb Dip - What's Cookin, Chicago

Saturday, October 23, 2010

Buffalo-Style Hot Wings


From the kitchen of One Perfect Bite...First a little history. For years, chicken wings, along with backs and necks and gizzards, were considered food for the poor or relegated to the stockpot and used to flavor soup. That changed in October of 1964 when Teresa Bellissimo, owner of the Anchor Bar in Buffalo, New York, created a late night snack for her son and his friends. She fried up a bunch of wings and dipped them in a buttery hot sauce before serving them with celery and a blue cheese dressing. Her original recipe can be found here. The wings became an instant hit and thus was history writ. Today the Anchor Bar sells 70,000 thousand pounds of wings a month. Who knew?

There's no way to pretend that these are good for you, so I'll make no attempt to do that. I rarely make Buffalo-style wings because I know how unhealthy they are, but when I do fix them I want the genuine article. I'd rather have them once a year in all their awfulness than have a doctored version of them more frequently. Good or bad, Bob and I find it easier to practice avoidance than to take shortcuts with certain recipes. Dishes that are new to the table comply with all known healthy cooking practices, but I refuse to touch old favorites. Now that you've read my warning label, it's time to move onto the recipe. Please take out your deep fryers. Here's my recipe for Buffalo-style chicken wings.


Buffalo-Style Hot Wings...from the kitchen of One Perfect Bite and bars across America

Ingredients:
1 cup all-purpose flour
1 teaspoon salt salt
1/2 teaspoon paprika
1/2 teaspoon garlic powder
1/4 teaspoon cayenne pepper
1/4 teaspoon black pepper
20 chicken wing segments
1/2 cup butter
1/2 cup hot sauce

Directions:
1) Combine flour, salt, paprika, garlic powder, cayenne and black pepper in a pie plate.
2) Coat each wing segment with seasoned flour and refrigerate for 1 hour. Coat again with seasoned flour.
3) Heat butter and hot sauce in a small sauce until butter melts. Turn heat to lowest possible setting to keep mixture warm.
4) Bring oil in a deep fryer or stovetop equivalent to 375 degrees F. Deep-fry chicken in two or three batches, turning once for about 6 minutes per side. Quickly transfer chicken to a wire rack. Let sit for 30 seconds, then toss in hot sauce. Remove from sauce with a slotted spoon to a warm serving platter. Repeat until all chicken is fried. Serve hot with celery sticks and blue cheese dressing. Yield: 4 servings.

You might also enjoy these recipes:
Honey Baked Teriyaki Chicken Wings - Ordinary Recipes Made Gourmet
Saucy Poppers - Shamrocks and Shenanigans
Chipotle Sweet Potato Fries - The Active Foodie
Cajun Popcorn Shrimp - Life's Ambrosia
Pig's In Blankets - Gonna Want Seconds
Toasted Spicy Pumpkin Seeds - My Life Runs on Food

Tuesday, October 19, 2010

Blue Cheese Dip


From the kitchen of One Perfect Bite...This is one of the chameleons of my kitchen. I use it as a dip, a spread and a salad dressing. It main ingredient is cottage cheese and that makes it figure friendly, as well as being versatile and easy to do. The downside to this recipe, if there is one, is that you'll need a food processor to break up and pulverize the cheese curds. Plan to make this a day before you plan to use it and use a really good blue cheese for best flavor. The original recipe was developed by Patricia Wells and she used a French Roquefort to make the dip. French Roquefort is made from sheep's milk and is naturally aged in caves to produce the blue streaks with which we are all familiar. The cheese must ripen for a period that ranges from three months to a year in order to produce its characteristic aroma and flavor. Other blue veined cheeses, domestic or imported, are made from cow's milk and are aged in humidity controlled environments rather than caves. I use Roquefort during the holiday season, but rely on good domestic varieties for the remainder of the year. The dip can be thinned with milk to produce a wonderful salad dressing. If you enjoy blue cheese I think you'll enjoy this dip. Here's the recipe.

Blue Cheese Dip...from the kitchen of One Perfect Bite, inspired by Patricia Wells

Ingredients:
2 cups cottage cheese
1/4 cup fresh snipped chives
1/2 to 3/4 cup coarsely crumbled Roquefort or blue cheese
Salt and pepper to taste

Directions:

Place cottage cheese in bowl of a food processor; pulse to break up curds. Add chives and blue cheese and process briefly just to blend. Season with salt and pepper to taste. Pulse again to distribute seasonings. Transfer to a lidded container and store in refrigerator for at least 24 hours to ripen. Bring to room temperature to serve. Yield: 2 cups.

You might also enjoy these recipes:
Bleu Cheese and Bacon Dip - Easy Appetizers
Roasted Red Pepper Hummus - Eat Real
Hummus - Food for Thought
Easy Appetizer: White Bean Dip - Spoonful
Baba Ganoush - One Perfect Bite
Seven Layer Bean Dip - Simply Recipes
Easy Black Bean Dip - Pinch My Salt

Wednesday, October 13, 2010

Dolmas - Stuffed Grape Leaves - Daring Cooks Challenge


Photo Courtesy of Budget Bytes - Creative Commons Attribution

From the kitchen of One Perfect Bite...Isn't that a gorgeous picture? I must tell you up front that it's not my photo and I'm Dolma green with envy.

I found it while doing research for the current Daring Cook's Challenge and I must explain my envy. Lori, of Lori's Lipsmaking Goodness, hosted this month's challenge and she selected Dolmas, or stuffed grape leaves, as the dish she wanted us to make. Though she gave us two wonderful recipes, which can be found here, she also gave the nod for us to do our own thing if we wished. Her only real requirement was that we roll a leaf around a filling, and that was fine by me. As a matter of fact, that's my kind of challenge. I made the meat-filled version of the rolls for my entry and thought the sauce was spectacular. I'm a big fan of tamarind and it really appealed to me. I love Dolmas, but mine are a visual disaster, more appalling than appealing, and decidedly unappetizing. As luck would have it, the batch I made for the challenge looked especially bad and my photo, as you can see, would do nothing to improve my reputation as a photographer, much less entice guests to my table.

While searching for ways to visually save and plate my Dolmas I came across this feature at Budget Bytes. Beth's recipe was great, but her photos are what really caught my eye. They were stunning and her Dolmas really looked appealing. It was too late to salvage the ones I'd made, but I finally found a way to make the next batch look pretty. I suspect our guests will be seeing Dolmas in their futures. I really learned something from this challenge. Thank you, Lori. Thank you, Beth.

You might also enjoy these recipes:
Moussaka - Surfing the World Cuisine
Avgolemono - The Mommy Porch
Greek Style Chicken - Living the Gourmet
Fasolada (Greek Navy Bean Soup) - Elly Says Opa
Cheese Saganaki - Five Star Foodie
Pastitsio - Teenie Cakes

Monday, October 11, 2010

Zuppa di Finocchio - Creamy Fennel Soup


From the kitchen of One Perfect Bite...I'm still able to buy fennel very cheaply. Last weekend I bought several large bulbs to try an idea I'd been mulling over. I wanted to make a creamy fennel soup that had an unmistakably anise flavor, but had the same grainy texture as a properly made potato soup. How hard could it be? I set to work and did the requisite dicing and slicing and had my pot on the stove in 30 minutes. In addition to fennel, the pot contain a large potato to help with thickening, some celery and, most importantly, finely ground caraway seeds to boost the anise flavor. I let the contents of the pot simmer for about an hour, then pureed the contents of the pot using an immersion blender. I thinned the soup with light cream, garnished it with fennel fronds and served it warm with seeded rye croutons. It was really good and I'll definitely be making it again. I gave it an Italian name to give it more panache. I thought some of you might enjoy the recipe. Here's how it's made.

Zuppa di Finocchio - Creamy Fennel Soup...from the kitchen of One Perfect Bite

Ingredients:
2 tablespoons olive oil
3 large fennel bulbs, trimmed, cored and coarsely chopped
1 (8 to 12-oz.) large Idaho potato, peeled and coarsely chopped
1 large celery stalk, coarsely chopped
1 teaspoon chopped garlic
1/2 to 1 teaspoon teaspoon pulverized caraway seeds
4 cups low-sodium Chicken broth
1 bay leaf
Salt and pepper
1/2 cup milk
1/2 cup light cream
Garnish: fennel fronds

Directions:
1) Heat olive oil in a large (4 to 5-quart) pan. Add fennel, potato, celery, and garlic. Cover pan, reduce heat, and sweat vegetables until soft but not brown, about 10 to 15 minutes. Add pulverized caraway seed, chicken broth, bay leaf and salt and pepper to taste. Simmer, partially covered, for 50 minutes. Remove bay leaf
2) Puree soup with an immersion blender. Strain soup if desired. Ladle into bowls and garnish with fennel fronds. Serve with seeded rye croutons. Yield: 5 servings.

You might also enjoy these recipes:
Mussels in Fennel Cream Sauce - Blissful Bites
Fennel, Olive and Orange Salad - The Creative Pot
Fennel Roasted Carrots - Handle the Heat
Apple Fennel Salad - Jenny Learns to Cook
Bouillabaise de Poulet - One Perfect Bite
Raw Beet and Fennel Salad - For the Love of Food

Sunday, September 5, 2010

Cauliflower Soup - Blue Monday


From the kitchen of One Perfect Bite...We all lose our heads from time to time, but not with the same finality as Madame du Barry lost hers. While not a royal, the comtesse, once mistress to King Louis the XVth , was guillotined following the false testimony of her chef who detested her imperious behavior. Many dishes in classic French cuisine, especially those containing cauliflower, are appended with her name. Not because she lost her head, but because her coif resembled a head of cauliflower in color and appearance.This is a simplified version of Creme du Barry. Almost all the butter and cream have been removed from the recipe and caraway seeds are, instead, added to provide flavor. The soup is simple to make and uses only a handful of readily available ingredients. It is really quite lovely. I know those of you who try it will enjoy it. It's an easy way to use the cauliflower that is flooding markets at this time of year and it would be a perfect first course for a holiday meal. Here's the recipe.

Cauliflower Soup
...from the kitchen of One Perfect Bite

Ingredients:
1 tablespoon canola oil
1 large onion, chopped
2 teaspoons caraway seeds
1 head cauliflower, broken into florets
1 medium all-purpose potato, cubed
6 cups chicken Stock
1 teaspoon lemon juice
Salt
Freshly ground pepper
Garnish: Chopped chives or parsley

Directions:
1) Warm oil in a large saucepan set over medium heat. Add onions and caraway seed and cook, stirring, until onions are soft but not brown, about 10 minutes.
2) Stir in cauliflower, potatoes, and stock. Season with salt and pepper. Bring to a boil over high heat. Reduce heat to medium, cover, and simmer for 20 minutes, or until vegetables are very tender. Remove form the heat and allow to cool slightly.
3) Transfer to a blender or a food processor fitted with the metal blade. Process until smooth. Transfer to a clean saucepan and place over medium heat. Bring to a simmer.Add lemon juice and adjust salt and pepper to taste. Thin soup with stock or milk if too thick. Pour through a fine mesh strainer. Pour into warm bowls. Garnish with chives or parsley. Yield: 4 servings.

You might also enjoy these recipes:
White Bean Cauliflower and Bacon Soup - Cinnamon Spice and Everything Nice
Cauliflower and Potato Salad - Guilty Kitchen
French Cauliflower Salad - Pham Fatale
Cauliflower Curry - The Spamwise Chronicles
Curried Cream of Cauliflower and Apple Soup - One Perfect Bite
Gobi Manchurian - One Perfect Bite
Cauliflower and Chickpea Curry - Closet Cooking
Roasted Cauliflower with Tomatoes and Black Olives - The Recipe Girl

This post is being linked to:
Smiling Sally - Blue Monday

Sunday, June 27, 2010

Baba Ganoush - Blue Monday


Baba Ganoush


Connor - the youngest of Oma's "Blue Boys"

From the kitchen of One Perfect Bite...Baba Ganoush is a vegetable dip that's very popular in the Arabic Middle East and other Mediterranean countries. It's a simple, inexpensive dish, and there are probably as many versions of it as there are kitchens in those countries. I don't mean to confuse the issue by posting yet another, but I wanted to record our family version of the dip in a spot where my girls can get to it when they need it. My version has a smoky flavor because it's grilled over an open flame, rather than being baked or broiled in an oven, as is the custom in some homes. This recipe also has some zip that comes from a fairly substantial addition of fresh lemon juice. There are several acceptable ways to garnish this dish. I tend to use what I have on hand, so, more often than not, I'll drizzle it with olive oil or sprinkle it with chopped flat-leaf parsley. When they are available I also love to use pomegranate seeds. I used to serve the dip with pita bread, but I have recently started to use still warm, freshly fried tortilla chips in their stead. It is not authentic, but it is delicious. Without further ado, here's the recipe for a dip or spread that is a wonderful accompaniment to a Middle Eastern or Mediterranean meal.

Baba Ganoush...from the kitchen of One Perfect Bite

Ingredients:
1 large (1-pound) eggplant
3 cloves garlic
1/4 cup fresh lemon juice
Salt to taste
3 tablespoons tahini
2 tablespoons olive oil
1/2 to 1 teaspoon ground cumin
1/4 to 1/2 teaspoon freshly ground black pepper
Garnish:
3 tablespoons pomegranate seeds, or 1 tablespoon chopped fresh flat-leaf parsley, or 1 tablespoon extra-virgin olive oil

Directions:
1) Prepare a charcoal fire or preheat a gas grill. Puncture eggplant in several places with a fork. Grill for 20 minutes, turning occasionally, until skin is charred and eggplant is soft.
Cool until it can be handled. Cut eggplant in half and scrape pulp into a sieve. Hold under cold and gently running water. Squeeze as much liquid as possible from pulp.
2) Combine pulp, garlic, lemon juice and salt in bowl of food processor. Process until smooth. Add tahini and process just to incorporate. Adjust seasoning if required. With processor running, add olive oil, cumin and pepper. Transfer to a small serving bowl, cover and chill for at least 30 minutes. Baba Ganoush can be refrigerated for up to 2 days. Garnish and serve. Yield: 2 cups.

You might also enjoy these recipes:
Red Pepper Hummus - One Perfect Bite
Black Bean Hummus - One Perfect Bite
Mexican Beer-Cheese Spread - One Perfect Bite
Hummus en Fuego - eCurry
Muhammara - Closet Cooking
Grilling Baba Ghanoush - Serious Eats

This post is being linked to:
Smiling Sally - Blue Monday

Wednesday, June 23, 2010

Deviled Eggs with Curry and Cilantro


From the kitchen of One Perfect Bite...I was an adult before I had a deviled egg. For whatever reasons, they were never prepared in the kitchens of my childhood. I suspect these may be one of those dishes that has regional, rather than national appeal and I was raised in an area where they were not widely popular. While I enjoyed my first deviled egg, I was never moved to reproduce them in my own kitchen. I sat in on a planning meeting for a picnic this week, and deviled eggs were mentioned as a possible menu item. I feel badly now, because I was the one who squashed the idea of serving them. I have a "thing" about dishes made with mayonnaise being served on occasions where there is no refrigeration, and, in arguing my point of view I was way more vociferous than was necessary. These eggs were my way of apologizing to the woman whose toes I stepped on. She liked them, so I thought those of you who enjoy deviled eggs might want to give them a try. The eggs have a hint of curry and are wonderfully fragrant. I found the recipe in Nancie McDermott's The Curry Book and I can recommend the eggs and the book to you. These eggs will never win a beauty contest, but if you are looking for a new twist on an old favorite, I think you'll like them. It is probably best to use a mild curry powder to prepare them. Here's the recipe.

Deviled Eggs with Curry and Cilantro
...from the kitchen of One Perfect Bite, courtesy of Nancie McDermott

Ingredients:

8 large eggs
1/4 cup mayonnaise
1 tablespoon mild curry powder
1/2 teaspoon prepared mustard
1/2 teaspoon salt
1/4 teaspoon freshly ground black pepper
1 large scallion, thinly sliced crosswise
2 tablespoons finely chopped cilantro

Directions:
1) Place eggs in a medium-sized saucepan and cover them with water. Bring to a full boil over high heat. Reduce heat to medium and simmer for eight minutes longer. Remove from heat. Drain and rinse in two changes of cold water. Leave eggs in water until cool.
2) While eggs cook, combine mayonnaise, curry powder, mustard, salt and pepper in a mixing bowl. Mix well. Set aside.
3) Peel eggs and cut in half lengthwise. Carefully scoop out yolks and force through a sieve. Add to mayonnaise mixture and mix well. Fold in scallions and cilantro. Stuff each egg with one tablespoon filling. Serve at once, or cover and chill until ready to serve. Yield: 16 deviled eggs.

You might also enjoy these recipes:
Tarragon Mustard Deviled Eggs - Kalyn's Kitchen
Wasabi Deviled Eggs - Cooking with Amy
Deviled Eggs Deluxe - The Recipe Girl
Lemon Dill Deviled Eggs - Eat Real
Incredible Deviled Eggs - Christine Cooks

Friday, June 18, 2010

Smoked Salmon Quesadillas - Pink Saturday


From the kitchen of One Perfect Bite...This is a lovely, quick appetizer that has great eye appeal. While it's easy to prepare, it's stylish enough for guests and will be loved by family and friends alike. Many of you are familiar with a version of this appetizer that is served on thinly sliced rye bread. I use fried flour tortillas to make mine. The base recipe uses goat cheese as a pillow for thinly sliced smoked salmon. Whipped cream cheese or mascarpone can be substituted for the chevre and herbs other than dill can also be used. This is one of my favorite informal appetizers and I make it a point to keep the ingredients need to make it on hand. Smoked salmon is plentiful here in the Pacific Northwest and it is slightly less expensive than in other areas of the country. Folks with a fisherman in the neighborhood are luckier still, as the bounty of our rivers is often shared. It takes about 15 minutes to make this dish. If you try it, I think you'll agree that it is time well spent. Here's the recipe.

Smoked Salmon Quesadillas
...from the kitchen of One Perfect Bite

Ingredients:
3 ounces chevre or whipped cream cheese
1 tablespoon well-drained prepared horseradish
1 tablespoon + 1 teaspoon fresh dill or chives
Salt and pepper to taste
3 tablespoons olive oil
3 (7-inch) flour tortillas
4 to 6 ounces smoked salmon
1 tablespoon fresh lemon juice

Directions
:
1) Combine cheese, horseradish, and 1 teaspoon dill or chives in a small bowl. Beat with a spoon until smooth and well-blended. Blend in salt and pepper to taste. Set aside.
2) Heat oil in an 8-inch skillet set over medium-high heat for 1 minute. Fry tortillas, one at a time, until both sides are lightly brown, about 2 minutes. Drain on paper towels.
3) Spread 3 generous teaspoons of cheese mixture on each tortilla. Arrange smoked salmon slices over over cheese. Sprinkle with 1 tablespoon reserved dill or chives. Drizzle with fresh lemon juice. Cut each tortilla into six pieces and serve immediately. Yield: 6 servings.

You might also enjoy these recipes:
Ravioli with Smoked Salmon and Vodka Cream Sauce - One Perfect Bite
Smoked Salmon Frittata - One Perfect Bite
Salmon Burgers with Chipotle Aioli and Pineapple Avocado Salsa
Buckwheat Blinis with Smoked Salmon and Creme Fraiche - The Recipe Girl
Smoked Salmon Chowder - Mennonite Girls Can Cook
Smoked Salmon Costini - Yum Sugar

This post is being linked to:
Pink Saturday, sponsored by Beverly at How Sweet the Sound.

Wednesday, June 9, 2010

Gobi Manchurian - Indo-Chinese Fritters


From the kitchen of One Perfect Bite...When I came across this dish, I knew it had to be tried and shared. This saucy cauliflower is both a curiosity and a contradiction. Kitchen lore insists the dish is an Indian adaption of an old Chinese recipe. While that makes for a wonderful story, cauliflower is rarely seen in China and until recently you'd be hard pressed to find it served in Manchuria or any other region of the country. It is, however, extremely popular in India where it is called Gobi Manchurian. Gobi is the Indian word for cauliflower and Manchurian is the name of a spicy Indian sauce that has Chinese overtones. The dish was developed in India by Chinese immigrants who adapted Indian foods to their way of cooking. In doing so, they created a new cuisine called Indo-Chinese. Interestingly, the dish is starting to work its way into China and you'll occasionally find it on Chinese menus in other countries. Gobi Manchurian is served as an appetizer or a side dish and it is prepared in a manner that is similar to making Japanese tempura. Florets of cauliflower are dipped into a savory batter and then quickly deep fried. Once drained, they are coated with a nicely spicy tomato sauce and warmed through for serving. This dish was an enormous hit with my family and friends, and when served hot it is absolutely delicious. It does not hold well, so be prepared to move and get it to the table as soon as it is sauced. The sauce I use is quite mild, so, if you need more heat, add it to taste. You'll love this one. Here's the recipe.

Gobi Manchurian...from the kitchen of One Perfect Bite

Ingredients:
1 large head of cauliflower, trimmed and broken into about 20 large florets
Batter
1/3 cup cornstarch
2/3 cup all-purpose flower
1/2 to 3/4 cups water
2 teaspoons fresh ground black pepper
Salt to taste
Sauce
½ cup chopped spring onions
1 tablespoon finely chopped garlic
1 tablespoon finely chopped green chillies
1 tablespoon finely chopped ginger
1 tablespoon cornstarch
1 cup water, divided use
1 tablespoon soy sauce
1 tablespoon tomato ketchup
1 tablespoon vegetable oil
Salt to taste

Directions:
1) To make batter and fry: Heat enough oil to deep fry in a wok or deep fryer. While oil heats, combine cornstarch, flowe, salt and pepper in a small bowl. Add enough water to form a pancake-like batter. Dip cauliflower florets into mixture to coat with batter. Add a few florets at a time to hot oil and fry until golden brown. Remove from oil and drain on paper towel. Continue until all florets are fried.
2) To make sauce: Mix cornstarch with 1/4 cup water. Stir in soy sauce, ketchup and salt. Set aside. Heat oil in a large skillet. Add garlic, ginger, green chillies and spring onions. Stir fry for about 1 minute to soften. Add cornstarch mixture and remaining , remaing 3/4 cup water and cook until thickened. Remove pan from heat.
3) To serve: Place fried cauliflower into sauce and stir-fry over high heat to warm and coat florets. Garnish, if desired, with cilantro sprigs or scallions. Serve hot. Yield: 4 servings.

You might also enjoy these recipes:
Spring Vegetable Ragout - One Perfect Bite
Creamed Shanghai Bok Choy - One Perfect Bite
Asian Bean Spout Salad - One Perfect Bite
Sugar Snap Peas with Sesame - One Perfect Bite
Gobi Manchurian - Appetite for China
The Great Chinese Recipes Gobi Manchurian - ArticlesBase

Friday, May 14, 2010

Cream Cheese and Pepper Jelly Spread - Pink Saturday


From the kitchen of One Perfect Bite...This is a new take on an old party favorite. Most folks have been at casual affairs where a brick of cream cheese, covered with pepper jelly, is served to guests. Many of us have prepared it for parties of our own and would agree that it is great football food. It's the essence of simplicity and, as such, is a boon for a busy host or hostess. While it's delicious, I do have a problem with its appearance. Once touched, the offering quickly begins to look like the remains of a massacre. Now I probably have a newfangled version of the "princess and the pea" syndrome, but I hate the way it looks, so, I took it upon myself to make something that would hold up better on the table. The ingredients have been only slightly altered and this new version retains the flavor of the old but is prettier for a longer period of time. It is important to note that the proportion of pepper jelly added to the cheese should not be increased. If that measurement is wrong you'll end up with a dip rather than a spread. The cheese will also need some additional heat added to it as it's whipped. While the recipe calls for cream cheese, you can replace one-third of that with chevre if you'd prefer another layer of flavor in the spread. I have also added additional heat to the mix. While I use Sriracha because I like its finished taste, any hot chili sauce sauce can be used. Just remember the pepper jelly adds heat as well, so go at it carefully. Red pepper jelly and chili sauce will give the spread a salmon hue. If you prefer a colorless spread, a plain pepper jelly can be used. Here's how the spread is assembled.

Cream Cheese and Pepper Jelly Spread...from the kitchen of One Perfect Bite

Ingredients:

1 (10.5-oz.) jar red pepper jelly
12 ounces cream cheese
1 to 2 teaspoons hot chili sauce (i.e. sriracha)

Directions:

1) Place jelly in bowl of a small food processor or blender. Pulse until mixture becomes spreadable. Set aside.
2) Beat cream cheese in a small bowl until light and fluffy. Stir in 1/3 cup pepper jelly and 1 to 2 teaspoons hot chili sauce. Mix well.
3) Turn half of cheese mixture into a small serving bowl. Gently spread 1/3 cup pepper jelly over surface of cheese. Top with remainder of cheese. Spread top with remaining pepper jelly. Serve with rice crackers or another cracker of your choosing.
Yield: 1-1/2 cups.

You might also enjoy these recipes:
Liptauer Cheese Spread - One Perfect Bite
Roasted Red Pepper and Sun-Dried Tomato Spread - One Perfect Bite
Pumpkin Butter - One Perfect Bite

This post is being linked to:
Pink Saturday, sponsored by Beverly at How Sweet the Sound.

Thursday, April 29, 2010

Black Bean Hummus with Crispy Corn Chips


From the kitchen of One Perfect Bite...Saturday marks the 136th run of the Kentucky Derby and I thought it would be nice to provide some snacks for nibbling as we watched the race and procession of hats at Churchill Downs. I'm a "people watcher", and, to Bob's dismay, I have more fun with before and after events than I do with the race itself. Fortunately food is our great equalizer. I want to serve something outside the pale of standard derby fare, so I decided to try a recipe developed by the chefs at Kai Restaurant in Phoenix, Arizona. The restaurant specializes in Native American food and this dip is their interpretation of hummus. It's extremely easy to make and is quite unlike its Middle Eastern cousin in all but texture. While bagged chips could certainly be used, I've decided to serve it with homemade tortilla chips. The corn flavored chips will nicely balance the citrus in the dip and give it a more Southwestern flavor. I cut my corn tortillas into quarters and deep-fried them. If you are watching calories they could be crisped in the oven. Either way, they are a perfect accompaniment to the dip. Here's the recipe for the black bean hummus.

Black Bean Hummus...from the kitchen of One Perfect Bite, inspired by a recipe from Michael Dowd and Jack Strong appearing in the book The New Native American Cuisine

Ingredients:

1/2 cup chopped red onion
1 (14.5-oz.) can garbanzo beans, drained and rinsed
1 (14.5-oz.) can black beans, drained and rinsed
5 teaspoons chopped garlic
1/2 to 1-1/2 teaspoons chipotle adobe pepper
1-1/2 teaspoons ground cumin
3 tablespoons minced fresh basil leaves
3 tablespoons minced fresh cilantro leaves
1/2 cup fresh lemon juice
1/4 cup fresh lime juice
Salt and pepper to taste
1/3 cup extra virgin olive oil

Directions:
Combine all ingredients except olive oil in a blender. Process until smooth. Slowly add oil to puree. Serve with crisp corn tortilla chips. Yield: 2 cups.

You might also enjoy these recipes:
Red Pepper Hummus - One Perfect Bite
Chunky Clam and Bacon Dip - One Perfect Bite
Liptauer Cheese Spread - One Perfect Bite

Monday, January 18, 2010

Bob's Tuscan Bruschetta


From the kitchen of One Perfect Bite...Several months after Bob was discharged from the army we met with a group of friends at Bughouse Square, the name locals gave to Chicago's Washington Square Park. After listening to the evenings "soapboxers" we headed to a coffee house for an evening of folk music and pizza. There were five couples with us that evening and the men had a shared service experience they rarely discussed. There was an engineer, a mathematician, 2 chemists and a pharmacist in the group. Between them they spoke 7 languages and held advanced degrees. The topic they preferred not to discuss? The army had made them all cooks and they had been together in cook's school at Fort Knox, Kentucky. Over the years it became a closed joke between them. As the wife of one of those men, I can tell you they pretty much avoided the kitchen after that. The only time Bob jumped in to help me was to make gravy. It was delicious, but he literally made a gallon of it, so, thereafter, I let him stand down. He'd occasionally roll up his sleeves to make chili, a pizza or ribs, but nothing adventurous. Then one night, in a fit of creativity, he made this Tuscan-style bruschetta. I'm here to tell you it is delicious. It is simple to do and the only trick is to make sure you serve it while it's still hot. The bruschetta can be assembled several hours before serving, but bake them off just before you want to serve them. I've found that oil-packed, sun-dried tomatoes pack quite a flavor punch and this bruschetta is the perfect place to use them. Kudos to my husband for his wonderful creation. Here's the recipe. I want you all to remember that, "no army travels far without its cooks". Even if they could have been Russian language translators or corpsmen.

Bob's Tuscan-Style Bruschetta...from Bob's corner of Mary's kitchen at One Perfect Bite

Ingredients:
1 cup drained and chopped sundried tomatoes packed in in seasoned oil
1/2 cup toasted pine nuts or slivered almonds
1/2 cup finely sliced scallions (white and tender green)
3 ounces grated Parmesan-Regianno cheese
8 ounces shredded Provolone cheese
24 1/2-inch baguette slices

Directions:
1) Combine sun-dried tomatoes, pine nuts, scallions, Parmesan and Provolone cheese in a large bowl. Mix well.
2) Preheat oven to 400 degrees F. Spread cheese mixture over baguette slices and place on a baking sheet. Bake for 6 to 8 minutes, or until cheese is melted and golden brown. Serve immediately. Yield: 24 bruschetta.

Sunday, January 3, 2010

Roasted Garbanzo Beans with Cajun Spice - Blue Monday


Roasted Garbanzo Beans with Cajun Spice ...and...


My Blue Boys


From the kitchen of One Perfect Bite...This is one of our favorite fireplace and football snacks. There are exactly 4 ingredients in this recipe. It really doesn't get any easier than this. BUT. I'm currently experimenting with dried garbanzo beans that are soaked in water for 24 hours before proceeding with the recipe. Please stay tuned! I'm sure, that given enough time, I can complicate this recipe for you. Till then, here's the bare bones version using canned garbanzo beans.

Roasted Garbanzo Beans with Cajun Spice...from the kitchen of One Perfect Bite

Ingredients:
2 cups canned garbanzo beans, rinsed, drained and patted dry
1 tablespoon vegetable oil
1 teaspoon commercially prepared Cajun Spice
1/2 teaspoon golden brown sugar
Coarse salt to taste

Directions:
1) Preheat oven to 400 degrees F. Coat a no-stick baking sheet with no-stick spray and set aside.
2) Toss garbanzo beans with Cajun Spice and brown sugar in a small bowl. Mix well.
3) Place beans in a single layer on prepared baking sheet. Bake for 30 to 40 minutes, or until crisp and golden. Sprinkle with coarse salt to taste. Allow to cool before serving. Yield: 2 cups.


This post is being linked to:
Smiling Sally - Blue Monday