Showing posts with label main course. Show all posts

Sunday, December 26, 2010

New York Strip Roast with Port Wine and Mustard Sauces


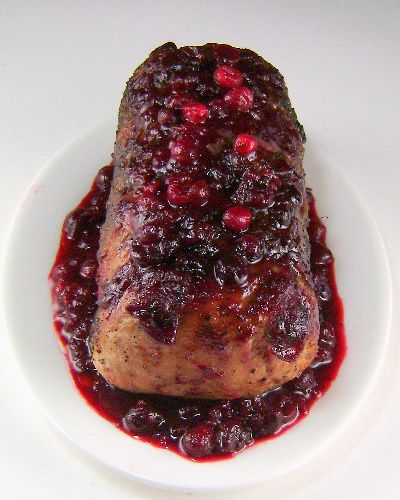
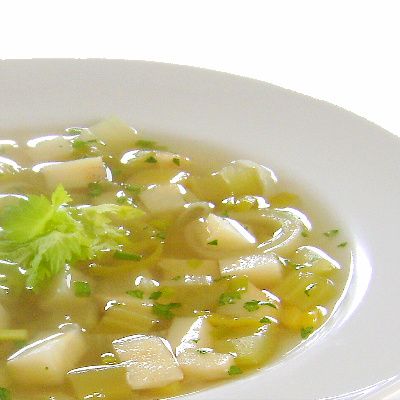
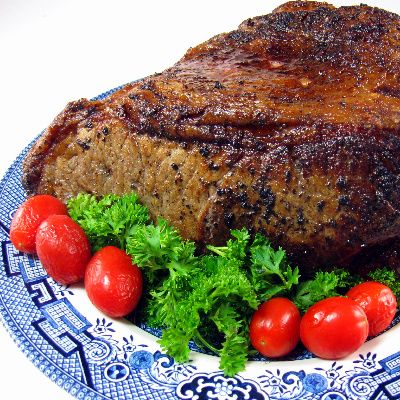
From the kitchen of One Perfect Bite...When all is said and done, Christmas is much like a wedding. Weeks of planning and preparation are over in nanoseconds, and along with the special memories we create are the remains of the day, which someone must attend to. The best part of being responsible for planning and execution of a feast is being excused from its clean-up detail. That gives me time to sit a spell and tell you about our dinner tonight, as others, very noisily I might add, tackle table debris and the dishes. Being queen is not half-bad on these occasions. One of the delights of living in an area where cattle and sheep are raised, is the abundance and affordability of meat, especially during the holiday season. Beef, standing rib and loin, can be had for under $5 a pound and that means that groaning boards in this area don't groan, they moan under the weight of holiday meat entrées. Most years, I prepare a really large boneless rib roast, but my trip to the market this week revealed some really nice looking New York Strip roasts that I decided to bring home as well. I've had a recipe developed by Wolfgang Puck for several years now and the roasts gave me the perfect opportunity to experiment with it. This is a nice alternative to a standing rib roast for the holiday. It is very easy to do and I made the roast as directed, save for the fact that I used coarse garlic salt and seasoned the roast 24 hours before cooking. It may be in my head, but I think the meat is more flavorful if its seasoned and sits for a good long while before baking. Our dinner began with a fresh pea soup and gravlax. Because of the potential sweetness of the sauce, I kept the remainder of the food quite simple and served the roast with Potatoes Anna and plain, lightly steamed asparagus. As it turned out, the sauce is wonderfully nuanced and I recommend it without reservation. I do think the beef, if cooked to specifications, will be overdone. I personally will aim for rare beef next time around. I also had to make a last-minute slurry to thicken the sauce, but in the light of eternity that was a small glitch and easily taken care of. I'm so glad I gave this recipe a try. It did not disappoint. Here's how the roast is made.

New York Strip Roast with Port Wine and Mustard Sauce...from the kitchen of One Perfect Bite courtesy of Wolfgang Puck

Ingredients:
Roast
1 whole New York strip, about 5 pounds, trimmed, trimmings reserved
Kosher salt (I used a coarse garlic salt)
Freshly ground black pepper
Olive oil
Port Wine Dijon Sauce
1 tablespoon minced shallot
1 cup port wine
1 cup beef stock
1 cup heavy cream
4 tablespoons unsalted butter, cut into pieces
2 tablespoons Dijon mustard
Salt
Freshly ground pepper

Directions:
1) Place rack in middle of oven. Preheat oven to 400 degrees F.
2) Generously season all surfaces of roast with salt and pepper. Place a heavy metal roasting pan or cast iron skillet on a burner over high heat. Heat pan, then film bottom of pan with olive oil. When oil begins to smoke, carefully put meat in pan and turn down heat to medium-high; scatter reserved trimming scraps around it. Sear until meat is evenly brown, about 5 minutes per side.
3) Transfer meat and trimmings to a roasting pan. Place roasting pan in oven and cook meat for about 45 minutes, or until it is medium rare, 140 to 145 degrees F on a meat thermometer.
4) Transfer meat from roasting pan to a serving platter, tent with aluminum foil, and allow to rest for 10 to 15 minutes.
5) While meat rests, remove and discard scraps from roasting pan. Pour off all but a thin film of fat. Transfer pan to stovetop and heat drippings over medium-high heat. Add shallot and, as soon as it starts to sizzle, pour in port wine and stock, stirring and scraping with a wooden spoon to dissolve pan deposits. With a whisk, stir in the cream. Reduce heat to maintain a bare simmer and, a piece at a time, whisk in butter until it melts. Continue cooking until sauce is thick enough to coat the back of a spoon. Turn off heat and stir in mustard. Sprinkle with salt and pepper, to taste. Transfer sauce to a small saucepan. Keep warm, but do not let boil.
6) Uncover New York strip and transfer it to a cutting board. Stir any juices that have collected into sauce. With a sharp knife, cut meat across grain into slices about 1/2-inch thick and place on a serving platter. Ladle a little sauce over meat. Pass remainder of sauce at table. Yield: 10 to 12 servings.

You might also enjoy these recipes:

Thursday, December 23, 2010

Mussels Fra Diavola


From the kitchen of One Perfect Bite...This is a wonderful dish that I love to make at least once during the Christmas holiday. If I were Italian and celebrated the Feast of Seven Fishes, I would include it in my menu for Christmas Eve. That would raise an eyebrow or two because the dish, like vodka sauce for pasta, is an Italian-American creation that is rarely served in Italy. Whatever the origin, mussels prepared in this fashion are a memorable, if messy, treat. Whenever I serve these, I cover the table with vinyl or oilcloth and distribute lobster bibs. It also helps to provide a large bowl or two to hold empty shells. Everyone at the table also receives two dish towels, one damp, the other dry. Only a crab boil is messier than this to serve to folks who eat with gusto. Believe me when I say, my folk have cornered the gusto market and these preparations are a necessity rather than an affectation. Once the mussels have been scrubbed and their beards removed, the dish can be made in minutes. Its heat, the alla diavola, comes from red pepper flakes, so you can manage it to your family's liking as long as you know their tolerance for heat. The dish has just three elements, a spicy red sauce, mussels and linguine. The mussels simmer in sauce and when they open they are served along with the sauce over piping hot linguine. I always serve this with a salad and the best Italian bread I can get my hands on. I do hope you'll try mussels prepared in this fashion. They really are delicious. Here's the recipe.

Mussels Fra Diavola...from the kitchen of One Perfect Bite adapted from Gourmet magazine

Ingredients:
12 garlic cloves, minced (1/3 cup)
3/4 to 1-1/2 teaspoons dried hot red pepper flakes
1/2 cup olive oil
1 (28-oz) can whole tomatoes in purée
2 tablespoons tomato paste
2 teaspoons dried oregano, crumbled
1 teaspoon dried basil, crumbled
1/4 cup drained bottled capers
1/2 cup Kalamata or other brine-cured black olives, pitted and chopped
1/3 cup dry red wine
1 lb dried linguine
3 lb mussels (preferably cultivated), cleaned (see cooks' note, below)

Directions:
1) Cook garlic and red pepper flakes in oil in a deep 12-inch heavy skillet over moderate heat, stirring, until fragrant but not browned, about 2 minutes. Add tomatoes with purée, tomato paste, herbs, capers, olives, and wine and simmer, uncovered, stirring occasionally and breaking up tomatoes, until sauce is thick, about 15 minutes.
2) Cook linguine in a 6- to 8-quart pot of boiling salted water until al dente, then drain in a colander.
3) While pasta cooks, increase heat under sauce to moderately high and add mussels, then cook, covered, until mussels just open wide, checking frequently after 3 minutes and transferring to a bowl. (Discard any mussels that remain unopened after 6 minutes.)
4) Serve linguine with mussels and sauce. Yield: 6 servings.

Cooks' note:
1) Scrub mussels with a brush under cold water and scrape off any barnacles with a knife. Remove beard by pulling it from tip to hinge or by pulling and cutting it off with knife.
2) Tomato sauce, without mussels, can be made and refrigerated 2 days before serving.

You might also enjoy these recipes:
Salt Cod and Tomato Stew - One Perfect Bite
Feast of the Seven Fishes - Italian Food Forever
Broiled Mussels - Smitten Kitchen
Sauteed Mussels with Garlic - The Housewife Diet
Flexing My Mussels - Charm and Salt
Moules Mariniere - One Perfect Bite
Coconut Curry Mussels - Simply Recipes
Spicy Mussels in White Wine - The Culinary Chronicles
Mario Batali's Feast of the Seven Fishes - Epicurious

Tuesday, December 21, 2010

Salt Cod and Tomato Stew


From the kitchen of One Perfect Bite...The ghosts of Christmas past sometimes surface unexpectedly. Mine snuck up on me this evening as I was making salt cod stew. Its aroma triggered a reverie that carried me back to the Christmas of my eighth year and "Ma'am's" kitchen where salt cod was being prepared for the Feast of Seven Fishes. This was also the year that St. Joseph, to the great consternation of Salvatore, Ma'am's husband, missed Christmas. Salvatore, a successful and respected contractor, was by training a stone mason. He was also an unrecognized, but talented, sculptor who fashioned one of the most beautiful Nativity scenes I've ever seen. There was, however, a problem this particular Christmas and it concerned the disposition of the young and hapless widow Moriarty. Many of you, especially those raised in the comforts and conformity of suburban homes, will be confounded by the remainder of my tale, but trust me, all of this really did happen "once upon a time in America." The widow Moriarty, left with five children and no visible means of support, wanted to sell her house and move back to the home of her parents. The house was in terrible condition and sat on the market for months. She finally told her sad tale to Ma'am who, always sympathetic, sent her boys to paint and otherwise refresh the house. Ma'am also decided to share Salvatore's St.Joseph with Mrs. Moriarty. Together they dug a hole in the Moriarty's back yard and buried the two foot statue, upside down. Ma'am firmly believed that the saint's intercession would help sell the house. I never understood the upside down part of the equation, but it apparently was a deal breaker and necessary if you wanted Joseph's help. In a normal year this would have caused no problems, but the furies, determined to wreak havoc, paid a visit and brought with them an early and hard freeze. The kind that would keep Joseph in the ground until the spring thaw. Now, this business with the statue transpired without Salvatore's knowledge or consent, so his bad temper was, in retrospect, explainable. He was neither religious nor superstitious and couldn't understand how all of this happened to him and his Joseph at Christmas, a time when folks came from miles around to admire his Nativity. Bent out of shape doesn't begin to explain his unhappiness. Ma'am did a lot of special baking that year and things finally settled down after the holiday. Mrs. Moriarty sold her house and, come spring, St. Joseph was disinterred and not buried again until Salvatore and Ma'am wanted to sell their home. Here is the recipe that triggered today's reverie. It's delicious and I hope you'll give it a try.

Salt Cod and Tomato Stew...from the kitchen of One Perfect Bite courtesy of Andy D'Amico

Ingredients:

1 pound dried salt cod
1/2 cup to 1 cup olive oil
1/2 cup 1/4-inch-diced onions
4 cloves garlic, peeled and sliced
1/2 jalapeño, minced and seeded
2 ounces grappa or dry white wine
2 cups tomatoes, chopped, with their juice
Bouquet garni: parsley stems, thyme, marjoram, fennel fronds, and a bay leaf, tied in cheesecloth or coffee filter
1 cup 1/2-inch-diced bell pepper
1/2 cup pitted Niçoise olives (stuffed Spanish olives may be substituted)
1 tablespoon capers, rinsed
Fruity extra-virgin olive oil for drizzling
Sea-salt crystals and freshly ground black pepper

Directions:

1) Place dried cod in a bowl, cover with cold water, and soak for at least 48 hours, changing water every 12 hours. Remove cod from water, pat dry with paper towels, and cut into 1-inch pieces.
2) Heat 3 tablespoons oil in a nonstick sauté pan, add cod in small batches, and sauté until lightly browned; set aside and repeat with remaining cod. (If the cod is too wet, it will not brown.)
3) Warm 4 tablespoons oil in a 2-quart casserole; add onions, garlic, and jalapeño; and cook gently without allowing them to color. Pour in grappa, and reduce until liquid has evaporated. Add tomatoes and bring to a simmer. Add browned salt cod and bouquet garni, cover casserole, and simmer gently for 45 minutes. Fold in peppers, olives, and capers, and return to a simmer for an additional 15 minutes. Stew should be juicy; if it becomes dry, add a little water or stock. Ladle into bowls, drizzle with olive oil, and sprinkle with plenty of black pepper and a few coarse sea-salt crystals. Serve with grilled or crusty fresh bread. Yield: 6 servings.

You might also enjoy these recipes:
Portuguese Kale and Salt Cod Chowder - Karen Cooks
Baccala alla Napoletana - Memorie di Angelina
Brandade de Morue - 2 Frugal Foodies
Fried Salt Cod with Garlic Sauce - Lisa is Cooking
Salt Cod, Fava Bean and English Pea Salad - Wright Food
Salt Cod with Red Pepper Sauce - Trissalicious

Thursday, December 16, 2010

Bean Burgers


From the kitchen of One Perfect Bite...I'm not a gambler, and have very low expectations when it comes to winning contests or giveaways. For years I'd enter and have nothing to show for my efforts, but it seems my luck has changed. Last week I received a package containing the Real Food Diet Cookbook by Dr. Josh Axe, some Equal Exchange Fair Traded coffee and vegan Snapdragon cookies made by Liz Lovely. The gifts were part of a giveaway sponsored by The Foodie Blogroll which is administered by Jenn Campus, its creator. I was thrilled with my windfall. I hope that all of you will take a look at the contests and giveaways that can always be found here. The Foodie Blogroll is also a great place to network and meet fellow bloggers.You won't regret your visit.


Dr.Ash is a wellness physician and radio show host. The real food diet he supports is not a fad or quick weight loss plan. His interest is in real, unprocessed food that will improve overall health. He is a proponent of counting nutrients rather than calories, fats or carbohydrates. His focus is on recipes that use unprocessed food and the book contains a wealth of information for those seeking a better diet and healthier lifestyle.


My regular readers know that my husband is a committed carnivore. He views meatless meals the same way a vampire views holy water or a cross. While this is not a strictly vegetarian cookbook, I wanted to try at least one of the meatless entrees for this post. My theory being, if the Silver Fox would eat it, it had to be good. I decided to go with the recipe for bean burgers. You'll probably have to shop for some of the ingredients needed to make these. Most kitchens don't have coconut oil or gluten free breadcrumbs lying around, but it is important to remember that these are recipes designed for a new way of eating, and that requires an openness to new ingredients. The burgers are very easy to assemble and they are quite good. Next time I make them I'll use less lime juice, but I was generally happy with the recipe. Oh, and yes, the Silver Fox ate his. He slathered it mayonnaise and buried it in a bun, but he ate it without complaint. If you are a proponent of "real" food, you'll like this book a lot. Here's the recipe for the bean burgers.

Bean Burgers...from the kitchen of One Perfect Bite courtesy of Dr. Josh Ash and the Real Foods Diet Cookbook

Ingredients:

2 cups cooked garbonzo beans, rinsed and drained if canned
1-1/2 pounds sweet onions, thinly sliced
2 tablespoons coconut oil, divided use
1/2 cup gluten free breadcrumbs
6 cloves garlic, minced
2 tablespoons fresh cilantro, minced
1 tablespoon fresh rosemary, minced
2 tablespoons tahini
2 tablespoons lime juice
1 teaspoon kosher or sea salt
Black pepper to taste

Directions:
1) Heat 1 tablespoon coconut oil in a large pan and saute onions until they are soft and begin to caramelize. Season with sea salt and pepper to taste. Place caramelized onions in a large mixing bowl and set aside.
2) Place garbanzo beans in a blender or food processor and mix until smooth. Add bean mixture to bowl containing onions.
3) Add all remaining ingredients and combine thoroughly. Form into patties. (I used a third cup measure to make 6 patties.)
4) Heat remaining coconut oil in pan and cook burgers until done, flipping once. (I cooked mine over medium heat, 5 minutes per side.) Serve with avocado slices and sprouts. Yield; 6 servings.

You might also enjoy these recipes:
Black Bean Burgers with Mango Salsa - Culinary in the Country
Turkey Bean Burgers - Real Mom Kitchen
Vegan Bean Burgers - Elle's New England Kitchen
Asian-Style Bean Burgers - Finger Licking Food
White Bean Burgers - Rachel Hearts Food
Vegan Mung Bean Burgers - Jeena's Kitchen
Gluten-Free Bean Burgers - Gluten Free Gobsmacked

Monday, December 6, 2010

Cranberry Glazed Pork Roast


From the kitchen of One Perfect Bite...I love the taste and flavor of pork, as well as the ease with which it can be prepared. Chops and tenderloins are perfectly sized for today's smaller families and even the larger loins can be cut to prevent endless leftovers. Pork is also inexpensive. Our warehouse store sells large single loins for about $2 a pound. Most of the loins weigh 8 to 9 pounds each and can be cut into meal size portions that are more appropriate for today's families. I usually divide these loins into thirds and freeze them for later use as whim dictates. Unfortunately, I usually spend the money I save buying meat this way on ingredients with which to sauce it. When I prepare a loin for roasting, I tie the meat into a cylinder of uniform size and brown it before roasting. I cook my pork loin to an internal temperature of 140 degrees. When I take it out of the oven, I tent it in foil and let it sit for another 15 minutes. The roast continues to cook and at the end of the rest period it will reach 150 - 155 degrees, a perfect temperature for pork. I've been experimenting with cranberries lately and I wanted to use them to make a glaze that could be used for pork or chicken. I finally have come up with one I think is acceptable and a somewhat different than standard fare. It is a bit pricey, but it is wonderfully flavorful and will give your palate a joyful jolt. I've left the berries whole for the photograph, but the sauce can be strained and you may actually prefer to use it that way. Here's the recipe for cranberry glazed roast pork.

Cranberry Glazed Roast Pork...from the kitchen of One Perfect Bite

Ingredients:
Glaze
1 (12-oz.) bag fresh cranberries
1/3 cup chopped fresh ginger
Zest and juice of 1 large orange
1 cup sugar
1-1/4 cups cranberry juice
1/4 cup orange liqueur
Roast
1 ( 2-1/2 to 3 pound) center cut boneless pork loin
1 tablespoon + 1 teaspoon olive oil, divided use
4 teaspoons coarse garlic salt
2 teaspoons coarsely cracked fresh pepper
2 teaspoons dried marjoram

Directions:

1) To prepare glaze: Combine cranberries, ginger, sugar, orange zest and orange and cranberry juices in a saucepan. Bring to a boil over high heat, stirring occasionally. Reduce heat and cook until cranberries burst and sauce thickens, about 5 to 10 minutes. If you wish, strain through a fine mesh sieve and allow to cool. When cool add orange liqueur.
2) To prepare roast: Preheat oven to 325 degrees. Using kitchen twine, tie roast at 1-inch intervals to form a cylinder of uniform circumference. Rub all surface of roast with 1 teaspoon olive oil. Rub cylinder with all of salt pepper and marjoram. Heat remaining 1 tablespoon oil in a large, heavy ovenproof skillet. Add pork and sear all surfaces well. Brush pork with glaze. Transfer skillet to oven and bake for 15 minutes. Brush again with glaze and cook for another 20 minutes, or until pork reaches an internal temperature of 140 degrees. Remove from oven. Brush again with glaze, tent with foil and let rest for 15 minutes before slicing. Yield: 6 servings.

You might also like these recipes:
Maple Rosemary Glazed Pork - What's Cookin, Chicago?
Pork Tenderloin with Honey Glazed Apples -Food and Whine
Pan Roasted Pork Chops with Cranberries and Swiss Chard - Dinner Du Jour
Slow Cooker Pork Chops - The Hungry Housewife
Roast Pork Tenderloin with Pears and Figs - Verses from my Kitchen
Pork Milanese - Bored Cook in the Kitchen

Wednesday, December 1, 2010

Southwestern Skillet Chicken with Rice and Black Beans


From the kitchen of One Perfect Bite...November in Oregon is no stroll on the boardwalk. It's almost always wet and it's hard to escape the pervading damp that penetrates and chills the bones. What's different this year is the temperature. It's been cold and we are spoiled. Locals here call any spell of weather that falls below freezing an Arctic Express. It's our version of the Mistral and, I am here to tell you, it passed through the valley last week. Our temperatures, which are normally quite moderate, plunged and we even had a sprinkling of snow. Foul weather and holiday preparations interrupted my usual exercise regime and I never got out for my daily walk. I was determined to get back with the program today. I rushed through my morning chores, anticipating what I call a sun break. While we have lots of rain, it rarely rains all day and there are usually intermittent periods of sunshine.When the sun broke through I was ready and headed out the door, full of vim, vigor and enthusiasm, despite admonitions from the Silver Fox who thought it was a bad idea. I had walked about a mile when the sky turned a steely gray and dumped its core. Within seconds I was drenched and began the trek home. You know who met me at the door and, fortunately, did not say what he was thinking. He did, however, have an insufferable grin on his face. Once warmed, I sat down to think about dinner. When the children were small, this would have been a chili day. Unfortunately, my chili recipe makes enough food to feed a small country and I didn't want to deal with leftovers. That thought, however, set me to thinking about other recipes that fall into the category I call "good grub." They're completely lacking in refinement but absolutely delicious and perfect for family and very good friends. I settled on this recipe because it's easy to do and I guarantee delicious. It's very loosely based on a recipe that appeared in Cook's Country magazine. It, sans chicken, would also be a great meal for Meatless Monday. I hope you'll give it a try. Here's the recipe.

Southwestern Skillet Chicken with Rice and Black Beans...from the kitchen of One Perfect Bite, inspired by Cook's Country magazine

Ingredients:

8 boneless, skinless chicken thighs
1/4 cup all-purpose flour
2 + 1/2 teaspoon salt, divided use
1/2 teaspoon pepper
2 tablespoons vegetable oil
1 cup chopped onion
1/4 teaspoon red pepper flakes
4 teaspoons minced garlic
1-1/2 cups long grain white rice
4 cups low-sodium chicken broth
4 ounces Colby or Monterey Jack cheese , shredded (1 cup)
1 (15.5-oz.) can of black beans, drained, and rinsed with water
1 (10 to 12-oz.) package of frozen corn, thawed and patted dry
1/4 cup chopped cilantro
Optional: Salsa for serving

Directions:

1) In a plastic bag, combine flour with 2 teaspoons salt and pepper. Add chicken and toss to coat. Shake off excess flour and set aside.
2) Heat the oil in a large skillet over medium-high heat until just smoking. Add chicken, skin-side down, and cook until golden, about 4 minutes per side. Transfer chicken to a plate.
3) Add onion, red pepper flakes, and 1/2 teaspoon salt to skillet and place over medium heat. Cook, scraping up any browned bits, until onion is softened, about 5 minutes.
4) Stir in garlic and cook until fragrant, about 15 seconds. Stir in the rice and cook until edges turn translucent, about 3 minutes. Stir in broth and bring to a simmer.
5) Cover, reduce the heat to low, and cook for about 15 minutes. Place chicken on top of rice in skillet and cook, covered, for another 10 minutes.
6) Transfer chicken to a serving platter. Stir in black beans, corn, cheese, and cilantro. Let cheese melt for 1 minute. Season rice mixture with salt and pepper to taste. Serve with salsa. Yield: 4 servings.

You might also enjoy these recipes:
White Turkey Chili - Inspired to Cook
Navajo Tacos - Kitchen Gypsies
Southwestern Steak and Grits - The Shoe Box Kitchen
Baked Shrimp with Tomatillos - Simply Recipes
Sizzling Southwestern Flank Steak with Creamy Salsa Verde - One Perfect Bite
Southwestern Chicken Tacos - The Corn Bread Kitchen

Tuesday, November 23, 2010

Salisbury Steak with Caramelized Onion Gravy


From the kitchen of One Perfect Bite...Salisbury Steak is one of the retro foods that has made a comeback in American kitchens. It was named for James Salisbury, a 19th-century physician, who prescribed it for battlefield patients who, in addition to their wounds, were suffering from digestive problems. His diet recommended serving chopped beef patties three times a day, and the oval-shaped patties, informally dubbed the poor man's steak, came to bear his name. In its purest form, the steak consists only of seasoned beef. However, frugal depression housewives and those cooking in the meat-rationed kitchens of WWII began to add extenders to the chopped beef in order to feed more people. I am no stranger to Salisbury Steak. It was a regular feature on my Mother's table and I made it in the early days of our marriage when then was more love than money. Versions of the steak that are currently popular use wine and mushrooms in the sauce that is served with the steak. The original versions of the recipes did not, for obvious reasons. A budget meal does not lend itself to auxiliary ingredients that cost more than its main components. The newer versions are delicious and I can heartily recommend them. I want, however, to share with you a really old-fashioned version of the steak. Here's the recipe.

Salisbury Steak with Caramelized Onion Gravy...from the kitchen of One Perfect Bite

Ingredients:
Onion Gravy
2 large red onions, thinly sliced
2 tablespoons unsalted butter
2 tablespoons all-purpose flour
3 cups low-sodium beef broth
1/2 cup dry red wine (optional)
1 tablespoon tomato paste
1 teaspoon cider vinegar
Salt and pepper
Meat Patties
1 pound lean ground beef
1/2 cup cooked white rice
1 egg yolk
1 teaspoon salt
1/4 teaspoon pepper
1 clove minced garlic
1 teaspoon Worcestershire sauce
3 tablespoons chopped parsley
1/2 teaspoon dried thyme
1 tablespoon olive oil

Directions:
1) To make gravy: Heat butter in a large sauté pan. Add onions and cook over medium-high heat, until onions start to brown, stirring occasionally. When onions are slightly softened and turning a deep honey brown, add 1/4 cup broth. Reduce heat, cover and continue cooking, adding more broth as needed to prevent caramelized bits at the bottom of the pan from burning. It should take at least 25 to 30 minutes to properly caramelize onions. Stir in flour and cook for about 2 minutes. Add wine and reduce by half. Stir in remaining beef broth and tomato paste. Stir in cider vinegar. Simmer for 10 minutes. Add salt and pepper to taste. Reduce heat to low and keep warm.
2) To make patties: Mix ground beef, rice, egg yolk, salt, pepper, garlic, Worcestershire sauce, parsley and thyme in a bowl. Shape into 4 oval patties about 3/4-inch thick. Heat olive oil in a large nonstick skillet set over medium-high heat. Sear patties about 3 minutes per side, or until a brown crust forms. Pour gravy over patties and simmer for an additional 10 minutes. Serve warm with mashed potatoes or noodles. Yield: 4 Servings.

You might also enjoy these recipes:
Ground Beef Stroganoff - Real Mom Kitchen
Easy Ground Beef Dinners: Holiday Time Savers - Are You Hungry?
Red Bean Chili - The Red Spoon
Stuffed Cabbage - Living the Gourmet
Meatballs with Gravy - Seasalt with Food
Shepherd's Pie - Annie Bakes

Tuesday, November 16, 2010

Alu Ki Tikki (Potato Patties) - Kalakho and Camel Caravans


Alu Ki Tikki.


From the kitchen of One Perfect Bite...There are two Indias. One is modern and vibrant, the other is mired in poverty and tradition. My first real exposure to the dichotomy came while visiting a farm village outside the town of Kalakho in the state of Rajasthan. The villagers invited us into their homes and the men entertained us with local music and dancing. While much of what we saw was well orchestrated showmanship, the journey to and from local villages gave some insight into what was really happening in these remote areas of the country. We traveled in camel caravans and the slow pace made close observation possible. Despite best efforts by the government, much work still needs to be done. Women here are little more than chattels and a headcount while at a local school confirmed an unintended male bias. Old ways die very hard, yet these people do not seem to be unhappy. Television, with its exposure to undreamed of freedom and material goods, has not reached their villages and they remain a serene and patient people, seemingly lost in another century. I don't know how much longer that can last.

In the midst of all that, we were housed in a lovely resort that overlooked a monsoon lake. Our meals were regular and delicious and I brought several recipes home with me. These potato patties were part of our breakfast buffet each morning. They are a simple mix of seasoned potatoes, combined with peas and spices, that is held together with chickpea or all-purpose flour. Despite their appearance they really are delicious. Here's the recipe.


Alu Ki Tikki...from the kitchen of One Perfect Bite

Ingredients:
1 pound potatoes, peeled and cut in 1-inch cubes
2 teaspoons salt
1 bay leaf
1 cup frozen peas, thawed
1/2 teaspoon salt
1/2 red onion, finely diced
1 (1-inch) piece ginger, peeled and finely diced
1/4 to 1/2 teaspoon dried red pepper flakes
1 tablespoon vegetable oil
1 teaspoon ground cumin
1 teaspoon ground coriander
1 teaspoon ground turmeric
2 tablespoons chickpea (besan) flour (all-purpose flour can be substituted)
1 tablespoon lemon juice
1/2 teaspoon garam masala
3 tablespoons vegetable oil or a mixture of vegetable oil and ghee

Directions:
1) Cover potatoes with cold water, add salt and bay leaf and bring to a boil. Then turn heat down to a simmer and let cook until soft enough to mash, about 15 minutes or so. Drain potatoes and return to pot.
2) Heat 1 tablespoon oil in a saute pan. Add onions, ginger and pepper flakes. Saute until soft. Add salt, cumin, coriander, turmeric and cook for a few seconds longer.
3) Mash potatoes. Gently fold in peas, onion-spice mixture, chickpea flour and lemon juice.
4) Using a 1/4 cup measures, form into patties.
5) Heat 3 tablespoons oil in a large nonstick skillet. When hot, add patties and cook until a deep golden brown, turn and continue cooking until reverse side is golden. Remove and drain on several layers of paper toweling. Serve warm or at room temperature with tomato or mint chutney. Yield: 12 to 14 patties.

You might also enjoy these recipes:
Aloo Palak - eCurry
Spicy and Seedy Indian Potatoes - Herbivoracious
Chickpea Potato Curry - Simply Recipes
East Indian Potato Chops - Foodista

Monday, November 15, 2010

Dal Bhat - Pokhara


Dal Bhat


From the kitchen of One Perfect Bite...Pokhara is a small Nepalese city tucked into the foothills of the Annapurna range of the Himalayas. Things, including time, move slowly here. Cars are not yet a problem, television transmission is intermittent and the air is fresh and clear. While the area tries to keep a low profile, 100,000 travelers arrive here every year. The city is a mecca for climbers and trekkers who account for 80% of its visitors. The area is also a retirement haven for Gurkha officers whose presence, coincidentally, keeps the crime rate low and the economy healthy. Those who come are charmed and pampered. Many stay. Hence, I can happily report it is possible to get fabulous pizza in the foothills of the Himalayas. The old city is much like the Kathmandu of my imagination, but accommodations are first-rate and are a welcoming place to train for, or recover from, strenuous outdoor activity. Part of the daily panoply is watching helicopters evacuate trekkers who have underestimated the toll that altitude will take on their bodies. Most recover poolside and still have the time of their life. I was completely charmed by Pokhara and its residents. If you are lured by the unusual and enjoy back roads and byways, Pokhara will enchant you as well.

In Nepal there's a entree called a Nepali set. It is an assortment of dishes arranged on a plate especially designed to feature each component of the meal. I'd like to take you through those components a step at a time and, today, we'll start with the two most basic elements of the dish. Rice and lentil are the staples of the Nepali people. They are eaten twice a day in a dish that's called Dal Bhat. The dish may be supplemented with curried vegetables, called Tarkari and pickles, but rice and lentils are always part of the meal. They will also appear on our expanded versions of the Nepali set that we'll build a step at a time. Here is the recipe for the rice and lentils that form the base of the Nepalese diet.


Dal Bhat...from the kitchen of One Perfect Bite

Ingredients:
Plain Rice (Bhat)
2 cups rice (Basmati or Long grain preferred)
4 cups (1 lt) water
1 teaspoon butter (optional)

Lentils (Dal)
1-1/2 cups lentil (any kind)
4 to 5 cups of water (depends preference of your consistency of liquid)
1/2 teaspoon turmeric
1 teaspoon garlic, minced
6 tablespoons clarified butter (ghee)
3/4 cup sliced onions
2 chillies (dried red chilies preferred)
Salt to taste
1 tablespoon fresh ginger paste (optional)

Directions:
1) To prepare rice: Wash rice and soak for 5 minutes. Boil the rice over medium heat for about 10 -15 minutes. Stir once thoroughly. Add butter. Turn the heat to low and cook, covered, for 5 more minutes until done
2) To prepare lentils: Wash lentils and soak lentil for 10 minutes. Remove anything that floats and drain. Place lentil in fresh water and bring to a boil. Add all spices. Reduce heat and simmer, covered, for 20 to 30 minutes until lentils are soft and have the consistency of oatmeal. In a small pan, heat remaining butter and fry onions, chilies and garlic. Stir into lentils a few minutes before you stop boiling. Serve with rice.

You might also enjoy these recipes:
Nepali Dal Bhat - Zack's Travel Musings
Dal Bhat - Experiments in My Kitchen
Dal Bhat - Yeti-Zone Trekking

Sunday, November 14, 2010

The Most Memorable Meal in India - Chole at the Missionaries of Charity Orphanage in Agra


From the kitchen of One Perfect Bite...Tucked behind a gate on Anjmar Road in Agra, is a Missionaries of Charity home. The facility, operated by the order of nuns that Mother Teresa founded, functions as an orphanage and a care facility for the chronic and terminally ill. As I passed through the gate and entered the grounds, I was followed by a young woman who was just completing the first of the ten years required to become a professed member of the community. She was lithe and fair, and her clipped accent indicated she was well-educated and came from a comfortable background. I suspect her task was to see that none of us one wandered into areas where our presence would be intrusive. She, instead, directed us to the right side of the compound and into a room of tiny miracles. Here, in cribs packed back to back, were twenty perfectly formed infants, abandoned, but found before starvation or exposure took their toll. Most of them were sleeping, but here and there you'd find a tiny flirt who'd shyly smile and reach for you. The babies in this room were adoptable and the vagaries of fate would soon take them to homes far from the streets on which they had been found. We passed through a connecting door into another room which told a different tale. Here, the infants and toddlers were dealing with physical or mental limitations that would keep them here until better facilities for their care could be found. Just outside, playing in a courtyard, were healthy children who were too old for adoption. The sisters had assumed responsibility for their education, job training, and, in the case of the girls, the arrangement of suitable marriages when they came of age.

Intent on showing us the others in their care, the young aspirant led us into a shaded courtyard where adult men were having a lunch of Chole and Naan. They were suffering from various mental or physical problems and many were horribly crippled. Off the courtyard was another room for those who were stricken with tuberculosis and AIDS. They were bedridden and obviously very ill. The young woman explained there was no money for the medicine that could effectively treat these men. They were languishing, waiting for a death that would not come quickly. Until it did, the sisters and their volunteers provided as much care and love as they possibly could to ease the final days of these men's existence.

Across the courtyard was a compound for the women that included a small cell-like structure that held some of them under lock and key. They had severe mental problems and the newer arrivals looked malnourished and had open wounds from scratching lice from their scalps and skin. The, soon to be, novice was now walking by my side and I asked how she was able to do this day after day. She smiled, took both my hands in hers and led me back to the children's quarters. There was a quotation hanging on the wall she wanted me to read. I'll share the last few lines of it with you. "I asked Jesus how much He loved me. He answered 'this much.' Then He stretched out His arms and died for me." She asked if I understood. I nodded yes and hugged her.

Today's Recipe

Chole is a North Indian chick pea dish. The base is a tomato gravy to which chick peas are added. Canned chick peas are used in this recipe. Like most Indian curries, spices can be adjusted so the dish is spicy or mild depending on your taste. This recipe will makes a Chole that's on the milder side.

Chole...from the kitchen of One Perfect Bite

Ingredients:
3 tablespoons vegetable oil or ghee
1 pinch asafetida powder (optional)
1/2 teaspoon cumin seeds
1/2 teaspoon ground turmeric
1 medium sized onion, diced
3 cloves garlic, minced
2 medium sized tomatoes, diced
1 teaspoon tomato paste
2 (15-oz.) cans chick peas, drained
1/4 teaspoon sugar
1 to 2 teaspoons salt, depending on taste
1/4 teaspoon finely minced ginger
1/4 to 1/2 teaspoon ground red chili powder
1/4 teaspoon ground coriander
1/4 teaspoon ground cumin powder
1/4 teaspoon teaspoon garam masala
1 cup water

Directions:
1) Heat oil or ghee in a large saucepan. Add cumin seeds and cook until sizzling and seeds begin to turn brown. Add asafetida powder, if using. Asafetida is a gum resin that has a strong onion flavor. Stir in turmeric.
2) Add onions and sauté until golden brown. Add garlic and stir until fragrant.
3) Stir in tomatoes and simmer on medium heat until tomatoes have melted and mixture is fairly uniform. Add 1 teaspoon of tomato paste and mix.
4) Stir in chick peas. Add salt, ginger. chili powder, coriander, cumin powder, garam masala and sugar. Mix thoroughly.
5) Add 1 cup of water. Simmer for 20 minutes with pot partially covered. Serve hot with rice,naan or roti. Yield: 4 to 5 servings.

You might also enjoy these recipes:
Channa (Chole) Masala - Kitchen Gypsies
YRTML: Punjabi Chole - Siri's Corner
Spicy Chole - Niya's World
Chole/Chana Masala - Enriching Your Kid
Chole Masala - Weird Combinations
Teri Wale Chole(Curried Chickpeas) - Annarasa - Essence of Flavor

This post is being linked to:
Smiling Sally - Blue Monday

Saturday, November 13, 2010

Tibetan Momo - Served in a Home Away from Home


Momo in Fresh Tomato Curry


Pokhara Valley


Tashi Palkhiel Refugee Settlement


Housing Area of Settlement


Community Hall


Settlement Monastery


Young Monks Following Induction Ceremony


A Break in the School Day


Kindergarten


Settlement Home for the Elderly

From the kitchen of One Perfect Bite...In Tibetan Buddhist tradition, it is expected that the second son of each family will enter the monastery and study to become a monk. I mention that because Bob and I had a tour guide who was the first son of one of the families who fled Tibet and formed the Tashi Palkhiel Refugee Camp in Pokhara, Nepal. That relationship led to one of the most beautiful and moving experiences of our trip. Good fortune put us in the refugee camp on a day when a new monk was entering the community and, thanks to the intervention of the second son, we were invited attend the ceremony. It was quite beautiful, replete with chanting that included the use of drums and the dungchen, or longhorn trumpet. Following the service we toured the camp to see how these folks had adjusted to their new environment. As might be expected, the young had no problems but their elders still clung to the hope of returning to a free Tibet. The community is remarkably cohesive and remains distinctly Tibetan despite living in the heart of Nepal.

I was curious to see how their diet differed from that of the Nepalese or Indian people. In truth, if the foods I sampled were typical, they are very similar. Tibetan food used Szechwan pepper to provide heat rather than the cayenne or red pepper that's used in India or Nepal and, while it is no where near as refined as the best of Indian cooking, the ingredients used are basically the same and similar dishes are produced. I sampled a soupy stew, dumplings, a bread and two desserts. I can't claim to be an expert based on that, but from that list I picked the dish I think you'll most enjoy. The recipe is for dumplings. Dumplings are a lot of work and it would help to have someone working with you should you decide to make them. The recipe is straight forward and if you are a dumpling lover you might want to give it a try. Here's the recipe.


Tibetan Momo...from the kitchen of One Perfect Bite

Ingredients:
Dough for wrappers:
5 cups all-purpose flour
1 tablespoon oil
1 cup water or as required
Pinch of salt
Filling:
1 lb. ground lamb
1 lb. ground pork
1 cup onion, finely chopped
1 cup Napa cabbage, finely chopped
1 cup mushroom, finely chopped
1 tablespoon fresh garlic, minced
1 tablespoon fresh ginger, minced
1/2 teaspoon Szechwan pepper
2 tablespoons soy sauce
3 tablespoons cooking oil
Salt and Pepper

Directions:
1) For stuffing mixture, combine all filling ingredients in a large mixing bowl. Mix well, adjust for seasoning with salt and pepper. Cover and refrigerate for at least an hour to allow all ingredients to meld.
2) In a large bowl combine flour, oil, salt and water. Mix well, knead until dough becomes homogeneous in texture, about 10 minutes. Cover and let stand for at least 15 min. Knead well again before making wrappers. Prepare 1-in. diameter dough balls. It is recommended to work with a dozen or so balls at a time to prevent drying. Take a dough ball, roll between your palms to spherical shape. Dust working board with dry flour. On board gently flatten ball with your palm. Then roll out into 3-in diameter wrapper. Repeat with remaining dough balls. Cover with bowl to prevent from drying.
3) For packing hold wrapper on one palm, put one tablespoon of filling mixture and with other hand bring all edges together to center, while making pleats. Pinch and twist pleats to ensure absolute closure of stuffed dumpling.
4) Oil a steamer rack. Bring water in steamer to a boil. Place uncooked dumplings in steamer, leaving some space between them. Cover steamer and cook until dumplings are cooked through, about 10 to 15 minutes.Remove dumplings from steamer and serve warm with a sauce of your choosing. In Tibet momos are served with a sour pickle called achar.

You might also enjoy these recipes:
Indian Dumpling Basics - Asian Dumpling Tips
Chinese Dumpling Recipes - Asian Dumpling Tips
Nepalese Dumplings - World Recipes
Tibetan Food - Yowangdu
The Dali Lama's Momos - Palachinka
Nepaese Vegetable and Cheese Dumplings - The Global Gourmet

Monday, November 8, 2010

Manhattan Clam Chowder


From the kitchen of One Perfect Bite...This recipe, developed at the Culinary Institute of America, caused me to change my mind about Manhattan clam chowder. I had, for years, scoffed at those who would order it as a soup of preference. I considered it to be nothing more than a vegetable soup into which a bunch of clams had been thrown. I needed to use the last of the canned clams with which I had been working and this recipe read well. I could find no reason not to make it, so I was off to the vegetable bin and chopping block and within an hour had a table ready meal. I was really surprised by how much I like this chowder. That just goes to show it doesn't pay to be a food snob. It would have been a shame not to have tried this. It will never replace its New England cousin but it is good enough to make into my rotation and it adds a bit of food lore to my collection as well. Did you know that legislators in Maine once tried to ban the use of tomatoes in chowder? While I suspect it must have been a slow legislative year, they swear its true. Come to think of it, I've never had Manhattan chowder in New England. Huh! While the CIA recipe, of course, used fresh clams, my exercise for these past few weeks has been to find ways to use the variety that comes in restaurant-sized cans. Two 51-ounce cans can be purchased at warehouse stores for around $12. That's enough clams to make four or five meals for an averaged sized family and that's a bargain by any standards. Here's the recipe.


Manhattan Clam Chowder...from the kitchen of One Perfect Bite, courtesy of the CIA

Ingredients:
2 slices bacon, minced
2-1/2 cups diced leeks (white and light green parts)
1-1/4 cups diced onion
1/3 cup diced carrot
1/3 cup diced celery
1 cup diced red bell pepper (seeds and ribs removed)
1 teaspoon minced garlic
2 canned plum tomatoes, seeded and coarsely chopped
2 cups diced yellow or white potatoes (peeled)
3 cups bottled clam juice
1 cup tomato juice
1 bay leaf
Pinch dried thyme
3/4 cup canned clam meat + juice from cans (about 3/4 cup) or 3 dozen chowder clams, shucked, juices reserved
Salt as needed
Freshly ground black pepper as needed
Tabasco sauce as needed

Directions:
1) Cook bacon in a soup pot over medium heat until crisp and browned, about 10 minutes.
2) Add leeks, onion, carrot, celery, pepper, and garlic. Cover pot and cook over medium-low heat, stirring occasionally, until vegetables are soft and translucent, about 10 minutes.
3) Add tomatoes, potatoes, clam juice, tomato juice, bay leaf, and thyme. Bring to a simmer and cook until potatoes are tender, about 15 to 20 minutes. Add clams with their juices and simmer until the clams are cooked, about 5 to 10 minutes more.
4) Using a shallow, flat spoon, remove any fat from surface of chowder and discard. Remove bay leaf and season to taste with salt, pepper, and Tabasco. Serve in heated bowls. Yield: 8 servings.

You might also enjoy these recipes:
Beggar's Chowder - One Perfect Bite
East Hampton Clam Chowda - Family Spice
Slow Cooker Corn Chowder - Creatively Domestic
Oyster Stew - Seriously Soupy
Hearty Cheddar Chowder - The Daily Dish
Potato Chowder - Sweet Basil Kitchen
Fish Chowder - A Thought for Food
New England Clam Chowder - One Perfect Bite
Fresh Corn Chowder - Barbara Bakes
Salmon Chowder - One Perfect Bite

Saturday, November 6, 2010

Crustless Onion Quiche


From the kitchen of One Perfect Bite...This lovely crustless quiche is wonderful to have on nights when real appetite fails you. It's also great to have on Sunday morning or for a holiday brunch when your appetite runs wild. It is inexpensive to make and can be prepared by novice cooks without special equipment. The Silver Fox makes this for me when I'm not feeling well. Believe me, if he can do it, you can do it. The onions are bothersome, but doable, and they are a perfect way to teach the culinary technique of sweating. A video showing how to sweat onions can be found here. Please notice the pan used here is a 10-1/2 inch round baking dish. If you use a pan of smaller size you'll have to adjust cooking time. While this can be assembled hours ahead of serving, I bake it at the last minute and serve it warm. I've found the onions get watery in the quiche sits around for too long a time. I usually serve this with a salad and really good peasant bread. If I've convinced you to try this, my work here is done. I'll leave supper in your capable hands. Here's the recipe.

Crustless Onion Quiche...from the kitchen of One Perfect Bite, courtesy of Patricia Wells

Ingredients:

Unsalted butter for greasing baking dish
1 pound onions, peeled
3 tablespoons unsalted butter
1 tablespoon fresh thyme leaves, carefully stemmed
Kosher salt and freshly ground black pepper to taste
Freshly grated nutmeg to taste
4 large eggs
1/4 cup whole milk
3 tablespoons heavy cream

Directions:
1) Preheat the oven to 425 degrees F. Generously butter bottom and sides of baking dish. Set aside.
2) Slice the onions in half lengthwise. Place, cut side down, on a cutting board and slice crosswise into very thin slices.
3) In a large unheated skillet, combine onions, butter, thyme, salt, pepper, and nutmeg. Sweat over moderate heat, covered, until onions are soft, about 8 minutes. They should not caramelize or turn brown. Taste for seasoning. Set aside.
4) Crack eggs into a medium-size bowl and whisk just to blend. Whisk in milk and cream.
5) Transfer onions to prepared baking dish, smoothing them out with back of a spoon. Pour egg mixture over the onions. Season with additional pepper and nutmeg.
6) Place in center of oven and bake until top is a deep golden brown and custard is firm, about 30 minutes. To test for doneness, insert tip of a knife in the center of quiche. It is done when the knife comes out clean. Do not underbake or the quiche will be mushy, not firm. Let sit for about 5 minutes to firm up. Serve warm, cut into thin wedges. Yield: 8 servings.

You might also enjoy these recipes:
Swiss Chard Quiche - Foodie/Nutritionist
Golden Onion Mushroom Quiche - The Edible Garden
Corn Quiche with Tortilla Crust
Spinach, Zucchini and Mushroom Quiche - Sing for Your Supper
Potato Frittata - The Comfort of Cooking
Southwestern Sausage Quiche - Plain Chicken
Swiss Onion Tart - One Perfect Bite
Savory Asparagus and Goat Cheese Tart- One Perfect Bite

Wednesday, November 3, 2010

Farfalle with Roasted Cherry Tomatoes


From the kitchen of One Perfect Bite...This pasta lacks any vestige of sophistication and is ridiculously easy to make. I'm featuring it here because it's one of my favorite go-to meals for the fall season. I can't resist the the flavor and fragrance of roasted tomatoes and each year I'm lured by the myriad colors in those tiny baskets that stack the shelves of stores and farm stands. Practicing my usual restraint, I generally end up buying a basket of each color and am left to ponder ways in which to use them. Would that all life's dilemmas be so easy to handle. While I've probably never made this dish twice in the same way, I wanted to formalize a recipe for you to follow. My hope is that you'll use it as a road map first time through, then take the first detour you see and make this recipe your own. There is nothing not to like here, so unless you hate tomatoes or garlic give it a try. Here's my disposable recipe.

Farfalle with Roasted Cherry Tomatoes...from the kitchen of One Perfect Bite

Ingredients:
4 cups cherry tomatoes, cut in half
12 garlic cloves, cut in half (don't be shy)
1/4 cup extra virgin olive oil
1 teaspoon dried basil
1/2 teaspoon salt
1/4 teaspoon hot pepper flakes
1/4 teaspoon ground pepper
12 ounces farfalle
1/4 cup chopped fresh basil
1/2 cup freshly shaved Parmesan cheese

Directions:
1) Preheat oven to 400 degrees F. Set pasta water to boil.
2) Combine and toss tomatoes, garlic, oil, basil, salt, hot pepper flakes and ground pepper in a baking pan large enough to hold vegetables in a single layer.
3) Roast until tomatoes are shriveled and garlic is tender, about 30 to 40 minutes.
4) About 15 minutes before tomatoes are finished, cook pasta in boiling salted water per package instructions. Drain, reserving 1 cup water, and return pasta to pot.
5) Add contents of roasting pan to pasta. Toss to distribute vegetables and coat farfalle. Fold in basil. If pasta appears dry, add some reserved pasta water to moisten. Sprinkle with cheese. Serve warm. Yield: 4 to 6 servings.

Your might also enjoy these recipes:
Bow Tie Pasta with Peas and Bacon - Deep South Dish
Bow Ties with Sausage and Leek Sauce - One Perfect Bite
Farfalle with Mushroom and Prosciutto Ragu - Worth the Whisk
Farfalle with Savoy Cabbage, Pancetta and Mozzarella - Cookography
Chopped Spinach and Farfalle Salad - Living the Gourmet
Farfalle with Broccoli and Feta - The Picky Cook

Saturday, October 30, 2010

Clam Fritters


From the kitchen of One Perfect Bite...I found this recipe several weeks ago while searching for dishes that would allow me to use the large cans of chopped clams found in warehouse stores. It was originally developed by Craig Claiborne, a prolific food writer and editor at The New York Times. He called the recipe Bonacker-Style Clam Fritters and considered it to be a perfect example of authentic American cooking. Bonacker is the name given to natives of the East Hampton, Long Island. Fortunately, this dish had been featured at Saveur.com and I was able to retrieve the original recipe from their files. I wanted to make the dish as it was written, the only substitution being the use of canned for fresh clams. The most difficult part of this exercise was determining how much meat would actually be harvested from 4 dozen cherrystone clams. Available search engines failed me, so I splashed water on my face, put on some lipstick and went for a chat with my guys at the fish market. Based on the assumption that all the cherrystones were the same middling size, the guys were certain - certain mind you - that I'd need 2-1/2 cups of chopped canned meat to equal the amount that I'd get from freshly shucked clams. It, of course, took another 20 minutes to explain why I was going through the exercise in the first place and by the time I left the market I wasn't quite sure why myself. At any rate, I made it home and we had great fritters for dinner. These are less doughy than most I've had and I really enjoyed them. I think you might too. Here's the recipe.

Clam Fritters (Bonacker-Style Clam Fritters)...from the kitchen of One Perfect Bite, courtesy of Craig Claiborne and Saveur

Ingredients:
1 cup all-purpose flour
1 teaspoon baking soda
2 teaspoons baking powder
2 eggs
1 tablespoon lemon juice
1⁄3 cup clam juice
1⁄4 cup milk
1 tablespoon melted butter
Pinch cayenne
2 tablespoons finely chopped fresh parsley
2-1/2 cups coarsely chopped, drained clams
Salt and freshly ground black pepper
Vegetable oil

Directions:
1) Sift together flour, baking soda, and baking powder in a mixing bowl. Whisk in eggs, lemon juice, clam juice, milk, butter, and cayenne, whisking until batter is smooth. Add parsley and clams, then season with salt and pepper. Mix well.
2) Add vegetable oil to a heavy skillet, to a depth of 1⁄8-inch, and heat over medium heat. When oil is hot but not smoking, spoon about 2 tablespoons of clam batter for each fritter into hot oil. (Work in batches and avoid crowding pan.) Fry until golden on one side, then turn fritters and continue frying about 2 minutes more. Make sure fritters are cooked through. Drain on paper towels. Season to taste with salt and pepper. Yield: 16 fritters.

You might also enjoy these recipes:
Linguine and Clams with Garlic White Wine Sauce - The Red Spoon
Cuban Clam Fritters with Cilantro Mayo - Lazaro Cooks
Spaghetti Frutti di Mare - Cooking-Gallery
Clams and Mussels in Tomato Broth - Mangiandobene
Clams with Green Peppers Tomatoes and Wine - My Mediterranean Diet
Karin's Curried Clam Pie - Pithy and Cleaver
Italian White or Red Seafood Chowder - What's Cookin' Italian Style Cuisine

Wednesday, October 27, 2010

Fusilli with Spinach and Ricotta


From the kitchen of One Perfect Bite...This is a wonderfully mild pasta that's light and easy on the palate. It's flavors are much like those found in spinach and cheese ravioli, but this deconstructed version is much less work. It's perfect for those evenings when you have a yen for pasta but your stomach can't quite handle a heavy spicy sauce. It really is quite easy to prepare, but it's not a pantry meal. The recipe requires fresh greens and, if possible, fresh ricotta. That means advanced planning is needed to make this dish properly. Lidia Bastianich developed the recipe on which mine is based. I've made some changes because I thought the original dish had too little sauce for the amount of pasta that was cooked. I also use more salt in the pasta water to assure it has some flavor. I generally add 1 teaspoon of salt for every quart of water in my pasta pot. I use a 6 quart pot, so I always add 2 tablespoon of salt to the pasta water. I add the salt after the water comes to a boil and I let the water return to a boil before I add the pasta. Shirley Corriher has written an article about the art and science of cooking pasta that you might find interesting. It can be found here. This is a lovely pasta to have in your rotation. You won't make it as often as some others, but it will not disappoint you. Here's the recipe.

Fusilli with Spinach and Ricotta...from the kitchen of One Perfect Bite adapted from a recipe by Lidia Bastianich

Ingredients:

Kosher salt
1 pound baby spinach, washed and patted dry
2 tablespoons extra-virgin olive oil
4 small scallions, chopped
Freshly ground black pepper
1 cup ricotta cheese
1 cup half-and-half or light cream
Pinch nutmeg
1 tablespoon unsalted butter
12 ounces dried fusilli
1/2 cup freshly grated Parmigiano-Reggiano

Directions:
1) Bring 6 quarts of water to a boil. Add 2 tablespoons salt to boiling water.
2) Stacking leaves, cut spinach crosswise into 1/4-inch strips. You should have 8 packed cups of shredded spinach.
3) Heat olive oil in a large pan or skillet set over medium-high heat. Add scallions and cook, stirring, until softened, about 5 minutes. Stir spinach and a pinch of salt and pepper into pan. Cover and steam spinach, stirring occasionally to cook evenly, until it's wilted but still bright green, about 5 minutes.
4) Meanwhile, in a small bowl, mix ricotta, half-and-half, and nutmeg, if using, until smooth. Stir ricotta mixture and butter into spinach and season with salt and pepper. Reduce heat to medium-low and simmer for 5 minutes.
5) Meanwhile, stir fusilli into boiling water and cover pot. When water returns to a boil, remove cover. Cook pasta, stirring occasionally, until al dente, about 12 minutes.
6) Reserve 1/2 cup of pasta cooking liquid. Drain pasta well and return it to its pot over low heat. Add spinach mixture and enough reserved cooking liquid to make a sauce that will lightly coat pasta. Toss thoroughly. Remove pot from heat and stir in grated cheese. Transfer pasta to a warm serving platter or individual bowls and serve. Yield: 6 servings.

You might also enjoy these recipes:

Pasta with Spinach and Asiago Cream Sauce - Good Things Catered
Heart Healthy Pasta with Spinach Sauce - What's for Dinner Across State Lines
Garden Pasta with Ricotta - Radishes and Rhubarb
Penne with Ricotta and Basil Sauce - My Fabulous Recipes
Malfalda Pasta with Ricotta Cheese - Anna's Table
Roasted Zucchini Pasta with Ricotta Cheese - Foodie/Nutritionist

Monday, October 25, 2010

Double Celery Soup


From the kitchen of One Perfect Bite...This is a light soup, but it is also substantial enough to be filling. A bit of a contradiction I know, but it really is a perfect soup to fill stomachs while bridging the seasons. When it's too cold for gazpacho, but too warm for a heavy bean soup, you'll be glad to have this recipe in your rotation. I must admit this soup surprised. I made it only because a neighbor had left celeriac on our porch and I had to figure out a way to use it. I have a handful of food writers that I go to when I'm exposed to new ingredients. Patricia Wells is one of them, and, sure enough, she had just what I was looking for. You can have this soup on the table in a little over an hour. You'll be delighted with it's flavor and its texture and you'll be especially pleased by how quickly it comes together. Celeriac, or celery root, is not always available in my community, so I snatch it up when I can get my hands on it. The root doesn't freeze well, but the soup does, so I usually make a double batch to assure I have some on hand. While there are herbs that add to the length of the ingredient list, the soup is made with just four real ingredients. It has made it to my top ten (soup) list and that doesn't happen often. I hope you'll try it. I know it sounds bizzare, but it is really, really good. Here's the recipe.

Double Celery Soup...from the kitchen of One Perfect Bite, courtesy of Patricia Wells

Ingredients:
1 medium celery root (about 1 pound) peeled and diced
10 celery ribs, cubed
3 leeks (about 9 ounces) trimmed, well rinsed and cut into thin rounds
Bouquet garni: 1 large sprig of thyme, 3 bay leaves, several sprigs of parsley, tied with a string
2 quarts (2 liters) chicken stock
Salt and freshly ground pepper
A handful of chopped fresh herbs for garnish: including chervil, chives, flat-leaf parsley

Directions:
In a large saucepan, combine celery root, celery, leeks, and bouquet garni. Add stock, and season gently with salt and pepper. Bring to a simmer over medium-high heat.Simmer until the vegetables are soft, about 25 minutes. Adjust the seasonings. Pour into warmed shallow bowls. Sprinkle with the chopped herbs and serve immediately. Yield: 6 to 8 servings.

You might also enjoy these recipes:
Roasted Butternut Squash Bisque - Petit Foodie
Pumpkin, Barley and Sage Soup - Noble Pig
Roasted Pumpkin Soup - Gourmet Girl
Creamy Tomato Basil Soup - Louanne's Kitchen
Tomato Leek Soup - Living the Gourmet
Creamy Tuscan Bean Soup - Italian Food Forever

Wednesday, October 20, 2010

Inside Outside Ravioli - Pasta Nudi


From the kitchen of One Perfect Bite...The Italians call it pasta nudi, or naked ravioli. It's much easier to make than classic forms of the dish and some like it just as well. The ingredients are identical to those used to make a meat-filled ravioli, but the pillows are deconstructed and the filling appears outside, rather than inside, the pasta. If you are pressed for time, and most of us are these days, this dish will deliver the characteristic flavors of ravioli without the work associated with its construction. What is lost, however, is the lovely texture of the stuffed pasta. This recipe was developed by Mark Bittman for The New York Times. He uses a sage-infused brown butter to dress the pasta. While some members of my family love this dish, it is too rich for my palate and I eat only small quantities of pasta when it's prepared in this fashion. Since mine is a minority opinion, I've decided to post the recipe and let you judge for yourself. The meatballs, which are poached in water, can be made well ahead of time, so there is minimal last minute fuss required to bring this dish to the table. If you like meatballs and brown butter sauce, I suspect this dish will become a favorite of yours. Here's how it's made.

Inside Outside Ravioli - Pasta Nudi

Ingredients:
1/2 pound ground veal
1/2 pound ground pork
1 large egg
1/4 cup grated Parmesan cheese, more for garnish
1/4 cup chopped fresh parsley leaves
1/4 cup very finely minced onion
Salt and pepper to taste
1 pound fresh or dried pasta, any kind
1/4 cup (4 tablespoons) butter
20 fresh sage leaves

Directions:

1) Place meat, egg, cheese, parsley, onion, and salt and pepper in a medium bowl. Mix well but do not knead. Form into balls 1/2-inch in diameter. Refrigerate until ready to cook. Bring a large pot of water to a boil and salt it.
2) Cook meatballs in water for about 5 minutes; remove with a slotted spoon and keep warm. Cook pasta in same water until tender but not mushy.
3) Meanwhile, in a medium pot cook butter and sage together until butter is light brown, about 5 minutes.
4) Before draining pasta, reserve a bit of its cooking water. Drain pasta, then toss it with butter-sage mixture and enough reserved water to make it saucy. Top with meatballs and serve, passing grated Parmesan at the table. Yield: 4 to 6 servings.

You might also enjoy these recipes:
Butternut Squash Ravioli - Vegacious
Basil and Goat Cheese Ravioli - The Saucy Kitchen
Arugula and Goat Cheese Ravioli - The Red Spoon
Corn and Pesto Ravioli with Parmesan Butter Sauce - Inexpensive Eating
Ravioli Gnudi with Walnut Sauce - Cinnamon Spice and Everything Nice
Red Pepper, Garlic and Herb Ravioli - Barbara Bakes
Asparagus, Pancetta and Ricotta Ravioli - Ladyberd's Kitchen