Tuesday, March 31, 2009

Steak Diane Flambé - Recipes to Rival Challenge


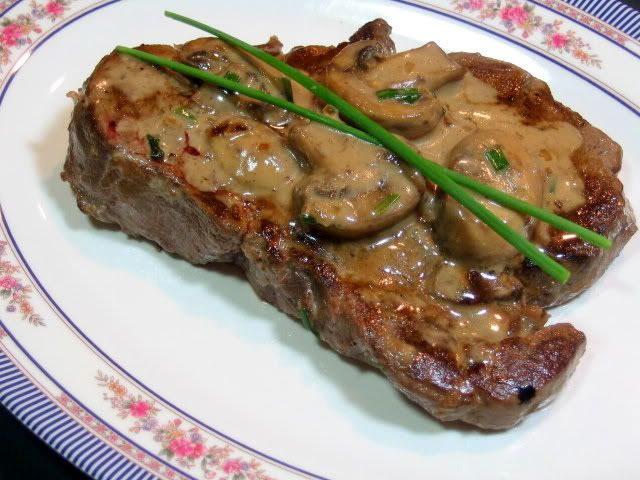
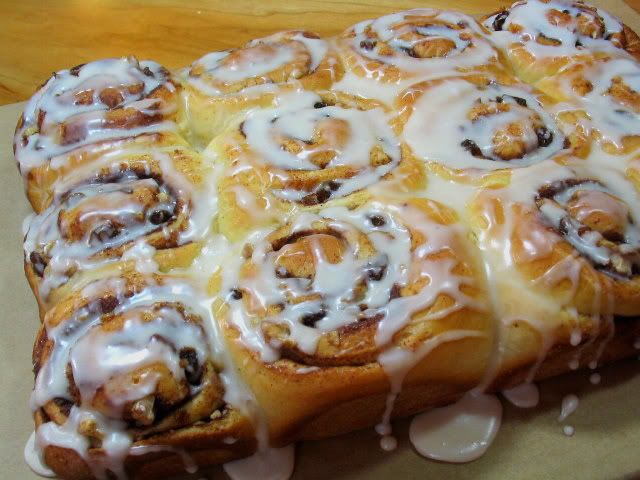
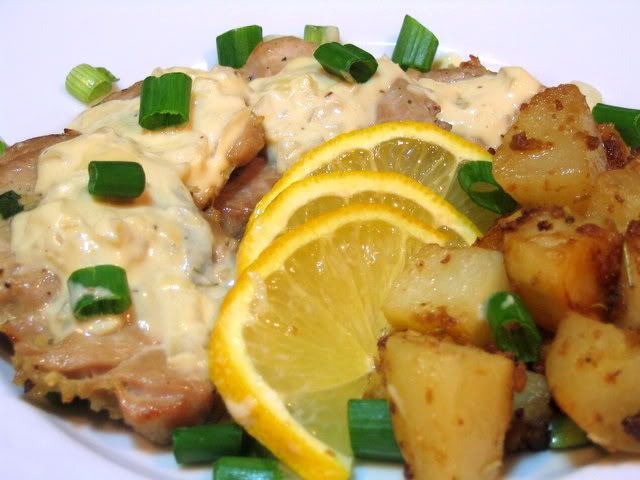
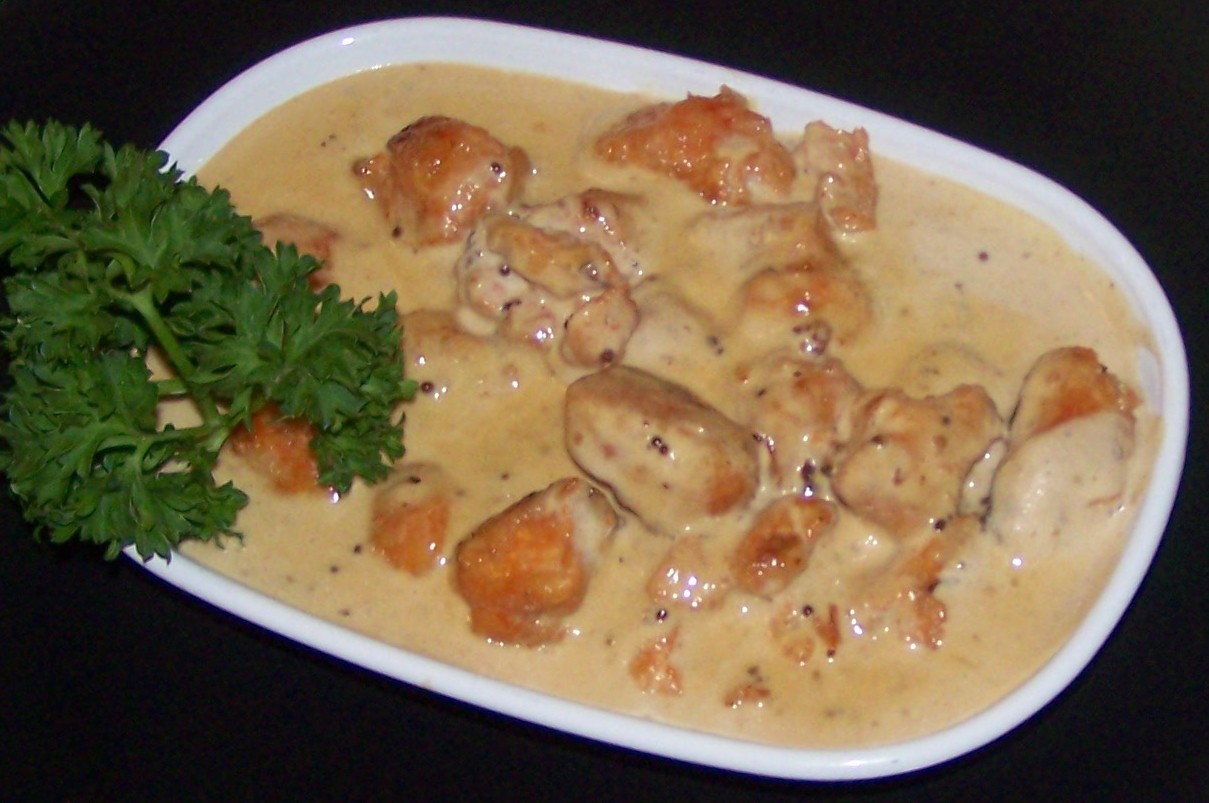
The March Recipes to Rival - Steak Diane Flambé - was a challenge that gave members an opportunity to play with fire. Temperance of High on the Hog and Shawnee of delishes-delishes hosted the challenge and selected this month's recipe which was developed by Frank Bordoni for UKTV's Great Food Live. The recipe calls for beef medallions that weigh about 3 ounces each. I altered my version of the recipe to include four 3/4-inch thick tournedos that weighed 6-ounces each. I cooked the mushrooms and the steak in separate skillets to assure the steaks would be a lovely, crusty brown. The contents of both skillets were combined for the final flambé. Now, I've had mixed feelings about igniting food for years. I suspect it's the result of a bad experience had in the Boom Boom Room at the Matador Restaurant in Spokane - short version, the server nearly set fire to my hair. The life lesson - never eat in a place called the Boom Boom Room. I do flambé but I make sure my hair is pulled back and I use a 12-inch bamboo skewer to torch the brandy. One other caution, make sure your mushrooms are very finely sliced. This dish is ready in about 5 minutes and they won't cook properly if they are too thick. This is a nice recipe and it has all the ingredients needed for a lovely supper for four.


Steak Diane Flambé


Ingredients:
4 (6-oz.) beef tournedo cut 3/4-inch thick
1 teaspoon Dijon mustard
Sea salt and freshly cracked black pepper
2 teaspoons melted butter, divided use
1 teaspoon Worcestershire sauce
2 tablespoons minced shallots
1/4 to 1/2 cup very thinly sliced mushrooms
1 teaspoon olive oil
Juice of 1/2 a lemon
1/2 cup heavy cream
1 tablespoon snipped chives
1/4 cup brandy

Directions:
1) Dry tournedos with paper towels. Season both sides with salt and pepper. Rub one side with mustard.
2) Heat a frying pan large enough to hold the mushrooms in a single layer over medium heat; add 1 teaspoon melted butter and Worcestershire sauce.
3) Add shallots and mushrooms; cook, stirring, for 2 minutes.
4) Heat a second skillet large enough to hold tournedos over high heat. When skillet is hot, add reserved 1 teaspoon butter and olive oil. Swirl pan to coat bottom of pan. Add tournedos, mustard side up; cook for 2 minutes. Turn and saute 2 minutes longer. Add mushrooms to pan.
5) Add lemon juice and season with salt and pepper.
6) Pour in cream and chives. Pour in brandy and ignite with a burning bamboo skewer. Remove from heat when flame is extinguished.
6. Transfer tournedos to a warm serving plate. Spoon sauce evenly over all. Garnish with additional chives if desired. Yield: 4 servings.

Monday, March 30, 2009

Beggar's Chowder - A Crock-Pot Recipe


Who said beggars can't be choosers? This plain Jane recipe won the last Rival Crocktober competition - my first big win. As a matter of fact, it's my only big win. Despite that, I've kept my sense of humor and a sure belief that lightening can strike twice if you're willing to fly kites and stand under tall trees in thunderstorms. I do dumb stuff like that. I've made this recipe, in one form or another, for decades. It first simmered on a two burner stove in the basement apartment that was our first home. In those days the chowder was made with turkey necks and truly was a beggar's chowder. It stayed in my recipe rotation as we moved uptown and ended up in the kitchen of the Institute for Culinary Education where it was judged best of show. If you're always on the lookout for crock-pot recipes, give this one a try. It will not disappoint.

Beggar's Chowder


Ingredients:
1/4 cup unsalted butter, room temperature
1/4 cup all-purpose flour
1 tablespoon garlic salt
1 tablespoon thyme
1 tablespoon sweet Hungarian paprika
1/2 teaspoon coarsely ground black pepper
4 skinless, bone-in turkey thighs, trimmed of visible fat
Cooking spray
2 (14.75-ounce) cans creamed style sweet corn
1 (10.5-ounce) can condensed chicken broth, undiluted
1 cup diced red bell pepper
1 cup diced green bell pepper
1 1/2 cups diced yellow onion
1 pound cleaned, stemmed white mushrooms, halved or quartered if large
1 (14.5-ounce) can petite diced tomatoes, drained
1 1/2 cups heavy whipping cream
1/2 cup cilantro or parsley
Salt and pepper

Directions:
1) Combine butter, flour, garlic salt, pepper, thyme and paprika in a small (1 quart) mixing bowl. Using the back of a wooden spoon, work the mixture to form a smooth paste. Rub the paste into all sides of the turkey thighs.
2) Spray the stoneware insert of a 5 1/2 - 6 quart slow cooker with a nonstick cooking spray. Place peppers and onions in stoneware. Toss with 1 tablespoon oil and microwave, covered, on HIGH power for 5 minutes, or until vegetables are tender. Put the turkey thighs in the bottom of the stoneware; cover with the the creamed corn and the undiluted chicken broth. Cover and cook on HIGH for 3 hours or until the turkey is fork tender.
3) Remove the turkey thighs from the pot and set aside until cool enough to handle. While the turkey cools add the mushrooms and diced tomatoes to the liquid in the stoneware; cover the pot and continue to cook for 1/2 hour more.
4) While the mushrooms are cooking, remove the turkey meat from the bones in bite size pieces.
5) When the mushrooms are tender, return the turkey to the chowder; add the heavy cream and the cilantro or parsley and cook, covered, until heated through, about 15 minutes more. Taste for seasoning, adding salt and pepper to taste. Yield: 8 servings.

Vegan Cream of Broccoli Soup


I must be honest here. Broccoli didn't pass my lips until I was well past my 30th birthday. I was raised in an era when green vegetables were cooked until they turned gray and I became adept at hiding peas and other sundry in my dinner napkin. My conversion, when it came, was due to the power of Chinese takeout and the lovely crisp vegetables tucked inside those carry-out containers. Again, in the interest of complete transparency, you also need to know that I love a bargain. That will help you understand how 5 pounds of spinach, 3 pounds of broccoli florets and 2 pounds of snap peas simultaneously ended up in the vegetable crisper of a refrigerator that feeds two people. I reason that if we don't eat it all it's still less expensive than buying in smaller quantities. Here's the problem - I can't bare to waste food, so I end up scrambling to create usable recipes that will save my bargains from the compost pile. I really like today's recipe. It uses five ingredients to produce a vegan soup that is delicious - a real palate pleaser. It starts with broccoli that's cooked in vegetable stock along with a puree of caramelized onions, garlic and lite tofu. The end result is a creamy broccoli soup that contains no cream. I hope you'll try this one. I don't think you'll be disappointed. It improves as it sits, it's great for company and it can be served hot or cold. What's not to like?

Vegan Cream of Broccoli Soup


Ingredients:

1 tablespoon vegetable oil
2 cups (14 to 16-oz.) thinly sliced onions
2 tablespoons (about 6 cloves) coarsely chopped garlic
1 (12-oz.) box lite silken tofu
1-1/2 to 2 pounds broccoli florets
2 (14.5-oz.) cans vegetable broth
1/2 cup water
Salt and pepper to taste
Fresh lemon juice to taste (optional)

Directions:

1) Heat oil in a large skillet set over medium-high heat. Add onions; cook covered, stirring occasionally until onions are caramelized. Remove onions to bender jar. Add garlic to skillet; cook until garlic is fragrant. Add to blender jar. Puree. Add tofu. Pulse to combine. Return to skillet.
2) Add broccoli, vegetable stock and water to skillet containing onion-tofu mixture. Bring to a simmer; cover and cook for 10 minutes. Transfer broccoli, in batches to a blender jar. Puree. Season to taste to with salt, pepper and lemon juice if using. I've found this recipe needs a good deal of salt. Yield: 6 servings.

Sunday, March 29, 2009

Empanadas


The area in which Bob and I live is often called the Emerald Valley. It's gorgeous, but our achingly beautiful spring is tempered by rain and fog that can cause melancholy and produce a cabin fever that makes the pacing of caged tigers seem tame. No doubt about it, you have to learn how to deal with the weather. One tactic is to head toward Mexico for the rainy season. Another, and the one we've chosen, is to forget about it. Umbrellas, except for the most formal occasions, become excess baggage and yellow slickers or Gortex become one's armor in the war against the elements. Once the temperature hits the mid 50's we are out of here. Last week we picnicked, stream side, in the canyon of a creek that meanders, sometimes forcefully, through protected forest land. It is breathtaking. It's still too wet for campfires, so I pulled empanadas from the freezer and baked them for an alfresco feast that included mugs of tomato soup, ginger tea and damp rear ends. The empanadas are not hard to do, but they do require planning. Every country in South America has its own version of these half moon pies. Some are deep fried, some are baked. I can't get my head around deep frying what is essentially pie crust, so I bake mine. These are a bit unusual in that turkey and hominy (hulled corn with the bran and germ removed) are among the ingredients used to make the filling. I use cream sherry to boost the sweetening power of the raisins. They make a great snack and older children love them. You'll need about an hour and a half to get these puppies on the table, so plan accordingly. Don't let the ingredient list turn you off - the empanadas require a lot of readily available herbs and spices and you'll have most, if not all, of them in your pantry. They empanadas can be frozen in their unbaked state. I think you'll enjoy these. Why not give them a try?

Empanadas

Ingredients:
Picadillo
1 tablespoon olive oil
1 large red bell pepper, diced
1 medium onion, minced
12 cloves garlic, minced
2 teaspoons fennel seeds
2 teaspoons gried oregano
2 teaspoons chili powder
2 teaspoons cumin
2 teaspoons sweet smoked paprika (pimenton)
1 teaspoon ground cinnamon
1/2 teaspoon red pepper flakes
1/2 pound ground turkey
2 cups sliced crimini or button mushrooms
1/3 cup creamed sherry
1 can drained hominy
1 cup chopped cilantro
1/2 cup pitted, coarsely chopped pimento stuffed olives
1/4 cup plumped raisins
Pastry Dough:
2-1/4 cups all-purpose flour
1 stick unsalted butter, cubed
1 teaspoon kosher salt
1/2 teaspoon sugar
1/3 cup cold water
1 egg
Assembly
1 egg
1 tablespoon water
1/4 cup chopped pistachios or pepitas
Paprika

Directions:
1) To make picadillo, heat oil in a large nonstick skillet over medium-high heat. Add red pepper, onions,garlic, fennel, oregano, chili powder, cumin, paprika, cinnamon and pepper flakes; cook until vegetables are slightly wilted, about 3 minutes. Add ground turkey; saute until brown. Stir in mushrooms and cream sherry; cook until sherry is absorbed, about 6 minutes. Remove from heat. Stir in hominy, cilantro, olives and raisins. Add salt and pepper to taste. Set aside
2 ) Preheat oven to 400 degrees F. Line two baking sheets with parchment paper. Set aside.
3) To make dough, Place flour, butter,salt and sugar in the bowl of a food processor. Pulse until crumbly. Add water and egg; pulse until dough forms a ball.
Divide dough into 6 equal pieces. Working on a floured surface, roll each piece into a 7-inch circle. Put 1/2 cup filling in center of each disk and fold in half. Seal edges with a fork. Transfer to parchment lined baking sheets.
4) To finish, beat remaining egg with 1 tablespoon water. Brush tops of half moons with egg wash. Sprinkle with pistachios and paprika. Bake until golden brown, about 30 minutes. Yield: 6 empanadas.

Thursday, March 26, 2009

One Bowl Vegan Chocolate Cake


My youngest grandson has an allergy problem that has caused my daughter to change the way her family eats. A few months ago a friend gave her a recipe for a vegan chocolate cake. She loved the cake. I asked her to send the recipe to me and I must admit I was surprised at just how good it is. It's a one bowl wonder and very easy to do. There are many versions of this cake in cyberspace. Unfortunately, none of them credit the original source. I've done some searching and as far as I can tell the recipe is a variation of a cake that first appeared in the Moosewood cookbook. Oops, time for an update. Thanks to one of our readers, I can now tell you that this should be called a Wacky Cake. It was developed for the bare bones kitchens of the depression or WWII - sources are not in agreement as to which. A big thanks to laurelvb for letting us know. Hopefully, we're inching closer to the original creator of the Wacky Cake. I've made the cake twice. Once exactly as it was written and the second time with a few variations of my own. It's a nice cake! Even our little guy likes it and that really delights us because, as you can see, he didn't care at all for his first birthday cake. It's nice to know that he'll be able to celebrate his second birthday with a cake and a big smile. My changes to the recipe are small. I decided to add espresso powder and almond extract to heighten the flavor of the cake. The cake has a nice crumb and is remarkably moist. It keeps well.

Vegan Chocolate Cake

Ingredients:
3 cups all-purpose flour
2 cups granulated sugar
2 teaspoons baking soda
1/2 cup Dutch processed cocoa
1 teaspoon salt
1 tablespoon espresso powder or crystals
2 teaspoons white vinegar
1 cup canola oil
2 teaspoons vanilla extract
1/2 teaspoon almond extract
2 cups cold water
Confectioners' sugar for dusting

Directions:
1) Preheat oven to 350 degrees F. Grease and flour a 9 x 13 x 2-inch pan. Set aside.
2) Combine flour, sugar, baking soda, cocoa, salt and espresso in a large bowl. Add vanilla and almond extract to water in a two cup measure. Combine with oil and vinegar and gradually add liquid to dry ingredients. Beat with an electric mixer for 2 minutes. Pour into prepared pan.
3) Bake in center of oven for 40 minutes, or until a toothpick inserted into center of cake comes out clean. Remove from oven. Sprinkle with confectioners' sugar just before serving. Yield: 12 to 16 pieces.

Wednesday, March 25, 2009

Lemon Cloud - A Creamy Tofu Dessert


This pudding-like dessert is made with reduced-fat tofu. It's light as a feather and truly silken on the tongue. If you share my love for citrus flavored desserts, you might want to consider adding this recipe to your repertoire. The dessert starts with a really tart lemon curd. The curd is cooled to room temperature and then blended with a reduced-fat tofu to produce a creamy custard that's as easy on the eyes as it is smooth on the tongue. This is really easy to do and it has the makings of a great company dessert - especially when garnished with candied lemon peel.

Lemon Cloud

Ingredients:
Lemon Cloud:
1-1/2 cups granulated sugar
1/2 cup cornstarch
1/4 teaspoon salt
2-1/2 cups water
4 egg yolks
1 tablespoon butter
1 tablespoon fresh lemon zest
1/2 cup lemon juice
2 (12.3-oz.) packages reduced-fat silken tofu (i.e. Mori Nu)
Candied Lemon Zest:
2 lemons
3/4 cup water
1/2 cup granulated sugar

Directions:
1) To make lemon cloud, combine sugar, cornstarch and salt in a medium (2-quart) saucepan. Gradually add water and stir to combine. Cook over medium heat, stirring constantly, until mixture bubbles and thickens. Cook for 1 minute longer; remove from heat and set aside. Beat yolks in a small (1-cup) bowl; beat in 1/2 cup of cornstarch mixture. Stir back into saucepan. Cook over low heat, stirring constantly, for 2 minutes. Remove from heat; stir in butter and lemon zest and juice.. Allow to cool to room temperature, about 20 minutes. Place curd and tofu in jar of a blender or food processor; process until smooth. Spoon an equal potion of mixture into six (8-oz.) or eight (6-oz.) glass mugs or parfait glasses. Cover and refrigerate for at least 1 hour.
2) To make candied lemon zest, scrub lemons and remove zest in thin strips with a citrus zester. Place zest in a small (1-quart) saucepan, cover with water and bring to a simmer over medium-high heat. Reduce heat to low and simmer for 5 minutes. Drain. Combine sugar and water in the same saucepan; bring to a simmer over medium-high heat, stirring occasionally, to dissolve sugar. Add lemon zest, reduce heat to low and simmer until zest is just tender, about 8 minutes. Drain and set aside.
3) To serve, top each lemon cloud with a small amount of candied zest. Yield: 6 to 8 servings.

Tuesday, March 24, 2009

Asian Chicken or Shrimp Salad


I've finally had a chance to look through the stack of magazines that accumulated while we were away and was surprised to find one of my recipes in the March/April edition of Simple and Delicious - a Taste of Home publication. It was a contest entry that took no prizes, but it's a nice recipe that's very easy to do and I do appreciate the "atta girl." I have a series of recipes that can be done in about 20 minutes. This is one of them. Shrimp can be used in place of chicken if you want a meatless entree. I round out the salad with tomato or egg flower soup for a more filling meal. You'll quickly see that this is a recipe that requires assembly, not cooking. One caution - dress the salad just before serving and don't drown the ingredients. The recipe makes more dressing than you'll need. Refrigerate unused dressing and use it as a dipping sauce. I'm quoted as saying “I serve this salad in lettuce leaves or in pita pockets to friends who enjoy something a bit out of the ordinary. This is fast, easy, a bit exotic and, best of all, delicious. If you like peanut butter, this is the chicken salad for you!" Sometimes I'm so full of it I can't stand myself. It must have been a peanut butter contest.

Asian Chicken Salad

Ingredients:
3/4 cup reduced-fat sesame ginger salad dressing
1/2 cup creamy peanut butter
1 tablespoon sesame oil
2 to 3 teaspoons cider vinegar
1 teaspoon salt
1/2 teaspoon crushed red pepper flakes
1/4 teaspoon pepper
3 packages (6 ounces each) ready-to-use grilled chicken breast strips
or
1 pound shelled, cooked shrimp
4 cups chopped cucumbers
1 cup chopped sweet red pepper
3/4 cup chopped green onions
1/4 cup grated carrot
8 Bibb or Boston lettuce leaves or 8 small pita pockets
Chopped fresh cilantro, optional

Directions:
1) Combine salad dressing, peanut butter, sesame oil, vinegar, salt, red pepper flakes and pepper in a jar with a tight-fitting lid; shake well to combine.
2) Combine chicken or shrimp, cucumbers, sweet pepper, green onions and carrots in a large bowl. Chill until serving.
3) Just before serving, shake dressing and pout over the chicken or shrimp mixture. Serve on lettuce leaves or in warm pita pockets. Garnish with cilantro if using. Yield: 8 servings.

Monday, March 23, 2009

Three Savory Quick Breads the French Way


Years ago a girl's rite of passage included the making toll house cookies and a quick bread or two. Since then I've made a ton of cookies, but quick breads, for whatever reason, fell victim to benign neglect. There was an occasional pumpkin or cranberry bread but most other recipes were tucked away for a someday that never came. Then came a challenge - a quick bread challenge. Now, if I tell you I know why folks climb mountains - they're there and the climbers aren't - you'll understand how I feel about a healthy challenge. I pulled six recipes from my files, put on an apron and went at it in a big way. Today's breads are French, sassy and come to the table with lots of attitude. They're gutsy and delicious, but - and it's a big but - I don't know when you'd actually serve them. I've been told they should be cubed and served on toothpicks as an appetizer or h'orderves. Maybe. The problem is, while quick, they're competing with other finger foods that are easier to prepare. That's my prejudice. I won't make them again, but I recommend that you give them a try. They are really very good and if you're looking for something with a wow factor these breads just might do the trick.

Walnut Bread

Ingredients:
2-1/4 cups all-purpose flour
2 teaspoons baking powder
1/2 teaspoon fine sea salt
2/3 cup whole milk
1 large egg
3/4 cup sugar
1-1/2 cups walnuts, coarsely chopped

Directions:
1) Preheat oven to 325 degrees F. Grease and flour an 8-1/2 x 4-1/2 x 2-1/2-inch loaf pan. Set aside.
2) Sift flour, baking powder and salt together. Set aside.
3) Place milk and egg in a large bowl. Add sugar. Whisk to combine. Stir in flour mixture and beat with a wooden spoon until ingredients are combined. Mix in walnuts. Turn into prepared pan.
4) Bake in center of oven until puffed and golden, about 45 minutes. Increase oven temperature to 375 degrees; continue baking until cooked through, about 15 minutes longer.
5) Remove from oven. Let sit for 10 minutes. Turn onto a wire rack to cool completely. Wrap in plastic wrap and allow to age 24 hours before serving. Yield: 1 loaf.

Recipe adapted from the French Farm House Cookbook by Susan Herrmann Loomis

Olive Bread

Ingredients:
1-1/2 cups unbleached flour
1/2 teaspoon fine sea salt
2 teaspoons baking powder
1 large roasted red pepper, coarsely chopped (from a jar is fine)
1 cup pitted Greek-style black olives, coarsely chopped
4 cups (loosely packed) then minced basil leaves
6 large eggs
1/4 cup olive oil
1 clove garlic, minced
1/2 teaspoon freshly cracked black pepper
1/2 cup grated Parmesan cheese

Directions:
1) Preheat oven to 400 degrees F. Liberally grease and flour a 8-1/2 x 4-1/2 x 2-1/2-inch loaf pan.
2) Sift flour, salt and baking powder together onto a piece of waxed paper. Set aside.
3) Place eggs in a large bowl; whisk. Add oil, basil and garlic; whisk until combined. Stir in flour; whisk until just combined. Add pepper and cheese. Fold in olives and roasted peppers. Scrape batter into prepared pan. Bake in center of oven until golden, about 45 minutes. Remove and cool in pan for 10 minutes. Turn onto a wire rack to cool completely. Yield: 1 loaf.

Recipe courtesy of Susan Herrmann Loomis

Herb Bread

Ingredients:
1 cup unbleached all-purpose flour
2 teaspoons baking powder
1/2 teaspoon fine sea salt
3 large eggs, lightly beaten
1 cup nonfat plain yogurt
2 tablespoons Dijon mustard
1/2 cup grated Parmesan cheese
1/4 cup minced fresh mint leaves
1/4 cup minced fresh thyme leaves

Directions:
1) Preheat oven to 425 degrees F. Grease and flour a 1 quart bread pan. Set aside.
2) Place flour, baking powder salt, eggs, yogurt and mustard in bowl of a food processor. Blend thoroughly. Add cheese and herbs and process to blend.
3) Pour batter into prepared pan. Bake in center of oven until firm and golden brown. Remove from oven. Let cool for 10 minutes. Turn onto a rack to cool to room temperature. Yield: 1 loaf.

Recipe courtesy of Patricia Wells


I'm sending these recipes to Mansi who is hosting this month's event at Fun and Food. BBD is a popular food-blog event that was started by Zorra of Kochtopf.

Sunday, March 22, 2009

Tom Kah Gai, Cooking School and Elephants

Photobucket


Lisu Elephant Camp in Chaing Mai, Thailand


The Morning Market and Farm Cooking School Chaing Mai, Thailand


Thailand is beautiful. It's sights and sounds and fragrances are unforgetable and while you occasionally stumble on tourist sctick, you'll probably love every minute of it. The hill tribes - insular ethnic minorities - put on quite a show for visitors; they have tourist villages as well as those they actually live in. They have wonderful costumes, but when you're not looking they dress much as other Thai. Not everything is for show, however. These tribes have been slow to adapt to the modern world and their health and education has suffered. Elephant camps help them care for the members of their tribal families and they really do take good care of their animals. One of the tribes, the Lisu, operated the elephant camp that so delighted the group I traveled with. When you see the pictures I think you'll see why this is one of my favorite memories of Thailand.

Another favorite memory is that of Thai cooking schools. Cooking schools in Southeast Asia tend to follow a pattern. The day begins just after first light with a stop at the local market to purchase ingredients needed for the day's lesson. Then it's on to classes which start early in order to avoid the intense midday heat. In Chiang Mai the school was in the country and part of a beautiful organic farm. Our instructor was a young Thai chef who brooked no departure from her agenda. She was about 4' 8" tall and if she weighed 85 pounds I'd be surprised. I don't quite know how she did it, but I'm here to tell you she struck fear in the hearts of some members of our group. Most of the men were there because their wives told them they had to be. The guys were known to horse around if cooking or weaving was involved. The highlight of my day was watching her watch them with an unblinking stare that prevented infractions before they could occur. She was there to teach, we were there to learn and learning did not include small talk, laughter or lack of respect for the food. I'll bear witness to the fact that her class was run with military efficiency - all dishes were prepared as directed and lunch was ready at noon. The other class didn't do so well. I heard lots of laughter over there and they were an hour late for lunch. That gave us lots of time to explore the old plantation and talk with the folks who helped with the gardens and kitchen prep work. I had a great time, but when I evaluated the day I became aware of a problem I would encounter throughout our trip - overcooked, dry meat. Today's recipe is based on the Tom Kah Gai recipe from the Farm School. I've reworked it in order to avoid dry chicken. This is a really simple recipe. Most of the ingredients can be found in supermarkets. The two items that might pose a problem are galangal and kiffir lime leaves. If a recipe calls for 3 kiffir lime leaves, substitute the peeled zest of 1 lime. If you are unable to find galangal - also called blue ginger - substitute an equal quantity of fresh ginger. The fresh ginger lacks the musky overtones of galangal, but it's a great substitute.


Tom Kah Gai

Ingredients:
2 (14.5-oz.) cans coconut milk
2 (14.5-oz.) cans reduced-sodium chicken broth
6 kaffir lime leaves
3 fresh stalks lemon grass (white part only), bruised
2 teaspoons green curry paste
12 thin slices galangal
3 tablespoons Thai fish sauce
2 cups sliced white mushrooms
1 pound chicken breast or thighs, cut in 3/4-inch cubes
1/4 cup fresh lime juice
Garnish: fresh cilantro, green onion tops

Directions:
1) Combine coconut milk, chicken broth, kaffir lime leaves, lemon grass, green curry paste and galangal in a large (3-quart) saucepan. Bring to a boil. Reduce heat. Add fish sauce. Simmer for 45 minutes.
2) Remove kaffir lime leaves, galangal and lemon grass. Add chicken and mushrooms. Simmer until chicken is cooked, about 7 minutes. Stir in lime juice. Ladle into bowls. Garnish with cilantro and green onion tops. Yield: 6 servings.

Thank You for a Wonderful Week.

Selba whose wonderful blog Selbys Food Corner should not be missed has passed the friendship award on to me. The award comes with this message attached:"These blogs are exceedingly charming. These kind bloggers aim to find and be friends. They are not interested in self-aggrandizement. Our hope is that when the ribbons of these prizes are cut, even more friendships are propagated." I am passing this award on to the following gals who all have wonderful blogs....

Becky at Random Musings of a Deco Lady
Martha at Lines from Linderhof
Susan at Schnitzel and Trout
Julie at Peanut Butter and Julie
Patsy at Family, Friends and Food
Lisa at Jersey Girl Cooks
Barbara at Traveling Aprons
Robin at The Saucy Bird

Thursday, March 19, 2009

Key Lime Sherbet - A Minimalists Dessert

Photobucket

If you share my love for citrus desserts I suspect you're ready for this tart, key lime sherbet. It's Zen-like in its simplicity and can be made without an ice cream or sherbet maker. The sherbet is easy to make, but do plan time for multiple freezings and sear the word cold into your brain. Bowls and beaters must be icy cold as you work and you'll find it's best to work as quickly as you can. The number of key limes you'll use will vary; I needed 20 key limes to make 2/3 cup of juice. If key limes aren't available, large Persian limes - about 3 of them - may be substituted. This is a wonderful way for the health conscious to end a meal. I like to frost the glasses in which I serve the sherbet. It's not necessary but it looks really nice and it makes for a great grand finale.


Key Lime Sherbet


Ingredients:

3 cups water
1-1/4 cups sugar, divided use
3/4 cup light corn syrup
2/3 cup key lime juice, strained
2 to 3 drops green food coloring (optional)
2 egg whites
Salt

Directions:
1) Place water, 1 cup sugar and corn syrup in a 2-quart saucepan. Bring to a boil, over high heat, stirring until sugar dissolves. Reduce heat; continue to boil for 5 minutes. Set aside; cool to room temperature.
2) Stir in lime juice and food coloring, if using. Pour into a shallow metal pan. Place pan in the freezer and freeze until solid throughout. Place bowl and beaters of an electric mixer in the freezer as well.
3) Remove pan from freezer. Quickly break up lime mixture with a wooden spoon; turn into frozen mixer bowl. Beat with frozen beaters at low speed, just until mixture is lump free. Remove bowl containing lime mixture from stand and transfer immediately to the freezer. Return beaters to freezer as well. Refreeze.
4) When the mixture is refrozen, place egg whites in a small mixing bowl. Add a pinch of salt; beat until slightly thickened. Add reserved 1/4 cup sugar and beat until egg whites hold their shape. Set aside.
5) Remove lime mixture from freezer, Break up with a wooden spoon. Beat with chilled beaters until just smooth. With mixer set to low speed, beat in egg whites only until just incorporated. Immediately return bowl to freezer. Refreeze, folding gently from bottom to top, two or three times during freezing process. Serve firm. Yield: 6 cups.

Wednesday, March 18, 2009

Cinnamon Rolls and the Junction City Daffodil Festival

Photobucket

Photobucket

Junction City is a small Oregon community that's quiet these days. One of the town's major employers recently closed their doors and left many of the town's 5000 people without work. Despite that, this resilient community is going ahead with its annual Daffodil Festival. The event includes nine miles of roadside daffodils, the small town version of a carnival and an assortment of refreshments that includes buns in guises ranging from cinnamon to beefcake (more about this in a bit). Inspired by Lady Bird Johnson's call to beautify America, Faye Moffett planted a handful of extra daffodil bulbs along the road near her house in the 60's. She planted a few more each year and urged her neighbors to do the same. Motorists soon learned of the lovely daffodil-lined street and began to drive along it when the flowers bloomed in March. The Daffodil Festival began in 1972, when Mrs. Moffett and her friends invited the drivers to join them at the Long Tom Grange for some homemade cinnamon rolls and coffee. Bulbs planted by a single gardener evolved into an event that's a marvelous way to showcase the spirit of a town devoted to community and family. The Long Tom Grange - a fraternal organization - took over the festival several years ago when its popularity overwhelmed its founders. Initially, Mrs. Moffett and her friends baked the cinnamon rolls and buns themselves. Now, the Junction City High School "cinnamon specialists" bake the rolls and sticky buns and deliver them to the festival. There are no strangers here. Once in the Grange hall you're treated like a member of the family and you might find yourself sitting at a table with an an organic farmer, a doctor or a mechanic. Status doesn't count for much here. Folks share a pot of coffee and chat like old friends as they eat their buns. If you're lucky you may run into one of the now famous Calendar Guys from the Long Tom Grange. Several years ago this group raised a quarter of a million dollars from sales of their nude calendar. The calendar caused a dustup later in the year when organizers of the Scandinavian Festival refused to sponsor the calendar guys and some schools talked about refusing funds from calendar sales. It made for some lively town meetings, but turned out to be a non-event. Despite vocal moral outrage the money went to its designated targets; it did, however, put a damper on the calendar fun. Sometimes you just can't win. Now back to cinnamon rolls. I collect recipes for cinnamon rolls. Today's recipe comes from Cook's Illustrated and, in keeping with their policy, I'm printing an unaltered version of their recipe. This was the first time I used this recipe and, while it's nice, it's not one of my favorites. I remain partial to brioche type doughs. If you're looking for a fairly simple recipe for cinnamon rolls, you might want to give this one a try. They'd be great for Easter Sunday breakfast.

Cinnamon Rolls:
Ingredients:
Bread dough
1/2 cup milk
4 tablespoons unsalted butter (1/2 stick), cut into 1/2 inch pieces
1 package dry active yeast (2 1/4 teaspoons)
1/2 cup warm water (110 degrees)
1/3 cup sugar
2 large eggs
1 1/2 teaspoons table salt
3 1/4 - 3 3/4 cups unbleached all-purpose flour
Filling
1/3 cup sugar
2 tablespoons ground cinnamon
1 tablespoon milk
1/2 cup raisins , golden or dark (optional)
1/2 cup chopped nuts of choice (optional)
Icing
1 1/4 cups confectioners' sugar , sifted
2 tablespoons milk
1/2 teaspoon vanilla extract

Directions:
1. For the dough: Heat milk and butter in small saucepan over medium heat until butter melts. Cool to lukewarm (about 110 degrees).
2. Meanwhile, sprinkle yeast over warm water in bowl of stand mixer fitted with paddle. Beat in sugar and eggs and mix at low speed to blend. Add salt, lukewarm milk mixture, 2 cups of flour; mix at medium speed until thoroughly blended, about 1 minute. Switch to dough hook attachment. Add 1 1/4 cups flour, and knead at medium-low speed, adding additional flour sparingly if dough sticks to sides of bowl, until dough is smooth and comes away from sides of bowl, about 10 minutes.
3. Turn dough onto work surface. Squeeze dough with a clean dry hand. If dough is sticky, knead in up to 1/2 additional cup flour to form a smooth, soft, elastic dough. Transfer dough to a very lightly oiled large plastic container or bowl. Cover top of container with plastic wrap and let rise until double in size, 2 to 2 1/2 hours. (Ideal rising temperature is 75 degrees.) After rise, punch down center of dough once (can be refrigerated, covered, up to 18 hours). Making sure not to fold or misshape dough, turn it onto unfloured work surface; let dough rest, to relax, about 10 minutes.
4. Grease a 13-by-9-inch baking pan. Mix cinnamon and sugar in a small bowl.
5. Roll dough with rolling pin into an evenly shaped 12-by-16-inch rectangle. Brush dough liberally with milk and sprinkle an even layer of cinnamon-sugar mixture, leaving a 1/2 -inch border along one of the long sides. Sprinkle 1/2 cup raisins and/or 1/2 cup chopped nuts over cinnamon mixture. Roll, beginning with the long side of the rectangle. Use both hands to pinch dough with fingertips as you go, sealing edges firmly to form a seam. Cut into 12 even pieces using dental floss (or serrated knife with cutting board) and arrange in prepared pan.
6. Cover loosely with plastic and allow to rise until double in size (rolls will touch), about one hour. When rolls are almost fully risen, adjust oven rack to center position and heat oven to 350 degrees.
7. Bake until golden brown and thermometer inserted in center roll registers 185 to 190 degrees, 25 to 30 minutes. Invert rolls onto wire rack. Cool to room temperature, 20 to 30 minutes.
8. For the icing: Whisk sugar, milk, and vanilla in small bowl until smooth. Reinvert rolls and place rack over piece of parchment or wax paper. Drizzle icing over rolls with spoon. Cut or pull apart to separate, and serve. Yield: 12 rolls.

I'm sending this recipe to Yeast Spotting a blogging event sponsored by Susan at Wild Yeast.

Tuesday, March 17, 2009

Mustard Glazed Potatoes

Photobucket

I love potatoes, but it's hard to find potato recipes that are scaled to smaller families. Sometimes you have to be creative. This recipe requires some attention, but if you're looking for something to make a roast chicken or grilled steak sing, you'll love these glazed potatoes. The ingredients are easy to obtain and the recipe is simple to prepare. One caution - keep your eye on them because the potatoes blacken quickly. Brown is good, black is not. The potatoes are prepared in two stages. They initially cook in a microwave but are glazed, stovetop, in a heavy skillet. Total cooking time is about 30 minutes. The potatoes must cook in a single layer, so avoid the temptation to work with more than a pound of potatoes at a time. You're going to like these.

Mustard Glazed Potatoes

Ingredients:
1 pound tiny Yukon Gold potatoes, washed and unpeeled
2 tablespoons Dijon mustard
3 tablespoons olive oil, divided use
1 tablespoon vermouth or white wine (optional)
2 tablespoons reduced sodium chicken broth + broth for thinning marinade
1 teaspoon minced garlic
1/4 teaspoon dried rosemary
1/4 teaspoon fresh cracked pepper
Salt to taste
1 tablespoon chopped parsley

Directions:
1) Place a single layer of potatoes in bottom of a large (12-inch) microwavable container that has a lid. Add 3 tablespoons of water to pan; cover and microwave on HIGH for 10 minutes. Remove from oven. Drain.
2) While potatoes cook, place mustard, 2 tablespoons oil, vermouth, chicken broth, garlic rosemary and pepper in a large bowl. Whisk to combine. Set aside.
3) Add potatoes to sauce; toss with a wooden spoon to coat all surfaces.
4) Heat reserved 1 tablespoon oil in a large (12-inch) skillet. When oil begins to shimmer, add contents of bowl containing potatoes to pan and cook over medium-high heat until potatoes are glazed and brown. Add more chicken broth if pan becomes too dry. Garnish with chopped parsley. Yield: 4 servings.

Monday, March 16, 2009

Chilled Avocado Soup - Sopa De Aguacate

Photobucket

My intent was to use this recipe to make the version of Dublin Lawyer that's in this photo. Gorgeous isn't it? The problem was the cost - it was obscene. I played with some other ideas, but I didn't come up with anything that tickled my fancy. So, rather than do an Irish meal I decided to do one that was green. Save for the salmon, we'll be green from start to finish. The first course is going to be an avocado soup from the Andalusian region of Spain. The last course is going to be lime sherbet that comes from a midwestern kitchen. The soup is lovely and I suspect you'll want to keep the recipe in your roster. For best flavor, the soup should be made in the morning and allowed to chill until meal time. It needs the day for the flavors to ripen. The soup thickens as it sits, so, you'll want to dilute it with ice water before serving. As with all chilled soups, you'll have to adjust the seasonings. I think you'll find it needs to be liberally salted. This is a very simple recipe. I think you'll like it. Here's what you need to do.

Chilled Avocado Soup - Sopa De Aguacate

Ingredients:
1 bunch scallions (about 8)
3 large ripe avocados
1 to 2 teaspoons chopped garlic
1 large lemon, juiced
1/4 teaspoon cumin
1/4 teaspoon sweet smoked paprika (pimenton)
2 cups chicken broth
1 small handful cilantro or parsley
1-1/2 to 2 cups ice water
Salt and pepper to taste
Cilantro or parsley leaves for garnish

Directions:

1) In the morning, trim scallions. Coarsely chop white part and place in jar of a blender. Add flesh of one avocado, garlic, and lemon juice. Puree. Add flesh of second avocado; puree. Add third avocado, cumin and paprika. Puree until smooth. Add cilantro. Slowly add chicken broth; blend until smooth. Add salt and pepper to taste. Refrigerate.
2) Just before serving, stir in iced water to thin puree. Check seasoning, adding salt and pepper if needed. Transfer to serving bowls. Garnish with cilantro or parsley leaves. Yield: 4 to 5 servings.

Sunday, March 15, 2009

Khmer Green Papaya Salad and the Story of Sala Bai Hotel and Culinary School

Photobucket

Green Papaya Salad


Sala Bai Kitchen


Cambodia - Sorrow and Splendor


An In-Depth Look at Sala Bai


There are stories that words alone can't tell. Cambodia is one of them. While the country is struggling to recover from the brutality of the Khmer Rouge, most of its people continue to live in dire poverty. Cambodia is tough to process; it assaults the mind and spirit, so it's best to let photographs tell that part of the story. There is, however, another more uplifting story to be told. Within Cambodia there are small groups of expats and NGO's who try, in ways large and small, to beat back poverty and offer hope to the people of this beleaguered country. The Australian Social Aid Agency and Agir Pour Le Cambodge are among those groups. They operate Sala Bai, a hotel school that trains young people from underprivileged families to work in the hospitality industry. Priority is given to girls, who are excluded from the traditional school system. Three-quarters of the students, some of whom are orphans, have never lived in town and come from the rice fields of villages in the area. The school trains 100 students a year; they are selected for the program based on records, an examination and an interview with the applicants and their families. All of the schools graduates find employment and earn a decent salary by Cambodian standards. One hundred is not a large number, but if you're among those chosen, your life, and that of your family, will forever be changed. Funds to support Sala Bai come from institutions such as the Orion Hotel alliance, star chefs like Joannes Riviere and culinary students around the world who dig into their own empty pockets to help as they can. Some future stars in the culinary world are being trained here; the best of them are snatched to apprentice in the kitchens of five star hotels. These kids can cook. Some of them can create. Today's recipe is based on a salad I had at Sala Bai. It's refreshing and simple to do. I hope you'll give it a try.


Khmer Green Papaya Salad


Ingredients:

3 cups green papaya, peeled and finely julienned

1 cup carrots, peeled and finely julienned

1/2 cup finely sliced onion

1 cup cucumber, peeled and finely julienned

1 small red bell pepper, stemmed and finely julienned

.

1/4 cup hot water

1/4 cup sugar

1/3 cup lime juice

1/4 to 1/2 teaspoon red pepper flakes

Salt and pepper to taste

.

1 handful fresh mint, torn into pieces

1/2 cup roasted peanuts


Directions:


1) Combine papaya, carrots,onion, cucumber, and bell pepper in a large bowl. Set aside.

2) Combine water and sugar in a small bowl. Stir until sugar dissolves. Add lime juice and pepper flakes. Adjust salt and pepper to taste.

3) Pour dressing over salad. Add mint and peanuts; toss to combine ingredients. Transfer to a serving dish or plates. Yield: 6 servings.


Cook's Note: Hot chili peppers can replace the pepper flakes. Plain boiled shrimp can be added to the salad.

Friday, March 13, 2009

Camarones a la Mexicana

Photobucket

This dish reflects the vivid colors and vibrant flavors of Mexico. It comes from the coastal city of Tampico where shrimp abound in the warm waters of the Gulf of Mexico. When a dish is called a la Mexicana, you know it is made with tomatoes, onions and chiles. Here, however, only the brine from canned guerito chile is used to provide heat; the chiles are used for garnish. The brine and the addition of thyme make this sweet-hot combination unique. The dish has surprisingly layered flavors and it's perfect to serve over rice or pasta. The shrimp will be table-ready in about 30 minutes. If you use the chiles for garnish forewarn your guest - they are very hot and not for every palate. The recipe can be doubled or tripled if you have a gang to feed.

Camarones a la Mexicana

Ingredients:
1 tablespoon olive oil
1/3 cup finely chopped onion
2 teaspoon minced garlic
1 pound Roma tomatoes, pee
led and coarsely chopped
1/4 teaspoon fresh cracked black pepper
1 bay leaf
2-1/2 teaspoons dried thyme
2 teaspoons kosher salt


1 tablespoon brine from a jar of guerito peppers


1 tablespoon butter
1 pound shrimp, shelled and deveined
Garnish: chopped parsley
guerito peppers

Directions:
1) Heat oil in a large saute pan over medium heat. Add onions and cook until softened, about 2 minutes. Add garlic and cook until fragrant, about 30 seconds. Add tomaatoes and cook, stirring, until they begin to release their juices, about 5 minutes. Stir in pepper, bay leaf, thyme, salt and chile juice. Cover; cook for 5 minutes. Adjust seasoning if required.
2) Heat butter in a separate large saute pan. When sizzling add shrimp and cook just until shrimp begin to turn pink.
3) Add shrimp to sauce and cook for 3 minutes longer. Place shrimp on a serving platter. Spoon a small amount of sauce on top. Garnish with parsley and chiles. Pass extra sauce at table. Yield: 3 adult servings.

Adapted from a recipe developed by Susanna Palazuelos.

This recipe is being sent to Regional Recipes, a montly blogging event sponsored by dp at Blazing Hot Wok. This month's event - Regional Recipes Mexico - is being hosted by Wandering Chopsticks.

Thursday, March 12, 2009

Irish Moonshine - Homemade Irish Cream Liqueur

Photobucket

When Irish eyes are smiling there's usually a reason. Could it be Bailey's Irish Cream? The liqueur has been available since 1974 when Gilbey's, an Irish distillery, discovered how to emulsify whiskey and heavy cream. The liqueur is uniquely Irish and is a balanced measure of Ireland's agricultural and distilling heritage. However important that may be, it's the amazing taste that has made the liqueur famous. If you're a devotee of Bailey's Irish Cream, perhaps in Irish coffee or straight-up over ice, today's recipe will have you smiling, too. It's easy, fast and inexpensive to prepare and it's great for a party. It also makes a nice hostess gift. Leftovers can be refrigerated for up to 2 weeks. A recipe for a dairy free Irish cream can be found here. Sláinte.


Irish Cream Liqueur

Ingredients:
1-1/2 cups whiskey (i.e. Jameson's Irish whiskey)
1 (14-oz.) can sweetened condensed milk
2 cups heavy cream
2 tablespoons chocolate syrup
2 teaspoons instant coffee
1 teaspoon pure vanilla extract
1/2 teaspoon almond extract

Directions:
1) Place all ingredients in a blender jar. Pulse to combine.
2) Pour into a serving container and refrigerate until ready to use.
3) Serve over ice in a glass. Refrigerate leftovers for up to 2 weeks. Yield: 5 cups.

Wednesday, March 11, 2009

Moros y Christianos - Moors and Christians + Ensalada Cubana

Photobucket

Moros y Cristianos - Moors and Christians - is an allusion that dates back to an era in Spain when black Muslims and white Christians lived peaceably together on the Iberian Peninsula. The Conquistadors brought rice to the new world where it was combined with native black beans, forming a dish that became a staple of the Cuban diet. I first sampled this in a cafe on Bergenline Avenue in Union City, New Jersey. The bodegas and cafes that line this street offer a bargain priced education in Cuban cooking to any who want it. I've played with this recipe over the years and have come up with a quick and easy version that is meatless and costs pennies to prepare. It's also kind to the waistline. It can be served as a main course or a side dish. I like to serve this with Ensalada Cubana, a salad that goes well with the rice and beans. I think you'll enjoy both recipes.

Moros y Christianos - Moors and Christians

Ingredients:
3 tablespoons olive oil
1 cup chopped onion
1 large bell pepper, chopped (optional)
1 tablespoon minced garlic
1/2 cup tomato sauce
2 (14.5-oz.) cans low-sodium chicken or vegetable broth
1 teaspoon apple cider vinegar
2 cups long-grain rice
1 teaspoon ground cumin
1 teaspoon dried oregano
1/2 teaspoon coarsely cracked black pepper
1/4 teaspoon red pepper flakes (optional)
2 (15-oz.) cans black beans, drained and rinsed
1 bay leaf
1/2 cup chopped cilantro or parsley
Garnish: finely chopped bell pepper, etc. (optional)

Directions:
1) Heat oil in a large Dutch oven over medium-high heat. Add onion and saute for 2 minutes. Add bell pepper and saute for 2 minutes more. Stir in garlic and cook until fragrant, about 30 seconds. Stir in tomato sauce, broth and vinegar. Add rice, cumin, oregano, black pepper, pepper flakes (if using), black beans and bay leaf. Mix well.
2) Bring mixture to a boil. Reduce heat, cover pot and simmer for 20 minutes, stirring occasionally. Remove from heat. Discard bay leaf. Stir in cilantro. Cover pot and let sit 15 minutes. Garnish as desired. Yield: 4 entree or 8 side servings.


Ensalada Cubana - Cuban Salad


Ingredients:
1 small head iceberg lettuce, coarsely shredded
2 cups drained pineapple chunks
1 large avocado, peeled and sliced
1 small onion, sliced thin
1/4 cup red wine vinegar dressing
Salt and pepper, to taste

Directions:
1) Place lettuce, pineapple, avocado and onion in a large bowl. Mix well.
2) Pour dressing over all; toss to coat ingredients. Season with salt and pepper to taste. Yield 4 to 6 servings.

Tuesday, March 10, 2009

Toasted Cashew and Caramel Squares

Photobucket

At the risk of sounding bonkers, I must admit that I test recipes for holiday desserts at this time of year. I collect them at Thanksgiving and Christmas time - like an almost sane person - but my dervish life leaves no time for holiday experimentation. It's now or never. I've been playing with a recipe from one of the Fine Cooking Annuals. They called this cookie a Mexican-Style Pecan-Chocolate Square. I've made a few changes to a wonderful base recipe. Bob's not crazy about pecans, so they've been replaced with salted cashews. Salted peanuts would also be wonderful with the caramel topping. These are easy to prepare and quite tasty. A definite maybe for next Christmas. Here's my adapted version.

Toasted Cashew and Caramel Squares

Ingredients:
1-1/4 cups cold unsalted butter, divided use
2 cups unbleached flour
1-1/2 cups packed golden brown sugar, divided use
2 teaspoons ground cinnamon
1 teaspoon table salt, divided use
3 ounces butterscotch chips
3 cups toasted, salted cashews, coarsely chopped
1/3 cup honey
2 tablespoons heavy cream

Directions:
1) Preheat oven to 350 degrees F. Lightly mist a 9-inch square baking pan with nonstick spray. Set aside.
2) Place 3/4 cup butter, flour, 1/2 cup brown sugar, cinnamon and 1/2 teaspoon salt in the bowl of a food processor; pulse to combine. Press crumbs into the bottom of prepared pan. Bake until lightly brown and firm, about 25 minutes. Remove from oven. Spread butterscotch chips over top; spread with a spatula as chips soften. Set aside.
3) Melt reserved 1/2 cup butter in a heavy bottomed pan set over medium-high heat. Stir in reserved 1 cup brown sugar, honey, cream and reserved 1/2 teaspoon salt. Bring to a boil, stirring constantly, and simmer for 1 minute. Stir in cashews. Pour mixture over cookie base, spreading evenly. Bake until most of the filling is bubbling, about 18 minutes. Cool in pan. Cut into 16 squares. Store, tightly covered, for up to 5 days. These do not freeze well. Yield: 16 squares.

Waiter, There's A Gecko in My Soup!


If you're smiling my work here is done!

Monday, March 9, 2009

Danny, Boy Oh Boy, Rye Bread with Guinness Stout and Fennel Seeds

Photobucket

Wowzer! Put the watercress away and grab a hunk of really, really sharp Cheddar cheese. This bread is not for sissies. It's a guy's bread - bold, assertive and great for male gatherings when you have a horde to feed. This is a high-moisture bread, so it's really easy to make once you overcome resistance to the wet, sticky dough. If you're tired of the St. Patrick's day soda bread ritual you might want to give this bread a try. I found instructions for the bread on the Group Recipes site where it is called Black Velvet Guinness Rye Bread with Fennel Seeds.

Rye Bread with Guinness Stout and Fennel Seeds

Ingredients:
2 teaspoons active dry yeast
24-ounces stout beer (i.e. Guinness), room temperature
3 ounces warm water
2 cups rye flour
5-1/2 cups unbleached flour + 1/2 cup flour for kneading
4 teaspoons table salt
1 tablespoon fennel seeds

Directions:
1) Combine beer and water in a large bowl. Add yeast and stir until completely dissolved.
2) Add rye flour and 3 cups of white flour; whisk until thick batter forms. Cover and let rest until mixture begins to bubble, about 2 to 4 hours.
3) Stir in reserved 2-1/2 cups flour, salt and fennel seeds. Turn batter onto a lightly floured work surface. Knead roughly. Dough will remain sticky and loose despite your best efforts. I've found it best to repeatedly fold and throw it onto the work surface. I use about 1/2 cup additional flour for kneading. At this point you want to incorporate as much air as possible in the dough. The mass will begin to resemble a dough as you knead, but it will be very, very loose.
4) Return dough to bowl, cover and rest for another 45 minutes or so.
5) Turn dough onto work surface and divide into 3 equal pieces. Shape each piece into a ball and allow to rest for 5 minutes.
6) Lay dishtowels onto your work surface and lightly flour them. Re-shape dough balls into loaves and place on dishtowels to rise. I used Italian bread pans to hold my loaves because the dough was so loose I feared I'd have pita bread if it was not constrained. Let rise until double in size, about 1 to 2 hours.
7) Preheat oven to 450 degrees F.
8) Diagonally slash loaves with a razor blade.
9) Mist sides of oven with water from a spray bottle.
10) Slide loaves or pans into oven. Reduce heat to 425 degrees F after 5 minutes of cooking. Bake for another 25 minutes or until bottom of loaves sound hollow when tapped. Transfer to a wire rack to cool. Yield: 3 loaves.

Cook's Note: This dough is very loose. I used Italian bread pans to contain the dough mass. Towel lined bread baskets can also be used.

I'm sending this recipe to Susan at Wild Yeast for her weekly Yeast Spotting event.

Sunday, March 8, 2009

Pork Indochine ( Grilled Pork with Mustard Sauce) and Halong Bay

Photobucket


The Emeraude, a retrofitted paddle steamer, now sails the breadth and width of Halong Bay in Vietnam. We slid through the bay trying to catch glimpses of famous landmarks and small islands from her decks; our first views were disappointing - we saw only shadows of outcroppings that were buried in layers of thick fog. The mist made the mildly cool air feel cold and the wail of distant foghorns and buoy bells did nothing to cheer the spirit or stay the creeping damp. Refusing to surrender to the elements, I climbed to the observation deck, ordered a tall glass of Vietnamese iced coffee (good stuff that), claimed a deckchair and sat down, camera ready, waiting for the elements to bend to my will. Several hours and cups of hot coffee later the weather broke. Before I go any further, I must tell you that I'm a reader who loves movies and I've developed an especial fondness for edgy female characters. Smilla (Smilla's Sense of Snow), Karen Blixen (Out of Africa) and Eliane Devries (Indochine) come to mind. So, when the ship sailed past the rock formations that were the backdrop for scenes in the movie Indochine, I was so excited that I dropped my cup, grabbed my camera and didn't put it away until I lost the light. As you flip through the pictures of Halong Bay I hope that some of you will experience a bit of deja vu. I surely did. While on the Emeraude, I had the good fortune to meet and speak with the ship's executive chef, Nguyen Thac Thiet. He, like many of the chefs in southeast Asia, is French trained. Today's recipe is one of his babies; it's a fusion of Asian and French technique. The marinade is decidedly Asian, the remainder of the recipe is decidedly French. Chef runs a tight ship in tiny quarters and he produces delicious food. This is a very, very nice recipe. It was the most popular item at the dinner buffet. I know you'll enjoy it. It's also easy to do.


Pork Indochine - Grilled Pork with Mustard Sauce


Ingredients:

1 pound pork tenderloin, trimmed and cut in 1/2-inch slices

2-1/2 tablespoons Dijon mustard, divided use

1/4 cup chopped scallions + green tops for garnish

1 tablespoon + 1 teaspoon chopped garlic

1 tablespoon brown sugar

1 tablespoon unsalted butter

1 cup finely chopped onion

1 cup low-sodium chicken broth

1/2 cup heavy cream

Lemon juice to taste (optional)

1/4 teaspoon dried tarragon (optional)

Salt and pepper to taste


Directions:

1) Lightly sprinkle pork medallions with salt and pepper. Place pork in a large mixing bowl. Add 1 tablespoon mustard, 1/4 cup scallions, 1 tablespoon garlic and brown sugar; toss to mix well. Let sit for 45 minutes.

2) While pork marinates, melt butter in a medium (10-inch) skillet with high sides. Add onions and cook until onions are coated with butter. Add reserved 1 teaspoon garlic and cook until garlic is fragrant. Add chicken broth and boil until onions are soft and liquid is reduced by half. Stir in cream and 1-1/2 tablespoon reserved mustard. Cook over low heat until mixture thickens and coats a spoon. Stir in lemon juice and tarragon if using. Adjust seasoning as required (remember mustard is salty). Keep warm.

3) Preheat broiler or grill. Arrange pork slices on a broiler pan or greased grill rack and cook for 2-1/2 minutes per side. Transfer pork to serving platter. Spoon mustard sauce over pork and serve. Yield: 4 servings.

Thursday, March 5, 2009

Andalusian Salad with Avocados, Oranges and Almonds

Photobucket

I love the blend of flavors and the colors of this Andalusian salad. It's a favorite of mine and because the picture says a thousand words I'll say no more. This is very easy to assemble and is table ready in minutes. I hope you'll enjoy it.

Andalusian Salad with Avocados, Oranges and Almonds

Ingredients:
3 oranges, peeled and cut in 1/4-inch slices
2 ripe tomatoes, peeled, seeded and roughly chopped
2 just ripe avocados, stoned, peeled and cut into chunks
1/4 cup extra virgin olive oil
2 tablespoons fresh lemon juice
1 tablespoon chopped fresh parsley
Sugar to taste (optional)
Salt and pepper to taste
Small Spanish or red onion rings
1/4 cup blanched and toasted almond slices
10 kalamata or oil-packed black olives

Directions:
1) Combine olive oil, lemon juice and parsley in a small bowl. Whisk to combine. Season with sugar (if using), salt and pepper.
2) Toss tomatoes and avocados in half the dressing. Set aside.
3) Arrange orange slices on a plate; scatter with onion rings. Drizzle with remaining dressing. Spoon tomatoes, avocados, almonds and olives on top of oranges. oranges. Serve right away. Yield: 4 servings.

Cook's Note: If your onions are too strong, soak rings in ice water for about an hour before using.

Wednesday, March 4, 2009

Tortilla Espanola

Photobucket

I've found some old meatless recipes that are wonderful for the Lenten season. Today's oldie is a delicious potato frittata, an entree of Spanish origin, that's good for brunch or dinner. I like to serve it with an avocado, orange and almond salad that also comes from Spanish peasant kitchens. The two make a lovely and complete meal when combined with a Spanish bread such as Pan Galllego. A real Tortilla Espanola is made with lots and lots of oil. It's absolutely delicious. I know many of you won't try a recipe that calls for almost 2 cups of oil, so I'm going to present two versions of the tortilla. One, of course, is the real thing; the other is a low fat version that's not a bad substitute. I must admit to some prejudice here. I have no problems with most "light" recipes. A lot of time and money has been spent to make them acceptable substitutes for their more calorific cousins. I've learned, however, that my family is fine with "light" recipes only if they've never had the real thing. This recipe in not in my standard rotation because I'd rather have the frittata once a year in all its awful splendor than its substitute once a month. I'll let you take your pick. One is great, the other good.

Tortilla Espanola

Ingredients:
2 pounds Yukon gold potatoes, peeled and cut in 1/8-inch slices
2-1/4 teaspoons Kosher salt, divided use
1/4 teaspoon coarsely cracked black pepper
1-3/4 cups canola oil
1 pound yellow onions, peeled and chopped
6 cloves fresh garlic, coarsely chopped
6 large eggs

Directions:
1) Place potatoes in a bowl and toss with 2 teaspoons salt. Set aside.
2) Place oil in a 10-inch skillet with high sides. Heat oil until very hot. Slip potatoes into oil and cook, turning occasionally, until potatoes are tender but not brown, about 10 minutes. Use a slotted spoon to transfer potatoes to a colander that has been set over a bowl. Let potatoes drain.
3) Add onions and garlic to oil. Cook until onions are soft and translucent but not brown, about 8 minutes. Transfer to colander and allow to drain.
4) Drain all but 1 tablespoon of oil from skillet.
5) Add eggs to a large bowl. Beat with 1/4 teaspoon salt until blended. Add potato mixture from colander to eggs. Mix gently to combine.
6) Heat oil remaining in skillet over medium-high heat. Add egg mixture and spread evenly. Cook for 1 minute, then lower heat to medium-low and cook until eggs are completely set around edges and tortilla moves easily in pan , about 10 minutes. Carefully flip the tortilla onto a flat plate. Return tortilla to pan, cooked side up, and cook until a knife inserted in center comes out clean and hot, about 6 minutes. Transfer to a serving plate. Let rest for 10 minutes. Cut into wedges or small squares. Serve warm or at room temperature. Yield: 4 main course or 12 appetizer servings.

Reduced-Fat Tortilla Espanola

Ingredients:
2 pounds Yukon Gold potatoes, thinly sliced and cut in 1/8-inch slices
2-1/4 teaspoons Kosher salt, divided use
1/4 teaspoon coarsely cracked black pepper
4 tablespoons canola oil, divided use
1 pound yellow onions, peeled and chopped
6 cloves fresh garlic, coarsely chopped
1-1/2 cups egg substitute

Directions:

1) Place potatoes, 2 teaspoons salt, pepper, 3 tablespoons oil, onions and garlic in a large (12-inch) microwave container. Toss to combine. Cover. Microwave on High power for 10 to 15 minutes, turning at 5 minute intervals until potatoes are just tender. Remove. Drain. Set aside to cook slightly.
2) Place egg substitute in a bowl; mix with reserved 1/4 teaspoon salt. Add drained potato mixture. Mix gently to combine.
3) Add reserved 1 tablespoon oil to a 10-inch skillet with high sides. Heat on medium-high until very hot. Pour in egg mixture; spread until smooth. Cook for 1 minute. Lower heat to medium-low and continue to cook until eggs are set at edges and mixture firms and moves easily in pan, about 10 minutes. Carefully flip tortilla onto a flat plate. Return to pan, cooked side up, and continue cooking until knife inserted in center of tortilla comes out clean and hot. Transfer to a serving platter. Let sit for 10 minutes. Cut into wedges or small squares. Yield: 4 main course or 12 appetizer servings.


This entry is being sent to the Potato Ho Down for March. The event is sponsored by Cathy at Noble Pig. It is hosted this month by Krysta of Evil Chef Mom fame.

Tuesday, March 3, 2009

Sticky Rice and Alms Giving in Luang Prabang


Sticky rice steamer is a Lao cooking school.

The traditional rice serving basket is called a gateep.

A double boiler used as a steamer for sticky rice.


Each morning as roosters greet first light, the sun begins to arc and the hazy rice paddies of Luang Prabang become tinged in pink and gold. This city wakens gently. Rice pots are set to steam and soon after temple drums begin a rhythmic signal that marks the beginning of a ritual as old as the Buddha himself. The morning alms procession (Tak Bat) is a living Buddhist tradition that has great meaning for the people of Luang Prabang. Monks file out of monasteries in lines that resemble threads of saffron swaying in the breeze. Townsfolk take their places on the side of the road, rice baskets in hand, to repeat, yet again, the ancient custom of giving alms. The men stand, shoulders covered in white scarfs. The women sit on stools or kneel. No one wears shoes. This is a silent procession; the stillness is broken only by strutting, crowing roosters and the scuffing of feet on hammered earth. The alms basket of each monk receives a ball of sticky rice from the right hand of every person along the route. Only the right hand may be used. The monks receive sustenance. The townspeople gain merit which they believe will bring them happiness, a peaceful life and strength to overcome any obstacles or misfortune that they might encounter. And what did I, an outsider, receive? I was strangely moved by the piety of givers and receivers and the nearly perfect silence of the procession; for a few precious moments my world stood still and I was suspended in time in a place that could be called Shangri-La.

In northern Thailand and Laos, sticky rice is served at every meal, much like bread in Europe ot the United States. The rice is soaked, then steamed and traditionally served in a wicker basket called a gateep. Diners, using their right hand, scoop a couple of tablespoons of rice at a time into a small ball, then use it to pick up a chunk of meat or vegetable, or to soak up sauces. It can be served hot, warm or at room temperature.


Sticky Rice

Ingredients:
2 cups sticky (also called glutinous) rice
Water for soaking and steaming

Directions:
1) Cover rice with 2 to 3 inches cold water in a large bowl and soak at room temperature for at least 3 or as long as 12 hours.
2) Place a steamer basket or a footed colander over the base of a steamer containing about 4 inches of water. Rinse rice until water runs clear; drain, place in steamer basket, and steam, covered, over boiling water until shiny and tender, about 20 minutes. Remove from heat. Let sit, covered, for 5 minutes. Gather rice into a mound and transfer to a serving dish or a gateep (a coverered serving basket). Yield: 4 servings.

Cook's and Traveler's Note: Many cultures still prefer to eat using traditional methods — their hands. In these cases, food is often offered communally, which is why it’s important to wash your hands before eating and observe the right-hand-is-for-eating and the left-hand-is-for-other-duties rule. If you eat with your left hand, expect your fellow diners to be mortified. And when partaking from a communal bowl, stick to a portion that’s closest to you. Do not get greedy and plunge your hand into the center. If you are left-handed, attempt to be ambidextrous — even children who are left-handed in these cultures are taught to eat with their right hand — or at least explain yourself to your fellow diners before plunging in.

Monday, March 2, 2009

Chimichurri Turkey Burgers

Photobucket

My bad! What I thought was ground chuck turned out to be ground turkey and I didn't realize it until I started to make dinner. Bob's favorite treat after weeks away from home is a hamburger and I dropped the ball. A better wife than I might have run to the store to correct the mistake but I decided to make the best of it and took another tact. As a bride, I was known to create days of fast and abstinence when I forgot to take meat from the freezer. Bob, who was not particularly well-versed with the liturgical calendar, always considered my declarations as fiat. These days I use recipe contests as an excuse to cover my tracks. Then, as now, things turned out fairly well. I'm not big on gourmet burgers; they've always seemed to me to be a contradiction in terms. A hamburger was/is something I throw on the grill when I've lost yet another battle with the clock - they're quick and flavorful and very easy to do. Turkey burgers are another story - they need all the help they can get. A quick look in the vegetable bin and freezer produced the "Eureka" moment that led to the creation of this turkey burger. It requires a bit more chopping than I care to do but the burger is flavorful and not at all dry. I actually kind of like it. Here's what I did.

Chimichurri Turkey Burgers

Ingredients:
1 tablespoon + 1/3 cup olive oil
1/2 cup chopped red onion
3 tablespoons coarsely chopped garlic, divided use
1 tablespoon + 1 teaspoon chopped jalapeno, divided use
2-1/4 teaspoons kosher salt, divided use
1/4 teaspoon freshly ground black pepper
1-1/4 pounds ground turkey
1/2 cup ricotta cheese
2 teaspoons ground cumin, divided use
1 teaspoon dried oregano
1/4 cup chopped cilantro
1 cup packed Italian parsley leaves
1 cup packed fresh mint leaves
1/4 cup lime juice
Five 6-inch pita pockets
Red onion slices
Lettuce leaves

Directions:
1) Heat 1 tablespoon olive oil in a medium skillet. Add onion, 1 tablespoon garlic, 1 tablespoon jalapeno and 1/4 teaspoon salt; cook until softened. Transfer to a mixing bowl. When cool, add turkey, ricotta cheese, 3/4 teaspoon salt, pepper, 1 teaspoon cumin, oregano and cilantro; mix gently until just combined. Shape into 5 patties. Set aside.
2) Combine, parsley, mint, reserved 1/3 cup olive oil, lime juice, 2 tablespoons reserved garlic, 1 teaspoon reserved jalapeno, 1 teaspoon reserved cumin and 1 teaspoon reserved salt in jar of a food processor. Process until a thick sauce is formed. Add additional salt to taste.
3) Spray a large skillet with olive oil or nonstick cooking spray. Heat pan. Sprinkle burgers with salt and pepper. Cook one side of burgers burgers over medium-high heat for 5 minutes. Turn and cook for 3 minutes longer. Serve each burger in a warm pita with sliced onions, lettuce and some chimichurri sauce. Yield: 5 servings.