Showing posts with label chinese. Show all posts

Sunday, March 7, 2010

Salt and Pepper Pork Chops


From the kitchen of One Perfect Bite...Like many small families we eat a lot of chicken and pork. They make it possible for us to have meals that can be eaten in one sitting without having to deal with leftovers. For years after the children were on their own, I'd use pork tenderloin because it was fast to make and always tender. We love pork chops, but cooking them properly and serving them before they become shoe leather isn't always easy. More often than not, they need to be brined to keep them moist and tender as they cook. While doing some reading in preparation for our, now completed, trip to China, I came across a recipe from Taiwan that used thin cut pork chops. I thought the recipe was worth a try and we've been delighted with the results ever since. If you like, a reduced sodium soy sauce or tamari can be used to marinate the chops. The chops should be no thicker than 3/8 of an inch. If yours are more than that, beat them to submission. While the marinade can be made in less than 5 minutes, the chops should laze in it for at least an hour before they're are cooked. Total cooking time is less than 5 minutes and, be forewarned, the chops will toughen if they are overcooked. I serve these right from the pan with scallion rice and a bean sprout salad. I know you're going to love these. Here's the recipe.

Salt and Pepper Pork Chops
...from the kitchen of One Perfect Bite with a lot of help from Wei-Chuan Cooking School Taiwan

Ingredients:
3 tablespoons soy sauce
2 tablespoons cornstarch
1 teaspoon fresh cracked pepper
1 tablespoon granulated sugar
1/4 teaspoon salt
1-1/4 pounds boneless thin-cut pork loin chops
2 tablespoons vegetable oil

Directions:
1) Combine soy sauce, cornstarch, pepper, sugar and salt in bottom of 9 x 13 x 2-inch baking pan. Stir with a fork until all ingredients are combined and marinade is smooth. Add chops, turning to coat both sides. Cover dish with plastic wrap. Refrigerate, turning occasionally, for 1 to 24 hours.
2) Heat oil in a large frying pan set over medium high heat. Add pork, working in batches if necessary. Cook 1 to 2 minutes per side, until golden brown and cooked through. Transfer to serving plate or serve from pan. Yield: 4 servings.

You might also enjoy these recipes:

Louie's Chinese Porcupines - One Perfect Bite
Braised Pork Chops with Homemade Curry and Chutney Sauce - One Perfect Bite
Pork Indochine and Halong Bay - One Perfect Bite

Sunday, February 28, 2010

Yangzhou Fried Rice


From the kitchen of One Perfect Bite...Ten years ago we spent a brief period of time in a loft apartment. It was quite small, but with only three of us and a great deal of planning, it became a manageable, if not luxurious, space. Bob and I had sold our family home and were biding time, waiting for secondary pensions to vest before moving on to Oregon. Our youngest daughter, home following a year in Asia, made her first forays into cooking in that tiny kitchen. Fried rice was her specialty. She and I had discovered Ming Tsai, who was a Food Network star at the time and his style of cooking was perfect for that tiny space. We became wok and cleaver women and began to study, really study, Asian cooking and techniques. Years later in Yangzhou, a city near Shanghai, China I came across a fried rice that would replace the one that we crafted in that loft. No one knows for sure how fried rice became associated with the city Marco Polo once called home. The rice, in different guises, is served throughout China, and Western eyes are drawn to the color of its myriad ingredients. The version I serve is meatless and made with two cups of diced vegetables. If you prefer meat in your rice, substitute one cup of vegetables with a protein you really like. In China, we were served a version that was, most often, made with dried, reconstituted shrimp and fatback or pork belly. It's interesting to note that fried rice was served in the emperor's court, though it was wrapped in egg crepes or lotus leaves. For most of us, however, it will remain a great way to use leftover rice and bits and bobs of previous meals. There are hundreds of ways to make this rice. Here's the one I use for a great meatless meal.

Yangzhou Fried Rice - Yangzhou Chao Fan
...from the kitchen of One Perfect Bite

Ingredients:
4 tablespoons vegetable oil, divided use
2 large eggs, beaten
1/2 cup finely minced yellow onion
1 teaspoon minced garlic
1/2 cup frozen petite peas, thawed and drained
1/2 cup frozen petite corn, thawed and drained
1/2 cup frozen diced carrots, thawed and drained
1/2 cup frozen edamame, thawed and drained
1 tablespoon dark sesame oil
2 tablespoons soy sauce
1 teaspoon salt
1/2 teaspoon sugar
4 cups cooked rice

Directions:
1) Heat a wok over medium high heat. Add 2 tablespoons of oil. When hot, pour in eggs and cook without stirring until lightly set, about 30 seconds. Break up eggs and transfer to a plate.
2) Add remaining 2 tablespoons of oil to wok set over high heat. Add onion and stir fry until softened, about 3 minutes. Stir in garlic and cook until fragrant. Add vegetables and stir fry until crisp tender, about 3 minutes.
3) Add sesame oil, soy sauce, salt and sugar to vegetables. Stir in rice and toss to combine. Add eggs and cook until rice is heated through. Serve hot. Yield: 4 servings.

You might also enjoy these recipes:

Warm Asian-Style Rice Salad - One Perfect Bite
Wild Rice, Celery and Walnut Salad - One Perfect Bite
Sticky Rice and Alms Giving in Luang Prabang - One Perfect Bite

Friday, February 19, 2010

Shrimp Omelet from the Pearl River Delta - Pink Saturday


From the kitchen of One Perfect Bite...Over the years, I've tried at least a thousand recipes and, of that number, only a hundred or so have survived and regularly appear on my table. This homely and unlikely candidate is one of them. The dish comes from Southern China and has several virtues to commend it. It has wonderful flavor and a play of textures that will appeal to almost any palate. It is also easy to prepare. It uses no exotic ingredients and its beautiful play of pink on yellow can be table ready in about 30 minutes. The two primary ingredients are eggs and shrimp. The Chinese rub the shrimp with a paste of cornstarch and salt to whiten them. If you are in a hurry this step can be omitted. The eggs are flavored with a very small amount of sesame oil. The trick to this dish is in the way it is cooked. In China the omelet is cooked in lard. We'll forego that and use canola or peanut oil to cook ours, but you'll need a cup or so of oil. Don't stint on that measure. The shrimp are quickly fried in the oil and then drained. Because they have no coating to absorb the oil, you'll find that almost all the oil remains in the pan after cooking. The shrimp will subltely flavor the oil and add a unique taste to the finished eggs. Omelets made in this fashion are easy to assemble because they are not rolled and require no special techniques to get them from the pan to the table. The eggs are gently cooked in a bit of the flavored oil and as they begin to set the shrimp are added to the pan. The only caution is to make sure you can serve these while they are still hot. This is a lovely, light dish that is perfect for those who avoid meat during the Lenten season. Here's the recipe for this treasure.

Shrimp Omelet from the Pearl River Delta
...from the kitchen of One Perfect Bite

Ingredients:
1/2 pound medium shrimp, peeled and deveined
1/2 teaspoon salt
1 tablespoon cornstarch
2 scallions (white part only), finely chopped
6 large eggs
3/4 teaspoon salt
Pinch of pepper
1/3 teaspoon toasted sesame oil
1 cup canola or peanut oil for frying

Directions:
1) Place shrimp in a dish with salt and cornstarch. Add a litlle cold water and gently rub shrimp to whiten them. Rinse thoroughly, drain and pat dry.
2) Beat eggs with salt, pepper and sesame oil.
3) Heat oil in a wok or heavy skillet and fry shrimp just until they turn bright pink, about 2 minutes. Remove and drain.
4) Pour off all but two tablespoons of oil. Add scallions and fry just until softened. Add the egg mixture. Cook gently, stirring slowly, until eggs begin to set. Add shrimp and continue to cook over gentle heat until the eggs are just firm. Transfer to a serving plate and serve immediately. Yield: 2 to 3 servings.

You might also enjoy these recipes:
Oven-Baked Scrambled Eggs - One Perfect Bite
Individual Baked Omelets - One Perfect Bite
Tortilla Espanola - One Perfect Bite

This post is being linked to:
Pink Saturday, sponsored by Beverly at How Sweet the Sound

Tuesday, February 16, 2010

Shrimp Cakes with Sweet and Sour Tomato Sauce


Vendor Selling Tomatoes in China

From the kitchen of One Perfect Bite...Now that Carnival and Mardi Gras have ended, meals in some households will be changing. Fridays between now and Easter Sunday will become meatless. For most who observe, this presents no problem. There are a wealth of recipes, really good recipes, that address the dietary constraints of this period. We've come a long way from grandma's mystery casseroles and overcooked fish. Each year I make it a point to search out, or create, new meatless meals to keep everyone at my table on board without complaint. Today's recipe is not only meatless, it's also easy to make if you have a food processor. All the ingredients you need to prepare this can be found in any well-stocked supermarket. The one item that might sound strange to your ears is ginger juice. It's a bother to find a place that sells it, but it can easily be made at home if you have fresh ginger available to you. To make the juice simply grate ginger and squeeze the juice from it. A garlic press makes easy work of the task. This dish can be on the table within 45 minutes. Bob and I first had these shrimp patties in Beijing. We encountered them over and over again as we crossed the country, though they did get hotter as we moved towards the interior. This dish will serve four people if served with rice and a vegetable or two. Here's the recipe for this surprising good sweet and tangy shrimp dish.

Shrimp Cakes with Sweet and Sour Tomato Sauce...from the kitchen of One Perfect Bite

Ingredients:
Shrimp Cakes
1 pound fresh shrimp, peeled and deveined
2 egg whites
1 tablespoon cornstarch
1 teaspoon ginger juice
1 teaspoon finely grated ginger
Oil for deep frying
Sweet and Sour Sauce
1/2 cup chicken broth
1/4 cup ketchup
1/4 cup rice wine vinegar
2 tablespoons unsweetened rice wine or dry sherry
1/2 cup granulated sugar
3/4 teaspoon salt
1 tablespoon cornstarch

Directions:
1) Place shrimp in bowl of a food processor. Process until a pulp or paste forms. Scrape into a medium bowl.
2) Place egg whites in another. Beat just until frothy. Add cornstarch, ginger and ginger juice and mix to combine.
3) Add egg mixture to shrimp and stir, going in one direction only, until everything is thoroughly mixed.
4) Combine chicken broth, ketchup, vinegar, sherry, sugar salt and cornstarch in a small pan. Bring to a boil, stirring constantly, until it begins to thicken. Simmer for 1 minute more. Remove fro heat. but keep warm.
5) Heat oil to 375 degrees F in a wok of deep frying pan. With wet hands, fashion large spoonfuls of shrimp mixture into silver-dollar sized cakes.
6) Working in batches, deep-fry shrimp cakes over moderate heat until golden brown. Drain on paper towels.
7) Arrange shrimp cakes on a serving plate. Pour warm sauce over all. Yield: 12-14 shrimp cakes.

You might also enjoy these recipes:
Singapore Noodles
Farfalle with Fresh Tomato and Basil Sauce
Vegan Red Lentil and Sweet Pepper Flan

This is being linked to:
Outdoor Wednesday - A Southern Daydreamer

Saturday, February 13, 2010

Sticky Rice Cake - Nian Gao for Chinese New Year


From the kitchen of One Perfect Bite...
There are many customs and traditions associated with Chinese New Year. One of the most pervasive has led to an exercise that takes place days before the celebration actually begins. It is believed the Kitchen God returns to heaven a week before the New Year to report on a family's behavior during the year that is ending. An unfavorable report means that the family will have bad luck in the year to come. In order to prevent that from happening the tradition of making sticky cake took hold. The belief that the Kitchen God could not issue a bad report if his mouth was full became pervasive. While a bit softer, the cake has the same chewy properties as taffy. It is, in a word, sticky. It's usually made with glutinous rice flour, a candy called peen tong and dried fruit. The traditional cake is always steamed and, if it's made with peen tong, it is always a rich caramel in color. However, as you move across China, you'll find there are regional differences in how the cake is made. If granulated sugar is used in place of peen tong, the cake will have a creamy hue. The cake is not easy to make, but it can be bought for next to pennies. Ergo, most sticky rice cakes, including mine, are purchased rather than made. A link to more information about the Kitchen God and a classical recipe for the steamed cake be found here. I'm including a much easier version of the recipe for you to try, should you wish to do so. I want to wish all of you who are celebrating, an auspicious New Year that will be rich in family, friends and food.

Baked Sticky Cake (Nian Gao)...from the kitchen of One Perfect Bite, courtesy of Frances Kai-Hwa Wang

Ingredients:
16 oz. Mochiko sweet rice flour
One stick of butter or 3/4 cup of vegetable oil
3 eggs
2-1/2 cups milk
1 to 1-3/4 cup sugar--depending on if you like it sweeter
1 tablespoon baking soda
One can of red azuki beans

Directions:
Mix everything but the beans with an electric mixer at medium speed for 2 minutes. Beat for 2 more minutes at high speed. Sprinkle Mochiko flour over a 9"x 13" baking dish that has been oiled or sprayed with Pam. Spread half of the batter on the bottom of the baking pan. Spread the red azuki beans (you can mix some batter into the beans if they are too thick to spread). Spread the other half of the batter over the red azuki beans. Bake in oven at 350 degrees for 40 to 50 minutes. Test for doneness by inserting a chopstick (this is Chinese New Year, Cake after all) if it comes out clean, it is done. This is best served warm.

You might also enjoy:

Long Life Noodles for Chinese New Year

Open Mouths Laughing for Chinese New Year
Pearl Balls - Louis Chinese Porcupines

Thursday, February 4, 2010

Creamed Shanghai Bok Choy


From the kitchen of One Perfect Bite...This, arguably, is the ultimate in miniature vegetables. Our local Asian market has started stocking a diminutive form of Shanghai bok choy. I'm thrilled. Bob and I became huge fans of the vegetable in China. Bok choy has crunchy stems and crinkled, spinach-like leaves. It appeared almost daily on the breakfast buffets in tourist hotels where it was steamed until crisp-tender and then napped with a light cream sauce. It appeared later in the day as a stir fry, topped with a garlic sauce that could be hot or not, depending on location or the cook's whim. Bok choy is a mild flavored form of cabbage that brings a lovely crispness to any dish to which it's added. I noted as we moved from one area to another that the color of the bok choy appeared to change. It wasn't my imagination. I learned that there are actually two types of the vegetable. We had been eating miniature forms of bok choy. The Canton variety had small yellow flowers and was lighter in color and sweeter in taste than its Shanghai counterpart. The Shanghai variety had a green hue and larger leaves, but, strangely enough, was the smaller of the two. I fell in love with both of the miniature versions because less chopping would be necessary with meal preparation. Once home, I began a search for recipes that would produce dishes similar to what we had been eating. This recipe for creamed bok choy makes a dish that is similar to the one we had for breakfast. I think you'll enjoy it.

Creamed Bok Choy...from the kitchen of One Perfect Bite, inspired by Gloria Miller

Ingredients:
1 pound baby bok choy (Shanghai or Canton)
1/2 teaspoon salt
1 cup chicken stock
2 tablespoons cornstarch
1 cup milk
3 tablespoons vegetable oil
1/4 cup minced smoked ham (optional)
Pepper to taste

Directions:
1) Trim ends from bok choy and cut stems into 2-inch pieces if necessary.
2) Heat a wok or large skillet over high heat. Add oil. When it begins to shimmer and bok choy and stir fry for for 2 minutes. Add salt and stock. Bring to a boil. Cover pan and cook over medium heat until softened, about 4 minutes.
3) Meanwhile, dissolve cornstarch in milk. When bok choy is softened, reduce heat and slowly stir milk mixture into pan. Do not allow milk mixture to boil. Cover pan and simmer for 3 minutes longer, stirring once or twice.
4) If using ham, sprinkle it on bok choy. Add pepper to taste. Serve hot. Yield: 4-6 servings.

Wednesday, February 3, 2010

Misfortune Cookies


From the kitchen of One Perfect Bite...“Ah, but a man's reach should exceed his grasp, or what's a heaven for?” I've been having an interior dialogue with Robert Browning today. You see, he wrote those words to comfort me. He knew that hubris would one day be my undoing. Make no mistake about it, I've been undone and it's time to "man" up. The cookie you see is the sole survivor of a kitchen experiment gone awry. This one hurts. These hands have spun sugar, boned duck and fashioned puff pastry so flaky and crisp that grown men have been known to weep and plead for mercy. These hands were sure they could make quick work of this task. After all, how hard could it be? Some flour, a little sugar, an egg or two, and, voila, home made fortune cookies. What could possibly be simpler? I had written special fortunes and color coded them so I'd know who should receive each of the cookies I'd baked. They were to be a special treat for Chinese New Year. I followed the recipe to a tee, but sensed from the get-go that I was in trouble. The thin batter rippled as as I smoothed the cookies on parchment paper. First note to self! Bake the cookies on silpat pads rather than parchment paper. Second note to self! Work with one cookie at a time, unless your hands suddenly develop a speed that rivals that of a hummingbird's wings. By the time I finished with one cookie, the others were unmalleable. Third note to self! Call Lok Yuan and order a hundred fortune cookies. After all, it's the thought that counts. I don't doubt this recipe is doable. The cookies are delicious and, if you're dexterous, a snap to make. I'm not dexterous. If you have time and are nimble, they're well worth a try. Here's the recipe.

Fortune Cookies...from the kitchen of One Perfect Bite, inspired by Sara Perry and Nancy McDermott

Ingredients:
1/2 cup all-purpose flour
1 tablespoon cornstarch
1/4 cup sugar
1/8 teaspoon salt
1/4 cup vegetable oil
2 egg whites at room temperature
1 teaspoon orange zest
1 tablespoon orange juice
1 teaspoon vanilla extract

Directions:
1) Preheat oven to 325 degrees F. Line a baking sheet with a reusable nonstick liner or parchment paper. Place fortune strips in a small bowl. Set out a measuring cup and a 12-cup muffin tin to help form cookies while they are hot.
2) Whisk flour, cornstarch, sugar and salt together in a medium bowl until well-blended. Add oil, egg whites, orange zest and juice and vanilla extract. Beat with an electric mixer until smooth.
3) Working with just two cookies at a time and leaving 3 inches between them, drop batter from a level tablespoon measure onto prepared baking sheet. Using back of a spoon or an offset spatula, spread each portion of batter into a 4-inch diameter circle. Bake until edges start to brown, about 8 to 10 minutes.
4) Using a thin, flexible spatula, lift each cookie off baking pan. Place a fortune strip in center of each cookie, then quickly fold in half. Pick up and drape over edge of measuring cup, gently pressing edges down to form standard fortune cookie shape. Place shaped cookies into muffin cups to complete cooling. Continue baking and shaping until all batter has been used. Store airtight. Yield: 12 cookies.

Sunday, January 17, 2010

Chinese Donut Sticks - You Tiao or Oil-Fried Ghosts


Food for the body and eye candy for winter-weary souls.


From the kitchen of One Perfect Bite...
Some folks called them Chinese donut sticks, but these long strips of fried dough are far more like bread sticks than donuts or crullers. You tiao, or oil-fried ghosts, are usually served with a traditional Chinese breakfast of rice congee or salted soy milk. Both are bland and are an acquired taste for the Western palate. The salty bread sticks help add a recognizable dimension of flavor to an Eastern breakfast. The strips are made so they can be torn, lengthwise, into two long pieces after deep frying. Chinese folklore tells us that two dough strips, one male, one female, were layered and joined in the center, as an act of protest against the official Qin Hui and his wife who plotted to kill, or dishonor, a revered general named Yue Fei. It's believed that their traitorous behavior was punished by boiling in oil. I leave the fate of their remains to your imagination. Keeping in mind the fact that most Chinese homes have no ovens, I think you can see how these salty sticks became popular. I'm featuring them here as a curiosity for most, but as an exploration for those with more adventuresome palates. They are really simple to do and are worthy of a one-shot. I do ask you to keep in mind the fact that these are nothing more than exotic bread sticks. Please don't slay the messenger. Here's the recipe.

Chinese Donuts Sticks - You Tiao or Oil-Fried Ghosts...from the kitchen of One Perfect Bite, courtesy of Jacki Passmore

Ingredients:
1-1/4 cups self-rising flour
2 teaspoons baking powder
1 to 1-1/2 teaspoons kosher salt
1/2 teaspoon baking soda
6 to 8 tablespoons lukewarm water
Vegetable oil for deep frying

Directions:
1) Combine flour, baking powder,salt and baking soda in a large bowl. Make a well in center of mixture and add 6 tablespoons of water, stirring to mix with a spoon until a soft dough forms. If necessary, add additional water, a tablespoon at a time, to form dough. Knead lightly in bowl until soft dough forms, about 30 seconds. Cover with plastic wrap and let sit for 15 minutes to relax gluten in flour.
2) Lightly flour a work surface. Turn dough onto surface and knead for about 30 seconds. Roll dough into a strip that is 16 x 4-inches in size. Cut crosswise into 20 3/4-inch strips. Pair and stack strips. Press each pair down the center with a chopstick to seal. Lightly stretch dough, working from center to ends, until each strip is about 10-inches long. Cover lightly with plastic wrap.
3) Using a high sided saute pan or a wok, pour in oil to a depth of 2-1/2 inches. Set over high heat and bring oil to a temperature of 350 degrees F. Place three to four strips of dough into pan and fry, turning often, until they turn golden brown, about 1 to 1-1/2 minutes. Remove from pan and drain on layers of paper toweling. Continue procedure until all dough strips are cooked. Serve at room temperature. Yield: 10 donut strips.

This post is being linked to:

Smiling Sally - Blue Monday

Mellow Yellow Monday

Thursday, January 14, 2010

Laughing Mouths - Kou Xiao Gao or Open Mouths Laughing - Foodie Friday


From the kitchen of One Perfect Bite...
I first sampled this lovely pastry at a vendor's stall in one of the labyrinthine streets of a hutong, or old neighborhood, in Bejing, China. I was surprised when I found them. I mistakenly believed that a lack of ovens and dairy cattle would preclude the serving of cakes and pastries as a snack or dessert. While fruit is more commonly served, griddle-cooked or steamed desserts are also available. Lard or oil substitute for the butter, cream and milk we associate with desserts in the West. These delightful mouthfuls, usually served with a sprinkling of sugar, are an example of a Chinese pastry. They are a bit like a Western donut but the exterior is slightly crustier and they are cooked in a different fashion. Anyone can make these. They require no special equipment, save for a food processor, a deep pan and a candy thermometer. Here's the good part. They take five minutes to assemble and form and can be on a plate 10 minutes later. The Chinese call these Kou Xiao Gao or "open mouth laughs" because a special technique causes them to split open as they fry. Once the dough is made and formed, oil is heated quickly to a temperature of 300 degrees F. At that point all the pastry balls are added to the oil and held below the surface to encourage them to rise and split. The oil will gradually increase in temperature until it's about 350 degrees F. The balls are first cooked at the lower temperature so the insides will heat and expand before the outer surface crusts or seals. The balls are cooked until they are a golden brown. Once drained they are sprinkled with sugar and served warm. I have also seen these coated with sesame seeds. This is a snack that's fun to make at anytime of year. I thought you might like to have some simple dishes for Chinese New Year. The kids will love this one. Here's the recipe.

Laughing Mouths (Kou Xiao Gao)...from the kitchen of One Perfect Bite inspired by Jacki Passmore

Ingredients:
1/2 cup superfine sugar
1 tablespoon butter
1 egg
2 to 3 tablespoons water
1-3/4 cups all-purpose flour
1/4 teaspoon salt
1-1/2 teaspoons baking powder
Oil for deep frying
3 tablespoons confections' or superfine sugar for dusting

Directions:
1) Combine sugar, egg and 2 tablespoons water in bowl of a food processor. Process until smooth. Slowly add flour, salt and baking powder. Pulse until a soft dough forms, adding 1 tablespoon reserved water if required.
2) Using a tablespoon measure, break off 18 piecs of dough. Wet hands and form into balls.
3) Heat oil in a wok or deep-sided frying pan over high heat until it reaches 300 degrees F. Reduce heat to medium-high and add balls all at one time. Use a pancake turner to push dough under oil. This will cause them to rise and split. Cook balls until they are a golden brown, about 2-1/2 to 3 minutes. Transfer with a skimmer to paper toweling to drain. Sprinkle with sugar and serve. These are best served warm. Yield 18 pieces.

This recipe is being linked to:
Designs By Gollum - Foodie Friday

Saturday, November 7, 2009

Chinese-Style Almond Cookies


From the kitchen of One Perfect Bite...Almost everyone is familiar with the almond cookies that are served in Chinese restaurants. Did you know they are not Chinese? They originated in the West, and while they have been adopted by the Chinese, they are a creation of American-Chinese restaurants that spread, with affluence, back to the East. While they love sweetness, the Chinese are more likely to combine sweet with savory rather than serve a separate course of each. These days you will find Chinese bakeries and the desserts they sell are a testament to the ready acceptance of sweets by the Chinese people. The bakeries are important because most Chinese homes don't have an oven, so they can't do their own baking. I'm not the person you want to teach you the ins and outs of moon cakes, but I can walk you through the very simple steps required to make Chinese-style almond cookies. This is a lovely recipe to have in your arsenal and the cookies are truly simple to make. The recipe was created by Nancie McDermott. Here's how it's done.

Chinese Almond Cookies
...from the kitchen of One Perfect Bite

Ingredients:
1-1/2 cups all-purpose flour
1 teaspoon baking powder
1/2 teaspoon baking soda
1/4 teaspooon salt
6 tablespoons butter, room temperatue
6 tablespoons shortening
1 large egg
3/4 cup granulated sugar
2 teaspoons almond extract
16 to 32 whole almonds, with or without skins

Directions:
1) Combine flour, baking powder, baking soda and salt in a medium-sized bowl. Whisk or sift to combine. Set aside.
2) Combine butter, shortening, egg, sugar and almond extract in another medium-sized bowl. Beat at medium speed with an electric mixer until all ingredients are combined, about 1 to 2 minutes.
3) Add flour mixture to butter mixture; stir with a wooden spoon until everything comes together into a smooth dough. Dough is easier to shape when cold. Cover and refrigerate for about an hour.
4) Preheat oven to 400 degrees F.
5) Divide dough into two cylinders. If you opt to make 16 large cookies, roll each cylinder to a diameter of 2 inches. To make 32 smaller cookies, roll each cylinder to a diameter of 1-1/4 inches. Cut each cylinder into rounds and place them on an ungreased cookie sheet, positioning them about 2-inches apart. Press a whole almond into center of each cookie.
4) Bake for 10 to 12 minutes, or until cookies are firm and lightly browned. Remove from oven and let cool on cookie sheets. When completely cool transfer to a serving dish or an airtight container. Yield 16 large or 32 small cookies.

Other recipes for Chinese-style almond cookies can be found at:

About.Com: Chinese Food - Chinese Almond Cookies


Sunset: Chinese Almond Cookies

Appetite for China: Chinese Almond Cookies

Sunday, March 1, 2009

Salt Roasted Chicken

Photobucket

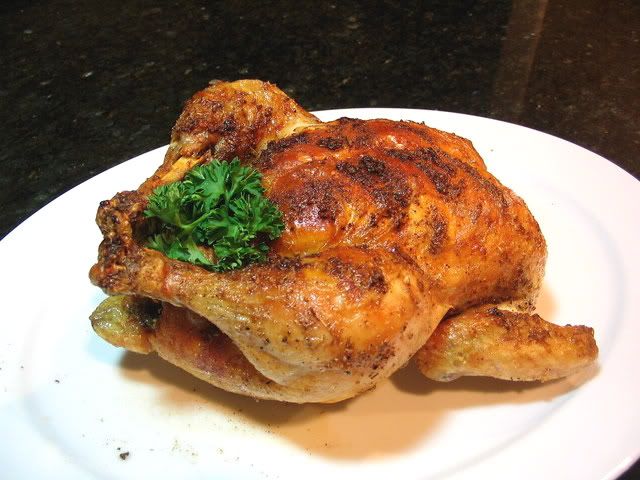
This is a "double-dog-dare" kind of recipe. Its flavors are based on those found in a true Chinese salt baked chicken - a dish I love to eat but hate to make because I always manage to burn myself (the chicken is buried and cooks in sizzling rock salt). While this chicken is much easier to prepare, it does involve wait time and a special ingredient called Sichuan pepper. Despite its name, this spice is not related to black pepper or chili pepper. It's actually the husk from seeds of a shrub called the Prickly Ash. Sichuan pepper has a unique aroma and flavor that is not hot or pungent; it has a lemony overtone that creates a tingly numbness on the tip of the tongue. The Chinese call this sensation "ma la" which means numbing and spicy. Sichuan peppercorns also have a romantically checkered past. Within China they were used as tribute. Elsewhere, import embargoes caused them to become the object of illegal trafficking. It's now perfectly legal to buy the peppercorns and you find them in Chinese markets and in the catalogues of spice purveyors (i.e. Penzy's). I start this recipe 24 hours before I plan to cook it. Let me walk you through the steps.


Salt Roasted Chicken


Ingredients:
1 tablespoon Sichuan peppercorn
1 tablespoon Kosher salt
2 to 3 teaspoons teaspoons fennel seeds
1 3-1/2 pound chicken
2 tablespoons minced ginger
3 tablespoon mirin or other rice wine
2 tablespoons butter or oil

Directions:
1) Place peppercorns, salt and fennel seeds in a small frying pan. Toast over low heat until mixture is fragrant and salt turns a light brown. Remove from heat. Cool. Pulverize in a spice grinder. Set aside.
2) Wash chicken and pat dry. Liberally rub surface and cavity of chicken with spice mixture. Place in a large bowl. Refrigerate for 1 hour. Combine ginger and rice wine in a small bowl. Strain the mixture through a fine sieve. Pour liquid over chicken. Place ginger in chicken cavity. Tie legs. Cover chicken and refrigerate for 8 to 24 hours, turning occasionally.
3) Bring chicken to room temperature. If using a convection oven, preheat to 400 degrees F. If using a conventional oven, preheat to 425 degrees F. Place chicken in a roasting pan, breast side down. Brush side of chicken facing you with 1 tablespoon butter. Roast for 30 minutes. Turn bird, brush top side of chicken with reserved tablespoon butter. Cook for 20 minutes longer or until thickest part of thigh registers 175 degrees F on a meat thermometer. Remove to a serving plate. Tent with foil. Let rest 15 minutes before carving. Yield: 4 to 5 servings.

Thursday, February 5, 2009

Spicy Sichuan Beef in Lettuce Cups

Photobucket

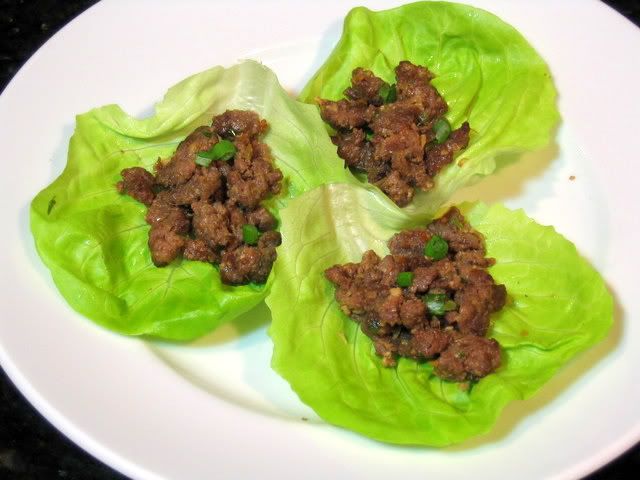
This is an easy, delicious meal that's also fun to eat. I've toned down the skovilles for first time eaters, but if you know your tolerance for heat feel free to take the heat up a notch or two. Older children like these but to cut down on the mess you might want to enclose the beef in packets or use it as a filling for pita pockets. All ingredients are readily available and the cups can be on the table in half an hour.


Spicy Sichuan Beef in Lettuce Cups


Ingredients:
3 tablespoons soy sauce
2 tablespoons rice wine or dry sherry
2 teaspoons cornstarch
1/2 teaspoon granulated sugar
3/4 pound ground beef
2 tablespoons vegetable oil
2 tablespoons finely chopped fresh ginger
1 tablespoon finely chopped fresh garlic
1/2 teaspoon red pepper flakes
1/4 cup finely chopped scallions
1 tablespoon dark sesame oil
20 to 25 small lettuce cups (i.e. Boston or Iceberg)

Directions:
1) Combine soy sauce, rice wine, cornstarch, sugar and salt; stir to dissolve cornstarch and make a smooth sauce.
2) Place beef in a medium bowl. Add sauce and gently mix into the beef. Set aside for 15 minutes.
3) Heat a wok or heavy frying pan until hot; add vegetable oil, garlic and ginger and stir-fry until fragrant, about 1 minute.
4) Add beef and let it cook for 1 to 2 minutes, or until color begins to change. Turn meat and continue to brown, breaking meat into smaller pieces as it cooks. Add pepper flakes and scallions; toss to combine. Add the sesame oil and toss to mix.
5) Transfer to a serving plate. To serve, add a spoonful or two of meat mixture to each lettuce cup. Yield: 4 to 5 servings.

Adapted from a recipe by Nancy McDermott

Tuesday, February 3, 2009

Corn Soup

Photobucket

This simple soup makes a wonderful lunch on a damp and chilly winter day. It's what I call a pantry soup. Chances are you have all the ingredients you need to make this in your cupboard. I've used ham, but bacon, shrimp or crabmeat would be wonderful as well. If you like a little more crunch add some finely chopped water chestnuts or celery to the pot. If you like heat throw in a bird chili or some hot pepper flakes. Enjoy!

Corn Soup

Ingredients:
2 (14.5-oz.) cans creamed corn
2 cups chicken stock
2 tablespoons rice wine or dry sherry
1 teaspoon salt
1/4 cup diced ham
1 teaspoon dark sesame oil
3 tablespoons chopped scallions

Directions:
1) Combine creamed corn and chicken stock in a 3-quart saucepan. Bring to a simmer over medium heat. Stir in rice wine, salt and ham. Cook until soup is hot and all ingredients are combined.
2) Remove from heat; stir in sesame oil and scallions. Ladle into bowls. Serve hot. Yield: 4 servings.

Adapted from a recipe created by Nancy McDermott

Monday, December 1, 2008

Pearl Balls - Louie's Chinese Porcupines

Photobucket

Photobucket

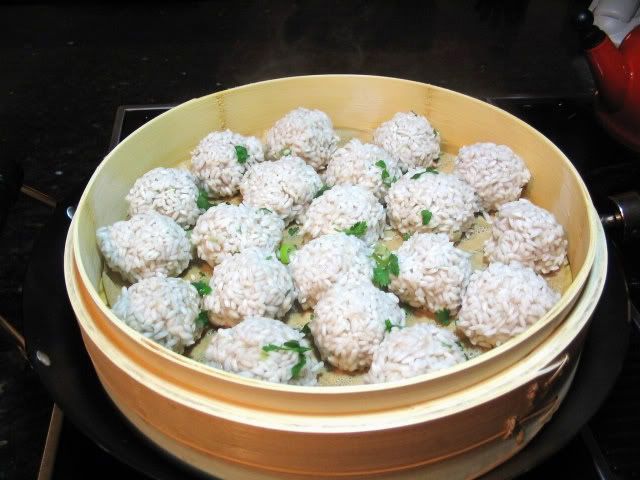
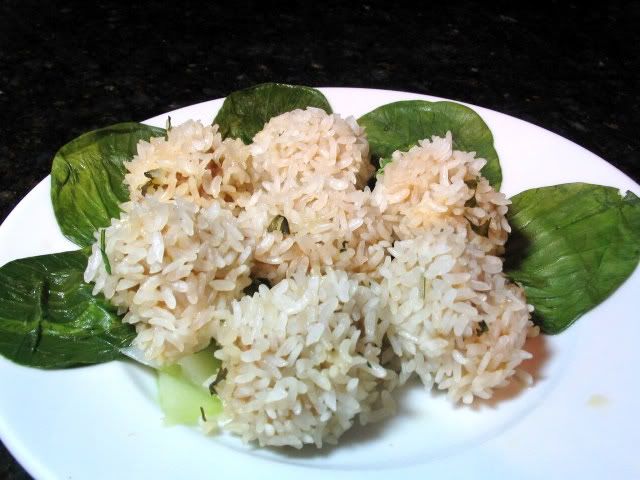
Now that every day is Sunday it's hard to remember the more trying aspects of the work I did before retirement. I was employed by an international conglomerate and was responsible for an area that was always "on". I really enjoyed problem solving but emergencies meant long hours and sometimes nights spent in the operations center. We were more fortunate than most in that an in-house kitchen was staffed to feed us regardless of the hour. Around 3:00 AM congee (an acquired taste for those not born to it), noodles, and some type of rice were brought to an area just outside the computer room by Louie - an honorary member of our staff who selected and delivered our breakfast. Louie worked in the kitchen as a clean-up man - not an official designation but one that made him happy enough and aptly described his job. He was hired shortly after WWII following his release from a military prison. Louie, functioning though retarded, was drafted and had a hard time in basic training because he looked so very normal. Unhappy, bullied and not understanding the concept of AWOL, Louie walked off the base, dropped his dog tags in an envelope and mailed them to President Roosevelt with a note that corporate legend insisted said "I quit." It took the JAG corp a while to straighten out the mess, but Louie was finally released and met the man, my VP and mentor, who became his benefactor. Fast forward to the coffee room where Louie would join us for tea and an early breakfast. Louie loved dim sum in any form and pearl balls - he called them porcupines - were a special favorite. He would count them out so everyone would have a fair share and then he'd sit with us and tell us about his day. This floored folks from other facilities and an enduring and favorite memory is that of my "second", John - a purported atheist, but the most godly man I've ever known - using scripture (Matthew 25:40) to still any who failed to respect or mock the simple soul who had become part of our family. Louie died several years before I retired. An employee collection effort and corporate matching funds saw that he was properly buried with a service, a headstone and friends who came to celebrate his life and say a last goodbye. I'll always associate pearl balls with Louie and John - his champion. These are really good. Children love them. I think you'll enjoy them, too.

Pearl Balls - Louie's Chinese Porcupines

Ingredients:
1 pound ground pork or turkey
1 tablespoon soy sauce
1 tablespoon rice wine
1 teaspoon sugar
1/2 teaspoon salt
1 large egg
8 water chestnuts, finely chopped
2 tablespoons finely chopped scallions
2 teaspoons freshly grated ginger
1 teaspoon freshly minced garlic
1/4 cup cornstarch
2 tablespoons water
1 cup glutinous rice
Dipping Sauce:
1/4 cup soy sauce
3 tablespoons rice wine vinegar
1 tablespoon minced fresh ginger
2 teaspoons sugar
1 tablespoon dark sesame oil
Salt to taste

Directions:
1) Combine pork, soy sauce, rice wine, sugar and salt in the bowl of a food processor. Process until a paste forms. Add egg, water chestnuts, scallions, ginger, garlic, cornstarch and water; process just until blended. Set aside.
2) Place rice in a fine-mesh strainer and rinse under cold running water. Fill a tea kettle with water (about 2-quarts) and bring to a boil. Pour boiling water over rice; rinse again with cold water and drain well. Spread rice on a plate or cookie sheet.
3) Form pork mixture into 1-inch balls. Roll meatballs in rice. Arrange meatballs on a steamer rack. Bring water in base of steamer or wok to a boil. Set steamer rack over water, cover, and steam for 20 minutes over rapidly boiling water. Reduce heat to low and steam until rice is tender, about 15 minutes longer.
4) Meanwhile, combine soy sauce, rice vinegar, ginger, sugar, sesame oil and salt (if using) in a small bowl; whisk to dissolve sugar and form a thin sauce.
5) Remove rack from steamer. Serve meatballs from steamer rack or transfer to a serving platter. Serve piping hot with dipping sauce. Yield: 20 pearl balls.