Showing posts with label cheesecake. Show all posts

Tuesday, November 30, 2010

Cranberry Layered Cheesecake


From the kitchen of One Perfect Bite...I was seduced by its color and because I'm weak, this five layered cranberry confection ended up on my table. I normally don't make desserts that are this involved. As a matter of fact, I rarely make cheesecakes at all. I love them, mind you. I just can't convince myself that the protein packed into all that cream cheese offsets the fat and calories that keep the protein company. The first time I saw this cake was on the table of an accomplished cake decorator. It was gorgeous and its garnet glow snared me before reason could take hold. I made a homely version of the cake, one precious time consuming layer at a time, and thought that would be the end of it. I never dreamed Bob would like it. He did and now I'm dealing with a case of unintended consequences. I'll have to make the cake again. The cake begins with an almond flavored crust that is partially filled with a sweetened cheese custard and then topped with a cranberry filling. The garnet layer is then smothered with the rest of the custard before being topped with sweetened sour cream. The cake bakes a considerable while, and then is cooled and chilled for a considerable while, before a final layer of cranberries crown the cake and decorations of almond whipped cream are applied. It is a lovely tangy cake that provides irresistible color on the holiday table. The recipe was developed by Teri Rasey for Taste of Home magazine. Despite the work, I'm glad to recommend this cake to you. I've made a few changes to the original recipe. which you can find here. My version of the recipe appears below. I suggest that you add salt and almond extract to the crust and that you eliminate the ground almonds from the whipped cream. Let the cake chill for 24 hours before serving. This is a very nice recipe and, if you like cheesecake, it will be a great addition to your files. Here's how it's made.

Cranberry Layered Cheesecake...from the kitchen of One Perfect Bite courtesy of Teri Rasey and Taste of Home magazine

Ingredients:
Pastry Layer
1/2 cup dried cranberries
2 cups cake flour
1/2 cup ground almonds
1/4 cup confectioners' sugar
1/4 teaspoon salt
1/4 teaspoon almond extract
1/2 cup cold butter, cubed
Cranberry Layer
3/4 cup sugar
2 tablespoons cornstarch
1/4 cup cranberry juice
2 cups fresh or frozen cranberries
Cream Cheese Layer
4 packages (8 ounces each) cream cheese, softened
1-1/2 cups sugar
1 teaspoon vanilla extract
4 eggs, lightly beaten
Sour Cream Topping
2 cups (16 ounces) sour cream
1/4 cup sugar
2 teaspoons vanilla extract
Whipped Cream Topping
1 cup heavy whipping cream
1 tablespoon sugar
1/4 teaspoon almond extract

Directions:
1) In a food processor, finely chop dried cranberries. Add flour, almonds and confectioners' sugar, salt and almond extract; process until blended. Add butter; pulse just until crumbly.
2) Press onto the bottom and 1-1/2 in. up sides of a greased 10-in. springform pan. Place on a baking sheet. Bake at 350° for 10 minutes.
3) In a small saucepan, combine 3/4 cup sugar and cornstarch; stir in cranberry juice until smooth. Add berries. Cook and stir until thickened and bubbly. Set aside.
4) In a large bowl, beat cream cheese, vanilla and sugar until smooth. Add eggs; beat just until combined. Pour half of batter into crust. Carefully spoon 3/4 cup berry mixture over batter; top with remaining batter.
5) Bake for 45 minutes. Reduce heat to 250°. Bake 25-30 minutes longer or until center is almost set. Combine sour cream, sugar and vanilla; spread over top. Bake 20-30 minutes or until set. Cool on a wire rack for 10 minutes. Run a knife around edge of pan to loosen; cool 1 hour longer. Spread remaining berry mixture over the top. Refrigerate overnight.
6) Beat cream with sugar and almond extract until stiff peaks form. Pipe around top edge of cheesecake. Yield: 16 servings.

You might also enjoy these recipes:
Caramel Cheesecake - Wild Yeast
Mini Bourbon Pumpkin Cheesecakes - Dessarts
Caramel Apple Cheesecake Pie - The Sweet's Life
German Cheesecake - Anja's Food 4 Thought
Pumpkin Toffee Cheesecake - The Other Side of 50
Pumpkin Cheesecake - Simply Recipes

Thursday, August 5, 2010

Lavender Cheesecake Bars


From the kitchen of One Perfect Bite...I wanted to get this recipe to you while culinary lavender is still available in markets. It was given to me a few weeks ago by a lavender grower of Viennese extraction. Her dessert is as lovely as she is, and it speaks to the wonderful richness of the country in which she spent her childhood. Like most pastry from the area, this is barely sweet and the use of lavender is so subtle that only a truly discerning palate could identify its presence without some help. I was not able to identify the flavor the first time I had these bars. Everyone who samples them can detect an unidentifiable, but pleasant, flavor lurking in the background. When told what it has we all share an "ah-ha" moment. The only trick to cooking with lavender is discretion. A very little of it goes a long way, and too much of it will make your food inedible. The lavender taste in this recipe comes from a mildly flavored sugar and from a scant teaspoon of fresh buds that are added to the streusel topping. This is a very simple recipe. There is, however, a trap waiting for those who read directions just before they plan to bake. You need lavender sugar, and, while it's child's play to make, it takes about a week for the lavender to imbue the sugar. I use a ratio of two tablespoons of lavender per cup of sugar and blend them in my food processor to make a mildly flavored sugar that I store for a week before using. Here, as in most of my recipes, I toast the almonds before baking with them. Toasted nuts give baked goods a real flavor boost and these bars have a wonderful almond flavor. If your not watching calories you'll love these rich bars. Here's the recipe.

Lavender Cheesecake Bars
...from the kitchen of One Perfect Bite, inspired by Oregon lavender growers

Ingredients:
Crust
2/3 cup light brown sugar, packed
1 cup chopped toasted almonds
2 cups all-purpose flour
1/3 cup unsalted butter, melted
1/8 teaspoon salt
Topping
2 (8-oz.) packages cream cheese, room temperature
1/2 cup lavender sugar
2 large eggs
2 tablespoons lemon juice
1/4 cup milk
2 teaspoons vanilla
1 teaspoon fresh lavender buds

Directions

1) To make the crust: Preheat oven to 350 degrees F. Combine brown sugar, almonds, flour, salt and melted butter in bowl of a food processor. Pulse until crumbly. Reserve one cup for streusel topping. Press remainder of mixture into bottom of a 9 x 13-inch pan. Bake for 12 to 15 minutes.
2) To make filling: Beat cream cheese with lavender sugar until smooth. Beat in eggs, lemon juice, milk and vanilla. Pour over prepared crust. Mix lavender buds with reserved streusel topping. Sprinkle topping over cream cheese filling. Bake for 25 minutes. Cool on wire rack until pan is room temperature. Cut into 24 bars. Refrigerate. Yield: 2 dozen 1-1/2 x 3-inch bars.

You might also enjoy these recipes:
Honey Lavender Ice Cream - Kitchen Fervor
Lavender Chiffon Cake with Lime Curd - Technicolor Kitchen
Lavender Strawberry Shortcake - Vegalicious Recipes
Honey Lavendar Panna Cotta - Food Memoirs
Strawberry Lavender Lemonade - Andrea Meyers
Lavender Creme Brule - SippitySup

Saturday, May 1, 2010

Margarita Cheesecake


Photo courtesy of B.J. LaCasse, Fine Texas Cuisine


The Lure


The Finished Product


From the kitchen of One Perfect Bite... They say third times a charm. There must be some truth to that, because it took me that long to get this cake right. I've made lots of cheesecakes over the years, but always keep coming back to my old favorite develop by Craig Claiborne for the New York Times. I thought for sure I'd found one to best it when I came across a recipe for a Margarita Cheesecake in Jon Bonnell's, Fine Texas Cuisine. While the directions were imprecise, I thought I could work my way through the omissions and still come up with a gorgeous cake. It didn't work that way. No pan size was given and I learned, to my chagrin, that a standard 9-inch springform pan wasn't large enough for the volume of batter the recipe produced. When the three hours it should have taken to bake the cake turned to four, I realized that that a convection oven was probably used to test the recipe. The biggest disappointment was the appearance of the cake. It bore no resemblance to the gorgeous photograph that lured me to the recipe in the first place. I realize that recipes used in restaurants don't always transpose to the home kitchen. This may have been one of those cases, but it is clear to me that the recipe was never tested in a home kitchen or these omissions would have been caught. The thing is, I didn't pay for the cookbook or three pounds of cream cheese to learn that this way. I groused a bit, actually I cussed a lot, but I was determined to make a Margarita Cheesecake. I did that by going back to ground zero. I added orange liqueur, tequila, lime juice and zest to Craig Claiborne's recipe and ended up with a fabulous cheesecake that's worthy of the fifth of May or Mother's Day. Here's the recipe that worked.

Margarita Cheesecake
...from the kitchen of One Perfect Bite, inspired by Craig Claiborne

Ingredients:
1⁄2 tbsp. butter, at room temperature
1 tablespoon finely grated lime zest
2-1/2 tablespoons fresh lime juice
2-1/2 tablespoons orange liqueur
2-1/2 tablespoons tequila
2 pounds cream cheese, room temperature
1 teaspoon vanilla extract
1-3⁄4 cups sugar
4 eggs
1/3 cup graham cracker crumbs

Directions:

1) Move oven rack to lowest position in oven and preheat oven to 350°. Grease a 3-inch deep 8" round one-piece cake pan all the way up to and including its rim with butter.
2) Combine lime zest, lime juice, orange liqueur and tequilla in a small bowl. Set aside.
3) Place cream cheese into bowl of a standing mixer and beat on medium high, scraping sides and bottom of bowl with a rubber spatula often, until completely smooth. Beat in vanilla and sugar well. Add eggs one at a time, beating well after each addition, but do not overbeat. Stir in juice and liqueur mixture lemon zest and juice with a spatula or spoon.
4) Generously spray buttered cake pan with nonstick spray, then pour in batter. Place cake pan inside a larger 3-inch deep pan. Place it in oven and pour hot water into larger pan, about 1-1/2-inches deep. Bake until top of cake is rich golden brown and feels dry when touched, about 1-1/2 to 1-1/2 hours (cake will be soft inside and become firm when cooled and refrigerated).
5) Lift cake pan out of water and place it on a cake rack. Let cake cool in pan for 3 hours. Cover pan with plastic wrap. Place a flat plate on top, invert, and remove pan. Sprinkle bottom of cake with graham cracker crumbs. Gently place another flat plate on top of crumbs. Very carefully invert again (without squashing cake), leave plastic wrap in place, and refrigerate cake overnight. Very carefully remove plastic wrap. Yield: 8 to 10 servings.

Cook's Note: This is a soft cheesecake and can be difficult to cleanly slice. I actually put the cake in the freezer for an hour before cutting to assure clean looking slices.

You might also enjoy these recipes:

Mini Black-Bottom Cheesecakes with Jam - The Food Addicts

Mocha Cheesecake - Evil Shenanigins
Mini Red Velvet Cheesescakes - Slashfoods

Wednesday, May 6, 2009

Yogurt Cheese Cake


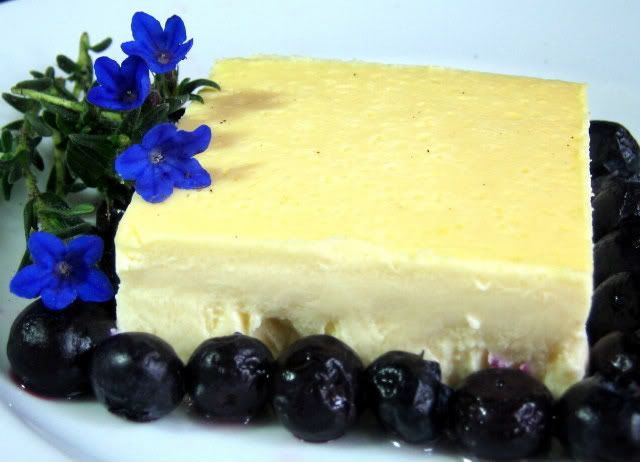
Cheesecake is a sometimes treat in our home. We love it but can't justify the calories that it packs. It's my youngest daughters favorite dessert, so I did a test run of a new lower-fat version last evening. The recipe was developed by Gina De Palma and it comes from her book "Dolce Italiano: Desserts from the Babbo Kitchen." Her cake caught my eye because it uses Greek yogurt and mascarpone instead of cream cheese. Both products are available in low-fat versions, so I thought I'd give her recipe a try. I was able to get low-fat Greek yogurt at Trader Joe's and a local grocery store had reduced-fat mascarpone. I decided to use a square springform pan. It's shape makes it possible to cut the cake into smaller pieces and I wanted to get 12 slices from the finished cake. Before I go any further, I must tell you that this is a delicious confection, but there are buts . The cake is less firm than a standard cheesecake. It actually jiggles. I had to cook it longer than the recipe suggested to assure the center of the cake was actually done. Plan to make the cake the day before you want to serve it. Because it was soft and I wanted reasonably clean slices, I froze the cake before slicing. That added more time to my game plan. Would I make it again? Absolutely. I love the texture and flavor of the cake. I plan to do another test run. I want to make the cake in individual custard cups. I know there are petite cheesecake pans, but the portion size is larger than I want to serve. The cake has a gorgeous yellow glow and it looks spectacular with fresh berries strewn around it. I hope you'll try this.


Yogurt Cheesecake


Ingredients:
Cooking spray
3/4 cup sugar + more to dust the pan
3 cups low-fat Greek yogurt
1-1/2 cups reduced-fat mascarpone or reduced-fat cream cheese
3 tablespoons confectioners' sugar
3 large eggs
6 large egg yolks
1/2 teaspoon kosher salt
1-1/2 teaspoons vanilla

Directions:
1) One day before serving, preheat oven to 350 degrees and bring a kettle of water to a boil. Grease a 10-inch springform pan with cooking spray. Sprinkle pan with sugar, tapping out excess. Wrap outside of pan with foil to prevent water from seeping into the cake. Place springform in a large roasting pan. Set aside.
2) Place yogurt, mascarpone, sugar, and confectioners' sugar in bowl of an electric mixer. Beat until smooth, about 1 minute. Add salt and vanilla. Beat in whole eggs and egg yolks, one at a time, scraping bowl as necessary. Pour batter into springform. Carefully fill roasting pan with enough hot water to rise halfway up sides of the springform. Tent pan with foil. Bake for 20 minutes. Rotate pan and bake for 20 minutes more. Remove foil and continue baking until cake is puffed but not cracked, jiggly but not liquid in center, about 25 to 35 minutes more.
3) Turn off oven. Open door and cool cake in roasting pan until water is lukewarm, then remove and cool an a rack. Cover and refrigerate overnight. Remove sides from springform just before serving. Yield: 12 servings.