Sunday, May 31, 2009
Falafel - Recipes to Rival Chickpea Challenge
The May Recipes to Rival - Chickpeas was a challenge of choice that centered around chickpeas in disparate forms. Lori of Lori's Lipsmaking Goodness was this month's hostess and she gave us two possibilities. We could opt to make chick pea fries using a Mark Bittman recipe or falafel using one developed by Madelain Farahand. Participants electing to make falafel also had to make homemade pita to accompany the chickpea patties. I chose the later and decided to use a recipe for Country-Style Whole Wheat Pita Bread undertaken by the Bread Baking Babes before I started blogging. Lori kindly included a tahini sauce to accompany the falafel. I made that as well as a thin tsatsiki that my husband, suspicious of non-meat entrées, could use to drown the falafel if it proved necessary. The recipe for falafel comes from Madelain Farah's, Lebanese Cuisine, Four Walls Eight Windows, 2001. My changes to her recipe are highlighted in red. I had a good time with this challenge and enjoyed the falafel. Bob maybe not so much. He didn't complain, but he used copious amounts of sauce, actually ate the tabouleh I made as an accompaniment and couldn't stop raving about the pita. Nary a word about the falafel. Go figure!
Falafel: Chickpea Patties
Ingredients:
1 pound dried chickpeas
1 small onion, coarsely chopped 1 small grated onion + it's onion juice
1/4 cup parsley, minced
1/4 cup cilantro, minced
2 cloves garlic, crushed 3 cloves garlic, crushed
1 tablespoon all-purpose flour 2 tablespoons all-purpose flour
1 teaspoon ground coriander
1 teaspoon baking soda
1/2 teaspoon ground cumin 1 teaspoon ground cumin
1/4 teaspoon red chile flakes, optional
Salt and pepper, as needed 1 tablespoon salt, 1/2 teaspoon cracked black pepper
1/2 cup vegetable oil 4 cups vegetable oil for deep frying
Accompaniments:
6 to 8 pitas, tops sliced open and lightly toasted
Shredded lettuce, as needed
Tomato wedges, as needed
Sliced red onion, as needed
Sliced cucumbers, as needed
Tahini sauce (see below)
Directions:
1) Soak the chickpeas in cold water in the refrigerator overnight.
2) Drain the chickpeas . Place chickpeas grated onion and onion juice, parsley and cilantro in bowl of a food processor. Add garlic, flour, coriander, baking soda, cumin, chili flakes, salt and pepper and process until finely ground and well-combined. The mixture will be slightly mealy. Using a tablespoon measure form into walnut-sized balls. Place in a single layer in a large pan, cover tightly with plastic wrap and refrigerate for 3 to 24 hours. Deep fry, six at a time, in hot oil. Drain on paper towels. Yield: 48 to 52 balls.
3) Stuff warm pita with shredded lettuce and nestle the falafel balls inside. Top with remainder of ingredients and drizzle with tahini or thin tsatsiki sauce. Serve immediately.
Tahini Sauce:
Ingredients:
1 clove garlic
1 teaspoon salt
1/2 cup tahini
1/2 cup water
1/2 cup lemon juice
Directions:
Mash garlic and salt together. Add tahini, mixing well. Gradually add water, blending thoroughly. Add lemon juice. Blend well. Yield : 4 to 6 servings.
Blue Lemonade for Blue Monday
You know what they say about the path to perdition. Well, I'd planned all week for a montage of the sky and ridgeline that I see from my kitchen windows. I thought about it and I thought about it, but never touched the camera and when I went to take the pictures the sky chose to bury itself beneath a haze of milky white and nap like Sleeping Beauty. I made myself a drink - I swear it was not the one you see here - and while sipping my tea had another thought that did lead to the photograph and recipe featured today. A few years ago I was asked to make a punch for a shower that had an all blue theme. Drinks are not my area of expertise, but with a little research I was able to find something called Blue Lemonade Punch. Now, unbenounced to me, there was one small problem with the drink. It's made with strawberry Kool-Aid. God has yet to create a man or woman who can taste blue curacao and vodka when mixed with this strawberry witches brew. Some of the revelers, though warned the punch was spiked, had a very, very good time that was matched only by the very, very bad headaches they had the following day. This is not that drink, but it's pretty darn close to it, so proceed with caution. I do love the color. It's perfect for Blue Monday.
Blue Lemonade
Ingredients:
1 ounce vodka
1 ounce Blue Curacao liqueur
4 - 5 ounces lemonade
Ice cubes
Directions:
Combine all ingredients in a shaker jar. Mix well. Serve in tall, thin glass over ice. Yield: 1 serving.
I'm send this to Smiling Sally for her Blue Monday event.
Labels:
alcoholic,
blue curacao,
drinks,
lemonade,
vodka
Saturday, May 30, 2009
Dandelion Blueberry Bars
These cookies are a "remembrance of things past." The recipe comes from the Quaker Oats test kitchen and you probably know the cookies as Berry Berry Streusel Bars. I renamed them when I realized that each time I made them I received a bouquet of dandelions or a daisy chain. Not bad for a cookie, huh? With very small changes these cookie bars can be enjoyed by vegans and the gluten intolerant. The recipe is extraordinarily easy to make and the only complaint I've ever heard is that the cookies are too crumbly. Firmly pressing down the base and crumb layer should take care of the problem. These are simple and wholesome, so get a jelly jar ready for your bouquet and that unbeatable "for you, Mommy." No tears, please.
Dandelion Blueberry Bars - Berry Berry Streusel Bars
Ingredients:
1-1/2 cups Quaker® Oats (quick or old fashioned, uncooked)
1-1/4 cups all-purpose flour
1/2 cup firmly packed brown sugar
12 tablespoons (1-1/2 sticks) butter or margarine, melted
1 cup fresh or frozen blueberries (do not thaw)
1/3 cup raspberry or strawberry preserves
1 teaspoon all-purpose flour
1/2 teaspoon grated lemon peel (optional)
Directions:
1) Heat oven to 350 degrees F. In a large bowl, combine oats, 1-1/4 cups flour, sugar and butter; mix until crumbly. Reserve 1 cup oat mixture for topping. Press remaining oat mixture evenly onto bottom of ungreased 8 or 9-inch square baking pan. Bake 13 to 15 minutes or until light golden brown. Cool slightly on wire rack.
2) In medium bowl, combine blueberries, preserves, 1 teaspoon flour and lemon peel, if using; mix gently. Spread evenly over crust to within 1/2 inch of edges. Sprinkle with reserved oat mixture, patting gently.
3) Bake 20 to 22 minutes or until light golden brown. Cool completely in pan on wire rack. Cut into bars. Store tightly covered. Yield: 16 bars.
Friday, May 29, 2009
Blueberry and Lemon Tea Biscuits
What to serve with tea for two or three or more? Tea biscuits are highly recommend. Ours, while just barely sweet, are kissed with lemon sugar and packed with blueberries. Making them requires a little forethought. You'll need lemon sugar but it's easy enough to make and can be used to flavor both the tea and the biscuits. I keep a small stash of the sugar in the refrigerator, so I can whip these up in no time at all. The biscuits keep for several days but they should be warmed and crisped before eating. They can be served for breakfast, brunch or my favorite meal "munch." We'll start with the lemon sugar and then move on to the tea biscuits which are adapted from Ina Garten's recipe for scones.
Lemon Sugar
Ingredients:
2 teaspoons finely grated lemon zest
1 cup sugar
Directions:
1) Work lemon zest into sugar with your fingers until well mixed.
2) Spread sugar in a large pan and let sit until dry, about 1 hour.
3) Store in a sealed, airtight container and use as need
Blueberry and Lemon Tea Biscuits
Ingredients:
2 cups + 1 tablespoon flour
1/4 cup lemon sugar, divided use
1 tablespoons baking powder
1 teaspoons kosher salt
1-1/2 sticks (6-oz.) cold butter, diced
2 eggs, lightly beaten
1/2 cup cold heavy cream
1 cup dried blueberries
1 extra-large egg beaten with 2 tablespoons milk or water, for egg wash
Directions:
1) Preheat the oven to 400 degrees F. Line cookie sheet with parchment paper. Set aside.
2) Combine 2 cups flour, 2 tablespoons lemon sugar, baking powder, and salt in bowl of an electric mixer fitted with a paddle attachment. Add butter and blend at low speed until mixture resembles small peas. Combine the eggs and heavy cream in a small bowl; add to flour mixture and mix until just blended. Dough will be sticky. Toss blueberries with reserved tablespoon of flour. Fold into dough.
3) Turn dough onto a floured surface. Knead only until smooth. Roll into a 1-inch rectangle. Using a 3-inch cutter, cut into rounds. Place on cookie sheet.
4) Brush top of biscuits with egg wash and sprinkle with reserved 2 tablespoons lemon sugar Bake for 20 to 25 minutes until outside is brown and crisp. Yield: 12 to 16 biscuits.
Thursday, May 28, 2009
Blueberry Fool
This luscious summer dessert - a blueberry fool - is similar to one I made as a child in the kitchen of a Swedish neighbor. A fruit fool is a dessert made with stewed or puréed fruit that is folded into a beaten cream or custard and served icy cold. It's a classic British dessert that was first made in the 16th century. It is usually served when fresh fruits are abundant. The fruit most favored to use in this dessert is the gooseberry, but, as they are not easy to come by, I use blueberries. Actually, any stewed fruit can be used. Times and taste have altered the way old desserts are made and this one is no exception. Today's version comes from Fine Cooking magazine. Strangely enough, it's higher in calories than many of the older recipes. I must be honest here. The magazine's version of the recipe is absolutely delicious, but when I make it for Bob I've been known to use a vanilla pudding that's been lightened with a nondairy whipped topping. It, too, is a lovely dessert but it's far less caloric than one that uses crème pâtissière or whipped cream as its base. This is extremely easy to make and it can assembled in less than thirty minutes. It does, however, require time to chill, so be sure to plan accordingly. The stewed blueberries would be absolutely delicious as a standalone or as a sauce for ice cream. I think you'll like the simplicity of this dessert.
Blueberry Fool
Ingredients:
4 cups blueberries, rinsed, picked over, and drained
1/3 cup packed light brown sugar
3 tablespoons fresh lemon juice
Scant 1/8 teaspoon salt
Scant 1/8 teaspoon nutmeg
1-1/4 cups cold heavy cream
Directions:
1) In a medium saucepan, combine blueberries, brown sugar, lemon juice, salt, and nutmeg. Simmer over medium-high heat, stirring occasionally, until berries have released their juice and burst when lightly pressed with a spoon, about 6 minutes. . Increase the heat to high and reduce mixture by half, stirring frequently to prevent scorching, 6-7 minutes. Pour the compote into a bowl and refrigerate until very cold, about 4 hours. The stewed blueberries will keep for up to 3 days in the refrigerator. Taste and adjust flavorings if you like, but remember that flavors will be muted when mixed with cream.
2) In a chilled bowl, whip cream to form firm but not stiff peaks. With a rubber spatula, gently fold half of the chilled compote into the cream just until incorporated. Serve immediately or refrigerate for up to 24 hours. Just before serving, spoon remaining compote over the fool. Yield: 4 servings.
I'm sending this to Gollum at Designs By Gollum who is hostess for "Foodie Friday."
Wednesday, May 27, 2009
Blueberry and Lemon Cake-Style Muffins
I've made these muffins for more years than I care to admit. My favorite way to entertain is with a Sunday brunch and these muffins fall right into place with that easy, no stress, style of entertaining. Unlike their bread-type cousins that quickly stale, these cake-type muffins can be made ahead and sit for 24 hours or so and still be moist and tender. They can also be frozen. The recipe on which these muffins are based came from the old New McCall's Cookbook - sorry for that unintended oxymoron. The cookbook was a bible of sorts in the early 70's and I suspect that anyone even near my age has made at least one dish from its pages. McCall's crepe manicotti with tomato sauce was legend and I probably had it a thousand time before it died a natural death. I digress. The blueberry muffins are inexpensive and really easy to make. This is definitely a "what's not to like" kind of recipe. It's worth a try.
Blueberry and Lemon Cake-Style Muffins
Ingredients:
3 cups all-purpose flour
2-1/4 teaspoons baking powder
3/8 teaspoons salt
3/4 cup butter, softened
1-1/2 cups granulated sugar
3 large eggs, unbeaten
1-1/2 teaspoons vanilla extract
1 teaspoon freshly grated lemon zest
3/4 cup milk
2 cups fresh or frozen, unthawed blueberries
Confectioners' sugar
Directions:
1) Preheat oven to 375 drgrees F. Spray 2 six-cup muffin tins with nonstick spray. Set aside.
2) Place flour, baking powder and salt in a large bowl. Whisk to combine. Set aside.
3) Place butter, sugar, eggs, vanilla and lemon zest in bowl of an electric mixer fitted with a paddle attachment. Beat at medium speed until light and fluffy, about 5 minutes. Scrape down sides of bowl as required.
4) Turn speed to low. Beat in flour mixture (in fourths) alternately with milk (in thirds), beginning and ending with flour mixture. Beat just until smooth.
5) Fold in blueberries, just until combined.
6) Use an ice cream scoop to fill each cup two-thirds full.
7) Bake until golden brown and cake tester inserted in center comes out clean, about 25 to 30 minutes. Transfer pans to wire racks; let cool for ten minutes. Remove muffins from pans. Serve warm or cold. Sprinkle with confectioners' sugar before serving. Yield: 12 large muffins.
Tuesday, May 26, 2009
Old-Fashioned Blueberry Crumb Bars
This recipe has been floating in the ether for years. I first saw these bars on the wonderful blog Nook and Cranny and determined I would make them as soon as possible. That was several months ago. Timely I'm not. Determined I am. I've made a single change to the base recipe which I'm told first appeared on All Recipes. You'll see that I've substituted some brown sugar for a portion of the white in an effort to make the bars more flavorful. I think it worked. If you use frozen berries do not thaw before using. Here's the recipe.
Blueberry Crumb Bars
Ingredients:
3 cups all-purpose flour
1/2 cup light brown sugar
1/2 cup + 1/4 cup granulated sugar, divided use
1 teaspoon baking powder
1 cup cold butter (2 sticks or 8 ounces)
1 egg, beaten
1 teaspoon of vanilla extract
1/4 teaspoon salt
Zest and juice of one lemon
4 cups blueberries
4 teaspoons cornstarch
Optional: Confectioners' sugar for dusting
Directions:
1) Preheat the oven to 375 degrees F. Butter and flour a 9 x 13 baking pan.
2) In a medium bowl whisk together 3 cups of flour, 1/2 cup brown sugar, 1/2 cup granulated sugar, baking powder, salt, and lemon zest. Use a pastry cutter or fork to cut in butter until mixture is in pieces no larger than a pea. Mix in egg and vanilla extract. Dough will be crumbly but stick together when squeezed. Pat half of the dough into the pan.
3) In another bowl, mix reserved 1/4 cup granulated sugar, cornstarch, and lemon juice. Add blueberries and gently toss them to coat. Pour blueberry mixture on top of the dough in pan. Then crumble remainder of dough evenly over surface of berries.
4) Bake in the preheated oven for 45 to 60 minutes, or until the top is slightly browned. Cool completely, then cut into squares. Dust with powdered sugar if using. Can be refrigerated for several days. Yield: 15 bars.
A Cool and Quiet Glade and Iced Blueberry Tea for Outdoor Wednesday
As summer ebbs, an unrelenting sun will bleach blossoms in beds gone dry and overgrown. The vibrant pinks and reds of spring will fade as the blues and greens of the forest floor become ascendant. The landscape of the shade garden is serene and sings a sirens song; these are the spots that lure us to stroll or sit and read and ponder. A pensa tola. Grab a chair, stake a claim and pour an icy flavored tea. The day has passed too quickly. Stay awhile and enjoy the insects song. I hope you enjoy the pictures. I know you will like the tea.
Iced Blueberry Tea
Ingredients:
1 (16-oz.) package frozen blueberries
1/2 cup fresh lemon juice
4 cups water
3 family-size tea bags
3/4 cup sugar
Directions:
1) Bring blueberries and 1/2 cup fresh lemon juice to a boil in a large saucepan over medium heat. Cook, stirring occasionally, about 5 minutes. Remove from heat, and pour through a fine wire-mesh strainer into a bowl, using back of a spoon to squeeze out juice. Discard solids.
2) Wipe saucepan clean. Bring 4 cups water to a boil in same saucepan; add 3 family-size tea bags, and let stand 5 minutes. Remove and discard tea bags. Stir in 3/4 cup sugar and blueberry juice mixture. Pour into a pitcher; cover and chill 1 hour. Serve over ice. Yield: 5 cups.
I so enjoy participating in Outdoor Wednesday. I'm sending this to Susan at A Southern Daydreamer who hosts the event.
Monday, May 25, 2009
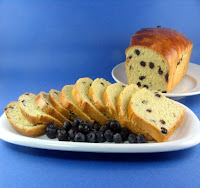
Very Berry Lemon and Blueberry Sweet Bread
Our friend, Susan, is celebrating the first anniversary of her event, YeastSpotting, today. Stop by and see all the glorious breads that have been made for the occasion.
No visit to Cape Cod would be complete without sampling Portuguese sweet bread. It was brought to the cape by the wives of Portuguese fisherman and the eggy, sweet bread quickly became a favorite of locals and visitors alike. Fortunately, the Portuguese established enclaves outside of Provincetown so the bread is also available to those who are not on vacation. Bob and I spent several decades on the east coast and did a lot exploring in ethnic communities of the area. One of our favorites was a stretch of sidewalk that twisted its way through several blocks of the Ironbound section of Newark, New Jersey. The area was an almost imperceptible blend of Italian and Portuguese families who refused to leave the area. Ferry Street was lined with restaurants and bakeries, some of which were truly wonderful. Bob and I would meet for lunch here several times a month. The area had an old world charm about it and I loved to market here. Round loaves of peasant bread with crackly crusts and soft crumb were stacked in bins next to discs of the the sweet bread we so enjoyed. We retired to an area in which the Portuguese population is minuscule, so I had to learn how to make the sweet bread or do without it. I used an old James Beard recipe as my starting point, but it's evolved over the years. My bread now contains lemon and blueberries and the traditional shot put has become a loaf. The loaf is easier to manage when there are only two people in the house. I slice and freeze the bread in slices that can be pulled from the freezer when they're needed. This bread makes wonderful toast and I like to keep some in the freezer for guest breakfasts and afternoon tea. The bread is easy to make and the marriage of lemon and blueberry takes an already lovely sweet bread to another level..
Lemon and Blueberry Sweet Bread
Ingredients:
5 teaspoons active dry yeast
1 cup + 1 teaspoon granulated sugar
1/2 cup warm water
1/2 cup (1 stick) unsalted butter, softened
1/2 cup warm milk
1 teaspoon finely grated lemon zest
4 large eggs, divided use
1 tablespoon salt
1 cups dried sweetened blueberries
4 to 4-1/2 cups all-purpose flour
Directions:
1) Place yeast, 1 teaspoons sugar and warm water in a large bowl. Let sit until foamy. Combine butter, warm milk, reserved cup sugar and lemon zest in a small bowl. Add to the yeast mixture and stir to combine. Add 3 eggs, lightly beaten. Whisk in salt. Add blueberries. Using your hands, knead in flour, a cup at a time, to make a soft dough. Turn onto a floured board and knead until dough is smooth and elastic, about 10 minutes. Shape into a ball. Place into a greased bowl, turning to coat surface. Cover with plastic wrap and allow to rise until doubled in bulk. This is a slow rising bread.
2) Punch down dough and divide into two pieces. If making round loaves shape into balls and place in two greased 9-inch cake pans. If making loaves, shape into loaves and place in two 8-1/2 X 4-1/2 X 2-1/2-inch bread pans. Cover with plastic wrap and allow to rise until doubles in bulk. Remember this is slow rising bread. While bread is rising, preheat oven to 350 degrees F. Beat reserved egg; glaze loaves with egg. Bake for 40 to 45 minutes, or until bread is a dark, shining color and sounds hollow when rapped. Cool on racks. Yield: 2 loaves.
Sunday, May 24, 2009
Blueberry Crumb Cake, Fats Domino and Blue Monday
Blueberries - partie un: What sparked this meme? I knew I was under fire when the second volley of berries hit me. He was a two-something minx who'd been left sitting in the grocery cart and was using the alone time to raid the berry basket and have a little target practice. That would be me. He was awfully cute; chances are he'll grow up to become a gunnery sergeant - if his mother doesn't kill him first. I held my ground lest he try to stand in the cart before she returned. My 40 yard dash was once the envy of the neighborhood and I stood at the ready should my prowess be needed to prevent bashed brains or sundry injuries. The adrenalin coursed until Mom returned, confirming to me yet again that God takes care of fools, drunks and mischievous baby boys.
Blueberries - partie deux: Ah, the music. Saddle shoes. Poodle skirts. Sock hops. I was 14 when he - all 15 years of him - asked me to dance. This was the song. The path to the altar was neither smooth or straight but we eventually got there. By that time, folk music, protest movements and coffee houses had replaced rock and roll and sock hops had gone the way of the dinosaur. The Weaver's trumped Fats Domino and folks stopped dancing altogether, but it's lovely to sit here in my December and remember the world when it was very young.
Blueberries - partie trois: Finally, it's time to eat, so grab a fork and belly up to the bar. I'm trying to reach the bottom of the freezer before the start of the new berry season. In order to do that, I've decided to have a blueberry bonanza - the first ever theme week on One Perfect Bite. Over the course of the next 7 days you're bound to find something you'll like. So, I hope you share my love of berries and will visit everyday to see what we're up to. First up is a crumb cake based on one developed by Ina Garten. Let's get the berrython started.
Blueberry Crumb Cake
Ingredients:
Streusel Topping:
1/4 cup granulated sugar
1/3 cup light brown sugar, lightly packed
1 teaspoon ground cinnamon
1/8 teaspoon ground nutmeg
1/4 pound (1 stick) unsalted butter, melted
1-1/3 cups all-purpose flour
Cake:
6 tablespoons unsalted butter, at room temperature (3/4 stick)
3/4 cup granulated sugar
2 extra-large eggs, at room temperature
1 teaspoon pure vanilla extract
Grated zest of 1 large lemon
2/3 cup reduced-fat plain or vanilla Greek yogurt
1-1/4 cups all-purpose flour
1 teaspoon baking powder
1/4 teaspoon baking soda
1/2 teaspoon kosher salt
1 cup blueberries (if using frozen do not thaw)
Confectioners' sugar for sprinkling
Directions:
1) Preheat the oven to 350 degrees F. Butter and flour a 9-inch round baking pan.
2) To make streusel, place granulated sugar, brown sugar, cinnamon, and nutmeg in a bowl. Whisk to combine. Stir in melted butter. Add flour. Mix well. Set Aside.with fork to combine and then the flour. Mix well and set aside.
3) To make the cake, cream butter and sugar in bowl of an electric mixer fitted with a paddle attachment until light and creamy, about 4 to 5 minutes. Reduce speed to low and add eggs, one at a time, just until incorporated. Add vanilla, lemon zest and yogurt. Place flour, baking powder,, baking soda and salt in a separate bowl. Whisk to combine. Slowly add flour mixture and beat on low speed just till combined. Fold in blueberries. Spoon batter into prepared pan, smoothing top with a knife or offset spatula. Crumble streusel topping over batter. Bake until a cake tester comes out clean, about 40 to 50 minutes. Transfer cake to a rack to cool. Let sit for 20 minutes. Remove from cake pan and cool to room temperature. Sprinkle with confectioners' sugar. Transfer to cale plate. Yield: 8 servings.
I'm send this to Smiling Sally for her Blue Monday event.
Saturday, May 23, 2009
Blueberry Salsa and Blueberry Barbecue Sauce
This is an unplanned post, but yesterday's barbecue produced some nice surprises. I was experimenting with a mop sauce and salsa to go with grilled lamb. I wanted something a little out of the ordinary and I had blueberries that were rapidly aging and would soon be fit only for the compost pile. The prime directive of old cooks is use it or lose it, so it was only natural to work with the berries. Thirty minutes later I had another variation of sauce and salsa for summer barbecues. Not only did they work, they worked well. So, I have a couple of more recipes for you. I hope you'll try these afterthoughts. They're PDG.
Blueberry Salsa
Ingredients:
1-1/2 cups blueberries, stemmed and washed
1 large Bartlet pear, peeled, cored and cut in 1/4-inch dice
1/4 cup finely minced red onion
1/4 cup diced red bell pepper
1 Jalapeno pepper, stemmed, seeded and finely mined
Juice of 1 lime
1 teaspoon honey
1 tablespoon chopped fresh oregano
1/4 teaspoon garlic salt
2 tablespoons chopped fresh cilantro
Directions:
Coarsely chop 1 cup blueberries ( food processor may be used). Combine chopped blueberries, 1/2 cup whole blueberries, pear, onion, bell pepper, Jalapeno, lime juice, honey, oregano, garlic salt and cilantro in a small bowl. Serve shilled or at room temperatur. Yield: 1-1/2 cups.
Blueberry Barbecue Sauce
Ingredients:
1/2 cup tomato catsup
1/4 cup blueberry sauce or melted blueberry jelly
1 tablespoon balsamic vinegar
1 tablespoon worcestershire sauce
1/2 teaspoon sriracha
1/2 teaspoon liquid smoke
1/4 teaspoon Dijon mustard
Salt and pepper
Directions:
Combine catsup, sauce, vinegar, worcestershire, sriracha, liquid smoke and mustard in a small bowl. Whisk to combine. Season to taste with salt and pepper. Yield: 3/4 cup sauce.
Thursday, May 21, 2009
Tunisian Semolina Bread - Khubz Mbassis
I do have to clear the air before we get too far into today's recipe. There are reputations at stake here. No matter what you may have heard, or who may have told you, magic paste and seeds of paradise are not controlled substances. Magic paste is a blend of seasonings used in some Thai cooking; it's made with garlic, white pepper and coriander and we'll be using it soon, just not today. Seeds of paradise, a combination of anise, fennel, brown sesame and black caraway seeds, figure prominently in the semolina bread I made today. This, and many other Mediterranean breads, is made with a dough starter or sponge. That means that while this bread is easy to make, it's not quick and you have to build untended "wait" time into your plans. The sponge or poolish lends enormous flavor to the finished bread, so it's worth the time and effort required to make it. It has to sit for at least eight hours and a fermentation of forty-eight hours would be even better. The finished bread is a thing of beauty - a culinary object d' art. It's a bit like focaccia bread, but it has a crackly, brittle crust that's more typical of a French or Italian peasant loaf. If anyone could give us a phonetic pronunciation for the name of this bread it would be appreciated. My mangled attempt would have everyone in stitches.
I'm sending this to Gollum at Designs By Gollum who is hostess for "Foodie Friday."
I'm also sending it to Susan at Wild Yeast for her weekly Yeast Spotting event.
Tunisian Semolina Bread - Khubz Mbassis
Ingredients:
For the starer or poolish:
1 cup warm water
1/8 teaspoon active dry yeast
2 cups all-purpose flour
For the seeds of paradise:
1 tablespoon anise seeds
1 tablespoon fennel seeds
1 tablespoon brown sesame seeds
1 tablespoon black caraway seeds
For the bread:
1 tablespoon active dry yeast
1 tablespoon sugar
2 cups warm water
1/4 cup olive oil
4 tablespoons seeds of paradise
3 cups semolina flour
2 cups all-purpose flour
1 tablespoon salt
Directions:
1) To make the starter, place warm water, yeast and flour in bowl of an electric mixer. Using a paddle attachment, beat at medium speed until mixture pulls away from sides of bowl, about 3 minutes. Transfer the dough to a lidded 2 quart container and let sit at room temperature overnight. Starter may be used eight hours later but flavor will improve if it can be refrigerated for a day or two longer.
2) To make seeds of paradise, combine anise, fennel, sesame and caraway seeds in a small lidded jar. Shake well to combine. Set aside.
3) To make bread, sprinkle yeast and sugar over warm water in the bowl of an electric mixer. When dissolved add 1/2 cup bread starter. Mix, using paddle attachment until starter is incorporated and the mixture is foamy. Switch mixer to dough hook. Add olive oil, 2 tablespoons seeds of paradise, semolina, all-purpose flour and salt. Knead on medium speed until dough pulls from side of bowl, about 10 minutes. Form dough into a ball and place in a lightly oiled bowl, turning ball to coat all surfaces. Cover bowl with plastic wrap and let double in size. Punch down and let double in bulk a second time, about 1 hour longer. Punch down and divide into 2 equal portions. Working on a lightly floured board, roll each potion into a 12-inch circle. Transfer each to a baking sheet. Working with 1 circle at a time, brush outer edge with water. At 1-inch intervals, pull up edges of dough and press down firmly, about 1-inch from edge to create a flute. Alternatively, crimp edges as though making pie dough. Repeat with second round. Sprinkle tops with reserved seeds of paradise. Cover lightly and let rise until double in height, about 45 minutes.
4) While loaves are rising, preheat oven to 425 degrees F. Transfer baking sheets to oven. During first 15 minutes of baking, mist loaves with water 3 or 4 times to create a crisp crust. Reduce heat to 375 degrees F. and bake for 30 minutes longer, or until loaves are a rich gold in color. Remove and cool on rack. Yield: 2 loaves.
Recipe adapted from Joyce Goldstein's Mediterranean the Beautiful Cookbook
Wednesday, May 20, 2009
Lemon and Almond Tart
This lemon and almond tart is one of the desserts that helped make Bob's birthday celebration so special. It's a simplified version of an Italian cheese pie that I made years ago and while this newer version is more sophisticated, it's not haughty. It's from my horde of treasured European-style desserts that are barely sweet but festive enough to end a special meal. The tart is made from common, readily available ingredients and it's inexpensive to make. One caution - like many custard based desserts this is best eaten the day it is made. Let's get to it.
Lemon Almond Tart
Ingredients:
Pastry
2 cups all-purpose flour
1/4 cup granulated sugar
Pinch of salt
1 stick (4-oz.) unsalted butter, room temperature
1 teaspoon finely grated lemon zest
2 large egg yolks
Filling
1-1/2 cups ricotta cheese
1/3 cup granulated sugar
3 large eggs, well beaten
1 tablespoon finely grated lemon zest
6 tablespoons (3-oz.) blanched almonds, toasted, finely chopped
3 tablespoons (1-1/2-oz.) blanched sliced almonds, toasted
Confectioners' sugar
Directions:
1) To make pastry, place flour, sugar and salt in a large bowl. Make a well in center of flour; add butter, lemon zest and egg yolk. Using finger tips work flour until a dough forms. Do not overwork dough. Wrap in plastic wrap and chill for at least 20 minutes.
2) To make filling, place ricotta and sugar in a large bowl. Using an electric mixer, beat until combined. Add eggs one at a time, beating well after each addition. Stir in lemon zest and almonds.
3) Preheat oven to 350 degrees F. Spray an 8-inch tart pan with removable bottom with nonstick cooking spray. On a lightly floured surface, roll pastry to fit tart pan. Fit into pan and trim. Pour in filling, smooth top and sprinkle with sliced almonds. Bake until lightly brown and set, about 55 to 60 minutes. Cool to room temperature. Remove sides of pan. Sprinkle top with confectioners' sugar. Serve at room temperature or chilled. Yield: 6 to 8 servings.
Recipe adapted from The Essential Dessert Cookbook.
Tuesday, May 19, 2009
Circassian Chicken - Cerkez Tavugu
Circassian Chicken is a Turkish wonder that's seems to be lost in time. The dish is like an extremely nutritious and flavorful chicken salad. While it still graces the meze tables of Turkey and once graced sabbath tables in the ghettos and shettles of North Africa and Europe, it's never gained popularity in the United States. The dish, a poached chicken in a walnut sauce, was brought to Turkey by slaves from Georgia. Jews who settled in Turkey following their expulsion from Spain, adapted the dish to their dietary rules. The prohibition of cooking on the Sabbath gave rise to meals, such as this chicken, that could be made ahead and kept warm in the dying embers of the stove or fireplace. This is one of those dishes that looks much harder to do than it actually is. Years ago, the grinding of nuts was a chore, but blenders and food processors have made swift work of a once tedious task. You can have this chicken on the table in an hour. It's not expensive to make and I think you'll like it, especially if you're looking to add a "wow" factor to your meals. This is one of those dishes you should try before you die. Serve it with warm pita bread and crisp lettuce. You're gonna' like the way this tastes.
Circassian Chicken - Cerkez Tavugu
Ingredients:
3 pounds (about 6) boneless chicken breasts
1 large onion, finely chopped
3 cups water
1/2 cup lemon juice
1 cup fresh cilantro
1 cup + 2 tablespoons fresh parsley, chopped, divided use
salt and pepper to taste
1 lb. shelled walnuts, finely chopped
5 slices white bread, crusts removed, finely chopped or grated
1 tablespoon + 2 teaspoons paprika, divided use
3 tablespoons walnut oil
Directions:
1) Place chicken breasts and onion in a large skillet. Add water, lemon juice, cilantro and parsley. Bring to a boil; reduce heat and simmer, covered, until chicken is tender, about 25 minutes. Do not overcook. Remove chicken, reserving stock. Set aside to cool. Shred chicken into bite size pieces. Season to taste with salt and pepper. Strain stock and reserve.
2) While chicken cooks, place walnuts in bowl of a food processor with some breadcrumbs and 1 tablespoon paprika. Pulse to combine. Add remainder of crumbs and pulse until fine. Slowly add reserved stock and puree until stock is like a thick soup. Season to taste with salt and pepper.
3) Toss chicken with some sauce, reserving half for topping. Transfer to a serving platter. Top with remaining sauce.
4) Warm walnut oil and reserved 2 teaspoons paprika in a small pan. Drizzle over top of chicken. Garnish with reserved 2 tablespoons parsley. Yield: 6 to 8 servings.
I'm sending this recipe to dp at Blazing Hot Wok for her Regional Recipes event. The country this month is Turkey.
What if.......
...I had taken the road less traveled by? Where might it have led? How different might my life had been? I muse in comfort, surrounded by people and things I love, so why ponder what can't be changed in the continuum of space and time. That is my nature. I question. I probe. Mine is a restless spirit that seeks something it cannot name but knows it does not have. I lack the certitude of those who would change nothing in their lives. To change nothing would mean nothing has been learned. So, I keep peering down that other road trying to puzzle what's at its end and how that journey might have changed my life - a backward glance, borne of curiosity, taken not in sadness but in wonder.
Today's meme - A Road Less Taken - is being sent to Susan at A Southern Daydreamer who graciously hosts Outdoor Wednesday, a blogging event.
Monday, May 18, 2009
Potato Gratin a la Flamande
Flemish cuisine has a split personality. It's part French and part Belgian. The food is delicious trencherman fare and the regional drink is beer. Parisian's cook with wine, the Flemish prefer beer. While the food of Flanders and Picardy lacks the finesse of other regions, it's not without sophistication and it's layered flavors are delicious. The bitter aftertaste that's ascribed to much of the regions cooking is really due to a poor choice of beer. In an effort to make a perfect carbonnarde, I've tested lots of beer. I discovered one that's perfect for cooking. It's O'Doul's Amber Non-Alcoholic Brew; it can be found everywhere for centimes on the dollar and, because it's non-alcoholic, it can be used by folks who might normally have to bypass a recipe because of its alcohol content. Beer is an important part of today's recipe. It adds a distinct flavor to the potatoes. I define a potato gratin as scalloped potatoes made without milk and I think I'm close to being correct. Today's potatoes are flavored with flat beer and a little butter, so we're going to call it a gratin. It's less rich and, I think more flavorful, than old-fashioned scalloped potatoes. Men love this.
Potato Gratin a la Flamande
Ingredients:
1 8-ounce yellow onion, halved, then finely sliced
1-1/2 pounds potatoes, thinly sliced
1 cup flat beer (i.e. O'Doul's Amber Non-Alcoholic Brew)
1 teaspoon brown sugar
1/2 cup heavy cream
2 tablespoons unsalted butter
Kosher salt
Black pepper, coarsely ground
Optional garnish: chopped parsley
Directions:
1) Preheat oven at 425F. Spray bottom and sides of a deep baking dish with nonstick cooking spray.
2) Alternate layers of onions and potatoes in casserole. First layer should be onions, last layer should be potatoes. Lightly salt and pepper layers as their built.
3) Combine beer and brown sugar in a small bowl. Pour over potatoes. Dot top of potatoes with butter.
4) Cover dish and place in oven. After 10 minutes reduce oven thermostat to 375 degrees F. Bake, covered, for 40 minutes longer. Remove cover, pour cream over potatoes and bake until golden brown, about 15 minutes longer. Let rest for 10 to 15 minutes before serving. Garnish with parsley if using. Yield: 4 servings.
I'm sending this entry to Cathy at Noble Pig for the May Potato Ho Down.
Sunday, May 17, 2009
Vegan Red Lentil and Pepper Flan
I had no intent to bamboozle my reluctant vegetarian. He becomes suspicious when I do strange things, so it's always best to warn him. I put the flan on the table. He studied it, rotating his plate from one angle to another to get the best possible view. "It's pretty," says he, "but it sure is red! What's in it?" "Red lentils and bell peppers, nothing exotic," say I. He has a bite. "What's really in it?" We parried a bit longer, but in the end I'm happy to report he ate a hearty portion and actually enjoyed it. I'm not always so lucky with meatless meals. This is a great entree and if you're looking to replace some animal protein with greener alternatives I heartily recommend this vegan flan. You won't be sorry. It's quick and easy to prepare. The recipe was developed in Australia, so there is one ingredient that may confound you. The ingredient list calls for yeast extract. You'll be able to find it in most large grocery stores and health food shops where it's sold as Vegemite or Marmite. There is also a new vegetarian version of Bovril which can be used and may be easier to find. If you're going to go all out, vegan margarine can be found in the dairy case of major grocery chains. Let's start with the pie dough.
Vegan Red and Pepper Flan
Ingredients:
1-3/4 cups all-purpose or whole wheat pastry flour
1/3 cup + 1 tablespoon vegan margarine, divided use
4 tablespoons ice water
3/4 cup red lentils, rinsed and drained
1-1/4 cups canned vegetable stock
1 cup finely chopped onion
2 large red bell peppers, stemmed, seed and cut in 1/4-inch dice
1 teaspoon yeast extract
1 tablespoon tomato paste
1/4 cup chopped fresh parsley
Pepper
Directions:
1) About an hour before serving, place flour in a medium bowl. Cut 1/3-cup margarine into small pieces and add to flour. Using fingertips, rub margarine into flour until it resembles cornmeal or fine breadcrumbs. Stir in water and bring together to form a dough. Wrap in plastic wrap and chill for at least 30 minutes.
2) While the dough chills, place lentils in a small saucepan, cover with vegetable stock and bring to a boil. Reduce heat: simmer for 10 minutes, or until lentils are soft and can be mashed to a puree. I didn't mash my lentils.
3) Melt remaining 1 tablespoon margarine in a medium frying pan. Add onions and red pepper and saute until just soft, about 6 minutes. Add lentils, yeast extract, tomato paste and parsley. Season to taste with pepper. Gently mix until combined. Set aside.
4) Preheat oven to 400 degrees F. Remove dough from refrigerator. Roll out on a lightly board. Line a 9-inch loose-bottom tart pan with dough. Prick bottom of pastry with a fork. Spoon lentil mixture into pastry. Bake for 30 minutes, or until filling is very firm. Yield: 6 servings.
"I See Skies of Blue...Clouds of White....
.....bright blessed days, dark sacred nights and I think to myself what a wonderful world." To see the world through the prism of a child is one of life's delights. Their joy in the discovery and mystery of the world is contagious and keeps the old among us young. We know that wonder must be tended if it's to last a lifetime. Sometimes it must be taught. Sometimes it must be shared. Several years ago I found myself stretched face-up in the sand of an Oregon beach holding hands with my grandsons as we searched an azure sky for phantom peaks hiding in the clouds above us - phantom peaks are cloud masses that resemble mountain ranges. It was a perfect day. We found K2 and Annapurna and watched the, sometimes amazing, aerial acrobatics of the raptors overhead. The boys have moved on to other things, but I know with certainty there will be another day when they scan the sky with children of their own, seeking the phantom peaks of their childhood.
I thought these pictures would be perfect for Blue Monday, so I'm sending them to Smiling Sally for her Blue Monday event.
Saturday, May 16, 2009
Strawberry Glacé Tart
Saturday was a day of passage and celebration in our home. It was Bob's 70th birthday. Now you don't serve just anything for an event that marks seven decades. There has to be a little pomp, a little circumstance, a meal with an air of celebration about it. We put our heads together, he and I, and came up with a feast. Bob picked the desserts. Over the next week or so I'll post them all, but I thought it would be nice to start with his first choice and the one that is still his favorite. It's an old-fashioned strawberry tart. Luscious berries are artfully, or semi-artfully, arranged in a buttery almond crust and then glazed. No custard. No whipped cream. Just naked berries clad in crimson. It's beautiful to look it and simple to do. A caution or two for those who plan to make this. It's a seasonal dessert. Make sure the berries you use are fully ripe and flavorful. It's also important to glaze the berries about two hours before you plan to serve the dessert. After a couple of hours the glaze will begin to water out and your gorgeous tart will begin to look like the portrait of Dorian Gray. I love this dessert for its simplicity and old-fashioned goodness.
Strawberry Glacé Tart
Ingredients:
Sweet Pastry Dough:
1-1/3 cups all-purpose flour
2 tablespoons granulated sugar
1/4 teaspoon salt
1 stick cold unsalted butter, cut in 1/2-inch dice
1 large egg yold
1/8 teaspoon almond extract
1-1/2 tablespoons ice cold water + additional water as needed
Filling:
8 cups strawberries, washed and stemmed
2/3 cup sugar
2 tablespoons cornstarch
2 to 3 drops red food coloring (optional)
Directions:
1) Place flour, sugar and salt in the bowl of a food processor. Pulse to combine. Add butter and pulse until mixture resembles coarse meal. Beat egg, almond extract and water together in a small bowl. Pour into flour and pulse. Remove from bowl. Add additional water as required to make a ball. Refrigerate for at least 1 hour.
2) Preheat oven to 450 degrees F. On lightly floured surface roll dough into a 10-inch circle. Fit into a 9-inch tart pan with removable sides. Prick bottom and sides of crust. Line with foil and fill with pie weights or dried beans. Bake for 8 minutes. Remove foil and bake until golden, about 5 to 6 minutes. Cool on a wire rack.
3) Place 1 cup strawberries in a blender jar or bowl of a food processor. Add 2/3 cup water. Blend or process until smooth. Pour into a two cup measure. Add additional water as required to make 1-1/2 cups of mixture. Place sugar and cornstarch in a medium saucepan. Stir in berry mixture. Cook over medium heat until thick and bubbly. Cook and stir 2 minutes more. Remove from heat. Add food coloring, if using. Let sit for 10 minutes without stirring.
4) Spread 1/4 cup of glaze over bottom of tart shell. Arrange remainder of berries, stem side down, in pastry shell. Spoon remaining glaze over berries, making sure each berry is covered with glaze. Chill for 1 to 2 hours before serving. Yield: 8 servings.
Thursday, May 14, 2009
Swiss-Style Two Grain Bread
This bread confounds me. It probably graced farm tables in the Tyrol and I'm sure it was known to Heidi and her Grandfather. It has no cache. It's a bit heavy and lacks any pretense of sophistication. I shouldn't like it but I do. It has enormous flavor and great nose. This cracked grain bread is an easy no-knead wonder that comes from Bob's Red Mill, the folks who make my flour. It's ready to slice in less than two hours and it's wonderful with good European butter or a Red Leicester Cheese. I could go on and on but instead of talking let's do.
Swiss-Style Two Grain Bread
Ingredients:
1/4 cup cracked wheat
1/4 cup cracked rye
Cold water
1 tablespoon active dry yeast
2 cups warm water
4 tablespoons dry milk powder
1-1/2 teaspoons salt
4-1/2 cups whole wheat flour
Directions:
1) Preheat oven to 400 degrees F. Grease a 2 pound bread pan. Set aside.
2) Place cracked wheat and cracked rye in a small saucepan. Cover grains with cold water. Bring to a boil over high heat; simmer for 2 minutes. Drain and cool to luke warm.
3) Place 2/3 cup of warm water in a large mixing bowl. Sprinkle yeast over water and let stand for 15 minutes. Stir in remaining 1-1/3 cup warm water, milk powder, salt and cracked grains. Gradually mix in whole wheat flour to make a very moist dough. Knead in bowl until it begins to change texture.
4) Transfer dough to prepared pan, cover and let rise in a warm area for about 30 minutes, or until dough rises to about 1/2-inch above top of pan. Bake for 45 minutes or until loaf sounds hollow when tapped. Cool on a wire rack. Yield: one 2-pound loaf.
I'm sending this recipe to Rachael at Tangerine's Kitchen for the May BBD multi grain bread challenge. BBD is a popular food-blog event that was started by Zorra of Kochtopf.
I'm also plan to send it on to Susan at Wild Yeast for her Yeast Spotting event.
Labels:
cracked grain,
swiss-style,
whole wheat,
yeast bread
Wednesday, May 13, 2009
Ricotta Gnocchi - Daring Cooks' Challenge
The Daring Kitchen is now home to the Daring Cooks as well as the Daring Bakers and today is reveal date for the first of what I hope will be many Daring Cooks' challenges. For its maiden voyage the group was asked to prepare ricotta gnocchi using the recipe from the Zuni Cafe Cookbook. Full instructions and the recipe can be found at The Daring Kitchen website. I followed the recipe as it was written but because there are just two people at our table I made half a batch of the gnocchi. The recipe is really simple, but there are time constraints that you should be aware of. The ricotta must be drained and that can take up to 24 hours. Assembly will be easier if you use fresh ricotta, but that, too, needs some time to drip. The gnocchi will disintegrate as they poach if there's too much moisture in the cheese. I kept the dumplings chilled before poaching and I didn't fiddle with them as they cooked so I had no problems. I chose to brown the suggested butter sauce. I also added 2 tablespoons of chopped chives. It was a mistake that made the sauce too rich for the simplicity of the dumplings. It didn't spoil them but these would have been so much better with a light lemon sauce and less butter. The gnocchi are good, but this is treadmill food and in the great scheme of things calories trump taste if you are trying to eat in a more healthy fashion. I won't be making them again. We all approach food from different perspectives so I'm sure my choices differ from yours. If you are looking for a challenge that will produce a really lovely meal I urge you to try these. It's a nice recipe. Just not for me.
Special thanks to Ivonne at Cream Puffs in Venice and to Lis at La Mia Cucina for making this event possible.
Tuesday, May 12, 2009
Old-Fashioned Blackberry Pudding
We're still weeks away from berry season in Oregon, but before I can plan for the new season's bounty I have to use the last of the old. While we always end up with more blackberries than we need, we've found ways to guarantee they won't go to waste. The blackberry bonanza begins early in the season with the fabled Marionberry. Then comes the harvest of wild Himalayan berries, the fruit of a pernicious weed intent on strangling anything in its path. These berries are free for the taking from bushes that line roads and highways in rural, and not so rural, areas of the state. They make great jams and jellies. Late in the season, my favorite, the lusciously sweet and nearly seedless Chester berry takes a bow and it's time to put by syrups and cordials for the holidays. Today's recipe can be made using any cane berry. I love to make it with the last of my frozen Chester berries. It takes 10 minutes to assemble and it's as healthy for you as any dessert, save fresh fruit, can be. I think you like this homely treasure.
Old-Fashioned Blackberry Pudding
Ingredients:
1 pound blackberries
1/3 cup granulated sugar
1/2 teaspoon grated orange zest
1 large egg
1/3 cup light brown sugar
6 tablespoons unsalted butter, melted
1/2 cup milk
1 cup self-rising flour
Directions:
1) Preheat oven to 350 degrees F. Spray 5 8-ounce custard cups with nonstick cooking spray. Set aside.
2) Place berries, sugar and orange zest in a large bowl. Lightly toss until thoroughly combined. Spoon an equal portion of berries into each custard cup. Set aside.
3) Place egg and brown sugar in a medium bowl. Beat with a fork or small whisk until combined. Add butter and milk. Stir to combine. Sift in flour and fold to form a smooth batter.
4) Cover fruit with berries. Bake in middle of oven until top is firm and golden, about 30 to 35 minutes. Remove from oven and cool until lukewarm. Sprinkle with crystalized sugar if desired. Yield: 5 servings.
Cook's Note: To make a self-rising flour sift 1-1/2 teaspoons baking powder and 1/2 teaspoon salt with 1 cup all-purpose flour.
Reflections on Weeds and Flowers for Outdoor Wednesday
Our home is built into a hillside that's a few degrees shy of being a cliff. The views are wonderful, even those beneath my feet. I'm standing on a host of weeds, some of them quite beautiful, whose names I've come to know thanks to a Master Gardener ™ program.
A significant portion of that program involves the identification and eradication of weeds. Its goal is to produce a trained corp of volunteers who will extend sustainable gardening techniques to others in the community. Classes, taught by faculty and industry professionals, are sponsored by the Extension Service of many state universities. At the end of the 12 week training period, now certified students become volunteers and start a year of pay-back that can range from teaching to weeding and time on the Extension Service hot-line. They know a lot about weeds, believe me. Some from the gardener's catechism, "A weed is a flower that grows where it's not wanted." Some from long hours spent in gardens of their own.
My musings today weigh how much flowers are like people. Some bloom only in the soil where they were first sown. Others thrive when taken on the wind and dropped on foreign lands. The flowers beneath my feet, while tended, are not deliberate plantings. The bluebells in the woods came from an English forest floor and the poppies, breath-taking in their profusion, came from California and managed to find the only patch of sunshine on our hillside. Nature, its design and vagueries, never ceases to amaze me. I've chosen to contain, rather than eradicate, these flowers others call weeds. They are simply too beautiful to destroy.
Today is Outdoor Wednesday. I'm sending this to Susan at A Southern Daydreamer who hosts the event.
Monday, May 11, 2009
Chocolate Bread Pudding
I suspect the kitchen version of planned obsolescence is leftovers for which there is a purpose. I made a loaf of chocolate bread last week and, while I knew the first few slices would be delicious with hazelnut spread, an expanded plan was also in order. There would, of course, be French toast but I was most anxious to see if the bread would work in an old-fashioned pudding. I wanted a simple dessert and I was determined to keep ingredients and calories to an absolute minimum. What follows is a really simple version of bread pudding with real chocolate flavor. I made the pudding twice; once with, and once without chocolate bread. While the flavor is more intense when the pudding has a chocolate base, I can happily report the recipe also works with a slightly stale white bread. The pudding is perfect for family and really good friends, but I wouldn't recommend it for occasions when you need to impress. This is a homely pleasure, best not served to the boss or queen.
Chocolate Bread Pudding
Ingredients:
5 to 6 cups chocolate or white bread, cut in 1-inch cubes
1/2 cup semi-sweet chocolate chips
2 large eggs, lightly beaten
2 cups whole milk
1/4 cup granulated sugar
1/4 teaspoon salt
1 teaspoon vanilla extract
2-1/2 tablespoons unsweetened cocoa powder
1 teaspoon cinnamon
Optional: whipped cream for garnish
Directions:
1) Preheat 350 degrees F. Place bread in a buttered 9 x 9-inch baking pan. Sprinkle with chocolate chips. Set aside.
2) Place eggs, milk, sugar, salt, vanilla, cocoa and cinnamon in a medium bowl. Whisk to combine. Pour over bread and mix gently. Let sit for 15 minutes.
3) Bake for 40 minutes until firm but not dry. Serve warm or at room temperature. Garnish with whipped cream if desired. Yield: 8 servings.
Sunday, May 10, 2009
Cotes de Porc A L'Auvergnate - Braised Pork with Cream and Cabbage
I am what I eat, but is that all that I am? I'm passionate about many things, consumed by some and totally repulsed by others. I'm intense and commit totally or not at all. My Dad - first coach and cheerleader - would watch my antics, shake his heads and murmur to me and an invisible asssembly, "Thank God, you're not a missionary!" I garden with the same intensity as I cook and that's how it happened that I was up to my knees in mulch on a wet, chilly Oregon day last week. It wasn't the bitter cold of winter, but rather a creeping, damp that chills the bone and afflicts serious gardeners wherever they may be. Soup and stew help ward it off, but there was no time to make either. I culled from memory a recipe - a golden oldie - that would provide warmth and comfort in a bit less than an hour. I'd forgotten how satisfying pork cooked in this manner can be. You'll need some bacon, pork chops, cabbage, wine and cream to pull it off. Then let imagination carry you to a French farmhouse kitchen with a roaring fire and bottle of vin rouge on the table. Grab a glass and pour. The recipe comes from the mountainous Auvergne region of France which is famous for rustic pork dishes such as this one. Here's the recipe.
Cotes du Porc A L'Auvergnate - Braised Pork with Cream and Cabbage
Ingredients:
1 tablespoon vegetable oil
4 slices bacon, cut in 1/2-inch dice
4 center-cut pork chops, about 1-1/4-inches thick
1 small head Savoy cabbage (2 pounds), cored and cut crosswise into 1/2-inch slices
1/2 cup dry white wine or dry vermouth
1 cup heavy cream
Pinch of sage
Salt and pepper to taste
1/2 cup Parmesan cheese
1 tablespoon butter, melted
Directions:
1) Heat oil in a large, deep skillet until it shimmers. Add bacon and saute until light golden brown, about 3 minutes. Transfer bacon pices to paper toweling to drain.
2) Season both sides of pork chops with salt and pepper. Saute until a deep golden brown on each side, about 5 minutes per side. Transfer to a plate and tent with foil to keep warm.
3) Add sliced cabbage to skillet and cook until wilted, about 3 minutes. Stir in white wine and cream. Season to taste with salt and pepper. Return pork chops and bacon to pan and simmer, partially covered, until cabbage is tender, about 10 to 15 minutes.
4) Preheat oven to 350 degrees. Transfer mixture to a greased ovenproof casserole or individual gratinee dishes. Spoon some cabbage over top of pork chops. Sprinkle with Parmesan cheese and melted butter. Bake, uncovered, until top is lightly brown, about 20 minutes. Yield: 4 servings.
Cook's Note: Light cream or milk can replace the heavy cream.
Himalayan Poppies and Blue Monday at Smiling Sally's
There are things we know to be true, things we know can't be true, and things that conspire to confound us. Years ago, while rummaging through a thrift shop, I found and claimed a watercolor with a blossom so intensely blue I believed it existed only in imagination. I had never seen a blue poppy and, doubting Thomas that I am, it, ergo, could not exist. To keep me humble, the fates and furies made sure I found the fabled Himalayan poppy. It was tucked in a far corner of a greenhouse flaunting a flower so intensely blue it hurt the eyes. That, of course, led to some investigation and, as things happen around here, a voyage of discovery. While I lobbied for the Himalayas, my soulmate thought Butchart Gardens a more practical destination. So we headed North in search of more blue poppies. We found them and since that time we've grown them, some years with more success than others. Gardeners know her to be a fickle lady. I thought you might enjoy a peek at this fabled beauty, so I'm send this to Smiling Sally for her Blue Monday event. For the record, I'm still lobbying for the Himalayas.
Saturday, May 9, 2009
Eggs Florentine
This is one of my favorite breakfast-for-dinner treats. It also works well for brunch and holiday mornings. Some multiplication or division will right-size the recipe and make it perfect for your family. I've never been good with this kind of leftover, so, rather than put myself in a pitch or toss dilemma, I do a head count. For every person being fed an 8-ounce custard cup, 1/2 cup sauteed spinach, 1 egg, 2 to 3 tablespoons heavy cream and 2 to 3 tablespoons coarsely grated Parmesan or Asiago cheese is required. Once the spinach is prepared this becomes an assembly line entree. As a rule of thumb, 8-ounces of uncooked spinach will wilt to half a cup when cooked, so plan accordingly. I use a wok to saute the spinach because of its high sides. The spinach can be prepared well in advance of assembly but I wouldn't complete the package too far ahead of serving. You can use reduced fat dairy products but if you go too far your eggs Florentine will become baked eggs with green stuff. Here's the recipe.
Baked Eggs Florentine
Ingredients:
2 pounds fresh spinach, washed, stems removed
4 cloves thinly sliced garlic
2 tablespoons olive oil
4 large eggs
1/2 to 3/4 cup heavy cream
1/2 to 3/4 cup coarsely grated Parmesan or Asiago cheese
Coarse sea salt
Freshly cracked black pepper
Directions:
1) Preheat oven to 375 degrees F. Spray four 8-ounce custard cups or ramekins with nonstick cooking spray. Set aside.
1) Heat a large wok or high-sided pan over medium high heat. Add oil. Add garlic and cook for 30 seconds, stirring constantly. Add spinach and cook, moving bottom to top until just wilted, about 2 minutes. Transfer to a colander and allow to drain.
2) Place 1/2 cup spinach in each ramekin. Make a well in center. Pour 1 to 2 tablespoons cream into each cup. Crack one egg into each well. Sprinkle each with cheese. Top each ramekin with 1 tablespoon heavy cream. Place on a baking sheet.
3) Transfer to oven and bake until egg white is just set, about 10 to 12 minutes. At this point, yoke will be cook but still runny. If you prefer firm yolks continue cooking until done to your liking. Transfer to serving plates. Sprinkle top of ramekins with coarse sea salt and cracked pepper. Serve piping hot. Yield: 4 servings.
Thursday, May 7, 2009
Kaiser Rolls
I was ten years old and safely cocooned in the old neighborhood on the South side of Chicago. In the wider world, war raged in Korea and the existence of a hydrogen bomb was confirmed by President Truman. Credit cards had just been introduced and mass production of main frame computers was underway. Automania was sweeping the country and folks were living comfortably on an income that averaged $2992 a year. That income made extras possible and contributed to the development of yo-yo mania among the young. I was a yo-yo maniac. Wednesdays were a special day. The Duncan yo-yo man came to the neighborhood to demonstrate the very latest of his tricks and conduct a contest using members of the audience. I was awfully good. As a matter of fact, I was fierce and ended my career with 3 gold and 2 silver yo-yos to commemorate my prowess. We won't speak of bragging rights. My Walk the Dog, Loop the Loop and Around the World were legend, but because I was small I was not always chosen from the chorus of "pick me" that proceeded each contest. These were elbow-room only affairs and to get a decent spot you had to beat the crowd. That meant lunch at Mary's Deli. That was also a good thing. Mary and her husband lived in the back of the store, their home separated from the deli by a curtain. I suspect their noses became inured over time to the smell of dill and cheese and pastrami that assaulted the senses as you walked in the door. Mary's sandwiches were Lucullian. It was the rolls that did it - her Kaiser rolls were to die for. They were eggy, slightly sweet and lightly laced with cinnamon. Today's recipe is my first attempt to recreate the rolls. I'll be making these again, but with more egg and a tad more sugar next time out. I'll update you as my experiment progresses. My changes to the recipe will be highlighted in red. If you like to learn how to shape Kaiser rolls I highly recommend a quick trip to The Fresh Loaf for a tour du jour. The rolls are simple to make and once you're comfortable with the five-fold technique they're actually quite easy to shape. Here's the recipe.
Kaiser Rolls
Ingredients:
3 1/2-4 cups (1 lb.) bread or unbleached all-purpose flour
1 1/2 teaspoons instant yeast
1 teaspoon salt
2 tablespoon sugar
1 teaspoon cinnamon
1 tablespoon malt powder
1 1/4 cups (10 oz.) water
1 tablespoon shortening, butter, or oil
1 egg
1 egg white
1/4 to 1/2 cup poppy seeds
Directions:
1) Combine 3 cups flour, yeast, salt, sugar, cinnamon and malt powder in the bowl of an electric stand mixer fitted with a dough hook. Stir in water, eggs and shortening. Mix for 5 to 7 minutes, adding flour only as necessary to form a tacky but not terribly wet dough. Place dough in a greased bowl, cover, and let rise until double in volume, about 1 hour. Punch down and let rise another hour before shaping. 2) Preheat oven to 450 degrees F. Cover the surface of a cookie sheet with poppy seeds. Set aside. To shape rolls, divide dough into 8 smaller pieces. Working on a lightly floured surface roll pieces of dough into balls and cover them with a damp kitchen towel; let sit for 5 minutes. Flatten into disks. Let rest another 5 minutes. Fold sides to center. Seal. Place them face down on prepared cookie sheet. This will keep seals from splitting while they rise. Cover with towel and let rise for 1 hour. Flip rolls upright in pan. Place in oven. Spray sides of oven with water to create steam. Bake until a deep golden brown, about 20 to 25 minutes. Remove to rack to cool. Yield: 8 rolls.
Recipe adapted from The Fresh Loaf.
I'm sending this recipe to Susan at Wild Yeast for her weekly Yeast Spotting event.
Wednesday, May 6, 2009
Yogurt Cheese Cake
Cheesecake is a sometimes treat in our home. We love it but can't justify the calories that it packs. It's my youngest daughters favorite dessert, so I did a test run of a new lower-fat version last evening. The recipe was developed by Gina De Palma and it comes from her book "Dolce Italiano: Desserts from the Babbo Kitchen." Her cake caught my eye because it uses Greek yogurt and mascarpone instead of cream cheese. Both products are available in low-fat versions, so I thought I'd give her recipe a try. I was able to get low-fat Greek yogurt at Trader Joe's and a local grocery store had reduced-fat mascarpone. I decided to use a square springform pan. It's shape makes it possible to cut the cake into smaller pieces and I wanted to get 12 slices from the finished cake. Before I go any further, I must tell you that this is a delicious confection, but there are buts . The cake is less firm than a standard cheesecake. It actually jiggles. I had to cook it longer than the recipe suggested to assure the center of the cake was actually done. Plan to make the cake the day before you want to serve it. Because it was soft and I wanted reasonably clean slices, I froze the cake before slicing. That added more time to my game plan. Would I make it again? Absolutely. I love the texture and flavor of the cake. I plan to do another test run. I want to make the cake in individual custard cups. I know there are petite cheesecake pans, but the portion size is larger than I want to serve. The cake has a gorgeous yellow glow and it looks spectacular with fresh berries strewn around it. I hope you'll try this.
Yogurt Cheesecake
Ingredients:
Cooking spray
3/4 cup sugar + more to dust the pan
3 cups low-fat Greek yogurt
1-1/2 cups reduced-fat mascarpone or reduced-fat cream cheese
3 tablespoons confectioners' sugar
3 large eggs
6 large egg yolks
1/2 teaspoon kosher salt
1-1/2 teaspoons vanilla
Directions:
1) One day before serving, preheat oven to 350 degrees and bring a kettle of water to a boil. Grease a 10-inch springform pan with cooking spray. Sprinkle pan with sugar, tapping out excess. Wrap outside of pan with foil to prevent water from seeping into the cake. Place springform in a large roasting pan. Set aside.
2) Place yogurt, mascarpone, sugar, and confectioners' sugar in bowl of an electric mixer. Beat until smooth, about 1 minute. Add salt and vanilla. Beat in whole eggs and egg yolks, one at a time, scraping bowl as necessary. Pour batter into springform. Carefully fill roasting pan with enough hot water to rise halfway up sides of the springform. Tent pan with foil. Bake for 20 minutes. Rotate pan and bake for 20 minutes more. Remove foil and continue baking until cake is puffed but not cracked, jiggly but not liquid in center, about 25 to 35 minutes more.
3) Turn off oven. Open door and cool cake in roasting pan until water is lukewarm, then remove and cool an a rack. Cover and refrigerate overnight. Remove sides from springform just before serving. Yield: 12 servings.
Labels:
cheesecake,
dessert,
low-fat,
mascarpone,
yogurt
Tuesday, May 5, 2009
Lamb and Feta Patties with Red Pepper and Apple Relish
Our summer plans have been finalized and, God willing, the entire family will be home for a reunion in late July. Tradition dictates that everyone gets to have at least one favorite meal or dessert while they are home. I also want to test some new recipes while "those raised not to lie" are sitting at the table. That means the gal who brought you Christmas cookies in March will be testing new recipes before the hungry horde descends upon the homestead. Today's effort was an old recipe from Gourmet magazine. Lamb patties are mixed with feta cheese, then broiled and finished with a topping of a mildly pickled pepper relish. I've had the recipe for six years or so and decided it's time to test it or toss it. Fortunately, the recipe is a keeper - a solid four on a scale of five. It's gorgeous to look at and vaguely Greek in flavor. I made a Greek salad and roast potatoes with lemon and garlic as an accompaniment. The patties can also be served on rolls or in pocket pita. One meal down, thirteen to go. If you're looking for a change of pace, you might want to give this a try.
Lamb and Feta Patties with Red Pepper and Apple Relish
Ingredients for relish:
3/4 cup cider vinegar
1/4 cup sugar
2/3 cup water
2 orange or red bell peppers, cut into 1/2-inch pieces
1/3 cup golden raisins
1 Golden Delicious apple, peeled, cored, and cut into 1/2-inch cubes
1 teaspoon mustard seeds
1/8 teaspoon cayenne
1/2 teaspoon salt
Ingredients for patties:
1 slice firm white sandwich bread, torn into pieces
1 scallion, coarsely chopped
1 garlic clove
1/3 cup coarsely chopped fresh mint
1 1/4 lb ground lamb
1 large egg, lightly beaten
1/4 lb feta, crumbled (3/4 cup)
3/4 teaspoon salt
1/4 teaspoon black pepper
Directions:
1) To make relish, bring vinegar and sugar to a boil in a 2-quart nonreactive heavy saucepan. Stir until sugar dissolves. Continue to boil for 1 minute longer. Stir in peppers, raisins, apple, mustard seeds, cayenne pepper and salt. Bring to a simmer and cook, uncovered, until peppers and apple are tender, about 25 minutes. Set aside.
2) To make patties, preheat broiler. Place bread, scallion, garlic, and mint in the bowl of a food processor. Pulse until finely chopped. Place crumbs in a bowl with lamb, egg, feta, salt and pepper. Mix with hands until combined. Do not over mix.
3) Form into 4 1/2-inch patties. Broil patties on oiled rack of a broiler pan 5 inches from heat until browned but still slightly pink in center, about 4 minutes on each side. Serve patties with relish. Yield: 4 servings.
Recipe adapted from Gourmet Magazine - February 2002
Another Harbinger of Spring - Hellibores for Outdoor Wednesday
Bob and I spent most of our lives on the east side of the Rocky Mountains where snowdrops were harbingers of spring. Here in Oregon, hellibores quietly trumpet winter's end. Unfortunately, the blooms of these shy ladies face downward and hide their beautiful faces. If you want to see them you'll have to kneel. These regal damsels are almost effortless to grow and propagate like rabbits. Unfortunately, they readily sport and that gorgeous yellow or near black plant may produce offspring of a different hue. While hybridization is a gamble, lovers of nature's lottery will enjoy an effortless show of flowers from one year to the next. These plants have no scent save for that of the damp earth and duff in which they grow. They are constant and serene. They've found a quiet place in a chaotic universe and are content to bloom where they are sown.
I'll be sharing this post with the other participants of Outdoor Wednesday, a blogging event sponsored by Susan at A Southern Daydreamer.
Monday, May 4, 2009
Orange Glazed Fiesta Chicken
We don't eat a lot of Mexican food and I tend not to make the high caloric favorites that graced the table when our children were at home. However, since today is Cinco de Mayo, I thought today's recipe should be Mexican or Mexican inspired. I didn't want to add another version of enchiladas to your already burgeoning collection and I thought you might enjoy the flavors of this quick and easy fiesta chicken. The recipe is straight forward. The chicken is braised stove top, but is finished under the broiler. While this is not necessary, time under the broiler gives the chicken a lovely orange glow. I use bone-in thighs for this preparation, but I remove the skin. The skin becomes flaccid as the chicken braises and, in my book, becomes inedible. I've tried cooking with the skin on and then removing it just before serving, but chicken prepared this way lacks the depth of the flavor I look for in a braise. I've found the best solution is to remove the skin, lightly dust the thighs with flour and then brown them using medium heat before adding liquid to the pan. The chicken is table ready in about 35 minutes. While there is a poblano in the sauce, this is not an overly spicy recipe. Let's get this done. It's time for a fiesta.
Orange Glazed Fiesta Chicken
Ingredients:
1 tablespoon freshly zested orange peel
1/2 cup fresh orange juice
2 to 3 tablespoons honey
2 tablespoons orange liqueur
1 chipotle chile (canned and packed in adobo sauce), mashed
1 teaspoon adobo sauce from canned chipotle chile
4 cloves minced garlic
1 chicken bouillon cube
1/2 teaspoon pimenton (sweet smoked Spanish paprika)
1 tablespoon olive oil
1 tablespoon butter
1/4 cup all-purpose flour
8 bone-in, skinless chicken thighs
1 teaspoon kosher salt
1/2 teaspoon freshly cracked pepper
Optional garnish:
1 tablespoon chopped cilantro
1 tablespoon orange peel strips
Directions:
1) Combine orange zest, orange juice, honey, orange liqueur, mashed chile, adobo sauce, garlic, bouillon cube and paprika in a small bowl. Mix well. Set aside.
2) Season chicken with salt and pepper. Lightly coat with flour.
3) Heat oil and butter in a large ovenproof skillet over medium heat. Add chicken thighs and saute, turning once, until both sides are brown, about 6 to 8 minutes. Pour sauce over chicken and bring to a boil. Reduce heat and simmer, covered, for 20 minutes turning and basting halfway through.
4) Meanwhile, preheat oven broiler. Transfer chicken to a broiler pan. Broil 5 inches from heating element until bubbly and lightly brown. Transfer chicken to a serving plate.
5) Rapidly boil sauce to reduce by half. Adjust seasoning. Spoon over chicken. Garnish with cilantro and orange strips, if using. Yield: 4 servings.
Subscribe to:
Posts (Atom)