Wednesday, June 30, 2010

Frozen Strawberry Souffle


From the kitchen of One Perfect Bite...The recipe for this light and airy creation comes from Wolfgang Puck, who learned how to make frozen souffles while working at Maxim's in Paris. This bears no resemblance to a baked souffle, and the recipe is easy enough that new cooks can successfully prepare the dish. The souffle is made with beaten egg whites and whipped cream. They are folded into a fruit base and frozen, without special equipment, to make a dessert that has a light, smooth consistency that is more like a frozen mousse than ice cream. We have very young children in our family, so, to avoid any chance of salmonella, we use pasteurized eggs in all dishes where eggs are not cooked. While they are beaten with a hot sugar syrup, in a process that is very similar to that used in making an Italian meringue, I don't think the eggs, as processed in this recipe, ever get hot enough to kill salmonella, should it be present. So, I've joined the "better safe than sorry" school of egg handling. I hope you will too. While the souffle is very easy to make and uses only five ingredients, it is an elegant and impressive dessert that is suitable for guests as well as family. This is a terrific recipe that also has instructions for making a lovely fruit syrup to spoon over the souffle. Any of the "cane" fruits can be used to make this dessert. It should be made the day before you need it , and the souffle should be transferred to the refrigerator about an hour before you plan to serve it. I know that those of you who try this won't be disappointed. Here's how it's made.

Frozen Strawberry Souffle...from the kitchen of One Perfect Bite, courtesy of Wolfgang Puck

Ingredients:

1-1/2 quarts ripe strawberries, hulled + 4 strawberries for garnish
2 pasteurized egg whites
1/2 cup sugar
3 tablespoons water
1 cup heavy cream, whipped
Optional: Grand Marnier or kirsch, for the sauce

Directions:
1) Set aside berries used for garnish. Place remainder of berries in bowl of a food processor. Process until pureed. Transfer to a storage bowl, cover, and refrigerate until well chilled.
2) When berries are chilled, place egg whites in a mixing bowl and beat with a hand-held electric mixer until they form soft peaks that droop when tested. Sprinkle in 2 tablespoons of sugar and continue beating until egg whites form stiff, shiny peaks. Set aside.
3) Place remaining 6 tablespoons of sugar and 3 tablespoons of water in a small saucepan. Cook over medium heat, stirring until sugar dissolves, and then continue cooking just until mixture starts to bubble and begins to thicken.
4) While continuing to beat egg whites, slowly pour hot syrup into egg whites. Continue beating until whites have cooled.
5) Using a rubber spatula, gently fold 1-1/2 to 2 cups of the strawberry puree into egg whites; reserve rest of puree in refrigerator for a sauce. Then, fold whipped cream into egg white mixture until thoroughly incorporated. Taste mixture and, if necessary, sprinkle in a little more sugar to taste.
6) Pour mixture into a 5- or 6-cup souffle dish. Cover with plastic wrap and freeze overnight.
7) Before serving, transfer frozen souffle to refrigerator to soften slightly. Meanwhile, pour remaining strawberry puree through a fine-meshed sieve into another bowl. Add a little sugar and a splash of Grand Marnier or kirsch to taste.
8) Scoop souffle into individual serving dishes. Spoon sauce around each serving and garnish with a whole berry. Serve immediately. Yield: 4 to 6 servings.

You might also enjoy these recipes:
Cold Lime Souffle - One Perfect Bite
Frozen Lemon Souffle - The English Kitchen
Iced Lime Souffles with Poppyseeds - La Tartine Gourmande
Deep Frozen Orange Souffles - Whisk
Frozen Coffee Liqueur Souffle - Five Star Foodie Culinary Adventures
Frozen Anisette Souffle - Foodista
Souffle Glace aux Framboise - Cookie Madness

Tuesday, June 29, 2010

Red Pepper Relish


From the kitchen of One Perfect Bite...The horror! Local berries of all sorts, have simultaneously appeared on the shelves of our farmer's markets and roadside stands. The berries are fully ripened and need immediate attention if their wonderful flavor is to be captured and preserved. I've pushed the raspberries and blueberries to the side for the time being, but I'm up to my elbows, literally, in flats of strawberries. My hands look like those of a surgeon in a trauma unit and words can't begin to describe the chaos that is currently my kitchen. I've been known to chuckle, sometimes discretely, at young managers who measured their own importance by the size of their staffs. I escaped that trap when I was working, but I've succumbed to ego in my kitchen. Forgive me, just this once, as I report my "body count." That would be 18 pints of freezer jam, 12 (1-gallon) bags of flash frozen berries, eight pints of raspberry syrup and five glorious desserts that I'll be sharing with you over the next few weeks. I was making strawberry salsa when I remembered this recipe that is based on one originally developed by Michael Symon. It is a sweet, deliciously spicy relish that can make eggs and sandwiches feel important. It's also great as an alternative topping for burgers or fish. For the record, the only thing it has in common with the strawberries is its glorious red color. I was thinking red today, and it made sense to make this before I restored order to the kitchen. Here's the recipe for a wonderful and uncommon relish. It will keep for a month in the refrigerator.

Red Pepper Relish ...from the kitchen of One Perfect Bite, inspired by Michael Symon

Ingredients:
1 tablespoon olive oil
1/4 cup finely diced red onion or shallot
2 large garlic cloves, finely minced
Kosher salt
2 red bell peppers, cored, seeded and finely diced
2 jalapenos, seeded and finely diced
1 tablespoon toasted coriander seeds
1/4 cup packed brown sugar
1/4 cup white wine vinegar
1/2 cup orange juice
1/2 cup chopped fresh cilantro

Directions:
1) Add olive oil to a medium saucepan. Place over medium heat and warm until oil begins to shimmer. Add onions, garlic and a pinch of salt. Cook until onions begin to soften, about 2 minutes. Add red peppers and jalapenos and cook for 2 minutes longer. Add corainder seeds and cook for 1 minute longer.
2) Add sugar and vinegar to pan and cook, stirring, until sugar dissolves. Add orange juice and simmer, stirring occasionally, until liquid has completely reduced, about 10 minutes. Remove from heat. Cool to room temperature. Add cilantro and season to taste with salt and pepper. Refrigerate. Yield: 2 cups.

You might also like these recipes:
Blueberry Salsa - One Perfect Bite
Watermelon, Black Bean and Corn Salsa - One Perfect Bite
Thai Cucumber Relish - One Perfect Bite
Corn Relish - SlashFood
Green Tomato Relish - Mommy's Kitchen
Mango, Red Pepper and Cilantro Salsa - Cook Sister
Mango Chutney - Ciao Chow Linda

Monday, June 28, 2010

Lemon Coleslaw


From the kitchen of One Perfect Bite...If you're still looking for a salad to accompany holiday barbecues or picnics, you might want to give this slaw a try. It's exceptionally easy to make, and if you use commercially shredded cabbage, it's next to no work at all. I know that you are deluged with salad recipes at this time of year, and I'm sure that most of them are worthy of your attention. This one, however, really deserves more than a fleeting glance. It's clean-tasting and is less sweet than most of the slaws I've tried. It also uses less mayonnaise. The slaw components are sprinkled with sugar and salt that causes them to release their juices and extend the mayonnaise. You can use reduced fat mayonnaise and sour cream if you are counting calories or fat grams. This salad gets its tang from fresh lemon juice and zest and that makes it really nice to serve with fish or chicken dishes. I love the ease with which this can be put together. It is one less thing to worry about when you are having guests, and it frees your hands to make that special dessert or entree that might become your signature dish. I hope you'll try this. Here's the recipe.

Lemon Coleslaw...from the kitchen of One Perfect Bite, courtesy of Gourmet Magazine

Ingredients:
2 tablespoons low-fat sour cream
2 teaspoons low-fat mayonnaise
1/2 teaspoon finely grated fresh lemon zest
4 teaspoons fresh lemon juice
1 teaspoon sugar
3 tablespoons water
1/4 teaspoon salt
1/8 teaspoon black pepper
4 cups (1 pound) thinly sliced green cabbage
2 carrots, cut into julienne strips or coarsely grated
1 cup (1 bunch) thinly sliced scallions
1/2 cup chopped fresh flat-leaf parsley

Directions:
Whisk together sour cream, mayonnaise, zest, lemon juice, sugar, water, salt, and pepper in a large bowl until sugar is dissolved. Add cabbage, carrots, scallions, and parsley and toss well. Chill, covered, 1 hour to allow flavors to develop. Season with salt and pepper. Yield: 4 servings.

You might also enjoy these recipes:
Bulgur Salad with Pomegranate Dressing - One Perfect Bite
Wild Rice, Celery and Walnut Salad - One Perfect Bite
Asian-Style Carrot Salad - One Perfect Bite
Whole Wheat Orzo Salad - Kalyn's Kitchen
Bean Salad - New york Times Diner's Journal
Strawberry Spinach Salad with Poppy Seed Vinaigrette - For the Love of Cooking
Simple Radish Salad - In Erika's Kitchen
Fresh Pea Salad - Closet Cooking

Sunday, June 27, 2010

Baba Ganoush - Blue Monday


Baba Ganoush


Connor - the youngest of Oma's "Blue Boys"

From the kitchen of One Perfect Bite...Baba Ganoush is a vegetable dip that's very popular in the Arabic Middle East and other Mediterranean countries. It's a simple, inexpensive dish, and there are probably as many versions of it as there are kitchens in those countries. I don't mean to confuse the issue by posting yet another, but I wanted to record our family version of the dip in a spot where my girls can get to it when they need it. My version has a smoky flavor because it's grilled over an open flame, rather than being baked or broiled in an oven, as is the custom in some homes. This recipe also has some zip that comes from a fairly substantial addition of fresh lemon juice. There are several acceptable ways to garnish this dish. I tend to use what I have on hand, so, more often than not, I'll drizzle it with olive oil or sprinkle it with chopped flat-leaf parsley. When they are available I also love to use pomegranate seeds. I used to serve the dip with pita bread, but I have recently started to use still warm, freshly fried tortilla chips in their stead. It is not authentic, but it is delicious. Without further ado, here's the recipe for a dip or spread that is a wonderful accompaniment to a Middle Eastern or Mediterranean meal.

Baba Ganoush...from the kitchen of One Perfect Bite

Ingredients:
1 large (1-pound) eggplant
3 cloves garlic
1/4 cup fresh lemon juice
Salt to taste
3 tablespoons tahini
2 tablespoons olive oil
1/2 to 1 teaspoon ground cumin
1/4 to 1/2 teaspoon freshly ground black pepper
Garnish:
3 tablespoons pomegranate seeds, or 1 tablespoon chopped fresh flat-leaf parsley, or 1 tablespoon extra-virgin olive oil

Directions:
1) Prepare a charcoal fire or preheat a gas grill. Puncture eggplant in several places with a fork. Grill for 20 minutes, turning occasionally, until skin is charred and eggplant is soft.
Cool until it can be handled. Cut eggplant in half and scrape pulp into a sieve. Hold under cold and gently running water. Squeeze as much liquid as possible from pulp.
2) Combine pulp, garlic, lemon juice and salt in bowl of food processor. Process until smooth. Add tahini and process just to incorporate. Adjust seasoning if required. With processor running, add olive oil, cumin and pepper. Transfer to a small serving bowl, cover and chill for at least 30 minutes. Baba Ganoush can be refrigerated for up to 2 days. Garnish and serve. Yield: 2 cups.

You might also enjoy these recipes:
Red Pepper Hummus - One Perfect Bite
Black Bean Hummus - One Perfect Bite
Mexican Beer-Cheese Spread - One Perfect Bite
Hummus en Fuego - eCurry
Muhammara - Closet Cooking
Grilling Baba Ghanoush - Serious Eats

This post is being linked to:
Smiling Sally - Blue Monday

Saturday, June 26, 2010

Curried Cream of Cauliflower and Apple Soup


From the kitchen of One Perfect Bite...We had guests for dinner last evening and I wanted to share the lovely soup we had to start the meal with you. It is French in origin, and has a highfalutin name that makes it sound more formal and pretentious than it actually is. I do, however, work on the theory, that those who know a language are entitled to use the name with which they are most familiar. Lovers of France and the French language call this potage, Soupe Crème de Choux-Fleurs et Pomme au Curry. Those of us who lack the requisite language skills will call it Curried Cream of Cauliflower and Apple Soup. Julia Child would have loved this recipe. It's based on one developed by Daniel Boulud and I think you'll love it too. It's actually easier to make than any of Julia's recipes and were you to eliminate the garnish, the soup is no harder to make than good old tomato soup. Really. Our local farmer's markets have shelves bending under the weight of cauliflower and it's also being tucked into CSA boxes. This is a wonderful way to use it up. The recipe has been developed to provide six servings and uses a cup of heavy cream. None of you need my permission to swap light for heavy cream. It changes the texture of the soup but it is still lovely. The recipe can also be doubled if you have a gang to feed. When I make the soup for family I omit the garnish, but I do use it when we have guests around the table. I use saffron when we have the queen to dinner. Those of you who try this are in for a sweet and spicy treat. It's smooth and creamy, and, like most cream soups, can be made well in advance of serving. Here's the recipe.

Curried Cream of Cauliflower and Apple Soup...from the kitchen of One Perfect Bite, inspired by Daniel Boulud

Ingredients:
Soup
4 cups chicken stock
1-1/2 tablespoons sweet butter
1 cup chopped onions
2 teaspoons curry powder
Optional: 1/2 teaspoon saffron threads or 2 pinches saffron powder
1 cup tart apples, such as Granny Smiths or Golden Delicious, peeled, split, cored and sliced
4 cups cauliflower (about 1 medium head), greens and stem discarded, head broken up
into small florets
1 cup heavy cream
1 tablespoon chives, minced
Salt and freshly ground black pepper to taste
Curried Apple Garnish
1 cup Golden Delicious apple, peeled, split, cored, cut in 1/4 inch dice
1 teaspoon curry powder
Optional: 1/4 teaspoon saffron threads or 1 pinch saffron powder
Salt and freshly ground black pepper to taste

Directions:
1) For soup: Warm chicken stock over medium heat. Melt butter in a heavy bottomed pot over medium-low heat. Add onions, curry powder, and saffron and cook for 2 minutes, stirring often. Add sliced apple and cook for another 5 minutes, stirring often. Add cauliflower and warm chicken stock and bring to a boil. Boil until cauliflower is tender when pierced with a knife, approximately 20 minutes. Add cream and cook for 3 more minutes. Salt and pepper to taste. Transfer soup in batches to a blender or food processor and purée at high speed until very smooth. Strain through a fine sieve. Keep warm until ready to serve or refrigerate when cool and reheat just before serving.
2) For garnish: Place diced apples with 1 tablespoon of water in a pan over medium heat. Add the curry powder, saffron, and salt and pepper to taste. Mix well, cover with a lid, and cook for 3 minutes over medium heat. Strain and keep warm.
3) To serve: Ladle soup into warm soup bowls or cups. Sprinkle garnish over top. Yield: 4 to 6 servings.

You might also like these recipes:
Yellow Cauliflower - One Perfect Bite
Gobi Manchurian - One Perfect Bite
Roasted Spicy Cauliflower - Kalyn's Kitchen
A Tale of Two Cauliflower Soups - Becks and Posh
Cauliflower Soup - Annie Blogs
Simple Cauliflower Soup - Simply Recipes

Friday, June 25, 2010

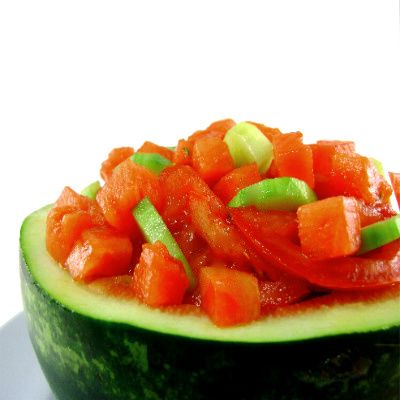
Watermelon, Cucumber and Tomato Salad - Pink Saturday


From the kitchen of One Perfect Bite...While searching for side dishes that would add pizzaz to barbecues and picnics, I came across this lovely salad that's guaranteed to waken tired taste buds. It's made with watermelon, tomatoes and cucumbers and gets an added boost of flavor from herbs that you get to choose. It's tossed with a light vinaigrette and served in a hollowed melon shell that adds visual appeal to an otherwise plain presentation. While there is some chopping involved, the salad is simple to make and it is portable. It can also be made more substantial with the addition of cooked shrimp or feta cheese. The components of this salad all release large amounts of liquid and they will drown in their own juice if the salad sits too long. So, while I prepare everything hours in advance of serving, I wait until the last minute to combine and toss the elements together. I love this dish, but as I made it a wave of nostalgia washed over me. You see, I remember a time when watermelon was a treat eaten while lying shoeless in the grass as we searched the sky for Venus and craters on the moon. No one spoke of mint or maceration, as seeds were spit, willy-nilly, among the fire-flies that lit the dark Midwestern night. I hope our children all still know the joy of simple pleasures and hear the crickets song. Here's the recipe that started my reverie. I think you'll really like it.

Watermelon, Cucumber and Tomato Salad...from the kitchen of One Perfect Bite, courtesy of Beth Nakamura and Oregon Live

Ingredients:
2 tablespoons granulated sugar
2 tablespoons white wine vinegar
1/4 cup slivered red onion
Pinch salt
Pinch crushed red pepper flakes
2 tablespoons extra-virgin olive oil
2 cups diced (1/2-inch) seeded watermelon
2 ripe firm, meaty tomatoes, cut into 16 thin wedges
1 seedless cucumber, peeled and halved lengthwise and cut crosswise into 1/2-inch pieces
1/4 cup slivered fresh basil leaves or other herbs such as mint or tarragon
Freshly ground black pepper

Directions:

1) Combine sugar, vinegar, onion, salt and red pepper flakes in a small saucepan. Stir over medium heat until sugar dissolves. Remove from heat, add oil. Set aside to cool.
2) Combine watermelon, tomatoes, cucumbers and basil in a large bowl. About an hour before serving, pour dressing over mixture and toss gently. Season to taste with salt and pepper. Chill. Turn mixture into a watermelon shell to serve. Yield: 6 to 8 servings.

You might also enjoy these recipes:
Corn Salad with Edamame and Tomatoes - One Perfect Bite
Asian Bean Sprout Salad - One Perfect Bite
Asparagus and White Bean Salad - One Perfect Bite
Picnic Pasta Salad - Good Bite
Grated Carrot Salad - Culinate
Dill Potato Salad - Susi's Kochen Und Backen Adventures

This post is being linked to:
Pink Saturday, sponsored by Beverly at How Sweet the Sound.

Thursday, June 24, 2010

Apple Raisin Chutney


From the kitchen of One Perfect Bite...I'm all set for a canning and freezing marathon, but our local strawberries are still a few days short of prime. To keep myself focused, I decided to put by a few jars of apple chutney that I anticipate will be lovely for glazing meats, and spreading on the Indian breads I experimented with this morning. If you like chutney, you'll love this recipe. It produces a dark, glossy spread with a curry flavor and a jam-like texture. The choice of curry, hot or not, is up to you. I make this in small quantities because the ingredients need to make it are always available, and that makes bulk storage and a canning orgy unnecessary. While this is really easy to prepare, there is some chopping involved and you'll have to carefully watch the chutney as it cooks to avoid it burning. If it catches on you'll have to pitch the entire batch. This chutney is less viscous than the mango chutneys that are commercially available, so don't panic when you see how thick this is. That's as it should be. I refrigerate or freeze the jars I make, but if you wish, they can be processed in a boiling water bath for long term shelf storage. The chutney will keep for three weeks in the refrigerator and for up to six months in the freezer. Here's the recipe.

Apple Raisin Chutney...from the kitchen of One Perfect Bite, inspired by Nancie McDermott
Ingredients:
4 cups peeled, cored and chopped cooking apples (i.e. Golden Delicious or Granny Smiths)
1/2 cup water
1 cup finely chopped onions
1 tablespoon minced garlic
1 can (14.5-oz.) peeled, chopped tomatoes, undrained
3/4 cup apple cider vinegar
1 cup dark raisins
1/2 cup golden brown sugar
2 tablespoons curry powder
2 teaspoons mustard seeds
1/2 teaspoon salt

Directions:

1) Place apples in a 3-quart pan with water. Cover pan. Bring to a gentle boil over medium heat. Simmer for 20 minutes or until apples are soft.
2) Meanwhile, combine onions, garlic, tomatoes, vinegar, raisins, sugar, curry powder, mustard seeds and salt in another heavy bottomed saucepan. Stir to mix well.
3) Mash apples and add to mixture in saucepan. Mix well. Bring to a rolling boil over medium-high heat. Stir well, reduce heat and simmer gently for 1 hour and 15 minutes. Stir pot often, being sure scrape bottom of pan to discourage sticking. Chutney is done when it is a th. Remove from heat. Cool to room temperature. Transfer to lidded jars or freezer containers. Chutney will keep in refrigerator for up to 3 weeks. It will keep in freezer up to 6 months. Yield: 4 1/2 pints.

You might also enjoy these recipes:
Fresh Mango Chutney - One Perfect Bite
Balsamic Onion Marmalade - One Perfect Bite
Tomato Jam - One Perfect Bite
Crock-Pot Dried Apricot Jam - One Perfect Bite
Spicy Tomato Chutney - Beck and Posh
Homemade Mango Chutney - Simply Recipes
Apricot Jalapeno Chutney - eCurry

Wednesday, June 23, 2010

Deviled Eggs with Curry and Cilantro


From the kitchen of One Perfect Bite...I was an adult before I had a deviled egg. For whatever reasons, they were never prepared in the kitchens of my childhood. I suspect these may be one of those dishes that has regional, rather than national appeal and I was raised in an area where they were not widely popular. While I enjoyed my first deviled egg, I was never moved to reproduce them in my own kitchen. I sat in on a planning meeting for a picnic this week, and deviled eggs were mentioned as a possible menu item. I feel badly now, because I was the one who squashed the idea of serving them. I have a "thing" about dishes made with mayonnaise being served on occasions where there is no refrigeration, and, in arguing my point of view I was way more vociferous than was necessary. These eggs were my way of apologizing to the woman whose toes I stepped on. She liked them, so I thought those of you who enjoy deviled eggs might want to give them a try. The eggs have a hint of curry and are wonderfully fragrant. I found the recipe in Nancie McDermott's The Curry Book and I can recommend the eggs and the book to you. These eggs will never win a beauty contest, but if you are looking for a new twist on an old favorite, I think you'll like them. It is probably best to use a mild curry powder to prepare them. Here's the recipe.

Deviled Eggs with Curry and Cilantro
...from the kitchen of One Perfect Bite, courtesy of Nancie McDermott

Ingredients:

8 large eggs
1/4 cup mayonnaise
1 tablespoon mild curry powder
1/2 teaspoon prepared mustard
1/2 teaspoon salt
1/4 teaspoon freshly ground black pepper
1 large scallion, thinly sliced crosswise
2 tablespoons finely chopped cilantro

Directions:
1) Place eggs in a medium-sized saucepan and cover them with water. Bring to a full boil over high heat. Reduce heat to medium and simmer for eight minutes longer. Remove from heat. Drain and rinse in two changes of cold water. Leave eggs in water until cool.
2) While eggs cook, combine mayonnaise, curry powder, mustard, salt and pepper in a mixing bowl. Mix well. Set aside.
3) Peel eggs and cut in half lengthwise. Carefully scoop out yolks and force through a sieve. Add to mayonnaise mixture and mix well. Fold in scallions and cilantro. Stuff each egg with one tablespoon filling. Serve at once, or cover and chill until ready to serve. Yield: 16 deviled eggs.

You might also enjoy these recipes:
Tarragon Mustard Deviled Eggs - Kalyn's Kitchen
Wasabi Deviled Eggs - Cooking with Amy
Deviled Eggs Deluxe - The Recipe Girl
Lemon Dill Deviled Eggs - Eat Real
Incredible Deviled Eggs - Christine Cooks

Tuesday, June 22, 2010

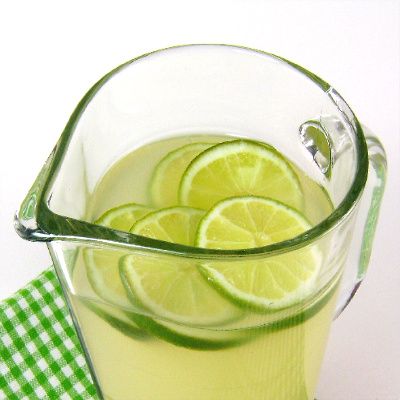
Limeade Concentrate


From the kitchen of One Perfect Bite...There is in cyberspace a remarkable site called Cooking for Engineers. It's written by Michael Chu who features wonderful recipes with instructions that clearly explain how and why things within his recipes are done. While the site is a technocrat's dream, it's designed and written in such a way that everyone can read and enjoy it. I recently paid the site a visit to search for recipes that used limes. I have a weakness for quantity buying and managed to return from a warehouse store with enough limes to serve the needs of a small country. Having made lime curd and sundry other treats, I still had limes to deal with. Lots of limes. Fortunately, Michael had a recipe for limeade concentrate that you can find here. The concentrate is made using fresh lime juice and a simple syrup. You'll need six to eight good-sized limes to extract a cup of juice. That cup of juice is mixed with three cups of a simple syrup to form a limeade concentrate that can be frozen. When you're ready to enjoy a cool and refreshing beverage, the concentrate is reconstituted using two parts water to one of the concentrate. We love bubbles in our summer drinks, so I reconstitute our limeade with club soda. Ginger ale or a lemon-lime drink would also work well. Here's the recipe for the concentrate and the limeade.

Limeade Concentrate
...from the kitchen of One Perfect Bite, courtesy of Michael Chu

Ingredients for concentrate:
1 cup fresh, strained lime juice
1-1/2 cups granulated sugar
1-1/2 cups water

Directions for concentrate:
Combine sugar and water in a medium saucepan. Heat, stirring occasionally, until sugar is dissolved. Cool. Add lime juice. Refrigerate or freeze. Yield: 1 quart concentrate.

Ingredients for limeade:

1 cup limeade concentrate
2 cups water

Directions for limeade:
Combine concentrate and water in a pitcher. Stir to dissolve. Yield: 3 cups.

You might also enjoy these recipes:
Homemade Ginger Ale - One Perfect Bite
Iced Watermelon Drinks - One Perfect Bite
Blue Lemonade - One Perfect Bite

Monday, June 21, 2010

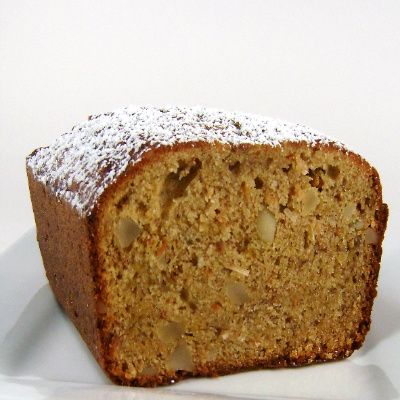
Hawaiian Banana Bread


From the kitchen of One Perfect Bite...My homey's call this lovely banana loaf King Kamehameha bread. We first had it in Hawaii several years ago. It is a lovely loaf whose taste has been enhanced by some very pleasant memories. When we returned from the islands, I began to search for a banana bread recipe that had the same plantation flavors as the bread we so enjoyed. Some find it strange that my quest for new foods begins with a search rather than an experiment. The work I did before retirement taught me not to reinvent the wheel, and, for better or worse, I've carried that belief into my kitchen. I don't create or develop recipes unless I absolutely have to, or I have a truly original idea. That I ever began to enter cooking contests is a mystery to those who know me, and that I actually began to win some is a miracle to me. So, it should come as no surprise, that rather than parse taste memories, I began a search for a recipe I suspected already existed. The search brought me to this lovely bread from Gourmet Magazine. It is very close to the one we sampled on the islands. There are some tricks to making a great banana bread and if you want full banana flavor you have to start with really nasty bananas. The best bananas, from a cook's perspective, are the ones that have huge leopard spots on their exteriors. Beautiful bananas look lovely in a fruit bowl but they make anemic breads, cakes or puddings. I also find it important to toast nuts and other dry additions that are folded into quick breads. Toasting will enhance their flavors as well. This bread is very moist and, if well-wrapped, will stay fresh for several days. It is easy to make and, in the great scheme of things, fairly inexpensive to make. If you can't find macadamia nuts in your area, almonds or pine nuts can be substituted. This is a wonderful bread and I think you'll enjoy it. The aroma as it bakes has been known to make grown men weep. Here's the recipe.

Hawaiian Banana Bread...from the kitchen of One Perfect Bite, inspired by Gourmet Magazine

Ingredients:
2-1/2 cups all-purpose flour
3/4 teaspoon double-acting baking powder
1/2 teaspoon baking soda
1 teaspoon salt
1-1/2 sticks (3/4 cup) unsalted butter, softened
1 cup firmly packed light brown sugar
1/2 cup granulated sugar
1-1/2 teaspoons vanilla extract
3 large eggs
1 tablespoon freshly grated lemon zest
1-1/3 cups mashed ripe banana (about 3 large)
3 tablespoons sour cream
3/4 cup chopped macadamia nuts, lightly toasted and cooled
1 cup sweetened flaked coconut, lightly toasted and cooled

Directions:

1) Preheat oven to 350 degrees F. Generously grease two 8-1/2 x 4-1/2-inch loaf pans.
Dust with flour. Set aside.
2) Sift flour, baking powder, baking soda, and salt together in a medium bowl. In another large bowl, cream butter with sugars with an electric mixer. When mixture is light and fluffy beat in vanilla, eggs, one at a time, zest, banana, and sour cream. Add flour mixture, beating batter until it is just combined. Stir in macadamia nuts and coconut.
3) Divide the batter between loaf pans and smooth tops. Bake 45 to 50 minutes, or until a cake tester inserted in center of loaf comes out clean. Remove bread from pans. Complete cooling on racks. Yield: 2 loaves.

You might also enjoy these recipes:
Lemon Poppyseed Bread - One Perfect Bite
Sugar Crusted Viennese Nut Bread - One Perfect Bite
Three Savory Quick Breads - One Perfect Bite

Sunday, June 20, 2010

Raspberry and White Chocolate Ice Cream


From the kitchen of One Perfect Bite...If you love white chocolate I suspect you'll like this ice cream. If you don't care for it, know that I am numbered in your ranks and have worked the recipe in such a way that it can be used to make something a bit more restrained. If you omit chocolate from the ingredient list, you have the makings for a really lovely French vanilla cream. With or without the chocolate, this is an extraordinarily rich ice cream and you'll probably enjoy it more if it is served in small portions. Too much of it becomes cloying and sets me to dreaming of my favorite ice milk recipe that we featured here over a year ago. I have really simple tastes in desserts and were it not for the raspberry streaks, I wouldn't bother with this. My family, however, loves it, so, I'll be making it, grousing sotto voce, for years to come. Here's the recipe for those of you who love white chocolate and don't mind my grousing.

Raspberry and White Chocolate Ice Cream
...from the kitchen of One Perfect Bite, a Cuisinart recipe adaption
Ingredients:
Ice Cream
1-1/2 cups whole milk
1-1/2 cups heavy cream
3/4 cup granulated sugar
2 large eggs
1 large egg yolk
1-1/2 teaspoon vanilla extract
8 ounces white chocolate morsels
Raspberry Puree
1-1/2 cups (6-oz.) fresh raspberries
1 tablespoon granulated sugar

Directions:
1) To prepare ice cream: Combine whole milk and heavy cream in a medium pan set over moderate heat. Bring to a boil and pour into bowl containing white chocolate, stirring until smooth. Combine sugar, whole eggs, and egg yolk in a medium bowl; beat with a hand mixer until thickened like mayonnaise. Stir in vanilla extract. Beat 1 cup of the hot cream into the egg mixture. Mix in remainder of chocolate cream mixture. Transfer to a medium saucepan and cook mixture over low heat, stirring constantly, until mixture begins to thicken and coats back of a spoon.
Transfer mixture to a bowl. Cover with plastic wrap and refrigerate until completely cooled.
2) To prepare raspberry puree: Combine raspberries and sugar in bowl of a food processor or blender. Process until smooth. Strain seeds from raspberry puree. Cover and refrigerate.
3) To make ice cream: Pour chilled ice cream mixture into freezer bowl and mix until thickened, about 25 to 30 minutes. Spread 1/3 of mixture into a shallow pan. Cover with half of raspberry mixture. Add another 1/3 of ice cream and top with remainder of raspberry puree. Top with last of ice cream mixture. Return to freezer and chill until firm, about 1 to 2 hours. Yield: 8 (1/2-cup) servings.

You might also enjoy these recipes:
Fresh Mint Ice Cream - One Perfect Bite
Ice Cream Crunch Cake - One Perfect Bite
Lemon Buttermilk Ice Cream - One Perfect Bite

Saturday, June 19, 2010

Sugar Snap Peas with Fresh Mint Oil


From the kitchen of One Perfect Bite...This is one of my favorite summer dishes. Sugar snap peas are a cross between snow and English peas and they are one of the easiest of vegetables to prepare. They are crisp and sweet and, unlike the English pea, even the pod is edible. It is, however, advisable to remove the strings from both sides of the peas before cooking. This is done by removing the tip of the pea, pinching the string between your fingers and pulling downward towards the opposite end. I love to make this version of snap peas when I grill lamb chops. The mint oil that is made to dress the peas can also be used as a marinade for lamb chops, assuring that nothing goes to waste. This is a five ingredient recipe that is sophisticated in its simplicity. The peas can be served hot or cold. I usually make them ahead of time and serve them at room temperature. It is one less thing to worry about when trying to get dinner on the table. I must warn you that these are addicting. I have to slap my own hand when I make them. If you are looking for new ways to prepare old standby vegetables, I know you'll love this recipe. You simply can't beat fast, easy and delicious. Here's the recipe.

Sugar Snap Peas with Fresh Mint Oil...from the kitchen of One Perfect Bite, inspired by Grace Parisi

Ingredients:

2/3 cup fresh mint leaves
2/3 cup canola oil
Salt and ground pepper
1 pound sugar snap peas, strings removed
Optional: Lemon wedges and sea salt for serving

Directions:
1) Bring 2 quarts of water to a boil in a 3-quart saucepan. Add mint and blanch just until it is limp and turns bright green, about 30 seconds. Remove mint from pan with a slotted spoon. Plunge into cold water to stop cooking and set color. Drain mint, squeezing out excess liquid. Place mint in blender jar and pulse until finely chopped. With blender running, slowly add oil and blend until mint is pureed. Transfer to a bowl. Season to taste with salt and pepper. Set aside.
2) Add salt to water in which mint cooked. Bring to a boil. Blanch peas until tender and bright green, about 3 minutes. Plunge peas into a bowl of cold water to stop cooking. Drain well and pat dry with paper towels. Transfer to a bowl. Toss with 2 tablespoons mint oil. Arrange on a serving platter. Sprinkle lightly with sea salt if using. Garnish with lemon wedges. Yield: 4 servings.

You might also enjoy these recipes:
Sugar Snap Peas with Sesame - One Perfect Bite
Asian Sugar Snap Peas - For the Love of Cooking
Flavorful Sugar Snap Peas - The Baking Beauties
Snap Peas and Feta Salad Dressing - Twin Tables
Honey Butter Snap Peas - Rachael Ray Show

Friday, June 18, 2010

Smoked Salmon Quesadillas - Pink Saturday


From the kitchen of One Perfect Bite...This is a lovely, quick appetizer that has great eye appeal. While it's easy to prepare, it's stylish enough for guests and will be loved by family and friends alike. Many of you are familiar with a version of this appetizer that is served on thinly sliced rye bread. I use fried flour tortillas to make mine. The base recipe uses goat cheese as a pillow for thinly sliced smoked salmon. Whipped cream cheese or mascarpone can be substituted for the chevre and herbs other than dill can also be used. This is one of my favorite informal appetizers and I make it a point to keep the ingredients need to make it on hand. Smoked salmon is plentiful here in the Pacific Northwest and it is slightly less expensive than in other areas of the country. Folks with a fisherman in the neighborhood are luckier still, as the bounty of our rivers is often shared. It takes about 15 minutes to make this dish. If you try it, I think you'll agree that it is time well spent. Here's the recipe.

Smoked Salmon Quesadillas
...from the kitchen of One Perfect Bite

Ingredients:
3 ounces chevre or whipped cream cheese
1 tablespoon well-drained prepared horseradish
1 tablespoon + 1 teaspoon fresh dill or chives
Salt and pepper to taste
3 tablespoons olive oil
3 (7-inch) flour tortillas
4 to 6 ounces smoked salmon
1 tablespoon fresh lemon juice

Directions
:
1) Combine cheese, horseradish, and 1 teaspoon dill or chives in a small bowl. Beat with a spoon until smooth and well-blended. Blend in salt and pepper to taste. Set aside.
2) Heat oil in an 8-inch skillet set over medium-high heat for 1 minute. Fry tortillas, one at a time, until both sides are lightly brown, about 2 minutes. Drain on paper towels.
3) Spread 3 generous teaspoons of cheese mixture on each tortilla. Arrange smoked salmon slices over over cheese. Sprinkle with 1 tablespoon reserved dill or chives. Drizzle with fresh lemon juice. Cut each tortilla into six pieces and serve immediately. Yield: 6 servings.

You might also enjoy these recipes:
Ravioli with Smoked Salmon and Vodka Cream Sauce - One Perfect Bite
Smoked Salmon Frittata - One Perfect Bite
Salmon Burgers with Chipotle Aioli and Pineapple Avocado Salsa
Buckwheat Blinis with Smoked Salmon and Creme Fraiche - The Recipe Girl
Smoked Salmon Chowder - Mennonite Girls Can Cook
Smoked Salmon Costini - Yum Sugar

This post is being linked to:
Pink Saturday, sponsored by Beverly at How Sweet the Sound.

Thursday, June 17, 2010

Lemon Anise Churros


Photo Courtesy of Nicki Dowey

From the kitchen of One Perfect Bite...
When a chef whose specialty is Southwestern cooking, adds Asian spices to pâte à choux, the end result is a churro with attitude. In its simplest form, a churro is a cylindrical piece of fried dough. It was developed by Spanish shepherds centuries ago and it got its name because it resembled the horns of the Churro sheep they tended. The original churro was the size of a breadstick and was usually eaten for breakfast. The churro escaped its borders during the Age of Discovery and can now be found on tables in many parts of the world. Chef David Walzog added ground star anise and lemon zest to the churros he made during his tenure in the kitchen at Arizona 206. They are delicious and easy to make, but they are not with out pitfalls. The churro must be well-drained, but still warm when it receives its sugar coating, and it must be served immediately after that's been done. These wait for no man or woman. You've been warned. You'll see what happens when I don't follow my own advice at the bottom this post. Having shared that with you, I'd like it to remain our little secret. If you have never had a churro, I hope you will give this recipe a try. If you've had them before, I hope you'll give this version a try. The star anise and lemon zest make these really special. Here's the recipe.

Lemon Anise Churros
...from the kitchen of One Perfect Bite, inspired by David Walzog

Ingredients:
1-1/4 cups all-purpose flour
1/8 teaspoon salt
1 cup water
1 stick (4-oz.) unsalted butter
2 teaspoons ground star anise
Grated zest of 1 lemon
4 large eggs
1 cup granulated sugar
1 cup confectioners' sugar
Vegetable oil for deep frying

Directions:

1) Sift flour and salt into a medium bowl
2) Combine water, butter, anise and lemon zest in a 3-quart saucepan. Bring to a boil over high heat. Add flour, all at once, and cook, beating constantly until flour forms a ball and films bottom of pan. Remove pan from heat.
3) Beat in eggs, one at a time, until incorporated and mixture is smooth and shiny.
4) Combine granulated sugar and confectioners' sugar in a plastic bag and set aside.
5) Spoon batter into a pastry bag fitted with a medium-sized star tip.
6) Heat 3-inch of oil in a deep pan until it reaches 375 degrees F.
7) Pipe batter into oil in 5 to 6-inch lengths. Do not crowd pan. Fry until golden brown, about three minutes. Remove from oil and drain on paper toweling. Continue frying until all batter has been used.
8) Drop warm churros into bag of sugar and shake to generously coat. Serve immediately. Yield: 6 servings

You might also enjoy these recipes:
French Quarter Beignets - One Perfect Bite
Zeppole - One Perfect Bite
Calas Sweet Rice Fritters - One Perfect Bite
Recipe of the Day: Churros - Mark Bittman
Churros con Chocolate - Baking Bites

Wednesday, June 16, 2010

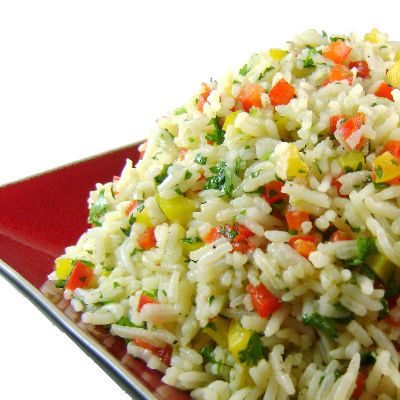
Southwestern Cilantro Rice Salad


From the kitchen of One Perfect Bite...I first had this salad in New York City at a restaurant called Arizona 206. Chef Brendan Walsh was head of the kitchen at that time and one of the restaurant's signature dishes was this lovely cilantro rice. I had the rice so often that I was able to reconstruct it in my own kitchen from taste memory. I liked it then, and I like it now, because it's an easy and inexpensive way to feed a large number of people. It's also a wonderful accompaniment to Southwestern or Mexican meals. While I doubt this will become your favorite rice dish, it's great for church suppers, block parties and other large gatherings where refrigerator and oven space space is at a premium. This rice salad is one of those rare dishes that is actually better when served at room temperature. The version of the recipe I have in my files feeds 36 people. I re-sized it earlier this week to serve with a Southwestern-style meal I had planned for four people. I thought you might like to have a copy of the smaller recipe for your files. Without further ado, here's how we make Southwestern Cilantro Rice Salad. Oh, and should you like the recipe for 36, multiply all ingredients, save the lime zest, by four.

Southwestern Cilantro Rice Salad...from the kitchen of One Perfect Bite, inspired by Brendan Walsh

Ingredients:

2 cups cold water
1 cup long grain or basmati rice
1 teaspoon kosher salt + salt to taste
3/4 cup chopped fresh cilantro
1/2 cup diced red bell pepper, cut in 1/4-inch dice
1/2 cup diced yellow bell pepper, cut in 1/4-inch rice
1/4 cup olive oil
3 tablespoons tablespoons fresh lime juice
Zest of 1 lime
Freshly cracked pepper to taste

Directions:

1) Bring water to a boil in a 3-quart pan set over high heat. Stir in rice and salt and bring back to a boil. Immediately cover pan and lower heat. Simmer for 20 minutes. Remove from heat. Let rice sit, covered, for another 10 minutes.
2) Transfer rice to a large pan. I use a roasting pan to assure enough space to thoroughly mix rice with other ingredients. Add cilantro, red and yellow peppers, olive oil, lime zest and juice and salt and pepper to taste. Mix well. Serve immediately or cover and let sit at room temperature until ready to serve. Yield: 4 servings.

You might also enjoy these recipes:
Moors and Christians - One Perfect Bite
Forbidden Rice and Jewel Toned Grains - One Perfect Bite
Arroz con Pollo - One Perfect Bite

Tuesday, June 15, 2010

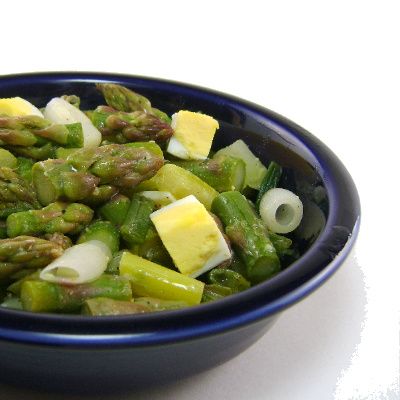
Scallion and Asparagus Salad


From the kitchen of One Perfect Bite...This lovely dish has been adapted from one that appeared in The Italian Family Table by Lidia Bastianich. I've had really good luck with her recipes and this one is no exception. This salad can be served as an antipasto, a first course or as a side dish. It's perfect for spring and early summer meals when local asparagus is plentiful and cheap. While the dish has only five ingredients, the recipe is a bit more involved than most of this kind. Asparagus is peeled before being simmered with scallions. The scallions flavor the braising liquid and become mellow as they cook. Once drained the dish is dressed with oil and vinegar and briefly chilled before a final toss to incorporate the hard boiled eggs. There are only two things that can spoil this lovely dish and since I've done both of them, I thought I'd alert you to the potential pitfalls. Don't overcook the asparagus. Count cooking time from the point at which the water returns to a boil. Six minutes will usually do it for both the asparagus and scallions. Immediately rinse the vegetables in cold water or place them in a cold water bath to stop the cooking. Make sure the vegetables are well drained and have been patted dry before drizzling with oil and vinegar. This salad should be assemble no more than an hour before serving. It will get "goopy" if it sits to long after being tossed. All that being said, this is a wonderful and uncommon little salad. I hope you'll try it. Here's the recipe.

Scallion and Asparagus Salad
...from the kitchen of One Perfect Bite, courtesy of Lidia Bastianich

Ingredients:

1-1/2 pounds fresh asparagus
3/4 pound scallions
3-1/2 tablespoons extra-virgin olive oil
1-1/2 tablespoons red wine vinegar
1 teaspoon salt, or more if needed
Freshly ground pepper to taste
3 hard-cooked eggs, peeled

Directions:
1) Snap off hard stalks at bottom of asparagus spears. To assure even cooking, use a vegetable peeler to shave off skin from bottom 3 inches or so of each asparagus stalk.
2) Trim away root end of each scallion as well as wilted ends of green leaves. Peel off loose layers of bulb, so scallions are all tight, trim, and about 6 inches long.
3) Bring 1 quart of water to a boil in a deep wide skillet. Add asparagus and scallions. Adjust heat to maintain a bubbling boil, and poach asparagus and scallions, uncovered, for about 6 minutes, or until they are tender but not falling apart, and cooked through but not mushy. Remove cooked vegetables to a colander and run under cold water to stop cooking. Drain, spread on paper toweling and pat dry. Sprinkle with 1/2 teaspoon salt.
4) Cut the asparagus and scallions into 1-inch lengths and gently put them into a mixing bowl. Drizzle with oil and vinegar. Season with 1/2 teaspoon salt and 1/4 teaspoon pepper. Toss very gently.
5) Quarter cooked eggs into wedges, and slice each wedge into two or three pieces; salt lightly and fold into vegetables. Adjust seasoning to taste. Chill briefly. Arrange on a serving platter or individual salad plates. Yield: 6 servings.

You might also enjoy these recipes:
Asparagus and White Bean Salad - One Perfect Bite
Penne with Asparagus and Lemon Sauce - One Perfect Bite
Asparagus Soup - One Perfect Bite

Monday, June 14, 2010

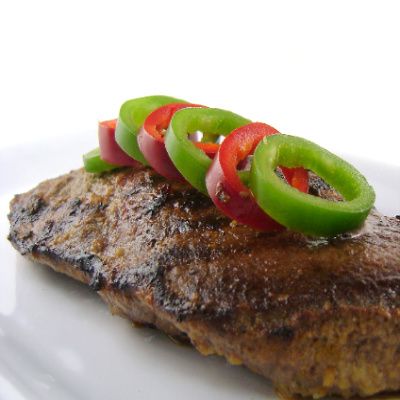
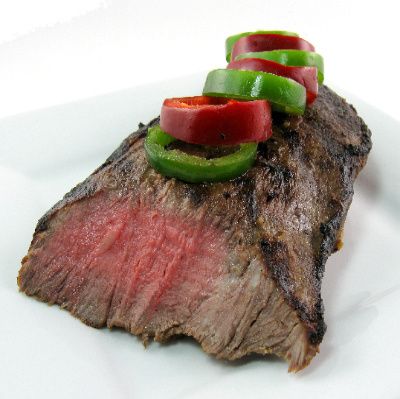
Carne Asada


From the kitchen of One Perfect Bite...School is out and Father's Day is just around the corner. That means that like it or not, ready or not, barbecue season is officially here and it's time to fire up the grill. I have a recipe for a steak that's so consistently good, and so easy to make, that the line that separates one made by a rank amateur from that of seasoned grill master is hard to distinguish. While I've changed it a bit, the original recipe, called Carne Asada Brava, was developed by Rick Baylis for his book and television show, "Mexico One Plate at a Time." This is an almost fool-proof dish. Two cautions. The steak needs an hour to marinate and you'll want to make sure your pan or grill is screaming hot when the steak first hits the surface. Ribeye steaks were originally used to make the dish. I use one or two flatiron steaks in the version I make for my family. Try to find a local source for flatiron steaks. They are wonderful for grilling and are still inexpensive. High restaurant demand makes them difficult to find in some areas, but these flavorful and fork tender steaks are worth seeking out. I promise you won't be sorry. You can find information about the steaks here. The recipe calls for pan roasted garlic and jalapeno chiles and the aroma they exude as they blacken and bubble is quite amazing. Served with or without tortillas, I think you'll love this one. Here's the recipe.

Carne Asada...from the kitchen of One Perfect Bite, courtesy of Rick Baylis

Ingredients:
Marinade
6 large garlic cloves, unpeeled
2 fresh jalapeno chiles, stemmed
1/4 cup fresh lime juice
2 tablespoons olive oil, plus more for the steaks
1-1/2 teaspoons salt or salt to taste
Steak
2 pounds flatiron steak or 6 1-inch thick ribeye steaks

Directions:

1) To make marinade: Roast unpeeled garlic and chiles over medium heat in a small ungreased skillet, turning occasionally, until both are soft and blackened in places. Chiles will be ready in 5 to 10 minutes. Garlic will require about 10 to 15 minutes. Cool. Peel garlic and place in jar of a blender or food processor along with chiles, lime juice and oil. Process until mixture is as smooth as possible. Add salt. Place marinade in a dish large enough to hold steaks. Smear mixture over both sides of steaks, cover and refrigerate for 1 hour.
2) To grill steaks: Preheat a gas grill or heat a grill pan over high heat. Scrape off marinade and spray or brush both sides of steak with oil. Place steaks on grate or in grill pan and cook for 3 to 4 minutes without moving steaks. Turn steaks and cook until medium rare, about 2 to 3 minutes longer. Remove pan from heat. Tent with foil and allow to sit for 10 minutes. Slice steak and serve with fresh salsa or a hot sauce. Yield: 6 servings.

You might also enjoy these recipes:
North African Steak Pimenton with Harissa Sauce - One Perfect Bite
Asian-Style London Broil - One Perfect Bite
Stuffed Flank Steak Spirals - One Perfect Bite

Sunday, June 13, 2010

Shrimp and Corn with Fresh Basil


From the kitchen of One Perfect Bite...I hope there are no secret rules or pledges associated with Meatless Monday. I'm going to proceed on the assumption that fish and shellfish are fair game for use by those participating in the challenge. I'll be working with shellfish today. I live in an area where frozen Alaskan shrimp are cheap and plentiful. While they're not suitable for all applications, the shrimp are perfect for budget family meals. Today's recipe takes all-American ingredients and uses a simple Asian stir-fry technique to make a wonderful family meal. This is a five ingredient recipe that actually works. Bob is always dubious about these really easy meals. I made this for his lunch today and got a high five for my efforts. While I used thawed, frozen corn to make the dish, it will be even better when fresh local corn can be used. I've adapted this recipe from one that appeared in Gourmet magazine a decade ago. I think those of you who try this, will love it. Here's the recipe that garnered me a "...this is really good!" Bon appétit.

Shrimp and Corn with Fresh Basil
...from the kitchen of One Perfect Bite, adapted for Gourmet Magazine

Ingredients:
1/4 cup unsalted butter
3 cups sweet corn, thawed if frozen
1 pound shelled large shrimp
1 bunch green onions (white and tender green), chopped
1/2 cup fresh basil, thinly sliced
Salt and pepper to taste

Directions:
Melt butter in a large nonstick skillet over moderately high heat, then sauté or stir-fry corn and shrimp, stirring, until shrimp are cooked through, about 3 to 5 minutes. Stir in scallions and basil and season with salt and pepper. Yield: 4 servings.

You might also enjoy these recipes:
Camarones a la Mexicana - One Perfect Bite
Brined Shrimp with Jalapeno and Garlic - One Perfect Bite
Shrimp Omelet from the Pearl River Delta - One Perfect Bite

This post is being linked to:
Meatless Monday at My Sweet and Savory

Saturday, June 12, 2010

Almond and Cherry Torte


From the kitchen of One Perfect Bite...A happy convergence of incidents led to the creation of this buttery torte. While sorting through my pantry, I found a half-used container of glaceed cherries that were still edible and soft enough to use. The prior evening I'd stumbled on a, new-to-me, site called Cake Crumbs and Cooking The feature that day had been a cherry cake that sounded like it would be perfect for tea or dessert. A version of the recipe also appeared in Delia Online and in the BBC Good Food Magazine. Thus, armed with cherries and several recipes, all of which had been well-received, I began to make my first ever cherry cake. The first step was to convert ingredients from metric to standard US measure. That done, I made a few changes to the base recipe to reflect the fact I had no self-rising flour and only half the cherries suggested in the original recipe. Undeterred, I carried on and within two hours had a lovely cake with a soft buttery crumb and marvelous almond flavor. Unfortunately, while they added texture to the cake the taste of the cherries was barely perceptible. In an effort to keep the fruit from sinking to the bottom of the cake, I halved and rinsed the cherries as had been suggested. I took the additional step of tossing them with flour before adding them to the cake batter. All that changed nothing. They sank anyway and probably lost flavor when their syrup was washed away. The strange thing is that I liked the cake and found the fruit almost superfluous. The cake is barely sweet but the almond meal and topping make it extremely flavorful. It is far more like a Viennese torte that a cherry cake. Would I make it again? Not with glaceed cherries, unless I had leftover bounty from my Christmas cooking. While I've heard some classify this dessert as being cheap as chips, it is not inexpensive to make and, while it is lovely, I like more bang for my buck. For those of you who are curious, here's the recipe.

Almond and Cherry Torte...from the kitchen of One Perfect Bite, adapted from several British sources

Ingredients:
2 sticks (8-oz.) butter, softened
1 cup granulated sugar
4 large eggs
1-1/2 cups all-purpose flour
1-1/2 teaspoons baking powder
1/2 teaspoon salt
1/4 to 1/2 teaspoon almond extract
1 small container (8-oz.) glace cherries, halved and rinsed
1 cup (4-oz.) ground almonds
1/4 cup milk
1/2 cup (2-oz.) flaked almonds
Confectioners' sugar

Directions:
1) Preheat oven to 325 degrees F. Grease bottom and sides of a high sided 8-inch cake pan. Line bottom with parchment paper. Grease paper. Dust bottom and sides of pan with flour.
2) Beat butter and sugar together until light and fluffy. Add eggs, one at a time, beating just until incorporated. Add almond extract and mix to combine.
3) Sift flour, baking powder and salt together. Fold into egg mixture. Fold in cherries, almonds and milk.
4) Spoon mixture into prepared pan. Level top and sprinkle with sliced almonds. Bake for 1¼ -1½ hrs or until cake has risen and is firm to the touch.
5) Remove cake from oven and cool in pan for 30 minutes. Turn pan onto wire rack to cool completely.
6) Dust top of cake with confectioners' sugar just before serving. Yield: 12 servings.

You might also enjoy these recipes:
Toscatarta - One Perfect Bite
Lemon and Almond Tart - One Perfect Bite
Chinese-Style Almond Cookies - One Perfect Bite

Friday, June 11, 2010

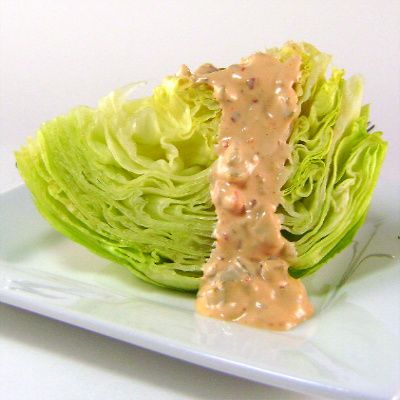
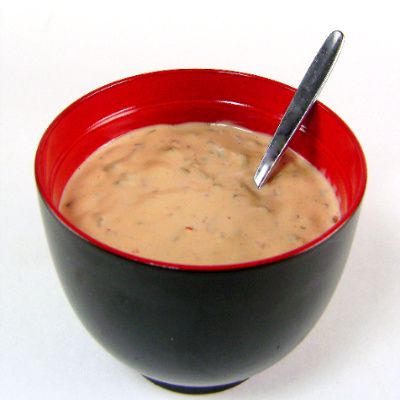
Thousand Island Dressing - Pink Saturday


From the kitchen of One Perfect Bite...It's baaack! While I'm not sure it ever went away, there was a long stretch of time when no one would admit they still ate this classic American salad. I speak, of course, of wedge-shaped iceberg lettuce that's been cloaked in the folds of a creamy dressing. The salad first appeared in the 1920's, but the height of its popularity came during the 1950's and 1960's when it was a standard feature on dinner tables across the country. There are few dishes easier to make and I'm fairly certain that its popularity coincided with the appearance of bottled salad dressings on supermarket shelves. While the preference these days seems to be for blue cheese, in those early years Thousand Island was the salad dressing of choice. I am a traditionalist and wouldn't dream of serving this salad with anything other than the ubiquitous salmon pink dressing. That, however, is where my homage ends. This dressing bares no resemblance to the one that was popular in the fifties. It carries with it a touch of the Orient and enough other ingredients to set your palate singing. I really think you like this. You'll need four wedges of iceberg lettuce to make this salad. Don't cut them until you are ready to dress the salad. Lettuce browns quickly when cut with a knife, so don't get too far ahead of yourself. This is the recipe I use to dress the salad.

Thousand Island Dressing
...from the kitchen of One Perfect Bite, courtesy of Martha Stewart

Ingredients:

1/2 cup mayonnaise
2 tablespoons ketchup
Optional: 1 teaspoon sambal oelek (hot chile paste)
2 tablespoons coarsely chopped sweet pickles, or sweet pickle relish
1 tablespoon coarsely chopped green olives with pimientos

Directions:
Whisk together mayonnaise, ketchup, chile paste (if using), pickles, and olives in a medium bowl. Dressing can be refrigerated in an airtight container up to 1 week. Yield: 3/4 cup.

You might also enjoy these recipes:
Asian-Style Carrot Salad - One Perfect Bite
Corn Salad with Edamame and Tomatoes - One Perfect Bite
Bulgur Salad with Pomegranate Dressing - One Perfect Bite
Iceberg Wedge Salad with Buttermilk Dressing - Sippity Sup
Iceberg Wedge with Blue Cheese Dressing - Saveur
Blue Smoke's Iceberg Wedges with Roquefort Dressing - Serious Eats

This post is being linked to:
Pink Saturday, sponsored by Beverly at How Sweet the Sound.

Thursday, June 10, 2010

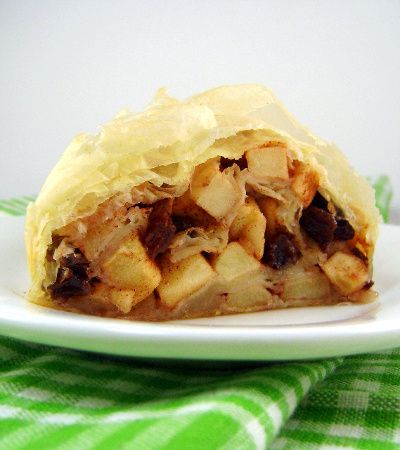
Apple Strudel


From the kitchen of One Perfect Bite...The ghosts with whom I share my kitchen are restless tonight. I took a short cut and made a strudel that bares no resemblance to the one they taught me to make all those years ago. I could argue that this pastry is difficult to make. That is true. Experts demand that the dough be stretched so thin a newspaper can be read through it. That is also true. My excuse tonight is that I had no one to help me stretch the dough. That led me to take a short cut, and, for my efforts, end up with a pastry that bares little resemblance to the "real" strudel I wanted to make. I could have gone with puff pastry, but I decided instead to use filo to form the skin of my strudel. The crackly crispness of the filo leaves appealed to me. That's where my plan went wrong. The filo sheets are so fine that that they can't handle the juices released by the fruit as it cooks. The pastry becomes water logged and most unappealing. I hasten to add that I love filo, I just don't love it for this application. I used an apple filling that I've made since childhood and I had no problem with that, but I do want to warn you that if you like cooked fruit it would be best to saute the apples before rolling them in pastry. This just doesn't bake long enough to do anything but soften the fruit. I also had difficulty getting the filo to brown. The best I could come up with was pale blond and I was really looking for a deep golden brown roll. My results were middling at best because the component parts did not work well together. If any of you plan to make strudel using anything but classic techniques, I'd advise using puff pastry instead of filo. The recipe, save for the "skin" remains the same. This makes a pleasant dessert served straight from the oven, but it does not keep well. It's best I keep the adjectives to myself. I will not make this again. Here's the recipe I used.

Apple Strudel...from the kitchen of One Perfect Bite courtesy of Quezi

Ingredients:
1 sleeve thawed filo dough
1/3 cup unsalted butter, melted
4 cups apples, cut in 1/2-inch dice
3/4 cup granulated sugar
1 tablespoon ground cinnamon
Juice and zest of 1 lemon
1 cup raisins
1 cup toasted finely chopped walnuts
1/2 cup confectioners' sugar, sifted

Directions:

1) Melt butter in microwave or stovetop in a small pan. Set aside. Preheat oven to 350 degrees F.
2) Combine apples, sugar, cinnamon and lemon juice and zest in a medium bowl. Toss well to distribute sugar and spices. Let sit for 30 minutes.
3) Unroll defrosted filo dough. Remove one sheet and place it on a pastry board. Cover stacked filo with a damp towel of plastic wrap. Brush sheet of filo with melted butter. Repeat with at least 4 more layers. You may use up to 10 sheets. Do not cover the last sheet with butter. Sprinkle surface of dough with walnuts. Drain apples and squeeze out juices that have accumulated. This is done to prevent filo from getting soggy. Scatter apples and raisins over filo stack, leaving 1-inch uncovered on all sides. Turn in edges of dough. Starting at short end loosely roll filo. Roll so seam is at bottom of roll when end of dough is reached. Transfer to an ungreased baking sheet. Brush top and sides of roll with remaining butter.
4) Bake at 350 degrees for about 15 minutes and check for progress. How long it will take to bake strudel depends on how many sheets of filo and what kind of fruit you used. Strudel should be golden brown. If it’s not done at 15 minutes increase baking time.
5) When done, take strudel out of the oven and immediately cut it into 6 – 8 slices with a serrated knife. Separate slices so that steam from hot fruit can escape. Strudel will become soggy if not sliced immediately. Sprinkle with powdered sugar if desired. Yield: 6 to 8 servings.

You might also enjoy these recipes:
Apfel Sahne Torte - One Perfect Bite
Cran-Apple Crisp - One Perfect Bite
The Apple Lady Apple Cake - One Perfect Bite

Wednesday, June 9, 2010

Gobi Manchurian - Indo-Chinese Fritters


From the kitchen of One Perfect Bite...When I came across this dish, I knew it had to be tried and shared. This saucy cauliflower is both a curiosity and a contradiction. Kitchen lore insists the dish is an Indian adaption of an old Chinese recipe. While that makes for a wonderful story, cauliflower is rarely seen in China and until recently you'd be hard pressed to find it served in Manchuria or any other region of the country. It is, however, extremely popular in India where it is called Gobi Manchurian. Gobi is the Indian word for cauliflower and Manchurian is the name of a spicy Indian sauce that has Chinese overtones. The dish was developed in India by Chinese immigrants who adapted Indian foods to their way of cooking. In doing so, they created a new cuisine called Indo-Chinese. Interestingly, the dish is starting to work its way into China and you'll occasionally find it on Chinese menus in other countries. Gobi Manchurian is served as an appetizer or a side dish and it is prepared in a manner that is similar to making Japanese tempura. Florets of cauliflower are dipped into a savory batter and then quickly deep fried. Once drained, they are coated with a nicely spicy tomato sauce and warmed through for serving. This dish was an enormous hit with my family and friends, and when served hot it is absolutely delicious. It does not hold well, so be prepared to move and get it to the table as soon as it is sauced. The sauce I use is quite mild, so, if you need more heat, add it to taste. You'll love this one. Here's the recipe.

Gobi Manchurian...from the kitchen of One Perfect Bite

Ingredients:
1 large head of cauliflower, trimmed and broken into about 20 large florets
Batter
1/3 cup cornstarch
2/3 cup all-purpose flower
1/2 to 3/4 cups water
2 teaspoons fresh ground black pepper
Salt to taste
Sauce
½ cup chopped spring onions
1 tablespoon finely chopped garlic
1 tablespoon finely chopped green chillies
1 tablespoon finely chopped ginger
1 tablespoon cornstarch
1 cup water, divided use
1 tablespoon soy sauce
1 tablespoon tomato ketchup
1 tablespoon vegetable oil
Salt to taste

Directions:
1) To make batter and fry: Heat enough oil to deep fry in a wok or deep fryer. While oil heats, combine cornstarch, flowe, salt and pepper in a small bowl. Add enough water to form a pancake-like batter. Dip cauliflower florets into mixture to coat with batter. Add a few florets at a time to hot oil and fry until golden brown. Remove from oil and drain on paper towel. Continue until all florets are fried.
2) To make sauce: Mix cornstarch with 1/4 cup water. Stir in soy sauce, ketchup and salt. Set aside. Heat oil in a large skillet. Add garlic, ginger, green chillies and spring onions. Stir fry for about 1 minute to soften. Add cornstarch mixture and remaining , remaing 3/4 cup water and cook until thickened. Remove pan from heat.
3) To serve: Place fried cauliflower into sauce and stir-fry over high heat to warm and coat florets. Garnish, if desired, with cilantro sprigs or scallions. Serve hot. Yield: 4 servings.

You might also enjoy these recipes:
Spring Vegetable Ragout - One Perfect Bite
Creamed Shanghai Bok Choy - One Perfect Bite
Asian Bean Spout Salad - One Perfect Bite
Sugar Snap Peas with Sesame - One Perfect Bite
Gobi Manchurian - Appetite for China
The Great Chinese Recipes Gobi Manchurian - ArticlesBase

Tuesday, June 8, 2010

Curried Turkey Salad


From the kitchen of One Perfect Bite...I took advantage of a sale on bone-in turkey breasts at one of our local supermarkets today. I bought several to feed the freezer and another to make this lovely turkey salad. The recipe won an honorable mention in a recipe contest several years ago. While I poached the turkey for tonight's salad, it can be made with freshly roasted poultry or even leftovers, if they are not too dry. Chicken also works well. With warm weather rapidly approaching, I thought some of you might like to have the recipe for this easy main course salad. It works well for luncheons and it is perfect for a light summer meal. I think those of you who try this will really enjoy it. Here's the recipe.

Curried Turkey Salad...from the kitchen of One Perfect Bite

Ingredients:
3 to 4 cups cooked turkey, cut into 1/2-inch pieces
1-1/2 cups chopped celery
1-1/2 cups seedless red grapes, halved
1/2 cup mayonnaise
1/2 cup plain yogurt
1 tablespoon lime juice
1/4 cup chutney
1 to 2 tablespoons mild curry powder or curry powder to taste
1 teaspoon kosher salt or salt to taste
1/2 cup salted roasted peanuts

Directions:
1) Combine turkey, celery and grapes in a large bowl. Set aside.
2) Combine mayonnaise, yogurt, lime juice and chutney in a small bowl. Add curry powder and salt to taste.
3) Pour dressing over turkey mixture and toss gently to combine. Refrigerate for 1 hour. Just before serving fold peanuts into salad. Yield: 4 to 6 servings.

You might also enjoy these recipes:
Thai Tuna Salad - One Perfect Bite
Pistachio Chicken Salad with Goat Cheese Medallions - One Perfect Bite
Asian Chicken or Shrimp Salad - One Perfect Bite

Monday, June 7, 2010

Asparagus and Mushroom Strata


From the kitchen of One Perfect Bite...While it is starting to get spindly, asparagus is still available in our local farmers' markets. I've been wanting to make this strata for ages, but for one reason or another kept putting it off. I finally decided it was foolish not to try it while asparagus is so cheap and plentiful. I always welcome recipes that make company breakfast or brunch easier to do and I like stratas because they can be assembled the night before they're needed. This one, adapted from Better Homes and Gardens magazine, is really easy to assemble and it is a pleasant way to start the day. If you are looking for a recipe that will simplify the serving of breakfast or brunch, you might want to give this one a try. It will never replace Eggs Benedict, but it's easy to do and festive. Here's the recipe.

Asparagus and Mushroom Strata...from the kitchen of One Perfect Bite, adapted from a recipe in Better Homes and Gardens magazine

Ingredients:
1 pound thin asparagus spears
1 tablespoon olive oil
1 pound sliced fresh mushrooms
3 cloves garlic, minced
1/4 teaspoon salt
1/4 teaspoon freshly ground pepper
2 cups shredded Swiss cheese (8 ounces)
2 tablespoons snipped fresh dillweed or 1 teaspoon dried dillweed
12 slices French or Italian bread, cut into 4x1x1-inch sticks
6 eggs
2-1/4 cups half-and-half or whole milk
1/4 cup grated Romano or Parmesan cheese

Directions:
1) Clean asparagus; snap off woody bases. Cut thick spears in half lengthwise. Cut spears into 3-inch pieces. In a large saucepan bring a small amount of water to boiling. Add asparagus. Cook, uncovered, 1 minute. Drain; rinse with cold water. Drain on paper towels.
2) Lightly grease a 2-quart rectangular baking dish; set aside. In a large skillet heat oil. Add mushrooms, garlic, salt, and pepper. Cook, uncovered, over medium-high heat for 4 to 5 minutes or until nearly all liquid has evaporated. Set aside.
3) In a bowl toss together the Swiss cheese and dillweed.
4) Cover bottom of baking dish with half of the bread sticks. Top with half of the mushrooms, half of the cheese mixture, and half of the asparagus. Repeat with remaining mushrooms, cheese mixture, and asparagus. Top with remaining bread pieces.
5) In a bowl beat together eggs and half-and-half. Pour mixture over layers in dish. Press lightly with back of a spoon to thoroughly moisten bread. Sprinkle grated cheese over top. Cover and chill 2 hours. Bake, uncovered, in a 325 degree F oven about 45 minutes or until a knife inserted near center comes out clean. Remove from oven; let stand 10 minutes before cutting. Makes 6 to 8 servings.

To Make Ahead: Layer the strata and pour the egg mixture over layers. Cover and chill up to 24 hours. Bake, uncovered, as directed above.

You might also enjoy these recipes:
Asparagus and White Bean Salad - One Perfect Bite
Penne with Asparagus and Lemon Sauce - One Perfect Bite
Asparagus Soup - One Perfect Bite