Sunday, January 31, 2010

Self-Frosting Chocolate Cake - Blue Monday


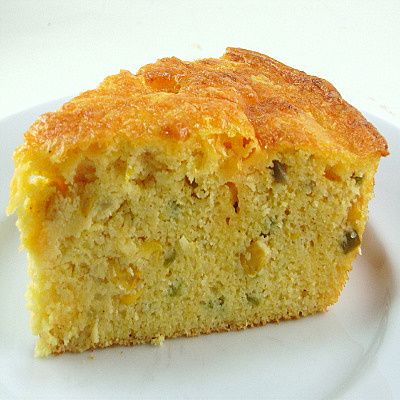
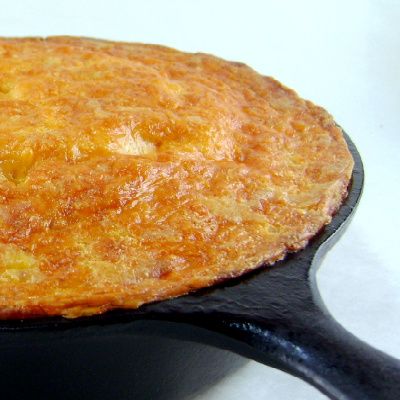
Two ways to have fun.


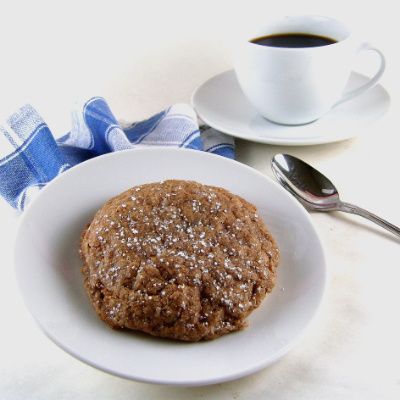
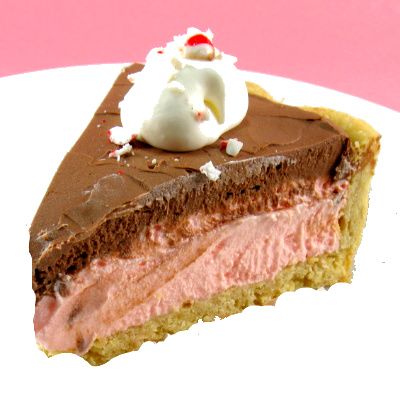
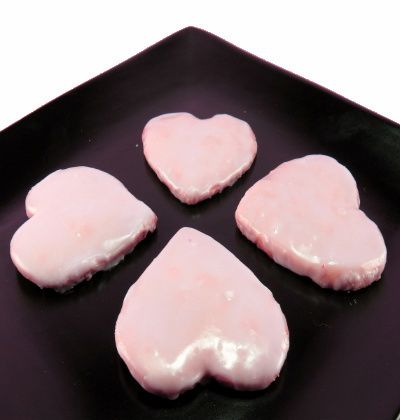
From the kitchen of One Perfect Bite...If you're looking for a dessert to serve on Valentine's Day, you might want to try this self-frosting chocolate cake. It's really easy to do and can be made as one large, or eight smaller, portion controlled, cakes. I always opt for the latter. It helps prevent me from overeating, which I have, on occasion, been known to do. The cake can be made a day before serving as long as you follow the directions for reheating that are in the recipe. If you decide to make this, be sure to use the finest bittersweet chocolate and raspberry jam available to you. This is one of those recipes where quality really pays off. If you like ease of preparation, the taste of bittersweet chocolate and raspberries, you'll love this treat. Just remember this is a dessert that should be served warm, and that means the cakes, large or small, can't be unmolded until you are ready to serve them. If you carefully follow the recipe instructions and say a prayer or two or three, you'll have no problems. I make these for family and good friends. I have, over the years, become a very relaxed hostess. If you do a great deal of formal entertaining, I have a caution for you. While these are luscious, they are probably too homely for a more formal dinner party. Here's the recipe.

Self-Frosting Chocolate Cake...from the kitchen of One perfect Bite, inspired by Epicurious.com

Ingredients:
Frosting
3 ounces fine-quality bittersweet chocolate (not unsweetened)
1/2 cup seedless raspberry jam (about 5 ounce)
1/2 cup heavy cream
Cake Batter
1/2 cup boiling water
1/3 cup plus 2 teaspoons unsweetened cocoa
powder (not Dutch process)
1/4 cup whole milk
1/2 teaspoon vanilla extract
1/3 cup seedless raspberry jam (about 3 1/2 ounce)
1/2 cup (1 stick) unsalted butter, softened
1/3 cup packed light brown sugar
1/3 cup granulated sugar
2 large eggs
1 cup all-purpose flour
3/4 teaspoon baking soda
1/4 teaspoon salt
1 pint raspberries (for garnish)

Directions:
1) Preheat oven to 350 degrees F. Generously butter a 9 x 2-inch round cake pan or 8 (8-oz.) custard cups. Set aside.
2) To make frosting: Break chocolate into small pieces. Place in a small saucepan with raspberry jam and cream. Bring to a simmer, stirring occasionally, until smooth. If making one large cake, pour mixture into prepared pan. If making individual cakes, pour an equal portion of mixture into each custard cup. Set aside.
3) To make cake batter: Whisk boiling water and cocoa powder together until smooth. Whisk in milk, vanilla extract and jam. Place butter and both sugars in a large bowl Beat with an electric mixer until light and fluffy. Add eggs, one at a time, beating well after each addition. Sift flour, baking soda and salt into another bowl. Add to egg mixture in batches alternately with cocoa mixture, beginning and ending with flour mixture. Beat well after each addition. Pour an equal portion of batter over frosting. If making one large cake, bake in center of oven for 30 to 35 minutes. If making individual cakes, bake for 20 to 25 minutes. Use a cake tester to check for doneness. Remember frosting will still be liquid. Transfer pan or custard cups to a wire rack. Let cool for 10 to 20 minutes. Cake may be made 1 day ahead, cooled completely in pan and left in pan, covered, at room temperature. Reheat cake, uncovered, at 350 degrees F for 10 to 15 minutes.
4) To unmold: Run a thin knife around edge of pan and twist pan gently back and forth on a flat surface to loosen cake. Invert a cake plate with a slight lip over cake pan and holding pan and plate together with both hands, invert cake onto plate. Serve cake garnished with raspberries if desired. Yield: 8 servings

This post is being linked to:
Smiling Sally - Blue Monday

Eggplant Parmesan - Recipes to Rival


It's hard to believe it's the first of February. January has really flown by, and, as usual, I had to scramble to complete the Recipes to Rival challenge for the month. I was slow to check what our hostess, Tempera, who blogs at High on the Hog, had chosen for us to prepare. As a result, we are having meatless "Parm" twice this month. Last week I made a wonderful Baked Portobello Parmesan that you can read about here. Tempera selected a recipe by Mario Batali and I must say it, too, made a lovely meal. The only change I made was to cut ingredients for the recipe in half. Here is what Tempera had to say about the recipe she selected:

"Somewhere in the world eggplant is in season. I know this because my local supermarket just got in some real beauties. So in celebration here is an Eggplant Parmesan recipe for one of my favorite Italian chefs."

Here is Mario Batali's Recipe.

Basic Tomato Sauce:

Ingredients:
1/4 cup extra-virgin olive oil
1 Spanish onion, chopped into 1/4-inch dice
4 cloves garlic, peeled and thinly sliced
3 tablespoons fresh thyme leaves, chopped
1/2 medium carrot, finely shredded
2 (28-ounce) cans peeled whole tomatoes
Salt

Directions:
In a 3-quart saucepan, heat olive oil over medium heat. Add onion and garlic and cook until soft and light golden brown, about 8 to 10 minutes. Add thyme and carrot and cook 5 minutes more, until carrot is quite soft. Add tomatoes and juice and bring to a boil, stirring often. Lower heat and simmer for 30 minutes until as thick as hot cereal. Season with salt and serve.

This sauce holds 1 week in the refrigerator or up to 6 months in the freezer.

Eggplant Parmesan - Parmigiana di Melanzane

Ingredients:
2 pounds (about 2 medium-sized) eggplant
Salt
4 tablespoons extra-virgin olive oil
1 cup fresh bread crumbs, seasoned with 1/4 chopped fresh basil leaves and 1/4 cup pecorino
2 cups Basic Tomato Sauce, recipe follows
1 pound ball fresh mozzarella, thinly sliced
1/2 cup freshly grated Parmigiano-Reggiano

Directions:
1) Preheat oven to 350 degrees F.
2) Wash and towel dry eggplant. Slice eggplant horizontally about 1/4-inch thick. Place slices in a large colander, sprinkle with salt and set aside to rest about 30 minutes. Drain and rinse eggplant and dry on towels.
3) In a sauté pan, heat extra-virgin olive oil until just smoking. Press drained eggplant pieces into seasoned bread crumb mixture and sauté until light golden brown on both sides. Repeat with all pieces. On a cookie sheet lay out 4 largest pieces of eggplant. Place 2 tablespoons of tomato sauce over each piece and place a thin slice of mozzarella on top of each. Sprinkle with Parmigiano and top each with next smallest piece of eggplant, then sauce then mozzarella. Repeat layering process until all the ingredients have been used, finishing again with the Parmigiano.
4) Place pan in the oven and bake until the top of each little stack is golden brown and bubbly, about 15 minutes.

Tips:
Fresh bread crumbs are required for the coating to stick without an egg wash.
The oil must be HOT HOT HOT or the eggplant will not cook fast enough and will be a greasy soggy mess.
The Mozzarella must be very thinly sliced or the eggplant tower will slide (it will still taste great)

Friday, January 29, 2010

Raspberry Streusel Muffins - Pink Saturday


From the kitchen of One Perfect Bite...I was rummaging through the freezer today. Actually, it was a search with purpose. I came across a recipe I want to try for Valentine's Day and had to make sure I had enough raspberries for both a test and final run. As it happened, I had more than enough for both. I pulled out an extra pint of berries and decided to use them to make muffins for a coffee I had to attend later in the day. This recipe has never disappointed me. Unfortunately, I don't know who originally develop it. I can't claim ownership and there are variations of it all over the internet. So, I'm working on the assumption that the recipe is now in the public domain and we can use it without attribution. If I'm wrong, let me know and I'll put your name in lights. These are biscuit-type muffins and despite a 3 step procedure they are easy to make. While they're more expensive than most breakfast muffins they are worth every penny they cost. If you are not a fan of raspberries and pecans, name your poison. I often use blackberries and hazelnuts as substitutes. As with any biscuit-type batter, mix only until ingredients are moistened and combined and be sure to use only colored portions of the zest. The white pith will make the muffins so bitter that no amount of sugar can sweeten them. I like to serve these warm, but they will keep for 24 hours and can be reheated. Here's the recipe for this special morning treat.

Raspberry Streusel Muffins
...from the kitchen of One Perfect Bite

Ingredients:
Muffins:
1-1/2 cups all-purpose flour
2 teaspoons baking powder
1/2 cup granulated sugar
2 teaspoons baking powder
1/4 teaspoon salt
1 teaspoon cinnamon
1/2 cup milk
1 large egg, lightly beaten
1/2 cup butter, melted
1 teaspoon vanilla extract
1 teaspoon grated orange zest
1 cup fresh or frozen, un-thawed raspberries
Streusel Topping:
1/2 cup chopped pecans
1/4 cup flour
1/2 cup golden or light brown sugar
1 teaspoon cinnamon
1 teaspoon grated orange zest
2 tablesspoons melted butter
Glaze:
1/2 cup sifted confectioners' sugar
1 tablespoon orange juice

Directions:
1) Preheat oven to 375 degrees F. Line 12 muffin cups with paper liners. Set aside.
2) Combine flour, sugar, baking powder, salt and cinnamon in a large bowl. Make a well in center of flour mixture. Set aside.
3) Place milk, butter, egg, vanilla extract and orange zest in another bowl. Mix well.
4) Pour milk mixture into flour mixture and stir just until blended.
5) Place 1 tablespoon of batter into each muffin cup. Divide raspberries into two equal piles. Use half the berries to top batter in muffin cups. Top with remaining batter, then with remaining berries.
6) Combine pecans, sugar, flour, cinnamon, butter and orange zest in a small bowl, Mix ingredients until mixture resembles moist crumbs. Sprinkle evenly over top of muffins.
8) Bake for 20 to 25 minutes. Let stand for 5 minutes. Remove from pan.
9) Mix sugar and orange juice in a small bowl. Drizzle over warm muffins with a spoon. Serve warm. Yield: 12 servings.

This post is being linked to:
Pink Saturday, sponsored by Beverly at How Sweet the Sound

Don't Be Scared - Finding Beauty - Dipity Road


What lies ahead? Does it matter? Today, the world is young and it belongs to them.

"The world was all before them, where to choose
Their place of rest, and Providence their guide;
They, hand in hand, with wandering steps and slow,
Through Eden took their solitary way."


John Milton - Paradise Lost

The photo was taken by my youngest daughter. The children in the picture are my grandson, Joshua, and his friend Lily.

This post is being linked to: Finding Beauty at Dipity Road

Thursday, January 28, 2010

Lemon Poppyseed Bread


From the kitchen of One Perfect Bite...Every generation develops recipes that catch the fancy of young women when they first begin to cook. Toll House cookies have been around for decades and they're as popular today as they were when I was 18. Other recipes have shorter life spans. Even the good ones can fall to the wayside because of sea changes in the way we live or what we think to be important. There was a time when tea breads enjoyed the same popularity as cookies, and young women strove to master their making. We have, however, become a nation of multi-taskers and afternoon tea, for most anyway, has become a quaint remembrance of a ritual now past. While recipes for quick breads abound, tea breads are becoming less common. I want to pass mine on to my daughters, and, so, I record it here. The one I finally settled on is at least 2 decades old and it was developed in the test kitchen that serves Land O' Lakes Creamery. The combination of lemon and poppyseed is one of those lovely marriages that sometimes occurs in the food world. I love this recipe because it keeps the poppyseeds under control. An awful lot of recipes overdo their use and the finished bread or cake ends up looking like it has a disease. Not so here. This is a lemon bread that happens to use poppyseeds in the batter. The use of a glaze is optional with this bread. I prefer to brush the warm bread with limoncello, but I've included instructions for a glaze should you want to use one. Here's the recipe for a mild and altogether lovely lemon tea bread. I hope you enjoy it.


Lemon Poppyseed Bread...from the kitchen of One Perfect Bite

Ingredients:
1-1/2 cups all-purpose flour
2 tablespoons poppy seed
1/2 teaspoon baking powder
1/4 teaspoon baking soda
1/4 teaspoon salt
3/4 cup granulated sugar
2/3 cup butter, softened
1/3 cup lemon yogurt
2 large eggs
1 tablespoon freshly grated lemon zest
1 teaspoon vanilla
1/2 cup milk
Optional glaze: 2 tablespoons limoncello or 3 tablespoons granulated sugar mixed with 2 tablespoon fresh lemon juice

Directions:
1) Heat oven to 350 degrees F. Grease bottom only of 8x4-inch loaf pan. Set aside.
2) Combine flour, poppy seed, baking powder, baking soda and salt in medium bowl. Set aside.
3) Combine sugar and butter in bowl of a stand mixer. Beat at medium speed, scraping bowl often, until creamy. Add yogurt, eggs, lemon peel and vanilla; mix well. Reduce speed to low. Alternately add flour mixture and milk, beating well after each addition, just until moistened.
4) Spoon batter into prepared pan. Bake for 55 to 60 minutes or until toothpick inserted in center comes out clean. Remove pan to a cooling rack. If desired, brush top of loaf with limoncello or lemon glaze. Cool 10 minutes; remove from pan. Cool completely before serving. Bread ages well and benefits from overnight storage. Yield: 1 loaf or 12 servings.

This recipe is being linked to:
Designs By Gollum - Foodie Friday

Game Day Chili-Mac Skillet


From the kitchen of One Perfect Bite...One of my favorite blogs is For the Love of Cooking. It's one of those sites that never fails to please. The photos are great, the recipes delicious and the writer an absolute charmer. Recently Pam featured a recipe for Italian Goulash that took me back to a casserole that made regular appearances on our table when the children were at home. I also serve it - then and now - for game day get-togethers with good friends. It's not meant to impress and it's best to think of it as grub at its finest. This is what happens when you combine chili with mac n' cheese. The dish takes ten minutes to prepare, twenty-five minutes to cook and uses just one pan. You can alter heat and spices to taste. You can also control the amount and type of cheese you use. Here's the base recipe. I hope you'll make this one your own.

Game Day Chili-Mac Skillet...from the kitchen of One Perfect Bite

Ingredients:

1 tablespoon vegetable oil
1 pound ground beef
1 cup chopped onion
1/2 teaspoon garlic salt
1 (14.5-oz.) can Mexican-style stewed tomatoes, undrained
1 (15.25-oz.) can red kidney beans, rinsed and drained
1 (8-oz.) can tomato sauce
1/2 cup elbow macaroni, uncooked
1/4 cup water
1 (4-oz.) can diced green chili peppers, drained
2 teaspoons ground cumin
1 teaspoon chili powder
1 cup (4-oz.) shredded Monterey Jack or cheddar cheese
Optional garnish: chopped cilantro or parsley

Directions:
1) Heat oil in a large skillet set over medium-high heat. Add ground meat, onions and garlic salt; cook until meat is brown and onions are tender. Pour off accumulated drippings.
2) Add beans, stewed tomatoes, tomato sauce, macaroni, water, green chili peppers, cumin, chili powder to meat mixture. Bring contents of skillet to a boil. Reduce heat, cover pan and simmer, stirring frequently, until macaroni is tender, about 20 minutes. Sprinkle top with cheese. Cover pan and heat until cheese melts, about 2 minutes. Garnish with chopped cilantro, if using. Yield: 6 servings.

Tuesday, January 26, 2010

Mexican-Style Pan Dulce


From the kitchen of One Perfect Bite...I first had pan dulce at the Riviera Bakery on Ferry Street in Newark, New Jersey. When Bob and I were especially busy at work, we'd make it a point to meet for lunch and to touch base. More often than not, we'd choose Ferry Street as our meeting spot. We loved the atmosphere. It was a street of sights and sounds and smells and had an air of nostalgia and simpler times about it. Years later, we found pan dulce in the panaderias of Baja. I hasten to add our Baja adventures weren't fancy or expensive. We weren't seeking the luxury of Cabo. We had come by car to look for whales and kayak in the sea of Cortez. Almost by necessity, the sweet rolls, called pan dulce, became our breakfast of choice. We could see them being made and assure ourselves they had not been sitting around, acting as a landing pad for sundry flying critters. The rolls are remarkably versatile. They range in appearance from simple flat rolls to elaborate shell shaped conchas. They're covered with a baked topping that can be as simple as a cinnamon paste or as involved as an etched pastel. The "frosting" cracks as the rolls bake, creating craters and dimples that spread across the top of the rolls. Today's rolls are simple in form and topping. When I make these for guests, I use scallop shells to shape them and etch the topping to create a more deliberate design. The etching really isn't important as the cinnamon topping will crack anyway, it just won't be as artful. There are many recipes for pan dulce. I've settled on this one because I love the texture of the rolls it produces. Here's the recipe.

Mexican-Style Pan Dulce...from the kitchen of One Perfect Bite

Ingredients:
Rolls:
2-1/4 teaspoons active dry yeast
3/4 cup warm water
3-1/4 cups all-purpose flour
1 cup granulated white sugar
1/2 teaspoon salt
3 tablespoons tepid melted butter
2 eggs, lightly beaten
Topping:
1 cup all-purpose flour
3/4 cup tepid butter
1 cup granulated sugar
1 egg, lightly beaten
Pinch of salt
2 teaspoons cinnamon

Directions:
1) Place warm water in a small bowl. Sprinkle yeast over water. Set aside to soften.
2) Whisk flour, sugar and salt together in a large bowl until light and combined.
3) Add yeast, tepid butter and eggs to flour mixture. Mix with a wooden spoon until a soft dough forms. Scrape dough into a greased bowl and turn to coat all surfaces.
Cover. Let rise in a warm, draft-free place until doubled in bulk, about 1-1/2 hours.
4) While dough is rising, make topping by combining flour, sugar, butter, egg, salt and cinnamon in a small bowl. Mix until smooth. Set aside.
5) Punch dough down and turn onto a lightly floured surface. Knead for 10 minutes, or until dough is smooth and elastic. It will still be sticky. Divide dough into 18 pieces. Roll each piece into a ball. Cover two baking sheets with parchment paper. Arrange balls at least 2 inches apart on baking sheets. Press dough down with palm of hand to flatten.
6) Form topping into 18 balls. Flatten and place on top of shaped buns.
7) Cover baking sheets with plastic wrap or kitchen towels. Let rise until double in size, about 30 to 45 minutes.
8) Preheat oven to 400 degrees F. Bake rolls for 10 to 15 minutes. Serve warm. Yield: 18 buns.

Blogging with a Frozen Shoulder

The operative title of this post really should be "trying" to blog with a frozen shoulder. The time I can spend at the keyboard has been reduced by 3/4 and my new BFF is my physical therapist. I just wanted you to know that while I'll be posting daily, I fear I'll be a terrible correspondent. I will answer everyone who posts a comment and I promise to continue reading all the blogs in my reader. Hopefully, this will last only for 4 to 5 weeks and I can back with the total program. Blessings...Mary

Monday, January 25, 2010

Mexican Skillet Cornbread


From the kitchen of One Perfect Bite...Over the years, I've tried at least a dozen recipes for Mexican cornbread. Some were great, others were just passable. Before going any further, I must disclose that Bob and I have an allegiance to a very simple Yankee cornbread. It's equally important that you know we are quite open-minded and willing to give almost anything a try. I found this version of Mexican cornbread while looking through a three decade old version of "The New York Times Bread and Soup Book Cookbook". It sounded good enough to try, and, if you like a spicy and moist cornbread, I think you'll find this recipe to be best of show. I liked it a lot. It's very much like the Romanian Mamaliga that I posted here last year. My preference is still for Yankee cornbread but this is very good and perfect to serve with chile or a Mexican bean soup. Here's the recipe.

Mexican Skillet Cornbread...from the kitchen of One Perfect Bite, inspired by Yvonne Young Tarr

Ingredients:
2-1/4 cups yellow cornmeal
2 teaspoons salt
4 teaspoons baking powder
1/4 teaspoon chile powder
3 eggs
3/4 cups vegetable oil
2 cups sour cream
1 to 2 jalapeno peppers, chopped
1/2 green pepper, chopped
2 cups canned creamed corn
2-1/2 cups sharp cheddar cheese, grated

Directions:
1) Preheat oven to 350 degrees F. Generously grease a 10-inch cast iron skillet. Set aside.
2) Place cornmeal, salt, baking powder and chile powder in a large bowl. Whisk to combine.
3) Beat eggs in a separate large bowl. Add oil and sour cream and beat until combined.
4) Add cornmeal mixture to eggs and stir until combined. Add peppers and creamed corn. Mix well.
5) Pour half of cornbread batter into the prepared skillet. Sprinkle with half the grated cheese. Cover layer with remaining batter and top with remainder of grated cheese.
6) Bake for 45 minutes. Serve warm. Yield: 12 to 16 servings.

Sunday, January 24, 2010

Mexican Black Bean and Vegetable Soup - Blue Monday


Food for the body and soul.


Photo by Nicola Stocken Tomkins from Country Home and Interiors February 2009

From the kitchen of One Perfect Bite... There are few foods that come from the kitchen that are more comforting than soup. This Mexican black bean soup is high in fiber and low in fat. It can be enjoyed by vegetarians and carnivores alike. The soup is delicious and it can be assembled quickly. I've scaled the recipe for small families but it can be doubled if you have a gang to feed or want to freeze leftovers. A puree thickens the soup and keeps the use of fats to an absolute minimum. My only caution regards the use of chipotles in the soup. Be judicious if you are unsure of your heat tolerance. The heat will sneak up on you. I've given a range of measurement and you can select the one you are most comfortable with. Bob and I love heat, but not the kind that kills the taste buds when it hits the tongue. I know of folks who do this in competition, hoping it will blunt the ability of judges to really taste the next entries. I've come up with a way to store unused chipotles for a longer period of time. I mash them with the adobo sauce in which they're packed and refrigerate them, tightly covered, for up to 3 months. One teaspoon of the mashed chilies is the equivalent of one chili. I hope you'll find the truc helpful. This is a very straight forward recipe, so let's get to it. Here's how it's done.

Mexican Black Bean And Vegetable Soup...from the kitchen of One Perfect Bite

Ingredients:
2 tablespoons vegetable oil
1 cup chopped onion
1/2 cup chopped carrots
1/2 cup thinly sliced celery
2 cloves minced garlic
1/2 to 1 finely chopped canned chipole chile in adobo sauce or 1/2 to 1 teaspoon chipotle paste
1 teaspoon ground cumin
1 teaspoon dried basil
1/2 teaspoon dried oregano
1/2 teaspoon chili powder
1 bay leaf
2 cups water
2 cans (14.5-oz. each) canned black beans, rinsed and drained
2 cans (14.5-oz. each) low-sodium vegetable or chicken broth
1 can (14.5-oz.) Mexican-style stewed tomatoes
1 teaspoon apple cider vinegar
Optional garnish:
1/4 cup plain nonfat yogurt
4 teaspoons chopped fresh cilantro
4 lime wedges
Salt and pepper

Directions:
1) Heat oil in a large soup pot set over medium heat. Add onions, carrots and celery and saute until soft, about 8 minutes. Add garlic and continue cooking until it's fragrance is released. Add chopped chipotle, cumin, basil, oregano, chili powder and bay leaf leaf. Cook for 1 minute, stirring constantly. Add water, black beans, broth, stewed tomatoes and vinegar.
2) Bring contents of pot to a boil. Reduce heat and simmer, partially covered, for 2 hours, stirring occasionally.
3) Remove pot from heat. Discard bay leaf. Place 2 cups of soup mixture in a blender. Let stand for 5 minutes and then process until smooth. Return puree to soup pot and stir until combined. Add salt and pepper to taste. Ladle 1-1/2 cups soup into each of 4 soup bowls. If using, top each serving with 1 tablespoon yogurt and 1 teaspoon cilantro. Serve with lime wedges. Yield: 4 servings.

This post is being linked to:
Smiling Sally - Blue Monday

Saturday, January 23, 2010

Drop Biscuits with Cheddar Cheese and Garlic Butter


From the kitchen of One Perfect Bite... The day began with streaks of terra cotta trailing through the sea of aquamarine that is our early morning sky. It heralded a lovely day to come. We took to the rear deck with morning mugs in tow and sat a spell, admiring the few courageous blossoms emerging from the forest duff. Then we heard birds and realized the winter silence of the forest was also at an end. Winters here are mild and of short duration. Most of the folks who've settled here are transplants and they can be slow to adopt the ways of native Oregonians. Once they're fully assimilated, they're said to have "gone native". I think that's finally happened to me. I found myself complaining about the weather this year. Memories of winter blizzards and sub-zero temperatures have been replaced with the quiet discontent that comes with prolonged periods of gray weather. I am, finally, an Oregonian. As such, I was determined to enjoy every moment of this gorgeous day. We decided to grill a chicken. I loved that, because its simplicity gave me an opportunity to try some highly flavored dishes that would be hard to pair with anything more involved. I've never eaten at Red Lobster, but I've been told their biscuits are extraordinary. I was able to find two copy-cat type recipes for their cheddar biscuits. One uses a baking mix and the other builds the biscuits from the ground up. I chose the more involved recipe because I had no biscuit mix in the house. The recipe comes from Food and Whine and it makes a nice biscuit. They are easy to do and I found myself charmed by their gnarly down-home appearance. I'm happy to recommend these to you, but do be aware they're not meant to be served with delicate food. Think grilled chicken, steak, ribs or pulled pork and you'll be fine. This is grub at its finest, but it is grub. Here's the recipe.

Drop Biscuits with Cheddar Cheese and Garlic Butter...from the kitchen of One Perfect bite, courtesy of Food & Whine

Ingredients:
2 cups all-purpose flour
1 tablespoon baking powder
1 teaspoon salt
1/4 teaspoon garlic powder
1/3 cup butter, cold, cut into chunks
2 tablespoons vegetable oil
1 heaping cup grated sharp cheddar cheese
1/2 - 2/3 cups milk
.
3 tablespoons butter
1/2 teaspoon garlic powder
1 tablespoon finely chopped fresh parsley

Directions:
1) Preheat oven to 400° F.
2) Whisk flour, baking powder, salt and garlic powder in a large bowl to combine. Add chunks of butter. Cut butter into flour until mixture is coarse and resembles peas. Add oil, grated cheddar cheese and 1/2 cup milk. Stir together. Keep adding milk a bit at a time, until the dough is just moistened and holds together.
3) Use an ice cream scoop or large spoon to drop 1/4 cup portions onto cookie sheet.
4) Bake for 15-17 minutes. or until biscuits are a light golden brown.
5) While biscuits are baking, melt 3 tablespoons butter is a small bowl in your microwave. Stir in 1/2 teaspoon garlic powder and the parsley. When biscuits come out of the oven, use a brush to spread garlic butter over tops of biscuits. Serve warm. Yield: 12 biscuits.

Friday, January 22, 2010

Chocolate Peppermint Pie - National Pie Day - Pink Saturday


From the kitchen of One Perfect Bite...I've been looking for a new dessert to serve on Valentine's Day. While searching for recipes for National Pie Day, which coincidentally is today, I found this lovely Chocolate Peppermint Pie on the Wisconsin Milk Marketing Board web site. It would be perfect for Valentine's Day and I knew I had to try it. Any recipe that combines white and dark chocolate with peppermint and cream cheese gets my attention immediately. I must tell you I wasn't disappointed, but there are things I'd change the next time I make the pie. Forget the crust. It doesn't add much to the pie. Use a prepared chocolate crumb shell instead. It will add another layer of flavor and save a lot of time as well. I'd also make the pie 24 hours before I plan to serve it. If you look at my photo, you'll see that the layers "bled" together when the pie was sliced. I think that can be avoided with longer chilling. You might also want to add a touch of red food coloring as the crushed peppermint adds only a hint of color to the white chocolate layer. It's sinfully rich and very sweet, but it's a dessert meant for a special day, so, I gave myself absolution and will atone with an extra hour on the treadmill. I do hope you'll try it. The verdict of my tasters was "most excellent". Here's the recipe.

Chocolate Peppermint Pie...from the kitchen of One Perfect Bite courtesy of the Wisconsin Cheese Board

Ingredients:
Crust:
2 cups all-purpose flour
2 tablespoons powdered sugar
1 teaspoon salt
3/4 cup (1 1/2 sticks) cold butter, cut into 1/2-inch cubes
1 teaspoon vinegar
5 to 6 tablespoons ice water
Chocolate Peppermint Pie:
1/2 cup (1 stick) butter, softened
1 cup (8 ounces) cream cheese, softened
3/4 cup sugar
1/2 cup pasteurized egg product*
1/2 cup whipping cream
1 cup white chocolate chips, melted and cooled
1/2 cup (20) peppermint candies, crushed
1/2 cup semi-sweet chocolate chips, melted and cooled
1 9-inch baked pie crust (press-in or fancy), cooled
Optional garnish: sweetened whipped cream, crushed peppermint

Directions:
Pie Crust:
1) In a bowl, stir together flour, sugar and salt. Using a pastry blender, cut butter cubes into flour mixture until pieces are pea-size. Sprinkle vinegar over flour mixture, tossing with a fork. Sprinkle 5 to 6 tablespoons cold water, 1 tablespoon at a time, over flour mixture, tossing with a fork each time until dough is moistened and crumbly. Gather dough into a ball, flatten into a disk, wrap in plastic wrap and refrigerate at least 4 hours.
2) Preheat oven to 400ºF.
3) Roll dough into a 12-inch circle. Gently fold the crust into quarters, center over 9-inch pie plate and unfold. Ease crust into the plate. Trim pastry, leaving a 1-inch overhang beyond plate edge. Fold crust edge under and crimp or flute the edge using a fork or your fingers.
4) Prick pastry with a fork. Line bottom and up sides of crust with foil and add dried beans or pie weights. Bake for 15 minutes, remove foil. Bake an additional 10 to 15 minutes, until crust is golden. Remove to a wire rack; cool completely.
Filling:
5) In a bowl, beat butter, cream cheese and sugar together. Combine egg product and whipping cream in a separate bowl; gradually add to butter mixture while beating, scraping bowl often. Beat until light and fluffy, about 5 minutes. Reserve half of mixture in a small bowl. Add cooled white chocolate to remaining half of mixture; beat well. Stir in crushed candy. Spread in baked pie crust; chill 10 minutes.
6) Return reserved butter mixture to bowl, add cooled semi-sweet chocolate; beat well. Spread over white chocolate layer. Refrigerate at least 2 hours. Garnish and serve. Yield 8 servings.

*Note: Pasteurized egg products are available in the supermarket. The reason the recipe calls for this product is that the filling is not cooked, and there is a salmonella risk associated with eating raw eggs.

This post is being linked to:
Pink Saturday, sponsored by Beverly at How Sweet the Sound

Thursday, January 21, 2010

Baked Portobello Parmesan - A Dieter's Delight - Foodie Friday


Portobello Parm before and after baking.


From the kitchen of One Perfect Bite...This is an old competition recipe. I give it new life each January as part of a regime to mend holiday excesses and restrict fat and caloric intake, at least until we're back in shape. I love the bold flavors of meat or vegetable Parmesan, but the amount of oil used in standard preparations meant we couldn't have it often, if at all. The whole purpose of this recipe was to come up with a variation that would require no frying and, if possible, use no meat or poultry. I had, for several years, grilled portobello mushrooms and was really happy with their meaty taste and texture. I settled on them for my recipe because eggplant simply didn't work when cooked this way. This version is really simple to make and if you are looking for a healthier alternative to standard "parm" recipes you might want to give this a try. You won't be sorry. Smaller families can halve the recipe and still enjoy its wonderful flavor. Here's the recipe.

Baked Portobello Parmesan...from the kitchen of One Perfect Bite

Ingredients:
1/2 cup Italian-style bread crumbs
1 cup (3-oz.) freshly grated Parmesan cheese, divided use
1 teaspoon sweet paprika
1/4 cup fresh minced parsley, divided use
2 teaspoons kosher salt, divided use
3/4 cup egg substitute
1/2 teaspoon fresh ground black pepper
1 teaspoon marjoram leaves
1 teaspoon garlic powder
1 teaspoon oregano leaves
4 large (5 to 6-inches wide) stemmed potobello mushrooms, brushed clean
1-1/2 cups (6-oz.) shredded part-skim mozzarella cheese
1 cup commercially prepared "light" tomato sauce
Cooking spray
Directions:
1) Position a baking rack in upper third of oven. Preheat oven to 400 degrees F. Line a 17-1/2 x 11-3/4 baking sheet with aluminum foil. Place a 16-1/2 x 11-1/2-inch wire cooling rack inside the baking sheet. Mist rack with cooking spray. Set aside.
2) Combine bread crumbs, 1/2 cup Parmesan cheese, 3 tablespoons parsley, paprika and 1 teaspoon salt in a shallow pan. Mix well. Set aside.
3) In a separate bowl, combine egg substitute, remaining 1 teaspoon salt. pepper, marjoram, garlic powder and oregano. Mix well.
4) Dip both sides of mushrooms into egg mixture. Dredge in crumb mixture until both sides are completely coated. Transfer, stem side down, to prepared wire rack. Spray tops with cooking spray and bake for 15 to 20 minutes, or until mushrooms are tender. Remove pan form oven.
5) Reset oven thermostat to 450 degrees F. Meanwhile, carefully turn mushrooms stem side up. Cover each mushroom with 2 tablespoons of remaining Parmesan cheese, 1/4 of Parmesan cheese and 1/4 cup tomato sauce. Spray tops lightly. Return to oven and bake until cheese melts and mushrooms are warmed through, about 10 minutes. Use a wide spatula to transfer mushrooms to a serving platter. Sprinkle with reserved 1 tablespoon parsley. Yield: 4 servings.

This recipe is being linked to:
Designs By Gollum - Foodie Friday

Connor Thomas One Month Old - Finding Beauty at Dipity Road


Each Friday, Claudia at Dipity Road, sponsors a lovely meme called Finding Beauty. I can't think of a more beautiful thing to share with you than our newest grandson, Connor Thomas. He is now one month old and starting to take in his world. Word on the street says he only has eyes for his Mom. She thinks he's going to be a "foodie".

Wednesday, January 20, 2010

Black Bread


From the kitchen of One Perfect Bite...This is a European peasant bread that gets its color from the ingredients used to make it. Black bread can range in hue from cocoa brown to a near ebony, depending on the nationality of the cook who bakes it. Each of the countries in Central and Eastern Europe have their own version of the bread. All of these "black" breads are made with made with a base of rye flour, but because of its low gluten content the rye is mixed with higher gluten grains to produce lighter and higher loaves. True or not, many people believe black bread is extraordinarily nutritious and can sustain life on its own for long periods of time. They point to the siege of Leningrad, where rationed portions of the bread are reported to have kept the population alive for 3-1/2 years. While I believe bread is the staff of life, I think that this narrow view overlooks the fact that a huge percentage of the population died of starvation during that period. Leningrad is probably a better example of survival of the fittest than a paean to the merits of black bread. I digress. Sorry. Today's black bread comes from an old recipe developed by James Beard. It lacks the velvet grain of a German pumpernickel, but has a flavor that's hard to beat. Like many of Beard's recipes, this bread claims no country as its own. It takes the best of several breads from several countries and kneads them into a singular, flavorful loaf that's sure to please. Here's the recipe.

Black Bread...from the kitchen of One Perfect Bite, courtesy of James Beard

Ingredients:
3/4 cup cornmeal
3/4 cup cold water
3/4 cup boiling water
1 tablespoon butter
1 tablespoon salt
2 tablespoons + 1 teaspoon brown sugar
1-1/2 teaspoons caraway seeds
1 tablespoon unsweetened cocoa
1 tablespoon instant coffee
4-1/2 teaspoons active dry yeast
1/4 cup warm water + additional water as needed to form dough
2 cups dark rye flour
1 cup whole wheat flour
2 cups unbleached flour + additional flour for kneading
1 egg white beaten with 2 tablespoons flour

Directions:
1) Add cornmeal to cold water and mix in a bowl. Pour mixture into saucepan containing boiling water. Stir until thick and bubbling. Add butter, salt, sugar, caraway seeds, cocoa and instant coffee. Stir well. Remove from heat.
2) Place yeast in a large bowl. Add 1/4 cup warm water; stir to dissolve. Add flours, adding more warm water as required tp produce a thick, sticky dough. Turn onto a floured board. Knead, adding more flour if required, to form a firm but elastic dough. Form into a ball and place in a greased bowl, turning once to coat dough on all side. Let rise until doubled in size, about 1 hour. Punch dough down and knead on a lightly floured surface for 2 to 3 minutes. Divide dough into 2 portions and shape into two free-form loaves. Place on baking sheets covered with cornmeal. Allow to rise until almost doubled in bulk. Brush bread with beaten egg-white. Bake at 375 degrees F for 50 to 60 minutes, or until loaves sound hollow. Transfer to cooling racks. Yield: 2 loaves.

This recipe is linked to:
Wild Yeast - Yeast Spotting

Tuesday, January 19, 2010

Mexicali Pizza - Outdoor Wednesday


Mexicali Pizza before and after baking.


The first hellebores of the year are now in bloom.


From the kitchen of One Perfect Bite...I originally put this recipe together for my Texas grandsons. I wanted something that they could make by themselves for a quick lunch or light supper. We were so busy last summer that they never got to try them, but somewhere along the line the pizzas became a go-to recipe for our dinner on those nights when the clock winds down before the day has ended. They take 10 minutes to assemble and another 10 minutes to bake. Everything needed to make them can be found in most pantries. I've deliberately kept them meat free, and will leave any additional toppings to your imagination. You can also use low-fat refried beans without changing the nature of the "pies". While I make them with flour tortillas, there's no reason a pizza crust can't be used. We like a little heat with our meals, so I use a spicy salsa and Pepper Jack cheese. If you prefer your food less spicy, use a mild salsa and a bag of pre-shredded Mexican cheese. Toppings can include olives, tomatoes, scallions and cilantro. I've tried to keep this a recipe a canvas that you can paint as you choose. I think you'll like this. Here's the recipe.

Mexicali Pizza...from the kitchen of One Perfect Bite

Ingredients:
2 8-inch flour tortillas
Cooking spray
1 can (16-oz.) traditional Mexican refried beans
1 cup medium thick and chunky salsa
2 cups shredded Mexican cheese blend or a mix of shredded Colby and Pepper Jack cheese
3 tablespoons chopped cilantro or other toppings of your choice

Directions:
1) Preheat oven to 400 degrees F. Spray a large baking pan with cooking spray. Set aside.
2) Warm refried beans in a microwavable bowl for 1 minute on High power. Carefully spread beans over tortillas. Top with salsa and cheese. Bake for 10 to 14 minutes, or until tortillas are lightly browned and cheese melted.. Sprinkle with toppins of your choice while the pizzas are warm. Carefully move to serving plates. Yield: 2 small pies.

This is being linked to:
Outdoor Wednesday - A Southern Daydreamer

Monday, January 18, 2010

Bob's Tuscan Bruschetta


From the kitchen of One Perfect Bite...Several months after Bob was discharged from the army we met with a group of friends at Bughouse Square, the name locals gave to Chicago's Washington Square Park. After listening to the evenings "soapboxers" we headed to a coffee house for an evening of folk music and pizza. There were five couples with us that evening and the men had a shared service experience they rarely discussed. There was an engineer, a mathematician, 2 chemists and a pharmacist in the group. Between them they spoke 7 languages and held advanced degrees. The topic they preferred not to discuss? The army had made them all cooks and they had been together in cook's school at Fort Knox, Kentucky. Over the years it became a closed joke between them. As the wife of one of those men, I can tell you they pretty much avoided the kitchen after that. The only time Bob jumped in to help me was to make gravy. It was delicious, but he literally made a gallon of it, so, thereafter, I let him stand down. He'd occasionally roll up his sleeves to make chili, a pizza or ribs, but nothing adventurous. Then one night, in a fit of creativity, he made this Tuscan-style bruschetta. I'm here to tell you it is delicious. It is simple to do and the only trick is to make sure you serve it while it's still hot. The bruschetta can be assembled several hours before serving, but bake them off just before you want to serve them. I've found that oil-packed, sun-dried tomatoes pack quite a flavor punch and this bruschetta is the perfect place to use them. Kudos to my husband for his wonderful creation. Here's the recipe. I want you all to remember that, "no army travels far without its cooks". Even if they could have been Russian language translators or corpsmen.

Bob's Tuscan-Style Bruschetta...from Bob's corner of Mary's kitchen at One Perfect Bite

Ingredients:
1 cup drained and chopped sundried tomatoes packed in in seasoned oil
1/2 cup toasted pine nuts or slivered almonds
1/2 cup finely sliced scallions (white and tender green)
3 ounces grated Parmesan-Regianno cheese
8 ounces shredded Provolone cheese
24 1/2-inch baguette slices

Directions:
1) Combine sun-dried tomatoes, pine nuts, scallions, Parmesan and Provolone cheese in a large bowl. Mix well.
2) Preheat oven to 400 degrees F. Spread cheese mixture over baguette slices and place on a baking sheet. Bake for 6 to 8 minutes, or until cheese is melted and golden brown. Serve immediately. Yield: 24 bruschetta.

Sunday, January 17, 2010

Chinese Donut Sticks - You Tiao or Oil-Fried Ghosts


Food for the body and eye candy for winter-weary souls.


From the kitchen of One Perfect Bite...
Some folks called them Chinese donut sticks, but these long strips of fried dough are far more like bread sticks than donuts or crullers. You tiao, or oil-fried ghosts, are usually served with a traditional Chinese breakfast of rice congee or salted soy milk. Both are bland and are an acquired taste for the Western palate. The salty bread sticks help add a recognizable dimension of flavor to an Eastern breakfast. The strips are made so they can be torn, lengthwise, into two long pieces after deep frying. Chinese folklore tells us that two dough strips, one male, one female, were layered and joined in the center, as an act of protest against the official Qin Hui and his wife who plotted to kill, or dishonor, a revered general named Yue Fei. It's believed that their traitorous behavior was punished by boiling in oil. I leave the fate of their remains to your imagination. Keeping in mind the fact that most Chinese homes have no ovens, I think you can see how these salty sticks became popular. I'm featuring them here as a curiosity for most, but as an exploration for those with more adventuresome palates. They are really simple to do and are worthy of a one-shot. I do ask you to keep in mind the fact that these are nothing more than exotic bread sticks. Please don't slay the messenger. Here's the recipe.

Chinese Donuts Sticks - You Tiao or Oil-Fried Ghosts...from the kitchen of One Perfect Bite, courtesy of Jacki Passmore

Ingredients:
1-1/4 cups self-rising flour
2 teaspoons baking powder
1 to 1-1/2 teaspoons kosher salt
1/2 teaspoon baking soda
6 to 8 tablespoons lukewarm water
Vegetable oil for deep frying

Directions:
1) Combine flour, baking powder,salt and baking soda in a large bowl. Make a well in center of mixture and add 6 tablespoons of water, stirring to mix with a spoon until a soft dough forms. If necessary, add additional water, a tablespoon at a time, to form dough. Knead lightly in bowl until soft dough forms, about 30 seconds. Cover with plastic wrap and let sit for 15 minutes to relax gluten in flour.
2) Lightly flour a work surface. Turn dough onto surface and knead for about 30 seconds. Roll dough into a strip that is 16 x 4-inches in size. Cut crosswise into 20 3/4-inch strips. Pair and stack strips. Press each pair down the center with a chopstick to seal. Lightly stretch dough, working from center to ends, until each strip is about 10-inches long. Cover lightly with plastic wrap.
3) Using a high sided saute pan or a wok, pour in oil to a depth of 2-1/2 inches. Set over high heat and bring oil to a temperature of 350 degrees F. Place three to four strips of dough into pan and fry, turning often, until they turn golden brown, about 1 to 1-1/2 minutes. Remove from pan and drain on layers of paper toweling. Continue procedure until all dough strips are cooked. Serve at room temperature. Yield: 10 donut strips.

This post is being linked to:

Smiling Sally - Blue Monday

Mellow Yellow Monday

Saturday, January 16, 2010

Tuscan Bean Soup


From the kitchen of One Perfect Bite...Bob and I have been playing hot potato with some version of the flu for two weeks now. We're both finally on the mend and our appetites are starting to return. Our meals have been light for much of that time. I'm happy to report there's not a can of soup left in the pantry. That's a good thing. One more bowl of chicken soup would have me laying eggs and Bob crowing to wake the sun. We're still not ready for "real" meals but I wanted to make something more substantial than what we've been living on. I must also add that I didn't want to make a trip to the store and that limited me to what was in the pantry or freezer. I had an abundance of beans, plenty of frozen stock and a small amount of pancetta to play with. Fortunately, I also had an adequate supply of vegetables to help get me where I wanted to go. My destination was Tuscany. Bob volunteered to make bruschetta while I made a Tuscan bean soup we both love. This is really simple to do but timing is important. The beans and the soup pasta should be added to the stock about 15 minutes before the soup is to be served. If either sit in the stock too much longer than that, there'll be no liquid in the pot when you go to serve the soup. Once the vegetables are diced, the soup can be on the table with the hour. This soup is a personal favorite of mine. I think you'll like it too. I've scaled the recipe to feed smaller families, but if you have an army at your table you can double or triple the recipe without a problem. Do not, however, increase the measurement for lemon or cider vinegar. Here's how we do it.

Tuscan Bean Soup...from the kitchen of One Perfect Bite

Ingredients:
2 tablespoons olive oil
3-oz. diced panchetta
1/2 cup finely chopped yellow onion
1/2 cup diced carrots
1/2 cup diced celery
1/4 teaspoon salt
1/4 teaspoon pepper
2 teaspoons minced garlic
1 teaspoon dried sage leaves
5 to 6 cups homemade or reduced-sodium chicken, beef or vegetable broth
Juice of 1/2 lemon or 1/2 teaspoon cider vinegar
1 cup acini pepe pasta, uncooked
2 (15.5-oz.) cans drained cannellini beans
1/2 cup grated Parmigiano-Reggiano cheese
3 to 4 tablespoons minced fresh Italian parsley

Directions:
Heat olive oil in a 5 to 6 quart stockpot set over medium heat. When oil shimmers, add pancetta and saute for 3 minutes. Add onion, carrots, celery, salt and pepper and cook until vegetables begin to soften, about 5 minutes. Stir in garlic and sage and cook until garlic releases its fragrance. Add stock and bring to a boil. Stir in lemon juice or vinegar. Reduce heat, cover pot and simmer for 30 minutes. Add pasta and beans and cook for 10 to 15 minutes or until pasta is al dente. Stir in cheese and parsley just before serving. Adjust salt and pepper to taste. Yield: 5 servings.

Friday, January 15, 2010

Sweetheart Shortbread - Pink Saturday


From the kitchen of One Perfect Bite...
I adore shortbread, thick or thin, and this is my favorite recipe for this buttery treat. I've dipped the cookies into a pink frosting for Pink Saturday. Truth be told, I also use a variety of other frostings or toppings for this cookie. This one seemed appropriate with Valentine's Day not too far off. This versatile classic defines simplicity and is very easy to make. It can take any shape you choose to give it. You're going to love this one, I promise. Here's the recipe.

Sweetheart Shortbread...from the kitchen of One Perfect Bite

Ingredients:
Cookie Base:
1 cup butter, room temperature
3/4 cup confectioners' sugar
1 tablespoon vanilla extract
2 cups all-purpose flour
1 teaspoon baking powder
Icing:
1 cup confectioners' sugar, sifted
2 tablespoons whole milk
Red food coloring

Directions:
1) To make cookie base: Combine butter and confectioners' sugar in bowl of an electric stand mixer. Beat with paddle attachment on medium speed until fluffy. Add vanilla extract and beat until combined. Combine flour and baking powder in a separate bowl. With mixer on low speed, slowly add flour to butter mixture. Beat only until combined. Over beating will make cookies tough. From dough in a ball. Cover in plastic wrap and chill for 30 minutes. Meanwhile, preheat oven to 350 degrees F. Line 2 baking sheets with parchment paper. Set aside. When dough is chilled, transfer to a lightly floured surface and roll dough to a thickness of 1/4-inch. Cut to desired shape with cookie cutter of your choice. Transfer to prepared cookie sheets, placing cookies 1/2-inch apart. Scraps can be rerolled.
Bake for 10 to 12 minutes. Cool on baking sheet for 10 minutes before transferring to cooling racks.
2) To make frosting: Combine confectioners' sugar, milk and a drop of red food coloring in a small bowl. When cookies are cool, dip them face down into frosting and transfer, frosting side up, to a rack that will allow excess to drip off. Allow frosting to set before transferring to air tight containers. Yield: 24 cookies.

This post is being linked to:
Pink Saturday, sponsored by Beverly at How Sweet the Sound

Shark's Fin and Sichuan Pepper : A Sweet-Sour Memoir of Eating in China - Food for Thought


Food for Thought is a new blog developed by Jain of Once In a Blue Moon and Food with Style. She sees this as "a place where pages from your book magically mix with the kitchen and your camera......to make a more memorable book review." I hope you'll stop by and see what's happening and what others are reading.

How can you not love a memoir written by the woman who was the first Westerner to train at the Sichuan Institute of Higher Cuisine? Fushia Dunlop's work at the BBC took her to China in 1992. She returned in 1994 to continue language studies and, as her skills improved, directed her interest to the cooking of Sichuan province. From her first encounters with the fiery food of Sichuan, to her brushes with corruption and greed, she tells a tale that enlightens and entertains and provides one of the best travel narratives I've ever read. It's the story of an English girl who went to China, ate everything that came her way and was surprised by the wonders of the country, its people and its cuisine. Her ability to evoke place and atmosphere place her on a level plane with other literary food writers and her cook books, and this memoir, establish her as an acknowledged expert on the food of China. The best way to catch your interest is to let you see its Table of Contents. While each chapter contains a recipe, you'll quickly find that this is not a cookbook.

CONTENTS

Prologue: The Chinese Eat Everything
1. Mouths That Love Eating
2. Dan Dan Noodles
3. First Kill Your Fish
4. Only Barbarians Eat Salad
5. The Cutting Edge
6. The Root of Tastes
7. The Hungry Dead
8. The Rubber Factory
9. Sickness Enters Through the Mouth
10. Revolution Is Not a Dinner Party
11. Chanel and Chickens' Feet
12. Feeding the Emperor
13. Guilt and Pepper
14. Journey to the West
15. Of Paw and Bone
16. Scary Crabs
17. A Dream of Red Mansions
Epilogue: The Caterpillar

I dare you to try the hotpot from Guilt and Pepper. The dumplings from The Hungry Dead are delicious, too, but do go easy with the chili oil or you might be. If you love stories of singular and gutsy women, you'll love Fushia Dunlops's Shark's Fin and Sichuan Pepper - A Sweet-Sour Memoir of Eating in China.

Thursday, January 14, 2010

Laughing Mouths - Kou Xiao Gao or Open Mouths Laughing - Foodie Friday


From the kitchen of One Perfect Bite...
I first sampled this lovely pastry at a vendor's stall in one of the labyrinthine streets of a hutong, or old neighborhood, in Bejing, China. I was surprised when I found them. I mistakenly believed that a lack of ovens and dairy cattle would preclude the serving of cakes and pastries as a snack or dessert. While fruit is more commonly served, griddle-cooked or steamed desserts are also available. Lard or oil substitute for the butter, cream and milk we associate with desserts in the West. These delightful mouthfuls, usually served with a sprinkling of sugar, are an example of a Chinese pastry. They are a bit like a Western donut but the exterior is slightly crustier and they are cooked in a different fashion. Anyone can make these. They require no special equipment, save for a food processor, a deep pan and a candy thermometer. Here's the good part. They take five minutes to assemble and form and can be on a plate 10 minutes later. The Chinese call these Kou Xiao Gao or "open mouth laughs" because a special technique causes them to split open as they fry. Once the dough is made and formed, oil is heated quickly to a temperature of 300 degrees F. At that point all the pastry balls are added to the oil and held below the surface to encourage them to rise and split. The oil will gradually increase in temperature until it's about 350 degrees F. The balls are first cooked at the lower temperature so the insides will heat and expand before the outer surface crusts or seals. The balls are cooked until they are a golden brown. Once drained they are sprinkled with sugar and served warm. I have also seen these coated with sesame seeds. This is a snack that's fun to make at anytime of year. I thought you might like to have some simple dishes for Chinese New Year. The kids will love this one. Here's the recipe.

Laughing Mouths (Kou Xiao Gao)...from the kitchen of One Perfect Bite inspired by Jacki Passmore

Ingredients:
1/2 cup superfine sugar
1 tablespoon butter
1 egg
2 to 3 tablespoons water
1-3/4 cups all-purpose flour
1/4 teaspoon salt
1-1/2 teaspoons baking powder
Oil for deep frying
3 tablespoons confections' or superfine sugar for dusting

Directions:
1) Combine sugar, egg and 2 tablespoons water in bowl of a food processor. Process until smooth. Slowly add flour, salt and baking powder. Pulse until a soft dough forms, adding 1 tablespoon reserved water if required.
2) Using a tablespoon measure, break off 18 piecs of dough. Wet hands and form into balls.
3) Heat oil in a wok or deep-sided frying pan over high heat until it reaches 300 degrees F. Reduce heat to medium-high and add balls all at one time. Use a pancake turner to push dough under oil. This will cause them to rise and split. Cook balls until they are a golden brown, about 2-1/2 to 3 minutes. Transfer with a skimmer to paper toweling to drain. Sprinkle with sugar and serve. These are best served warm. Yield 18 pieces.

This recipe is being linked to:
Designs By Gollum - Foodie Friday

Wednesday, January 13, 2010

Warm Beef and Cheese Dip with Pecans


From the kitchen of One Perfect Bite...I love to see old things made new again. Over the holidays we were served a long retired beef and cheese dip that I'm very fond of. While I love its taste, I even more enamored of the ease with which it can be prepared. I especially like this recipe because the ingredients can be reduced by half to produce a quantity that's perfect for smaller gatherings. I shouldn't admit this, but I 'm a fan of dips. I 'm fond of those made with ingredients that make those more sophisticated than me shudder. I dip freely into mixtures made with dehydrated mixes, so it should come as no surprise that I occasionally serve one made with dried beef. There are many versions of this on the net. This version is my refinement of the recipe to suit the tastes of my family. I always serve this warm from the oven with thinly sliced French bread or an assortment of good crackers. It's perfect football fodder.

Warm Beef and Cheese Dip with Pecans
...from the kitchen of One Perfect Bite

Ingredients:
2 (8-oz.) packages of cream cheese, room temperature
3/4 cup sour cream
1/4 cup mayonnaise
1/4 cup grated onion and juice
1 large clove garlic, minced
2 (2-1/2-oz.) jars dried beef, finely minced
1 cup chopped toasted pecans

Directions:
1) Combine cream cheese, sour cream, mayonnaise, onion and juice and garlic in a small bowl. Mix until smooth and light. Fold in minced beef. Transfer to a bake and serve dish. Top with toasted pecans.
2) Preheat oven to 300 degree F. Bake, uncovered for 30 minutes. Serve with good bread and crackers. Yield: 2-1/2 cups.

Tuesday, January 12, 2010

Sizzling Rice with Shrimp in Chili-Garlic and Tomato Sauce - Outdoor Wednesday


When you look outside and see a scene like this, it's time to head into the kitchen to make this specialty that hails from Shanghai. It comes with a story of its own. I can't vouch for its veracity, but I do love its moral. As told to me, the cook of a wealthy merchant was dragged from bed one night to prepare a meal for his drunken master. The cook, enraged by the indignity, stirred fiercely hot chili sauce into leftovers, and then to make his revenge complete, scraped the rice crust from the bottom of an unwashed rice pot into hot oil. The sizzle made when the sauce hit the rice and its sweet-spicy taste so delighted the merchant, that he declared the dish a masterpiece and richly rewarded the cook.


This is a bit of a bother to make. If you live outside a major city chances are you'll have to make your own rice cakes. Its not hard to do, but it does require time. A true rice cake is the crust that forms at the bottom of a rice pot or cooker. It is scraped from the bottom and then refrigerated until it can be used for other purposes. When deep fried, the cakes are called sizzling rice because they sizzle on contact with other hot liquids. Until a few months ago, I was able to buy the cakes at my Asian markets. I no longer have that option, so I had to learn how to make them. Here's the first of today's recipes. You will need the rice cakes to proceed with the Shrimp in Chili-Garlic and Tomato Sauce.


Sizzling Rice

Ingredients:

1-3/4 cups medium grain white or sushi rice
2-1/2 cups water

Directions:
1) Place rice and water into a medium saucepan with a heavy bottom. Cover pan and bring to a boil over high heat. Reduce heat to lowest possible setting. Cook, covered, for 12 minutes. Remove from heat. Do not remove cover. Let sit for 10 minutes.
2) Meanwhile, preheat oven to 200 degrees F. Lightly spray a 9x 13-inch baking pan with oil or non-stick cooking spray. Set aside.
3) Spread rice over bottom of prepared pan. Pat down as best you can. Place pan in the oven and leave to dry overnight. Remove from oven. Let cool. Break into to 2 to 4-inch pieces. Your rice squares will bare no resemblance to their commercial counterparts. Not to worry! Set aside if using immediately or store in an airtight container. Yield: about 12 pieces.


Sizzling Rice with Shrimp in Chili-Garlic and Tomato Sauce

Ingredients:
2 tablespoons vegetable oil + oil for deep frying
2 teaspoons dark toasted sesame oil
1/2 cup finely chopped yellow onion
1 (8-oz.) can sliced water chestnuts, drained and rinsed in cold water
1/4 cup red bell pepper, cut in 1/4-inch dice
1-1/2 tablespoons peeled and finely julienned fresh ginger
1 pinch red pepper flakes
1 teaspoon minced garlic
1 pound shrimp, peeled and deveined
1 cup frozen peas and diced carrots, thawed
1/3 cup tomato ketchup
2 tablespoons soy sauce 1 tablespoon cider vinegar
2 teaspoons garlic-chili sauce
1 to 2 teaspoons sugar
1 tablespoon cornstarch
1 cup chicken or fish stock
Salt and pepper to taste
Garnish: 2 tablespoons sliced green onion tops

Directions:
1) Preheat a deep-fryer to 375 degrees F.
2) Heat a wok or high-sided frying pan over high heat. Add vegetable and sesame oil. When it shimmers, add onion, water chestnuts, bell pepper, ginger, pepper flakes and garlic. Stir-fry until crisp tender, about 1-1/2 minutes. Remove vegetables from wok.
3) Return wok to high heat. When oil shimmers, add shrimp and stir-fry just until firm and shrimp are beginning to turn pink. Add peas and carrots and stir-fry 1 minute longer. Add reserved vegetables, ketchup, soy sauce, vinegar, garlic-chili sauce and sugar and stir just until combined, about 30 seconds. Mix cornstarch with stock. Pour into pan and cook, stirring slowly, until sauce thickens. Season to taste with salt and pepper. Remove from heat but keep warm.
4) Add rice cakes to hot oil and fry until golden and crisp. Rice cakes will poof a bit as they cook. Use a slotted spoon to lift and drain them from the oil. Quickly place cakes in one large or individual serving bowls. At the table, pour shrimp mixture over hot rice and listen to it sizzle. Top immediately with green onion tops and serve. Yield: 4 to 6 servings.


This is being linked to:
Outdoor Wednesday - A Southern Daydreamer

Monday, January 11, 2010

Chocolate and Black Bean Chili


From the kitchen of One Perfect Bite...Ethnic cooking presents some challenges for smaller families. Most recipes appear to be scaled to feed armies rather than the two or three people who typically break bread at the table. Chili, a food, I love, is one of them. Several years ago I came across a recipe for Chocolate Chili Con Carne developed by Michael Chiarello for the Food Network. It sounded delicious, but it made way to much food for two of us eat and still enjoy. I've altered the recipe to make fewer servings and changed the spicing slightly. This is a nice chili, but there are certain elements of the recipe that shouldn't be changed. Masa harina, Mexican corn flour, is used to thicken the chili and if you're looking for an authentic Mexican flavor it is a must. A small quantity of Manteca, lard, is also used. Don't worry too much about the type of beer to use in the recipe. I've settled on a non-alcoholic amber ale that adds flavor without bitterness to the chili. The finished sauce, which contains chocolate, is a bit like a mole. This has been well-received whenever I serve it, though I suspect the play of flavors might be too much for kids. If you're looking for a new chili, or just want to experiment, you might like to give this a try before game day. Here's the recipe.

Chocolate and Black Bean Chili...from the kitchen of One Perfect Bite courtesy of Michael Chiarello

Ingredients:
1-1/2 pounds beef chuck, cut in 1/2-inch dice
1/4 teaspoon freshly ground black pepper
1 teaspoon kosher or sea salt
3/4 teaspoon ground cinnamon, divided use
1-1/2 teaspoons ground cumin, divided use
2 tablespoons chili powder, divided use
Masa harina (Mexican corn flour)
1/4 cup extra-virgin olive oil
2 tablespoons lard (Manteca)
2 cups minced red onion
1 tablespoon minced garlic
1 to 2 jalapeno peppers, stems removed, thinly sliced
2 tablespoons tomato paste
1 teaspoons dried oregano
1/4 teaspoon sugar
1(12-ounce) bottle beer (I like to use a non-alcoholic amber ale)
1 (14.5-oz.) Mexican-style stewed tomatoes
1 cup chicken stock
1 to 2 (12-ounce) cans black beans, drained
1 ounce unsweetened chocolate, cut into large chunks
Toppings: sour cream, chopped onion, grated cheese

Directions:
1) Place diced chuck in a large bowl. Add salt, pepper, 1/4 teaspoon cinnamon, 1/2 teaspoon cumin and 1 tablespoon chili powder. Mix well. Add 2 to 4 tablespoons masa harina and toss again to coat. The masa harina will thicken sauce as chili cooks and give it a unique Mexican flavor.
2) Heat a cast iron, or other heavy bottomed, Dutch oven on stove over medium heat. Add olive oil and, when it shimmers, add meat in one layer and brown it on all sides. Add lard to pan. Remove browned meat to paper toweling. Add the onions and garlic to pan and saute for 5 minutes over medium heat until they start to caramelize and get soft. Add jalapenos and allow to cook for 2 more minutes until soft. Add tomato paste and sugar. Add remaining teaspoon of cumin, 1/2 teaspoon of cinnamon, oregano and 1 heaping tablespoons of chili powder. Add beer. Stir to incorporate everything. Add stewed tomatoes, and stir. Return meat to pan. Add chicken stock. Simmer for 1-1/2 hours until meat is tender. Strain liquid from black beans, add beans to Dutch oven and bring up to simmer. Add chocolate and stir until it melts. Serve immediately with toppings of choice or refrigerate for 2 to 3 days. Chili may also be frozen. Yield: 5 servings.

Saturday, January 9, 2010

Cuban Reuben with Mojo


From the kitchen of One Perfect Bite...
The sky has been steel gray for several days now and our local landmark, Spenser Butte, is wrapped in fog so thick it looks like Witch Mountain. While it's not cold by most standards, the fog and Oregon's creeping damp can chill you to the bone in no time. The fire's warmth is tempting, but things must still be done, so, Bob and I were out and about and determined to make the day ours. By the time we returned, we were not only cold, but had lost the light and 15 degrees of Fahrenheit. I was in the mood for something tropical and Bob had a yen for corned beef. This recipe, which I've had in my files for several years, held a promise that might please us both...and...it almost did. Please understand that this a nice recipe. It just wasn't nice enough to please both of us. Every once-in-a-while, I forget how much Bob knows about food. He has a very clear idea of what a Cuban sandwich should be. This didn't meet his expectations. I actually liked it, but even I had a few reservations. Let me say up front that I think it's hard to spoil a grilled sandwich that contains cheese. I just thought the cheese warred with the other ingredients. I loved the beans and I loved the simple Mojo. My strangely wired brain is already thinking about using the bean mixture to extend ground chicken and saucing the patties with the Mojo. I've a hunch that it could produce something spectacular. Now we have to get to the sticky part. Am I recommending the recipe? Yes, because it makes a perfectly fine sandwich that might truly please a bored palate. Will I make it again? No, not in this format. In fairness, while I think the original Reuben is hard to beat and easier to make, I'll let you judge for yourself. Here's the recipe.


Cuban Reuben with Mojo...from the kitchen of One Perfect Bite inspired by a prize winning recipe at the 2003 Finlandia Great Sandwich Recipe Contest


Ingredients:
1 cup mayonnaise
Zest and juice of 1 lime
3 tablespoons orange juice concentrate, thawed
1 teaspoon ground cumin
1/4 teaspoon freshly ground black pepper
1/4 to 1/2 teaspoon dried red pepper flakes
2 10-inch French or Italian baguettes
1-1/4 cups canned black beans, rinsed and drained
8 ounces thinly sliced corned beef
1-1/3 cups sauerkraut, rinsed and drained
6 slices Swiss cheese
6 slices Provolone cheese

Directions:
1) To make Mojo sauce: Combine mayonnaise, lime juice and zest, orange juice, cumin, black pepper and red pepper flakes in a small bowl. Mix well.
2) Cut each baguette almost in half, being careful to leave a hinge. Use 1/2 cup of Mojo to spread on cut sides of bread.
3) Mash black beans with a fork. Stir in remainder of Mojo sauce and, mixing well.
4) Layer bottom half of each loaf with 3 slices of Swiss cheese, bean mixture, corned beef, sauerkraut and 3 slices of Provolone cheese. Close loaves. Place top side down on a preheated, hot, well-oiled griddle or 12-inch skillet. Cover with foil and weight down with a heavy skillet. Cook five to six minutes. Uncover loaves, turn, re-cover with foil and weight down again. Cook until very hot and cheese begins to melt. Cut each loaf in half or thirds. Yield 4 to 6 servings.

Friday, January 8, 2010

Ravioli with Smoked Salmon and Vodka Cream Sauce - Pink Saturday


From the kitchen of One Perfect Bite...I met for a last lunch with Mrs. S. before Bob and I made the big move from Chicago to the East Coast. It was a small gesture to thank her for all she had done for me through the years. We met in an Italian restaurant and spent a loud and lovely afternoon laughing and retracing the path through the field of memories we shared. Within the year her great heart would seize and surrender, a passing that was quick and painless for her but left those who loved her reeling. On that day, however, we spoke of things silly and serious. Among the silly, were her thoughts on my choice of pasta. She insisted it was not Italian. Turns out she was right. I was having a prototype of what would become penne with vodka sauce and part of the nuova cucina that raged across the United States in the 1980's. Vodka is not native to Italy and it wasn't distributed there until the latter portion of the 1970's. It's thought that vodka sauce for pasta was probably developed to attract people to the beverage. We know that vodka sauce was invented at Dante, a restaurant in Bologna, Italy, but Joanna's Restaurant, in New York City, is credited with beginning the fad for vodka sauce in the United States.

Several years ago, I developed a recipe for a competition that used a vodka cream sauce. A few of you may have seen it on the Better Recipes website. It won no prizes, but it is one of the best recipes I've developed. I'm proud of it on several levels. While expensive to make, it is very easy to do and, with all due modesty, I'll tell you it's absolutely delicious and perfect for family or guests. Mrs. S. would be proud to see that all those hours she spent with me weren't wasted. Here's the recipe.

Ravioli with Smoked Salmon and Vodka Cream Sauce...from the kitchen of One Perfect Bite

Ingredients:
1/4 to 1/2 teaspoon crushed red pepper
1 tablespoon olive oil
1/3 cup vodka
1-1/4 cups whipping cream
4 ounces thinly sliced smoked salmon, cut into strips about 1/4-inch wide x 2-inches long
1 pound fresh or frozen cheese-filled ravioli
Salt and pepper to taste
Minced Italian parsley for garnish

Directions:
1) Heat oil in a 12-inch skillet, large enough to hold ravioli and sauce. Add red pepper flakes and saute for 30 seconds, or until fragrant. Remove pan from heat and carefully add vodka. When pan has stopped sizzling return it to a burner set on medium-high heat and cook until vodka has nearly evaporated. Add cream and bring to a boil over high heat. Add salmon, reduce heat to very low and simmer gently for 5 minutes. Remove from heat and allow the salmon to steep and infuse the cream. Salt and pepper to taste.
2) Meanwhile, bring a 6-quart pot of water to a boil. Salt water, add ravioli and cook, per package instructions, until just until tender. Drain. Add ravioli to salmon-cream mixture and toss gently to coat. Evenly divide ravioli among 4 shallow pasta bowls; spoon any additional sauce evenly over pasta. Garnish with minced parsley and serve. Yield: 4 servings.

This post is being linked to:
Pink Saturday, sponsored by Beverly at How Sweet the Sound

Thursday, January 7, 2010

Torpedo Rolls - Foodie Friday


From the kitchen of One Perfect Bite...Why torpedo rolls? I've been searching for a recipe that would produce a roll similar to the one that is used to make a banh mi, or Vietnamese sandwich. In the course of that search I stumbled on this recipe. While this wouldn't work as the base for a banh mi, I can happily report it does make a wonderful Italian-style submarine sandwich. The roll lacks the crackly crust associated its French or Italian counterparts, but it has a lovely soft interior that makes for a wonderful sandwich. These rolls are easy to do if you have a stand mixer with a dough hook. The machine really does all the work and no kneading is required. The dough is soft and very sticky and you may need to flour your hands to form the rolls. Resist the temptation to add too much flour to the dough as you mix it. I stop adding flour when the dough leaves the sides of the bowl and climbs the dough hook. You can select the shape you want to make. I've chosen torpedo rolls which are coincidentally named for their resemblance to torpedoes. I've also used the recipe to make sandwich rolls. To be truthful the recipe can also be used to make wonderful dinner rolls. For under $4 you can have 16 sandwich or torpedo rolls or 3 dozen dinner rolls that taste a bit like challah. My biggest problem is having the rolls ready when I want to use them. I usually make a double batch and freeze them for future use. I've cut back - way back - on the amount of sugar used in the original recipe. I know you'll love these if you give them a try. Here's the recipe.

Torpedo Rolls...from the kitchen of One Perfect Bite adapted from The Pastry Queen by Rebecca Rather

Ingredients:
1 tablespoon active dry yeast
1 cup lukewarm water
1/4 cup vegetable oil
1 large egg
1/3 to 3/4 cup granulated sugar (I use 1/3 cup)
1-1/2 cups water
6-1/2 cups all-purpose or bread flour
1 tablespoon kosher or sea salt
Pinch of ground cinnamon
Extra-virgin olive oil to brush on warm rolls

Directions:
1) In the large bowl of a stand mixer, sprinkle yeast over 1 cup of warm water. Let sit for 5 minutes, or until foamy. Add vegetable oil, egg, sugar and remaining 1-1/2 cups water and mix, using dough hook, until well combined. Add flour a cup at a time. Mix on medium-low speed until dough holds together, about 5 minutes. If it does not come together add water a tablespoon at a time until it does. Let dough rest in mixing bowl for 20 minutes to relax. Add salt and cinnamon and mix dough for 1 minute on low speed. Transfer to an oiled bowl. Cover with plastic wrap and let rise in a warm spot until doubled in volume, about 90 minutes.
2) Preheat oven to 350 degrees F. Line two baking sheets or cookie pans with parchment paper. Set aside.
3) Punch dough down. If it's sticky, flour your hands. If making dinner rolls, pinch off and roll golf ball-size pieces of dough. If making sandwich or torpedo rolls, pinch off tennis ball-sized pieces or dough and shape them as you choose. Place rolls on prepared pans, leaving 2-inches of space between them. Cover loosely with plastic wrap and let sit for about 20 minutes, or until rolls feel like soft marshmallows. Bake for 20 to 30 minutes, or until rolls are golden brown. Remove from oven and brush very lightly with olive oil. Rolls may be served hot or at room temperature. Yield: 16 torpedo or 32 dinner rolls.

This recipe is being linked to:
Designs By Gollum - Foodie Friday

This recipe is linked to:
Wild Yeast - Yeast Spotting

Wednesday, January 6, 2010

Individual Baked Omelets


From the kitchen of One Perfect Bite...These little gems are perfect for breakfast or brunch for a bunch. I first had them at Rebecca Rather's Bakery, Rather Sweet, while it was still in Austin. They're a savory and simple way to kick-start a day. They can be assembled and refrigerated the night before serving and baked off in the morning. They rise beautifully, but sink quickly, so get them to the table as rapidly as you can. I, truthfully, have given up on serving them with their top hats intact. These omelets are all about flavor. Once you've mastered the base recipe you can alter it to include savory ingredients of your own choosing. My only suggestion is to keep the amount of vegetables you use in line with the quantity in the original recipe. This is one of my favorite breakfast dishes. It's not as glamorous as some, but it really is delicious. You will need Texas sized muffin pans or 8-oz. custard cups to make these. Here's the recipe.

Individual Baked Omelets...from the kitchen of One Perfect Bite, courtesy of Rebecca Rather

Ingredients:
2 tablespoons unsalted butter
1 medium red-skinned potato, peeled and cut in 1/2-inch dice
1 small onion, diced
1 teaspoon salt
1/2 of medium red bell pepper, seeded and cut in 1/2-inch dice
4 slices bacon, cooked and chopped in small pieces
1 fresh Roma tomato, seeded and finely chopped
6 large eggs
1/2 cup heavy cream or half-and-half
1/4 teaspoon freshly ground black pepper
Dash of hot pepper sauce (i.e. Tabasco)

Directions:
1) Preheat oven to 350 degrees F. Generously grease 6 Texas size muffin pans (3-1/2 X 2-inches deep).
2) Melt butter in a medium skillet over medium heat. Add potato, onion and 1/2 teaspoon salt. Saute for about 5 minutes, stirring occasionally. Add red bell pepper and saute for 15 minutes longer, stirring occasionally. Check to make sure potatoes are done. If they are not, cook for a few minutes longer. Remove vegetable mixture from heat. Stir in tomato and bacon. In a large bowl, whisk eggs together with cream, remaining 1/2 teaspoon salt, pepper and hot sauce. Scrape in vegetable mixture. Pour egg mixture evenly into muffin cups.
3) Bake for 20 minutes, or until omelets appear to be set. Give pan a gentle shake. If omelets look or feel runny, bake until they are firm, 5 to 10 minutes longer. Unmold and serve. Yield: 6 servings.